Linux \ Python \ 神经网络常用操作
文章目录
- Shell
-
- 回收站
- PYTHON指令
-
- 虚拟环境
-
- 1.创建
- 2. 取消当前base环境
- 3. 激活
- 4. 配置到pycharm编译器
- 5. 配置pip镜像
- 6. 安装所需库requirements.txt
- Pycharm远程调试
-
- 在远程服务器上安装anaconda编译环境
- 连接远程服务器
- flask接口运行步骤
-
- gunicorn配置
- Celery
- linux
- windows下linux子系统
-
- 常用指令
- 代码运行指令
- 局域网文件传输
- 路径问题解决
- set()
- dataloader
-
- 主要作用
- CSV
- Collections
-
- nametuple()
- Linux指令
- 神经网络操作
-
- pytorch优化器: torch_optimizer
- 冻结参数
Shell
回收站
pip install trash-cli
- 重定rm命令
vi ~/.bashrc
alias rm='trash-put'  #rm指令默认就是将文件移动到回收站 root/.local/share/Trash/files
alias rl='trash-list' #rl指令显示回收站的列表
source ~/.bashrc
PYTHON指令
虚拟环境
1.创建
python -m venv myvenv
2. 取消当前base环境
conda deactivate
3. 激活
source venv/bin/activate
source venv/Scripts/activate
4. 配置到pycharm编译器
5. 配置pip镜像
pip config set global.index-url https://pypi.tuna.tsinghua.edu.cn/simple
更换其他镜像:
pip install xxx -i https://pypi.org/simple
6. 安装所需库requirements.txt
pip install -r requirements.txt
若安装失败可直接到下载链接下载, 如:
https://download.pytorch.org/whl/cu101/torch-1.7.1%2Bcu101-cp39-cp39-linux_x86_64.whl
Pycharm远程调试
在远程服务器上安装anaconda编译环境
从官网找到linux anaconda的下载地址
wget -i https://repo.anaconda.com/archive/Anaconda3-2021.11-Linux-x86_64.sh

bash Anaconda3-2021.11-Linux-x86_64.sh
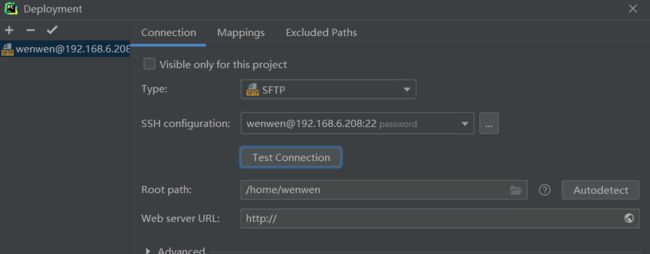
连接远程服务器
flask接口运行步骤
gunicorn配置
# gunicorn.py
bind = "0.0.0.0:1872"  # 服务器端口

workers = 1
timeout = 6000

# 访问日志和错误日志
accesslog = 'logs/gunicorn_acess.log'
errorlog = 'logs/gunicorn_error.log'

# 日志级别
loglevel = 'info'
$ gunicorn app:app -c gunicorn.py
# 或者
$ gunicorn app:app -b :1872 -w 10
Celery
通过 Celery 进行后台任务调度。
$ celery -A app.celery worker --concurrency=2
linux
windows下linux子系统
wsl2: https://docs.microsoft.com/zh-cn/windows/wsl/compare-versions
常用指令
ps aux|grep python  # 查看python程序
lsof -i:8060        # 查看端口占用情况
代码运行指令
CUDA_VISIBLE_DEVICES=1,2 nohup python train_demo.py --model proto_trans_encoder --hidden_size 768 --trainN 5 --encoder bert --pretrain_ckpt pretrain/bert-base-uncased --Q 5 --batch_size 1 --K 5 --N 5 --lr 1e-1 --train_iter 10000 > result.log 2>&1 &
CUDA_VISIBLE_DEVICES:选择运行的GPUnohup XXX > > result.log 2>&1 &:后台运行
局域网文件传输
- 开启端口1872
- python运行命令行:
python -m http.server 1872 - 其它用户访问:本机ip:1872
路径问题解决
import os

# 动态获取当前项目路径
PROJECT_ROOT = '/'.join(os.path.realpath(__file__).split('/')[:-1])

# 路径拼接
os.path.join(root, 'images')
set()
x & y  #交集
x | y  #并集
x - y  #差集
x ^ y  #补集
PS: 当set中的元素为列表时,将列表转成对象(class\collections.namedtuple())即可使用。
dataloader
- iterable可迭代对象
- 使用iter()访问,不能使用next()访问
- 利用多进程来加速batch data的处理,使用yield来使用有限的内存
主要作用
将自定义的Dataset根据batch size大小、是否shuffle等封装成一个Batch Size大小的Tensor,用于后面的训练
CSV
def csv_writer(file_name, tsv_name):
    with open(file_name, 'w', encoding='utf-8', newline='') as f:
        tsv_w = csv.writer(f, delimiter='\t')
        tsv_w.writerows(tsv_name)

def csv_reader(file_name):
    with open(file_name, 'r', encoding='utf-8') as f:
        tsv_r = csv.reader(f, delimiter='\t')
        tsv_list = []
        for row in tsv_r:
            tsv_list.append(row)
        return tsv_list
Collections
nametuple()
- 增强可读性
- 使用名字访问元组
import collections
DataItem = collections.namedtuple("DataItem", ["event", "label"])
data = DataItem._make(['从来没有进行过应急评估', '应急管理不足'])
print(data['event']) # == data[0]
Linux指令
nvida-smi:GPU占用率ps aux|grep XX:显示XX所有程序
神经网络操作
pytorch优化器: torch_optimizer
# 原生
from torch import optim
pytorch_optim = optim.SGD

# 第三方库
import torch_optimizer as optim
pytorch_optim = optim.Lamb
冻结参数
for p in self.albert.parameters():
    p.requires_grad = False


