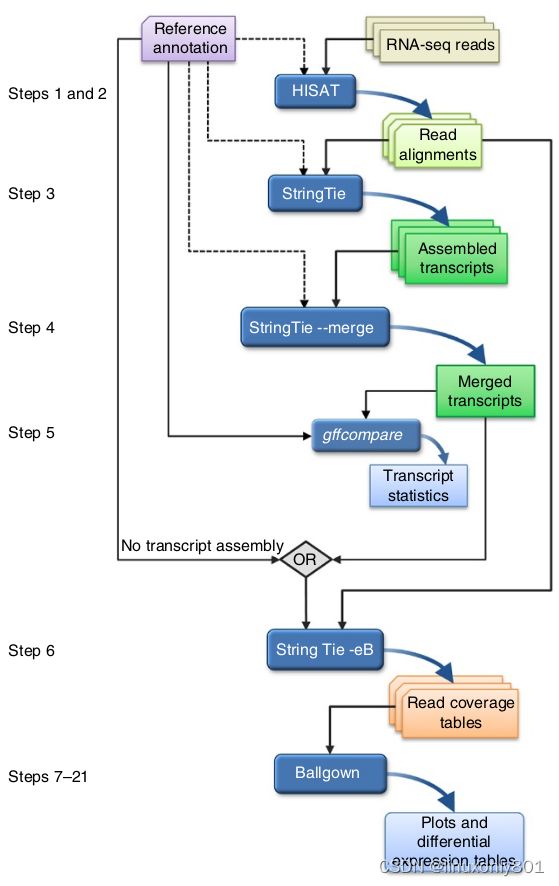
复现Transcript-level expression analysis of RNA-seq experiments with HISAT, StringTie and Ballgown文章代码
文章目录
- 前言
- 一、安装R和Rstudio和相应的包
- 二、文章复现
-
- 0. 前期准备:下载文章中的数据
- 1. 把所有的测序数据map到reference genome。
- 2. 将SAM文件转换成BAM文件
- 3. 组装transcripts
- 4. 把所有样品的transcripts merge到一起
- 5. optional-使用gffcompare检查transcripts与参考基因组比对情况
- 6. 估算transcript的abundances并生成供ballgown使用的table counts
- 7. 使用R进行差异分析
前言
刚开始接触RNA-seq,本文主要是为了记录自己的学习过程。
一、安装R和Rstudio和相应的包
这个直接参考自己之前的文章就可以了。
二、文章复现
0. 前期准备:下载文章中的数据
先新建一个文件夹用于存放所有的数据和R代码:
mkdir RNAseqDEMO  # 生成文件夹
cd RNAseqDEMO  # 进入文件夹
wget ftp://ftp.ccb.jhu.edu/pub/RNAseq_protocol/chrX_data.tar.gz  # 下载数据
tar xvzf chrX_data.tar.gz  # 解压数据
解压完成后会多出一个文件夹:chrX_data,这个文件夹下面有4个directory和两个文件:
samples文件夹:包含12个paired-end RNA-seq reads。所有序列都是fastq格式。
indexes文件夹:包含8个ht2文件,是HISAT2对X染色体的indexes。
genome文件夹:仅包含一个chrX.fa文件,就是人X染色体的序列文件。如果使用人的全基因级,genome文件夹下也应只包含一个文件,但是这个文件需要包含所有染色体的序列。
genes文件夹:仅包含一个chrX.gtf文件,内容是RefSeq中GRCh38的基因annotations信息。
mergelist.txt和geuvadis_phenodata.csv:文章作者提供的,用于做比对的text文件。如果是自己分析,需要自己创建。作者只是提供出来让新手更容易入门。
1. 把所有的测序数据map到reference genome。
所有的fastq文件都是一个文本,使用more命令打开后可以看到文件包含4行,分别是read名,序列,+号,测序质量。
 使用HISAT2软件进行map:
hisat2 -p 8 --dta -x chrX_data/indexes/chrX_tran -1 chrX_data/samples/ERR188044_chrX_1.fastq.gz -2 chrX_data/samples/ERR188044_chrX_2.fastq.gz -S ERR188044_chrX.sam
hisat2 -p 8 --dta -x chrX_data/indexes/chrX_tran -1 chrX_data/samples/ERR188104_chrX_1.fastq.gz -2 chrX_data/samples/ERR188104_chrX_2.fastq.gz -S ERR188104_chrX.sam
hisat2 -p 8 --dta -x chrX_data/indexes/chrX_tran -1 chrX_data/samples/ERR188234_chrX_1.fastq.gz -2 chrX_data/samples/ERR188234_chrX_2.fastq.gz -S ERR188234_chrX.sam
hisat2 -p 8 --dta -x chrX_data/indexes/chrX_tran -1 chrX_data/samples/ERR188245_chrX_1.fastq.gz -2 chrX_data/samples/ERR188245_chrX_2.fastq.gz -S ERR188245_chrX.sam
hisat2 -p 8 --dta -x chrX_data/indexes/chrX_tran -1 chrX_data/samples/ERR188257_chrX_1.fastq.gz -2 chrX_data/samples/ERR188257_chrX_2.fastq.gz -S ERR188257_chrX.sam
hisat2 -p 8 --dta -x chrX_data/indexes/chrX_tran -1 chrX_data/samples/ERR188273_chrX_1.fastq.gz -2 chrX_data/samples/ERR188273_chrX_2.fastq.gz -S ERR188273_chrX.sam
hisat2 -p 8 --dta -x chrX_data/indexes/chrX_tran -1 chrX_data/samples/ERR188337_chrX_1.fastq.gz -2 chrX_data/samples/ERR188337_chrX_2.fastq.gz -S ERR188337_chrX.sam
hisat2 -p 8 --dta -x chrX_data/indexes/chrX_tran -1 chrX_data/samples/ERR188383_chrX_1.fastq.gz -2 chrX_data/samples/ERR188383_chrX_2.fastq.gz -S ERR188383_chrX.sam
hisat2 -p 8 --dta -x chrX_data/indexes/chrX_tran -1 chrX_data/samples/ERR188401_chrX_1.fastq.gz -2 chrX_data/samples/ERR188401_chrX_2.fastq.gz -S ERR188401_chrX.sam
hisat2 -p 8 --dta -x chrX_data/indexes/chrX_tran -1 chrX_data/samples/ERR188428_chrX_1.fastq.gz -2 chrX_data/samples/ERR188428_chrX_2.fastq.gz -S ERR188428_chrX.sam
hisat2 -p 8 --dta -x chrX_data/indexes/chrX_tran -1 chrX_data/samples/ERR188454_chrX_1.fastq.gz -2 chrX_data/samples/ERR188454_chrX_2.fastq.gz -S ERR188454_chrX.sam
hisat2 -p 8 --dta -x chrX_data/indexes/chrX_tran -1 chrX_data/samples/ERR204916_chrX_1.fastq.gz -2 chrX_data/samples/ERR204916_chrX_2.fastq.gz -S ERR204916_chrX.sam
参数说明:
可以参考:http://daehwankimlab.github.io/hisat2/manual/
-p (pthreads),线程数。
–dta (downstream-transcriptome-assembly),专门为包括StringTie在内的assemblers程序生成align结果用于分析。添加该参数后,HISAT2需要更长的anchor长度来重新发现剪接位点。这将减少与short-anchors的align,从而帮助assemblers程序显著提高计算和内存使用。
-x (hisat2-idx,参考基因组索引文件的前缀)
-1 (m1,pair-end测序中的mate1文件)
-2 (m2,pair-end测序中的mate2文件)
-S (hit,可以理解为save,保存为SAM文件)
比对结束后,会在当前文件夹中生成.SAM文件,SAM文件占用空间大,需要转换成BAM文件(BAM是SAM文件的二进制binary形式,内容是一样的)。
2. 将SAM文件转换成BAM文件
需要进行sort的原因:
- BAM is compressed. Sorting helps to give a better compression ratio because similar sequences are grouped together. BAM 文件是压缩的二进制文件,对文件内容排序之后相似的内容排在一起,使得文件压缩比提高了,因此排序之后的 BAM 文件变小了,相对应的 SAM 文件就是纯文本文件,对 SAM 文件进行排序就不会改变文件大小。
- stringtie官网指出,必须使用sort之后的文件:The main input of the program (
) must be a SAM, BAM or CRAM file with RNA-Seq read alignments sorted by their genomic location (for example the accepted_hits.bam file produced by TopHat or the output of HISAT2 after sorting and converting it using samtools as explained below).
samtools sort -@ 8 -o ERR188044_chrX.bam ERR188044_chrX.sam
samtools sort -@ 8 -o ERR188104_chrX.bam ERR188104_chrX.sam
samtools sort -@ 8 -o ERR188234_chrX.bam ERR188234_chrX.sam
samtools sort -@ 8 -o ERR188245_chrX.bam ERR188245_chrX.sam
samtools sort -@ 8 -o ERR188257_chrX.bam ERR188257_chrX.sam
samtools sort -@ 8 -o ERR188273_chrX.bam ERR188273_chrX.sam
samtools sort -@ 8 -o ERR188337_chrX.bam ERR188337_chrX.sam
samtools sort -@ 8 -o ERR188383_chrX.bam ERR188383_chrX.sam
samtools sort -@ 8 -o ERR188401_chrX.bam ERR188401_chrX.sam
samtools sort -@ 8 -o ERR188428_chrX.bam ERR188428_chrX.sam
samtools sort -@ 8 -o ERR188454_chrX.bam ERR188454_chrX.sam
samtools sort -@ 8 -o ERR204916_chrX.bam ERR204916_chrX.sam
参数说明:
-@ 排序和压缩的线程数,默认是单线程。
-o 输出文件名
最后一个是sam文件名
生成的bam文件和sam文件内容相同,但是bam需要使用binary方式打开,所以如果想查看内容,可以使用excel打开sam文件。
可以参考:http://samtools.github.io/hts-specs/SAMv1.pdf
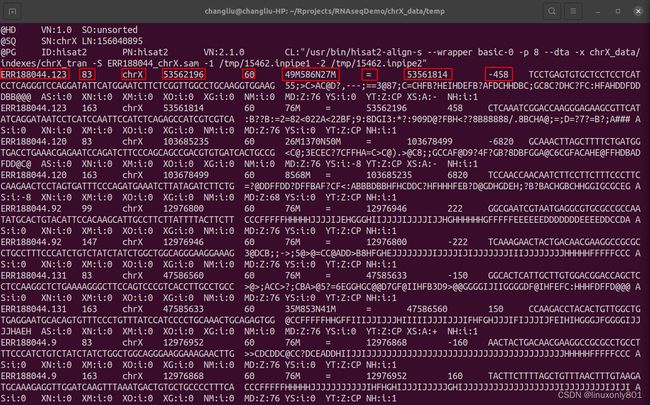
内容说明
表头:
HD(header description):VN: version number,SO: sorting order。
SQ:Reference sequence dictionary. SN: reference sequence name,LN: reference sequence length
PG:program. (会记录使用的命令)
文件:
共11列。
第1列:QNAME,query template name,即reads名。
第2列:FLAG标签。bitwise FLAG。
第3列:RNAME,比对到基因组的位置。
第4列:比对到参考基因组的物理位置。
第5列:MAPQ, map quality。比对质量(0-60)。
第6列:CIAGR(用于记录插入、缺失等信息)。
第7列:RNEXT, 配对reads比对到的染色体,=表示相同。
第8列:PNEXT, 配对reads比对到参考基因组的物理位置。
第9列:ISIZE, 文库插入序列大小;
第10列:sequence。
第11列:quality。
看看就行,不用太在意。有几列需要说明一下:
49M586N27M:49+27=76。49和27都是M(match)到基因组上的,一共76bp,正好是一个read的长度。586N表示在match到的49bp和27bp之间有586个bp是内含子。
-458: = 53561814 - 53562196 - 76(这个自己品吧,就是两个位置的差,再减去测序read长度。)
3. 组装transcripts
好像不使用 -l 参数也是可以的,原始论文里面写的代码运行时会报错。下面的是正确的。
官网给出的-l参数的解释如下:
-l (label): Sets (label) as the prefix for the name of the output transcripts. Default: STRG
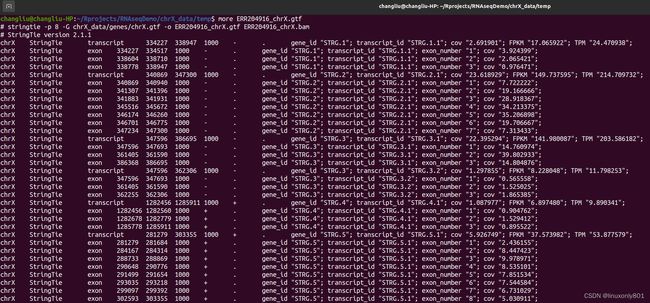
stringtie -p 8 -G chrX_data/genes/chrX.gtf -o ERR188044_chrX.gtf ERR188044_chrX.bam
stringtie -p 8 -G chrX_data/genes/chrX.gtf -o ERR188104_chrX.gtf ERR188104_chrX.bam
stringtie -p 8 -G chrX_data/genes/chrX.gtf -o ERR188234_chrX.gtf ERR188234_chrX.bam
stringtie -p 8 -G chrX_data/genes/chrX.gtf -o ERR188245_chrX.gtf ERR188245_chrX.bam
stringtie -p 8 -G chrX_data/genes/chrX.gtf -o ERR188257_chrX.gtf ERR188257_chrX.bam
stringtie -p 8 -G chrX_data/genes/chrX.gtf -o ERR188273_chrX.gtf ERR188273_chrX.bam
stringtie -p 8 -G chrX_data/genes/chrX.gtf -o ERR188337_chrX.gtf ERR188337_chrX.bam
stringtie -p 8 -G chrX_data/genes/chrX.gtf -o ERR188383_chrX.gtf ERR188383_chrX.bam
stringtie -p 8 -G chrX_data/genes/chrX.gtf -o ERR188401_chrX.gtf ERR188401_chrX.bam
stringtie -p 8 -G chrX_data/genes/chrX.gtf -o ERR188428_chrX.gtf ERR188428_chrX.bam
stringtie -p 8 -G chrX_data/genes/chrX.gtf -o ERR188454_chrX.gtf ERR188454_chrX.bam
stringtie -p 8 -G chrX_data/genes/chrX.gtf -o ERR204916_chrX.gtf ERR204916_chrX.bam
参数说明:
-p: 线程数
-G: (guide_gff) 参考基因组的gtf文件路径
-o: (output) 输出文件,gtf格式
最后一个是组装用的bam文件
这样就可以把所有测序的结果组装在一起,从而就可以等到每个transcript对应的FPKM和TPM值。
生成的gtf文件包含9列:
1.seq_id:序列编号,一般为chr或者scanfold编号。
2.source: 注释的来源,可以是数据库的名称,也可以是软件的名称,也可以为空,用.填充。
3.type: 特征类型:Gene, cDNA, mRNA, 5UTR, 3UTR, exon, CDS, start_codon, stop_codon, transcript等。
4.start:起始位置。
5.end: 终止位置。
6.score: 得分,注释信息可能性说明,可以是序列相似性比对时的E-values值或者基因预测是的P-values值,“.”表示为空。
7.strand: +正链,-负链,?不清楚,.正负无意义。
8.phase: 仅对type为“CDS”有效,表示CDS下一个密码子开始的位置。
9.attributes:属性,key value格式。必须包含gene_id和transcript_id。
结果看看就行。如果想多看看,只需要关注FPKM和TPM的值就行,还有就是是不是所有的exon都测出来了。
4. 把所有样品的transcripts merge到一起
merge到一起的原因:
StringTie将GTF/GFF文件列表作为输入,并将这些转录本合并/组合成一组非冗余的转录本。这种模式用于新的差异分析管道,以生成跨多个RNA序列样本的一组全局统一转录本(异构体)。
这时就用到了上面说的mergelist.txt。
mergelist.txt和geuvadis_phenodata.csv:文章作者提供的,用于做比对的text文件。如果是自己分析,需要自己创建。作者只是提供出来让新手更容易入门。
这个txt文件的作用就是告诉软件,你有哪些文件想merge在一起。文件内容很简单,就是把上一步组装的所有gtf文件全部写进来就可以了:

stringtie --merge -p 8 -G chrX_data/genes/chrX.gtf -o stringtie_merged.gtf chrX_data/mergelist.txt
处理后,软件会把所有的(这里是12个)gtf文件合并成一个gtf文件。使用more命令查看一下merge前后的文件:
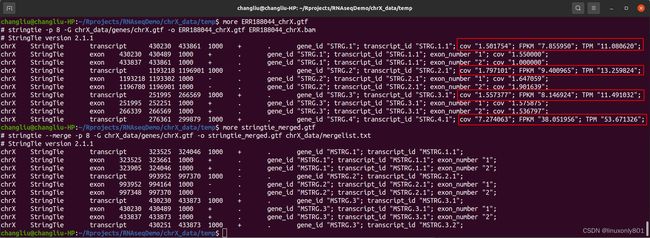 上面是merge前的gtf文件,下面是merge后的gtf文件。可以看到,merge后就不再有FPKM和TPM信息了。
5. optional-使用gffcompare检查transcripts与参考基因组比对情况
当与参考注释(也作为 GFF 提供)进行比较时,程序 gffcompare 可用于比较、合并、注释和估计一个或多个 GFF 文件的准确性。
我使用的是ubuntu 20.04,发现gffcompare好像无法直接使用,需要进入到gffcompare的解压目录,使用./gffcompare才能运行。代码如下,注意相对路径的使用:
./gffcompare -r ../../Rprojects/RNAseqDemo/chrX_data/genes/chrX.gtf -G -o merged ../../Rprojects/RNAseqDemo/stringtie_merged.gtf

运行完成后,会生成两个文件:merged.stringtie_merged.gtf.refmap 和 merged.stringtie_merged.gtf.tmap。两个文件都可以使用excel打开。
refmap文件的内容如下:

一共4列。主要看class_code就行,=号代表match。
6. 估算transcript的abundances并生成供ballgown使用的table counts
原始论文里面写的代码运行时会报错。需要把 -B -e放到最后。
先新建一个ballgown(名子随便)的文件夹,在stringtie的-o命令里面需要把output的文件都放到这里面。
mkdir ballgown
然后再运行下面的代码,这里使用到了第4步生成的stringtie_merged.gtf作为guide_gff(参考基因组),:
stringtie -p 8 -G stringtie_merged.gtf -o ballgown/ERR188044/ERR188044_chrX.gtf ERR188044_chrX.bam -B -e
stringtie -p 8 -G stringtie_merged.gtf -o ballgown/ERR188104/ERR188104_chrX.gtf ERR188104_chrX.bam -B -e
stringtie -p 8 -G stringtie_merged.gtf -o ballgown/ERR188234/ERR188234_chrX.gtf ERR188234_chrX.bam -B -e
stringtie -p 8 -G stringtie_merged.gtf -o ballgown/ERR188245/ERR188245_chrX.gtf ERR188245_chrX.bam -B -e
stringtie -p 8 -G stringtie_merged.gtf -o ballgown/ERR188257/ERR188257_chrX.gtf ERR188257_chrX.bam -B -e
stringtie -p 8 -G stringtie_merged.gtf -o ballgown/ERR188273/ERR188273_chrX.gtf ERR188273_chrX.bam -B -e
stringtie -p 8 -G stringtie_merged.gtf -o ballgown/ERR188337/ERR188337_chrX.gtf ERR188337_chrX.bam -B -e
stringtie -p 8 -G stringtie_merged.gtf -o ballgown/ERR188383/ERR188383_chrX.gtf ERR188383_chrX.bam -B -e
stringtie -p 8 -G stringtie_merged.gtf -o ballgown/ERR188401/ERR188401_chrX.gtf ERR188401_chrX.bam -B -e
stringtie -p 8 -G stringtie_merged.gtf -o ballgown/ERR188428/ERR188428_chrX.gtf ERR188428_chrX.bam -B -e
stringtie -p 8 -G stringtie_merged.gtf -o ballgown/ERR188454/ERR188454_chrX.gtf ERR188454_chrX.bam -B -e
stringtie -p 8 -G stringtie_merged.gtf -o ballgown/ERR204916/ERR204916_chrX.gtf ERR204916_chrX.bam -B -e
参数说明(直接把官网的复制过来了):
-e: this option directs StringTie to operate in expression estimation mode; this limits the processing of read alignments to estimating the coverage of the transcripts given with the -G option (hence this option requires -G).
-B: This switch enables the output of Ballgown input table files (*.ctab) containing coverage data for the reference transcripts given with the -G option. (See the Ballgown documentation for a description of these files.) With this option StringTie can be used as a direct replacement of the tablemaker program included with the Ballgown distribution. If the option -o is given as a full path to the output transcript file, StringTie will write the *.ctab files in the same directory as the output GTF.
这时就需要对第三步和第六步的代码进行对比。可以看到,两者几乎一样,只是使用的guide_gff不一样。在第三步使用的是整个X染色体的gtf文件,而在第六步使用的是自己在第四步生成的merge后的gtf。
 可以对比一下这两个文件:
 我也看不出有多大区别,反正就是X染色体有CDS、start_codon等注释,并且第9列信息也更多。等我有了更多的理解后,再来添加吧。
运行完成后,会在ballgown文件夹下生成对应的文件夹,每个文件夹下面都包含6个文件,其中5个ctab文件是用于ballgown分析用的。
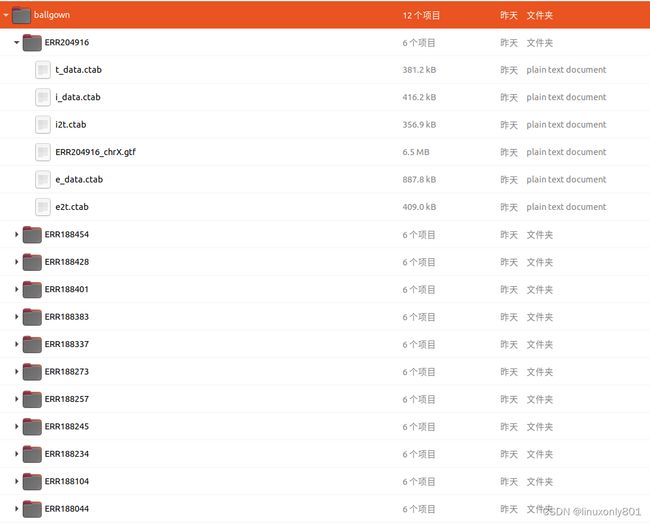 所有的ctab文件都可以使用exel打开,每个文件的内容如下(直接copy的官网)。
e_data.ctab: exon-level expression measurements. One row per exon. Columns are e_id (numeric exon id), chr, strand, start, end (genomic location of the exon), and the following expression measurements for each sample:
    rcount: reads overlapping the exon
    ucount: uniquely mapped reads overlapping the exon
    mrcount: multi-map-corrected number of reads overlapping the exon
    cov average per-base read coverage
    cov_sd: standard deviation of per-base read coverage
    mcov: multi-map-corrected average per-base read coverage
    mcov_sd: standard deviation of multi-map-corrected per-base coverage
i_data.ctab: intron- (i.e., junction-) level expression measurements. One row per intron. Columns are i_id (numeric intron id), chr, strand, start, end (genomic location of the intron), and the following expression measurements for each sample:
    rcount: number of reads supporting the intron
    ucount: number of uniquely mapped reads supporting the intron
    mrcount: multi-map-corrected number of reads supporting the intron
t_data.ctab: transcript-level expression measurements. One row per transcript. Columns are:
    t_id: numeric transcript id
    chr, strand, start, end: genomic location of the transcript
    t_name: Cufflinks-generated transcript id
    num_exons: number of exons comprising the transcript
    length: transcript length, including both exons and introns
    gene_id: gene the transcript belongs to
    gene_name: HUGO gene name for the transcript, if known
    cov: per-base coverage for the transcript (available for each sample)
    FPKM: Cufflinks-estimated FPKM for the transcript (available for each sample)
e2t.ctab: table with two columns, e_id and t_id, denoting which exons belong to which transcripts. These ids match the ids in the e_data and t_data tables.
i2t.ctab: table with two columns, i_id and t_id, denoting which introns belong to which transcripts. These ids match the ids in the i_data and t_data tables.
这里,又生成的一个gtf文件,此时的gtf文件与第三步生成的文件名子相同,可以看一下两者的区别:
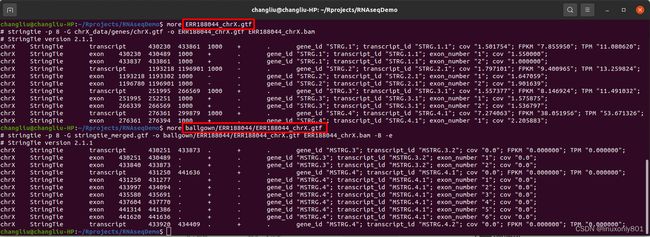
两者内容相似但不相同,我找了同一个基因,对比如下(上面是第三步生成的文件,下面的第六步生成的文件):
 可以看到,两个文件在前8列的内容是一样的。区别出现在第9列,即 attributes:属性,第六步生成的文件应该是经过了两次计算,所以结果更准确。因此在后续使用R分析的时候,使用的就是这个文件了。
到这里,全部的linux操作就完成了,后面是R语言的分析了,有空再补上。
7. 使用R进行差异分析
进入R环境。
导入下面的包:
ballgown (for data analysis,用于数据分析)
RSkittleBrewer (for setting up colors,用于设置颜色),
genefilter(for fast calculation of means and variances,用于快速计算均值和方差),
dplyr (for sorting and arranging results,用于筛选和整理结果)
devtools (for reproducibility and installing packages,用于结果复现和安装包)
>library(ballgown)
>library(RSkittleBrewer)
>library(genefilter)
>library(dplyr)
>library(devtools)
对于ballgown的使用,还是参考官方教程比较好:https://www.bioconductor.org/packages/release/bioc/html/ballgown.html 。在Rstudio中也可以使用browseVignettes(“ballgown”)来查看教程。
加载样品的phenotype
这里使用到了作者提供的geuvadis_phenodata.csv文件,如果是自己做其它的分析,这个文件是需要自己准备的。
文件内容很简单,注意此时所在的路径一定要是:RNAseqDemo:
>pheno_data = read.csv('./chrX_data/geuvadis_phenodata.csv')
读取表达数据
>bg_chrX = ballgown(dataDir = "ballgown", samplePattern = "ERR", pData=pheno_data)
ballgown各参数的含义可以通过下面的代码查看:
library("ballgown")
?ballgown
删除低丰度的基因
RNA-seq数据经常会有很低或0 counts。因此需要对这些数据进行去除。过滤方式可以按照自己的实验需求进行。
bg_chrX_filt = subset(bg_chrX,"rowVars(texpr(bg_chrX)) >1",genomesubset=TRUE)
找出显著基因
results_transcripts = stattest(bg_chrX_filt, feature="transcript",covariate="sex",adjustvars = c("population"), getFC=TRUE, meas="FPKM")
