时序动作检测《BSN++: Complementary Boundary Regressor with Scale-Balanced Relation Modeling for ……》
时序动作检测SSAD《Single Shot Temporal Action Detection》_程大海的博客-CSDN博客_时序动作检测
时序动作检测《BSN: Boundary Sensitive Network for Temporal Action Proposal Generation》_程大海的博客-CSDN博客
时序动作检测《BMN: Boundary-Matching Network for Temporal Action Proposal Generation》_程大海的博客-CSDN博客
《Non-local Neural Networks》个人总结理解_程大海的博客-CSDN博客
时序动作检测《BSN++: Complementary Boundary Regressor with Scale-Balanced Relation Modeling for ……》_程大海的博客-CSDN博客
温馨提示:本文仅供自己参考(勿捧杀),如有理解错误,有时间再改!
代码实现:https://github.com/xxcheng0708/BSNPlusPlus-boundary-sensitive-network
PS:本文实现的BSN++在Activity 1.3数据集上性能好于BSN,略低于BMN。
BSN++论文涉及的相关算法:
1、BSN:时序动作检测《BSN: Boundary Sensitive Network for Temporal Action Proposal Generation》
2、BMN:时序动作检测《BMN: Boundary-Matching Network for Temporal Action Proposal Generation》
3、Non-Local:《Non-local Neural Networks》个人总结理解
4、UNet++:
https://github.com/bigmb/Unet-Segmentation-Pytorch-Nest-of-Unets/blob/master/Models.py
5、IoU-Balanced Sampling:《Libra R-CNN:Towards Balanced Learning for Object Detection》
BSN算法的缺点
基于anchor top-down方法的缺点是生成的proposal边界不够准确。BSN算法是bottom-up方法,能够生成边界准确的proposal,BSN方法仍然有一下缺点:
- BSN只使用了局部特征来预测动作边界,没有使用序列特征丰富的上下文信息
- 在评估生成proposal的置信度时,BSN算法没有考虑proposal之间的关系
- Proposal正负样本数量不均衡,以及时序特征序列持续时间长度的不平衡问题被忽略了
BSN++针对BSN算法存在的问题,提出进行以下改进:
- 使用带有嵌套跳跃连接(skip connection)的U形架构网络来利用丰富的上下文信息预测动作边界
- 在BSN以及BMN网络中,对于动作边界开始位置和结束位置的检测是单独进行的,其实开始和结束位置的检测是同一类问题,它们之间可以互相补充。因此作者提出了一种开始和结束位置边界识别的补充机制,当对视频进行反向处理时,可以使用starting的分类器来预测ending位置
- 提出了一种proposal-proposal之间关系建模的方法,提升proposal的预测置信度
- 对于训练过程中正负样本不均衡的问题,提出一种样本采样方法
视频特征提取
BSN++算法对于视频的定义,以及视频特征提取方法与BSN、BMN算法相同。
Base Model模块
与BSN、BMN算法中的Base Model作用相同,用于从输入的原始特征序列中提取更加丰富的时序信息,增加时序特征的感受野。与BSN、BMN一样,BSN++的Base Model也采用滑窗的方法将不定长度的视频转换为多个固定长度滑动窗口内的序列特征。
Complementary Boundary Generator(CBG)模块
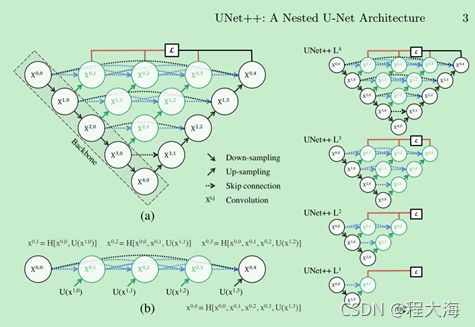
CBG模块是一个Encoder-Decoder结构的子网络,借鉴于UNet++在图像实例分割方面的成功,UNet++可以提取更加丰富的上下文特征。个人理解类似于FPN和PANet网络,只是网络的结构不同而已。CBG模块的网络结构如下:
图像每个圆圈都是一个1D卷积操作,向下的箭头表示下采样down samplig,向上的箭头表示up sampling上采样,横向箭头表示横向连接,多个箭头汇聚是采用concat方式进行特征融合,红色点的位置表示预测输出开始和结束位置的概率。具体实现见代码:
相比一下,看一下原始UNet++的网络结构(其实就是剪枝后的UNet++模块):
CBG模块UNet网络实现代码如下:
class ConvUnit(nn.Module):
    """
    BSN++中CBG模块的UNet的每个单元unit
    """

    def __init__(self, in_ch, out_ch, is_output=False):
        super(ConvUnit, self).__init__()
        module_list = [nn.Conv1d(in_ch, out_ch, kernel_size=3, stride=1, padding=1, bias=True)]
        if is_output is False:
            module_list.append(nn.BatchNorm1d(out_ch))
            module_list.append(nn.ReLU(inplace=True))
        self.conv = nn.Sequential(*module_list)

    def forward(self, x):
        x = self.conv(x)
        return x


class NestedUNet(nn.Module):
    """
    UNet - Basic Implementation
    Paper : https://arxiv.org/abs/1505.04597
    """

    def __init__(self, in_ch=400, out_ch=2):
        super(NestedUNet, self).__init__()

        self.pool = nn.MaxPool1d(kernel_size=2, stride=2)
        self.up = nn.Upsample(scale_factor=2)

        n1 = 512
        filters = [n1, n1 * 2, n1 * 3]
        # UNet的第一列
        self.conv0_0 = ConvUnit(in_ch, filters[0], is_output=False)
        self.conv1_0 = ConvUnit(filters[0], filters[0], is_output=False)
        self.conv2_0 = ConvUnit(filters[0], filters[0], is_output=False)

        # UNet的第二列
        self.conv0_1 = ConvUnit(filters[1], filters[0], is_output=True)
        self.conv1_1 = ConvUnit(filters[1], filters[0], is_output=False)

        # UNet的第三列
        self.conv0_2 = ConvUnit(filters[2], filters[0], is_output=True)

        # 输出,红点位置
        self.final = nn.Conv1d(filters[0] + filters[0], out_ch, kernel_size=1)
        self.out = nn.Sigmoid()

    def forward(self, x):
        x0_0 = self.conv0_0(x)
        x1_0 = self.conv1_0(self.pool(x0_0))
        x0_1 = self.conv0_1(torch.cat([x0_0, self.up(x1_0)], 1))
        x2_0 = self.conv2_0(self.pool(x1_0))
        x1_1 = self.conv1_1(torch.cat([x1_0, self.up(x2_0)], 1))
        x0_2 = self.conv0_2(torch.cat([x0_0, x0_1, self.up(x1_1)], 1))
        # 同步输出正向和反向的中间特征,用于计算MSELoss
        out_feature = torch.cat([x0_1, x0_2], 1)
        final_feature = self.final(out_feature)
        out = self.out(final_feature)

return out, out_feature开始和结束分类结果互补Complementary
作者在论文中提出,当正向观察视频序列时,开始位置:由背景变为前景,结束位置:由前景变为背景,当反向观察视频序列时,开始位置:由前景变为背景,结束位置:由背景变为前景。当将视频序列反向输入时,以前的结束位置就是一个伪开始位置,以前的开始位置就是一个伪结束位置,所以可以同时将视频序列正向和反向输入到同一个CBG模型中进行预测开始和结束位置,并使用正向和反向的预测结果互补计算开始和结束概率,同时对于正向和反向输出的中间特征,作者还添加了一个对于中间特征的MSELoss限制。
有了正向和反向的预测结果,下面就可以计算开始和结束的概率了:
关于CBG模块边界互补的计算方式如下:
- 首先使用正向视频特征输入到网络模型,得到一组开始和结束概率
- 然后将视频特征沿着时序维度倒序,得到反向视频特征,输入到网络模型,得到一个开始和结束概率
- 将第一组的开始概率和第二组的结束概率的逆序进行相乘开根号得到开始概率,将第一组的结束概率和第二组的开始概率的逆序进行相乘开根号得到结束概率
input_data = input_data.cuda()
# CBG处理正向视频特征
confidence_map, start_forward, end_forward, feature_forward = model(input_data)

# CBG处理反向视频特征
input_data_backward = torch.flip(input_data, dims=(2,))
confidence_map_backward, start_backward, end_backward, feature_backward = model(input_data_backward)
正向-反向概率融合:
start = torch.sqrt(start_forward * torch.flip(end_backward, dims=(1,)))
end = torch.sqrt(end_forward * torch.flip(start_backward, dims=(1,)))
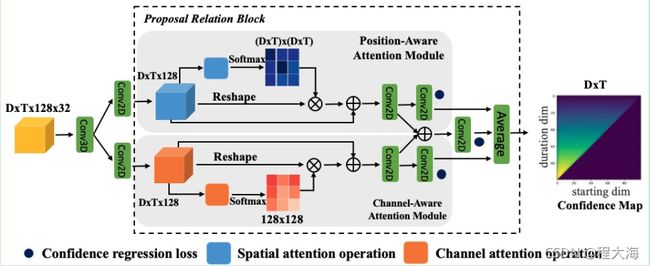
Proposal Relation Block(PRB)模块
PRB模块与BMN算法的BM模块功能一样,都是用来生产边界图的置信度矩阵。在BM模块中,先对boundary map中的每个proposal进行N个特征采样,然后使用3D卷积核2D卷积进一步提取proposal的特征,具体实现方法参见上一篇BMN算法介绍。在PRB模块,采用与BMN算法类似的实现方式来对proposal进行特征点采样,PRB模块中只是用一层3D卷积,不使用2D卷积,经过采样之后得到的boundary map的大小为:
![]()
在得到proposal的特征图![]() 的基础上,为了能够捕获proposal之间的relation,这也是论文开始时作者指出的BSN算法的不足之处,在FP
的基础上,为了能够捕获proposal之间的relation,这也是论文开始时作者指出的BSN算法的不足之处,在FP![]() 特征图上分别在position位置和channel维度上使用两个self-attention模块,通过self-attention加权计算的方式来实现proposal之前的relation关系提取。这里使用的self-attention模块参考自Non-Local论文。
特征图上分别在position位置和channel维度上使用两个self-attention模块,通过self-attention加权计算的方式来实现proposal之前的relation关系提取。这里使用的self-attention模块参考自Non-Local论文。
Non-Local网络
在神经网络中,为了解决长距离依赖提取丰富的上下文特征的问题,在处理时序问题(语音、文字)是通常使用循环神经网络来实现,对于图像数据,通常采用堆叠卷积操作来不断增加感受野来提取更多的上下文相关特征,但是堆叠卷积操作存在以下几点问题:
- 计算量增大
- 模型优化困难
- 特征传递层级太多
- 高层特征太抽象(自己加的)
为了能够提取图像数据丰富的上下文特征,同时避免堆叠卷积操作带来的以上缺点,Non-Local算法论文提出了一种特征加权融合方法,non-local网络中每个位置的特征都是通过加权求和其它所有位置的特征得到的,所以每个位置的特征都和全局特征相关,这也就是self-attention自注意力机制。
a non-local operation computes the response at a position as a weighted sum of the features at all positions in the input feature maps。
关于Non-Local的更多实现细节和原理,请参考原文或者上一篇。
Position-aware attention module(PAM位置注意力模块)
PAM模块是在position维度上(可以简单理解成是H和W维度)进行加权计算,得到position之间的相关性,具体实现细节参考Non-Local论文中的non-local block部分。其实就是一路得到一个加权系数(通过按行进行softmax得到),另一路进行形状变化,然后与softmax进行矩阵乘法,得到加权之后的结果,然后再与原始输入特征进行相加(形成残差模块)。具体实现见如下代码:
class PositionAwareAttentionModule(nn.Module):
    def __init__(self, in_channels, inter_channels=None, sub_sample=None):
        super(PositionAwareAttentionModule, self).__init__()

        self.sub_sample = sub_sample
        self.in_channels = in_channels
        self.inter_channels = inter_channels

        if self.inter_channels is None:
            self.inter_channels = in_channels // 2
            if self.inter_channels == 0:
                self.inter_channels = 1

        conv_nd = nn.Conv2d
        max_pool_layer = nn.MaxPool2d(kernel_size=(2, 2))
        bn = nn.BatchNorm2d

        self.g = nn.Sequential(
            conv_nd(in_channels=self.in_channels, out_channels=self.inter_channels, kernel_size=1, stride=1, padding=0),
            bn(self.inter_channels),
            nn.ReLU(inplace=True)
        )
        self.theta = nn.Sequential(
            conv_nd(in_channels=self.in_channels, out_channels=self.inter_channels, kernel_size=1, stride=1, padding=0),
            bn(self.inter_channels),
            nn.ReLU(inplace=True)
        )
        self.phi = nn.Sequential(
            conv_nd(in_channels=self.in_channels, out_channels=self.inter_channels, kernel_size=1, stride=1, padding=0),
            bn(self.inter_channels),
            nn.ReLU(inplace=True)
        )
        self.W = nn.Sequential(
            conv_nd(in_channels=self.inter_channels, out_channels=self.in_channels,
                    kernel_size=1, stride=1, padding=0),
            bn(self.in_channels)
        )
        if self.sub_sample:
            # 对g和phi进行相同的下采样可以进一步降低计算量
            self.g = nn.Sequential(self.g, max_pool_layer)
            self.phi = nn.Sequential(self.phi, max_pool_layer)

    def forward(self, x):
        batch_size = x.size(0)
        g_x = self.g(x).view(batch_size, self.inter_channels, -1)
        g_x = g_x.permute(0, 2, 1)

        theta_x = self.theta(x).view(batch_size, self.inter_channels, -1)
        theta_x = theta_x.permute(0, 2, 1)

        phi_x = self.phi(x).view(batch_size, self.inter_channels, -1)

        f = torch.matmul(theta_x, phi_x)
        f = F.softmax(f, dim=2)

        y = torch.matmul(f, g_x)
        y = y.permute(0, 2, 1).contiguous()
        y = y.view(batch_size, self.inter_channels, *x.size()[2:])
        y = self.W(y) + x

        z = y + x
        return z
Channel-aware attention module(CAM通道注意力模块)
CAM的实现方式与PAM一样,只不过加权计算发生在channel通道维度上。具体实现见代码:
class ChannelAwareAttentionModule(nn.Module):
    def __init__(self, in_channels, inter_channels=None, sub_sample=None):
        super(ChannelAwareAttentionModule, self).__init__()

        self.sub_sample = sub_sample
        self.in_channels = in_channels
        self.inter_channels = inter_channels

        if self.inter_channels is None:
            self.inter_channels = in_channels // 2
            if self.inter_channels == 0:
                self.inter_channels = 1

        conv_nd = nn.Conv2d
        max_pool_layer = nn.MaxPool2d(kernel_size=(2, 2))
        bn = nn.BatchNorm2d

        self.g = nn.Sequential(
            conv_nd(in_channels=self.in_channels, out_channels=self.inter_channels, kernel_size=1, stride=1, padding=0),
            bn(self.inter_channels),
            nn.ReLU(inplace=True)
        )
        self.theta = nn.Sequential(
            conv_nd(in_channels=self.in_channels, out_channels=self.inter_channels, kernel_size=1, stride=1, padding=0),
            bn(self.inter_channels),
            nn.ReLU(inplace=True)
        )
        self.phi = nn.Sequential(
            conv_nd(in_channels=self.in_channels, out_channels=self.inter_channels, kernel_size=1, stride=1, padding=0),
            bn(self.inter_channels),
            nn.ReLU(inplace=True)
        )
        self.W = nn.Sequential(
            conv_nd(in_channels=self.inter_channels, out_channels=self.in_channels,
                    kernel_size=1, stride=1, padding=0),
            bn(self.in_channels)
        )
        if self.sub_sample:
            # 对g和phi进行相同的下采样可以进一步降低计算量
            self.g = nn.Sequential(self.g, max_pool_layer)
            self.phi = nn.Sequential(self.phi, max_pool_layer)

    def forward(self, x):
        batch_size = x.size(0)
        g_x = self.g(x).view(batch_size, self.inter_channels, -1)

        theta_x = self.theta(x).view(batch_size, self.inter_channels, -1)

        phi_x = self.phi(x).view(batch_size, self.inter_channels, -1)
        phi_x = phi_x.permute(0, 2, 1)

        f = torch.matmul(theta_x, phi_x)
        f = F.softmax(f, dim=2)

        y = torch.matmul(f, g_x)
        y = y.permute(0, 2, 1).contiguous()
        y = y.view(batch_size, self.inter_channels, *x.size()[2:])
        y = self.W(y) + x

        z = y + x
        return z
PRB模块的整体实现代码如下:
def conv_block(in_ch, out_ch, kernel_size=3, stride=1, bn_layer=False, activate=False):
    module_list = [nn.Conv2d(in_ch, out_ch, kernel_size, stride, padding=1)]
    if bn_layer:
        module_list.append(nn.BatchNorm2d(out_ch))
        module_list.append(nn.ReLU(inplace=True))
    if activate:
        module_list.append(nn.Sigmoid())
    conv = nn.Sequential(*module_list)
    return conv


class ProposalRelationBlock(nn.Module):
    def __init__(self, in_channels, inter_channles=128, sub_sample=False):
        super(ProposalRelationBlock, self).__init__()
        self.p_net = PositionAwareAttentionModule(in_channels, inter_channels=inter_channles, sub_sample=sub_sample)
        self.c_net = ChannelAwareAttentionModule(in_channels, inter_channels=inter_channles, sub_sample=sub_sample)
        self.conv0_0 = conv_block(in_channels, in_channels, 3, 1, bn_layer=True)
        self.conv0_1 = conv_block(in_channels, in_channels, 3, 1, bn_layer=True)

        self.conv1 = conv_block(in_channels, in_channels, 3, 1, bn_layer=True)
        self.conv2 = conv_block(in_channels, 2, 3, 1, bn_layer=False, activate=True)
        self.conv3 = conv_block(in_channels, 2, 3, 1, bn_layer=False, activate=True)
        self.conv4 = conv_block(in_channels, in_channels, 3, 1, bn_layer=True)
        self.conv5 = conv_block(in_channels, 2, 3, 1, bn_layer=False, activate=True)

    def forward(self, x):
        x_p = self.conv0_0(x)
        x_c = self.conv0_1(x)

        x_p = self.p_net(x_p)
        x_c = self.c_net(x_c)

        x_p_0 = self.conv1(x_p)
        x_p_1 = self.conv2(x_p_0)

        x_c_0 = self.conv4(x_c)
        x_c_1 = self.conv5(x_c_0)

        x_p_c = self.conv3(x_p_0 + x_c_0)

        x_out = (x_p_1 + x_c_1 + x_p_c) / 3
        return x_out
Re-sampling
在目标检测算法中,存在着正负样本不均衡的问题,为了解决这个问题,Faster RCNN算法提出了OHEM在线难样本挖掘,RetinaNet算法提出了Focal Loss损失函数等方法。OHEM方法需要在训练的过程中进行计算,影响训练速度。Focal Loss可以用于单阶段的目标检测人物,对于Faster RCNN这种两阶段的检测算法,第一阶段的RPN网络已经对于正负样本进行筛选了,所以不再适用于Focal Loss。
IoU-balanced Sampling(基于IoU值的样本均衡采样)
IoU-balanced Sampling采样方法是《Libra R-CNN: Towards Balanced Learning for Object Detection》论文在2019年提出的。与传统的随机采样方法不同,随机采样方法中各个样本具有相同的采样概率,该方法的核心思想是基于目标检测算法中proposal(有的算法中也叫anchor)与GT的IoU值进行分组,并重新计算每个分组中的采样概率,在每个组中进行按照一定的概率进行采样,这样可以保证在每个IoU值的区间内,采样的样本都是均衡的。
Scaled-balance Sampleing(基于proposal持续时长,以及正负样本数量的均衡采样)
与目标检测方法相对应,时序动作检测方法的训练样本采样中,不仅涉及到正负样本的不均衡问题,同时还涉及到采样的proposal的持续时长不均衡的问题。作者基于IoU-Balanced Sampling采样方法设计了一个两阶段的Scaled-Balanced Sampling方法。
首先,将confidence map按照duration持续时间维度进行分桶,如分成[0 - 0:3; 0:3 - 0:7; 0:7 - 1:0]三个组,计算每个分组的采样概率:
![]() 表示分组的数量,
表示分组的数量,![]() 表示每个分组中positive样本的数量。
表示每个分组中positive样本的数量。
更新每个分组的概率![]() ,并重新对计算得到的一组新的数值进行归一化得到一个新的采样概率分布,并按照这个新的采样概率在每个分组中进行正样本的采样:
,并重新对计算得到的一组新的数值进行归一化得到一个新的采样概率分布,并按照这个新的采样概率在每个分组中进行正样本的采样:
对于负样本也采用同样的采样策略,同时保持正负样本1:1。这一块代码还不知道怎么实现???有实现了采样部分代码的大佬可以指点以下。


