PaddleCV官方人体姿态估计预训练模型转ONNX
项目地址
https://github.com/PaddlePaddle/models/tree/develop/PaddleCV/human_pose_estimation
论文地址
Pose ResNet: https://arxiv.org/abs/1804.06208
网络结构
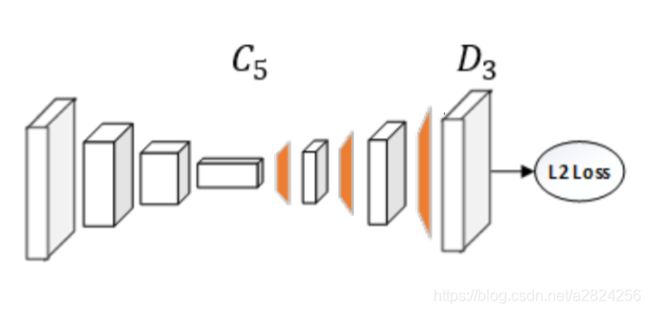
简单来说,这个网络把分类用的ResNet的最后几层全连接层替换为反卷积层输出heatmap,如果训练集有16个人体关键点,那么最后一层output的channel就是16,分别对应16个关键点,把置信度最高的一个像素采用为对应部位的关键点。

网络输入与输出
| Type | Size(batch_size、channel、height、width) |
|---|---|
| input | -1, 3, 384, 384 |
| output | -1, 16, 96, 96 |
预训练参数下载
不含网络结构,只有权重和偏置数据
使用mpii数据集训练的ResNet-50: https://paddlemodels.bj.bcebos.com/pose/pose-resnet50-mpii-384x384.tar.gz
下载后解压到项目根目录checkpoints文件夹下面
环境安装
# 使用的是paddle 2.1版本
pip install paddlepaddle-gpu -i https://mirror.baidu.com/pypi/simple
pip install onnx onnxruntime opencv-python
pip install paddle2onnx
导出网络结构和权重
import sys
import argparse
import functools
import paddle
import paddle.fluid as fluid
import paddle.fluid.layers as layers

from lib import pose_resnet
from utils.transforms import flip_back
from utils.utility import *
# 开启静态图模式,2.0版本默认关闭
paddle.enable_static()
# 预训练参数路径
weights_path = './checkpoints/pose-resnet50-mpii-384x384'
# 定义网络的输入
image = layers.data(name='image', shape=[3, 384, 384], dtype='float32')
# 定义使用的resnet版本,这里使用resnet50,kps_num是keypoints数量,对应mpii的16个关键点,test_mode开启,不需要返回loss
model = pose_resnet.ResNet(layers=50, kps_num=16, test_mode=True)
# 获得网络的output
output = model.net(input=image, target=None, target_weight=None)
# 选择使用CUDA执行,也可改为cpu
exe = fluid.Executor(fluid.CUDAPlace(0))
prog = fluid.default_main_program()
startup_prog = fluid.default_startup_program()
exe.run(startup_prog)
# 加载预训练参数
fluid.io.load_persistables(exe, weights_path, prog)
# 将网络结构与参数导出到__model__目录下
fluid.io.save_inference_model(dirname='./__model__', feeded_var_names=['image'], target_vars=[output], executor=exe)
print('模型导出完毕')
使用Paddle2ONNX将静态图导出为onnx模型
根据下面的教程把上一步的导出结果转换为.onnx文件
官方教程地址
Terminal输入以下命令
paddle2onnx --model_dir ./__model__ --save_file pdkp.onnx --opset_version 10 --enable_onnx_checker True
测试代码(CPU版本 - 尚未添加注释)
import onnxruntime
import cv2
import numpy as np
from scipy.ndimage import gaussian_filter, maximum_filter
import torch
from numba import jit

SIZE = 384
HEIGHT = 480
WIDTH = 640


@jit(nopython=True)
def load_image(image):
    image = image / 255.0
    image = image.transpose((2, 0, 1))
    return image


def post_process_heatmap(heatMap):
    kplst = list()
    for i in range(heatMap.shape[0]):
        _map = heatMap[i, :, :]
        _map = gaussian_filter(_map, sigma=1)
        _nmsPeaks = non_max_supression(_map, windowSize=3, threshold=1e-6)

        y, x = np.where(_nmsPeaks == _nmsPeaks.max())
        if len(x) > 0 and len(y) > 0:
            kplst.append((int(x[0]), int(y[0]), _nmsPeaks[y[0], x[0]]))
        else:
            kplst.append((0, 0, 0))

    kp = np.array(kplst)
    return kp


def non_max_supression(plain, windowSize=3, threshold=1e-6):
    under_th_indices = plain < threshold
    plain[under_th_indices] = 0
    return plain * (plain == maximum_filter(plain, footprint=np.ones((windowSize, windowSize))))


def render_kps(cvmat, kps, scale_x, scale_y):
    for _kp in kps:
        _x, _y, _conf = _kp
        if _conf > 0.2:
            cv2.circle(cvmat, center=(int(_x*4*scale_x), int(_y*4*scale_y)), color=(0, 0, 255), radius=5)
    return cvmat


def create_ort_session(onnx_model):
    global ort_session
    ort_session = onnxruntime.InferenceSession(onnx_model)


def run_inference(image_path):
    image = load_image(image_path)
    image = image[np.newaxis, :, :, :]
    ort_inputs = {ort_session.get_inputs()[0].name: image.astype('float32')}
    ort_outs = ort_session.run(None, ort_inputs)
    ort_kps = post_process_heatmap(ort_outs[0][0, :, :, :])
    return ort_kps


if __name__ == '__main__':
    x_scale = WIDTH/SIZE
    y_scale = HEIGHT/SIZE
    model_path = 'pdkp.onnx'
    image_path = 'test.jpeg'
    create_ort_session(model_path)
    ori_image = cv2.imread(image_path)
    ori_image = cv2.resize(ori_image, (SIZE, SIZE))
    image = ori_image[:, :, ::-1]
    ort_kps = run_inference(image)
    ori_image = cv2.resize(ori_image, (HEIGHT, WIDTH))
    img = render_kps(ori_image, ort_kps, y_scale, x_scale)
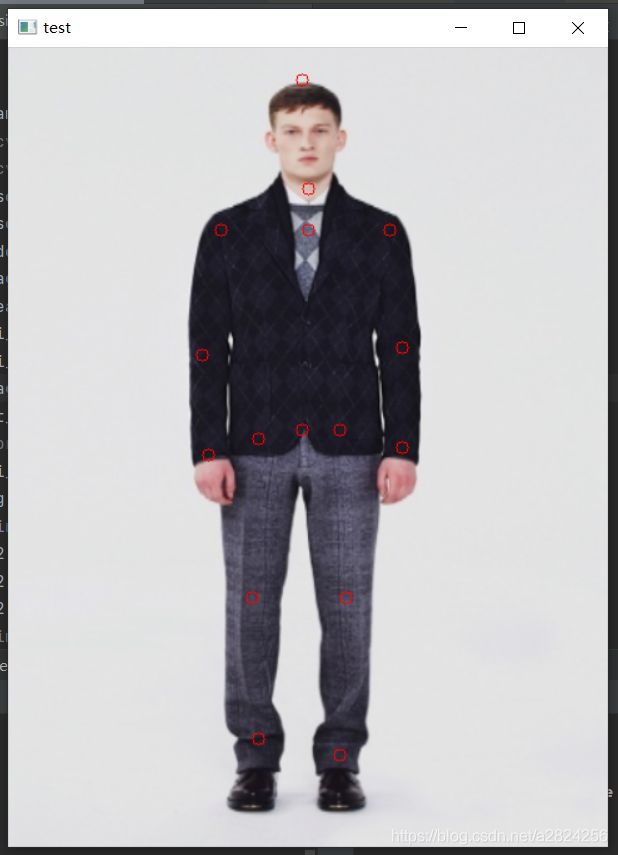
    cv2.imshow('test', img)
    cv2.waitKey(5000)
    cv2.destroyAllWindows()
