人脸矫正方案收集
说明
自己最近在嵌入式上用到了人脸检测和人脸对齐和矫正。这里收集下最近接触的一些方案。
人脸识别的流程
人脸识别通常是人脸检测、人脸对齐、人脸矫正和人脸特征提取的组合。
有些地方把人脸对齐的概念当成是“关键点检测+人脸矫正”,或者当成人脸矫正。我这里把人脸对齐当成关键点检测,和人脸矫正区分开。
人脸矫正
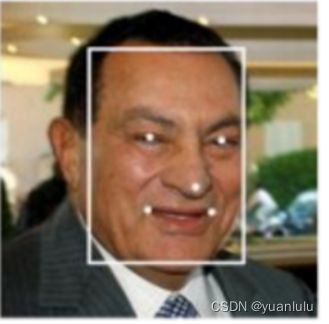
通常在进行人脸检测的时候会同时输出人脸关键点。比如mtcnn就会输出五个关键点。
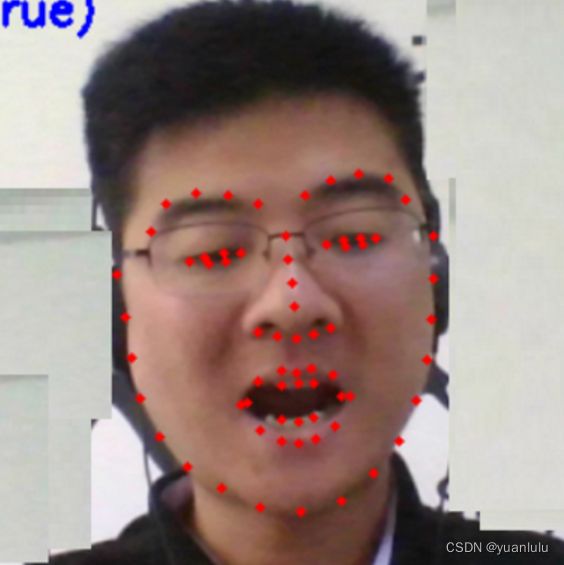
也可以在人脸检测后使用功能专门的模型检测更多关键点。比较出名的就是dlib用到的68点布局:
我们注意到,人脸往往是倾斜的,所以为了能够减少人脸姿势对提取特征的影响,需要将图片进行仿射变换,让人脸尽量接近正面镜头的效果。
人脸矫正的工作就是利用前面得到关键点计算人脸的倾斜,将之转换到一个比较正的角度。
简单的矫正:旋转图片使两只眼睛在同一水平线上
最简单的矫正,就是以眉心为中心点,计算两只眼睛与水平线的夹角,旋转图片使两只眼睛在同一水平线上。参考资料里的《【人脸】人脸检测与对齐python实现》就是这种实现方式。
我从另外一个地方https://github.com/YunYang1994/face_recognition/blob/0fb70eb5c5a7e8138d03ad036ea6485fcb7c63d5/utils.py摘抄了一段更简洁的代码:
def align_face(image, keypoints, scale=1.0):
    eye_center = (
            (keypoints['left_eye'][0] + keypoints['right_eye'][0]) * 0.5,
            (keypoints['left_eye'][1] + keypoints['right_eye'][1]) * 0.5,
            )
    dx = keypoints['right_eye'][0] - keypoints['left_eye'][0]
    dy = keypoints['right_eye'][1] - keypoints['left_eye'][1]

    angle = cv2.fastAtan2(dy, dx)
    rot_matrix = cv2.getRotationMatrix2D(eye_center, angle, scale=scale)
    rot_image = cv2.warpAffine(image, rot_matrix, dsize=(image.shape[1], image.shape[0]))
    return rot_image
上述代码先用getRotationMatrix2D计算了一个仿射变换矩阵参数,然后使用warpAffine进行了仿射变换。
五点仿射变换
只让眼睛水平的话,另外3个点的信息就用不到,浪费了。我们也可以通过计算和标准五点坐标的差异得到仿射变换矩阵参数,最后仿射变换为接近标准五点的图片。
https://github.com/TreB1eN/InsightFace_Pytorch/blob/master/mtcnn_pytorch/get_aligned_face_from_mtcnn.ipynb就利用mtcnn的五个关键点讲解了5点仿射变换的思路。
上述代码是python的,参考资料里的《根据人脸关键点做人脸对齐face alignment----C++实现》提供给了cpp的实现。里面的的核心代码位于FaceProprocess.h, 这个代码来自:https://raw.githubusercontent.com/deepinsight/insightface/master/cpp-align/FacePreprocess.h
ncnn的五点人脸矫正
ncnn也提供了5点人脸矫正的方案
// 计算变换矩阵 并且求逆变换
int type = 0;       // 0->区域外填充为v[0],v[1],v[2], -233->区域外不处理
unsigned int v = 0;
float tm[6];
float tm_inv[6];
// 人脸区域在原图上的坐标和宽高
float src_x = target->det.rect.x / target->det.w * pIveImageU8C3->u32Width;
float src_y = target->det.rect.y / target->det.h * pIveImageU8C3->u32Height;
float src_w = target->det.rect.w / target->det.w * pIveImageU8C3->u32Width;
float src_h = target->det.rect.h / target->det.h * pIveImageU8C3->u32Height;
float point_src[10] = {
src_x + src_w * target->attr.land[0][0], src_x + src_w * target->attr.land[0][1],
src_x + src_w * target->attr.land[1][0], src_x + src_w * target->attr.land[1][1],
src_x + src_w * target->attr.land[2][0], src_x + src_w * target->attr.land[2][1],
src_x + src_w * target->attr.land[3][0], src_x + src_w * target->attr.land[3][1],
src_x + src_w * target->attr.land[4][0], src_x + src_w * target->attr.land[4][1],
};
float point_dst[10] = { // +8 是因为我们处理112*112的图
30.2946f + 8.0f, 51.6963f,
65.5318f + 8.0f, 51.5014f,
48.0252f + 8.0f, 71.7366f,
33.5493f + 8.0f, 92.3655f,
62.7299f + 8.0f, 92.2041f,
};
// 第一种方式:先计算变换在求逆
AffineTrans::get_affine_transform(point_src, point_dst, 5, tm);
AffineTrans::invert_affine_transform(tm, tm_inv);
// 第二种方式:直接拿到求逆的结果
// AffineTrans::get_affine_transform(point_dst, point_src, 5, tm_inv);
// rgb 分离的,所以要单独处理
for(int c = 0; c < 3; c++)
{
    unsigned char* pSrc = malloc(xxx);
    unsigned char* pDst = malloc(xxx);
    ncnn::warpaffine_bilinear_c1(pSrc, SrcWidth, SrcHeight, SrcStride[c], pDst, DstWidth, DstHeight, DstStride[c], tm_inv, type, v);
}
// rgb packed则可以一次处理
ncnn::warpaffine_bilinear_c3(pSrc, SrcWidth, SrcHeight, SrcStride, pDst, DstWidth, DstHeight, DstStride, tm_inv, type, v);
更多点的对齐
如果能得到人脸的68个关键点,自然也可可以用68个关键点和标准模型进行对齐来矫正人脸。
参考资料
【人脸】人脸检测与对齐python实现
人脸对齐与仿射变换
根据人脸关键点做人脸对齐face alignment----C++实现
人脸对齐过程实现 c++和python