DETR:Transformer的目标检测(detection)- Demo
DETR:Transformer的目标检测
Transformer是一个基于自注意力机制的深度学习模型,它的经典结构:encoder-decoder。前几年该模型在NLP领域有非常好的应用,最近查阅论文时发现Transformer逐渐在CV方向发力,ViT (Vision Transformer)的提出更是添了一把火,今天就来简单了解一下DETR。
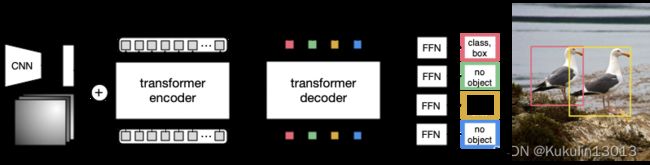
DETR结构

注:上图来源于开源项目DETR开源链接
这里可以看到,网络的提取部分还是ResNet,不同于ViT,ViT的特征提取使用的也是ransformer。
Demo
这里我们参考Github的开源项目DETR开源链接实现一个预测Demo来进一步了解DETR。
首先,下载anaconda,利用conda创建一个虚拟环境,安装pytorch==1.5.1和torchvision==0.6.1。具体过程如下:
# win+R cmd 回车打开命令行 创建conda虚拟环境
conda create -n your_env_name python=3.6 # 我的虚拟环境名称是:detr python版本最好写3.6或者3.7
# 进入虚拟环境
conda activate detr # 可以看到命令行最前面有(detr) C:\Users\username>
# 安装pytorch和torchvision,这里可以使用 conda install,但是推荐使用 pip install,这样该第三方库就只安装在这个环境下,虽然 conda install 更易于管理,其他环境都能使用,但是这里我只是想运行一个Demo,为了防止对其他环境产生影响,就直接 pip 了
pip install torch==1.5.1 torchvision==0.6.1 -f https://download.pytorch.org/whl/torch_stable.html # 从pytorch官网上下载,其他源里可能最低的pytorch版本都是1.7.0
# 安装requests和matplotlib Demo所需第三方库
pip install requests
pip install matplotlib
# 安装ipykernel 我们需要使用jupyter notebook来实现Demo,所以需要将detr虚拟环境添加到jupyter notebook中
pip install ipykernel
python -m ipykernel install --name=detr # 添加detr 出现 Installed kernel detr 就表示添加成功
# 注意 以上以及以下所有步骤都是在detr环境下进行
# 打开jupyter notebook
jupyter notebook #直接输入
环境安装完成,接下来在notebook中新建一个.ipynb,Demo就是在这个文件中实现,这里实现的detr稍有不同,其将positional encoding直接输入减少计算,过程如下图:
注:上图来源于开源项目DETR开源链接
首先将需要用到的库导入:
from PIL import Image
import requests
import matplotlib.pyplot as plt
%config InlineBackend.figure_format = 'retina'

import torch
from torch import nn
from torchvision.models import resnet50
import torchvision.transforms as T
torch.set_grad_enabled(False);
然后定义DETR网络结构
class DETRdemo(nn.Module):
    """
    Demo DETR implementation.

    Demo implementation of DETR in minimal number of lines, with the
    following differences wrt DETR in the paper:
    * learned positional encoding (instead of sine)
    * positional encoding is passed at input (instead of attention)
    * fc bbox predictor (instead of MLP)
    The model achieves ~40 AP on COCO val5k and runs at ~28 FPS on Tesla V100.
    Only batch size 1 supported.
    """
    def __init__(self, num_classes, hidden_dim=256, nheads=8,
                 num_encoder_layers=6, num_decoder_layers=6):
        super().__init__()

        # create ResNet-50 backbone
        self.backbone = resnet50()
        del self.backbone.fc

        # create conversion layer
        self.conv = nn.Conv2d(2048, hidden_dim, 1)

        # create a default PyTorch transformer
        self.transformer = nn.Transformer(
            hidden_dim, nheads, num_encoder_layers, num_decoder_layers)

        # prediction heads, one extra class for predicting non-empty slots
        # note that in baseline DETR linear_bbox layer is 3-layer MLP
        self.linear_class = nn.Linear(hidden_dim, num_classes + 1)
        self.linear_bbox = nn.Linear(hidden_dim, 4)

        # output positional encodings (object queries)
        self.query_pos = nn.Parameter(torch.rand(100, hidden_dim))

        # spatial positional encodings
        # note that in baseline DETR we use sine positional encodings
        self.row_embed = nn.Parameter(torch.rand(50, hidden_dim // 2))
        self.col_embed = nn.Parameter(torch.rand(50, hidden_dim // 2))

    def forward(self, inputs):
        # propagate inputs through ResNet-50 up to avg-pool layer
        x = self.backbone.conv1(inputs)
        x = self.backbone.bn1(x)
        x = self.backbone.relu(x)
        x = self.backbone.maxpool(x)

        x = self.backbone.layer1(x)
        x = self.backbone.layer2(x)
        x = self.backbone.layer3(x)
        x = self.backbone.layer4(x)

        # convert from 2048 to 256 feature planes for the transformer
        h = self.conv(x)

        # construct positional encodings
        H, W = h.shape[-2:]
        pos = torch.cat([
            self.col_embed[:W].unsqueeze(0).repeat(H, 1, 1),
            self.row_embed[:H].unsqueeze(1).repeat(1, W, 1),
        ], dim=-1).flatten(0, 1).unsqueeze(1)

        # propagate through the transformer
        h = self.transformer(pos + 0.1 * h.flatten(2).permute(2, 0, 1),
                             self.query_pos.unsqueeze(1)).transpose(0, 1)

        # finally project transformer outputs to class labels and bounding boxes
        return {'pred_logits': self.linear_class(h),
                'pred_boxes': self.linear_bbox(h).sigmoid()}
接着定义一下先验框以及类别数和可视化参数
# COCO classes
CLASSES = [
    'N/A', 'person', 'bicycle', 'car', 'motorcycle', 'airplane', 'bus',
    'train', 'truck', 'boat', 'traffic light', 'fire hydrant', 'N/A',
    'stop sign', 'parking meter', 'bench', 'bird', 'cat', 'dog', 'horse',
    'sheep', 'cow', 'elephant', 'bear', 'zebra', 'giraffe', 'N/A', 'backpack',
    'umbrella', 'N/A', 'N/A', 'handbag', 'tie', 'suitcase', 'frisbee', 'skis',
    'snowboard', 'sports ball', 'kite', 'baseball bat', 'baseball glove',
    'skateboard', 'surfboard', 'tennis racket', 'bottle', 'N/A', 'wine glass',
    'cup', 'fork', 'knife', 'spoon', 'bowl', 'banana', 'apple', 'sandwich',
    'orange', 'broccoli', 'carrot', 'hot dog', 'pizza', 'donut', 'cake',
    'chair', 'couch', 'potted plant', 'bed', 'N/A', 'dining table', 'N/A',
    'N/A', 'toilet', 'N/A', 'tv', 'laptop', 'mouse', 'remote', 'keyboard',
    'cell phone', 'microwave', 'oven', 'toaster', 'sink', 'refrigerator', 'N/A',
    'book', 'clock', 'vase', 'scissors', 'teddy bear', 'hair drier',
    'toothbrush'
]

# colors for visualization
COLORS = [[0.000, 0.447, 0.741], [0.850, 0.325, 0.098], [0.929, 0.694, 0.125],
          [0.494, 0.184, 0.556], [0.466, 0.674, 0.188], [0.301, 0.745, 0.933]]
# standard PyTorch mean-std input image normalization
transform = T.Compose([
    T.Resize(800),
    T.ToTensor(),
    T.Normalize([0.485, 0.456, 0.406], [0.229, 0.224, 0.225])
])

# for output bounding box post-processing
def box_cxcywh_to_xyxy(x):
    x_c, y_c, w, h = x.unbind(1)
    b = [(x_c - 0.5 * w), (y_c - 0.5 * h),
         (x_c + 0.5 * w), (y_c + 0.5 * h)]
    return torch.stack(b, dim=1)

def rescale_bboxes(out_bbox, size):
    img_w, img_h = size
    b = box_cxcywh_to_xyxy(out_bbox)
    b = b * torch.tensor([img_w, img_h, img_w, img_h], dtype=torch.float32)
    return b
然后封装检测器
def detect(im, model, transform):
    # mean-std normalize the input image (batch-size: 1)
    img = transform(im).unsqueeze(0)

    # demo model only support by default images with aspect ratio between 0.5 and 2
    # if you want to use images with an aspect ratio outside this range
    # rescale your image so that the maximum size is at most 1333 for best results
    assert img.shape[-2] <= 1600 and img.shape[-1] <= 1600, 'demo model only supports images up to 1600 pixels on each side'

    # propagate through the model
    outputs = model(img)

    # keep only predictions with 0.7+ confidence
    probas = outputs['pred_logits'].softmax(-1)[0, :, :-1]
    keep = probas.max(-1).values > 0.7

    # convert boxes from [0; 1] to image scales
    bboxes_scaled = rescale_bboxes(outputs['pred_boxes'][0, keep], im.size)
    return probas[keep], bboxes_scaled
最后执行实例检测
url = "C:/Users/username/Desktop/1.jpg"
im = Image.open(url)
scores, boxes = detect(im, detr, transform)
def plot_results(pil_img, prob, boxes):
plt.figure(figsize=(16,10))
plt.imshow(pil_img)
ax = plt.gca()
for p, (xmin, ymin, xmax, ymax), c in zip(prob, boxes.tolist(), COLORS * 100):
ax.add_patch(plt.Rectangle((xmin, ymin), xmax - xmin, ymax - ymin,
fill=False, color=c, linewidth=3))
cl = p.argmax()
text = f'{CLASSES[cl]}: {p[cl]:0.2f}'
ax.text(xmin, ymin, text, fontsize=15,
bbox=dict(facecolor='yellow', alpha=0.5))
plt.axis('off')
plt.show()
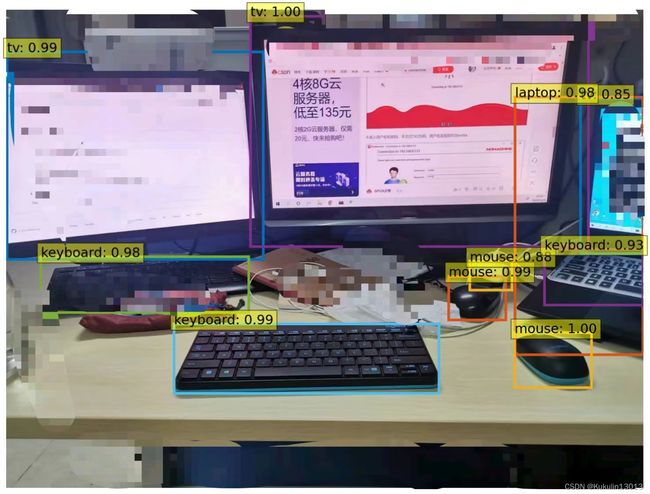
plot_results(im, scores, boxes)
结果为:(图像部分区域涉及个人信息打了马赛克)
声明:文中所有代码以及部分图片据来自于开源项目DETR开源链接,文中已标注
本节到此结束,主要动手做了Demo的实现,接下来会更加深入学习DETR