PyQT QTableView实现数据库增删改查(CRUD)操作的可视化
PyQT 提供了模型/视图 (Model/View)编程模式 并提供了相应的实现类 QTableView 与QSqlTableModel,以可视化的方式对数据库进行操作。
可以理解为:
Model层从View层分离出来,Model层负责直接操作数据库。 View视图层负责显示数据,以及管理业务逻辑。 同时还提供了delegate类用于渲染单元格
本文将实现1个Model/View架构的实例,实现对数据库的增删改查。

下面用实例来演示这一实现过程。
1、准备测试数据库
为了方便,提供如下脚本创建数据库,并插入测试记录
# 用于向数据库表插入数据
import sys
from PyQt5.QtSql import *

# Create the connection
con = QSqlDatabase.addDatabase("QSQLITE")
con.setDatabaseName("./contacts.sqlite")

# Open the connection
if not con.open():
    print("Database Error: %s" % con.lastError().databaseText())
    sys.exit(1)

# Create a query and execute it right away using .exec()
createTableQuery = QSqlQuery()
createTableQuery.exec(
    """
    CREATE TABLE contacts (
        id INTEGER PRIMARY KEY AUTOINCREMENT UNIQUE NOT NULL,
        name VARCHAR(40) NOT NULL,
        job VARCHAR(50),
        email VARCHAR(40) NOT NULL
    )
    """
)
print(con.tables())

# Creating a query for later execution using .prepare()
insertDataQuery = QSqlQuery()
insertDataQuery.prepare(
    """
    INSERT INTO contacts (
        name,
        job,
        email
    )
    VALUES (?, ?, ?)
    """
)
# Sample data, you can replace data with yours
data = [
    ("王小乙", "Senior Web Developer", "[email protected]"),
    ("Lara", "Project Manager", "[email protected]"),
    ("David", "Data Analyst", "[email protected]"),
    ("Jane", "Senior Python Developer", "[email protected]"),
]

# Use .addBindValue() to insert data
for name, job, email in data:
    insertDataQuery.addBindValue(name)
    insertDataQuery.addBindValue(job)
    insertDataQuery.addBindValue(email)
    insertDataQuery.exec()

query = QSqlQuery()
query.exec("select * from contacts")
while query.next():
    print(query.value(0), query.value(1), query.value(2))

print(query.finish())
con.close()
2、创建model对象,并连接至数据库
PyQT提供了QSqlDatabase类负责数据库连接,其封闭了多种数据库连接API, 所以推荐使用。
与 QAbstractTableModel 比较,你不需要实现繁琐的data()方法等,QSqlDatabase已经帮我们封装好了,开箱即用。
mydb = QSqlDatabase.addDatabase("QSQLITE")
mydb.setDatabaseName('./contacts.sqlite')  #设置数据名称
mydb.open()
self.model= QSqlTableModel(None,mydb)
# self.model.database() 也会返回QSqlDatabase对象
self.model.setTable(‘contacts’)  # 设置相关表
数据也可以是MySql, PostGreSQL 等, 如下,需要设置更多的参数,
db = QSqlDatabase.addDatabase("QMYSQL")
db.setHostName("localhost")
db.setDatabaseName("customdb")
db.setUserName("root")
db.setPassword("123456")
db.open()
按面向对象的方式,创建1个ContactsModel类,并提供添加,删除,查询等方法
# 文件名: mv_contact_db_model.py
from PyQt5.QtCore import Qt
from PyQt5.QtSql import *
from PyQt5.QtWidgets import QMessageBox

class ContactsModel:
    def __init__(self):

        """Create and set up the model."""
        mydb = QSqlDatabase.addDatabase("QSQLITE")
        mydb.setDatabaseName('./contacts.sqlite')
        if not mydb.open():
            QMessageBox.critical(
            None,
            "QTableModel Example - Error!",
            "Database Error: %s" % mydb.lastError().databaseText(),
            )
        self.model = QSqlTableModel(None, mydb)
        self.model.setTable("contacts")  # 选择表名
        self.model.setEditStrategy(QSqlTableModel.OnFieldChange)
        self.model.select()    # 相当于执行select语句,把数据读入model
        headers = ("ID", "姓名", "工作岗位", "邮箱")
        for columnIndex, header in enumerate(headers):
            self.model.setHeaderData(columnIndex, Qt.Horizontal, header)


    def addContact(self, data):
        """Add a contact to the database."""
        rows = self.model.rowCount()
        self.model.insertRows(rows, 1)
        for column, field in enumerate(data):
            self.model.setData(self.model.index(rows, column + 1), field)
        self.model.submitAll()
        self.model.select()

    def deleteContact(self, row):
        """Remove a contact from the database."""
        self.model.removeRow(row)
        self.model.submitAll()
        self.model.select()

    def queryContact(self,condition):
        """ query contacts with condition to name field"""
        self.model.setFilter(condition)
        self.model.select()
3. QTableView 绑定 Model ,提供可视化界面
QTableView通过 setModel()方法绑定 model.
        self.view = QTableView()
        self.view.setModel(self.ContactsModel.model)
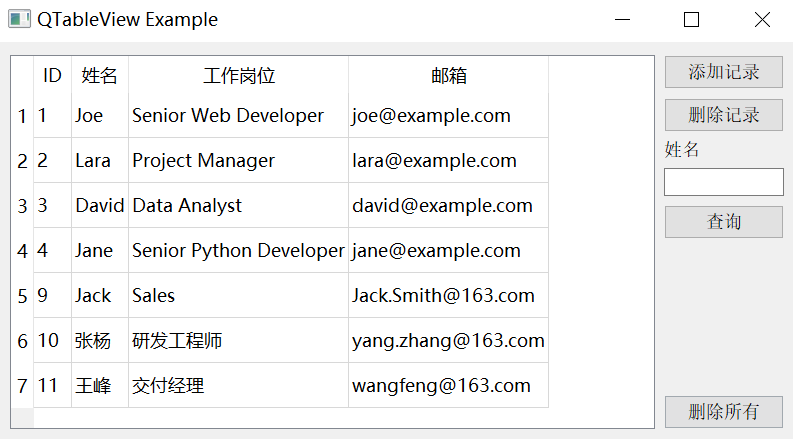
本例的主窗口布局,除了TableView,还提供了添加、删除记录的按钮,查询条件输入框等。
单击添加记录按钮后,会弹出1个新记录输入对话框。
下面是实现的完整代码。
# 文件名: mv_contact.py
import sys
from PyQt5.QtCore import Qt
from PyQt5.QtSql import QSqlDatabase, QSqlTableModel
from PyQt5.QtWidgets import *
from mv_contact_db_model import ContactsModel

class AddDialog(QDialog):
    """Add Contact dialog."""
    def __init__(self, parent=None):
        """Initializer."""
        super().__init__(parent=parent)
        self.setWindowTitle("Add Contact")
        self.vbox = QVBoxLayout()
        self.setLayout(self.vbox)
        self.data = None

        self.setupUI()

    def setupUI(self):
        """Setup the Add Contact dialog's GUI."""
        # Create line edits for data fields
        self.nameField = QLineEdit()
        self.nameField.setObjectName("Name")
        self.jobField = QLineEdit()
        self.jobField.setObjectName("Job")
        self.emailField = QLineEdit()
        self.emailField.setObjectName("Email")
        # Lay out the data fields
        layout = QFormLayout()
        layout.addRow("Name:", self.nameField)
        layout.addRow("Job:", self.jobField)
        layout.addRow("Email:", self.emailField)
        self.vbox.addLayout(layout)
        # Add standard buttons to the dialog and connect them
        self.buttonsBox = QDialogButtonBox(self)
        self.buttonsBox.setOrientation(Qt.Horizontal)
        self.buttonsBox.setStandardButtons(
            QDialogButtonBox.Ok | QDialogButtonBox.Cancel
        )
        self.buttonsBox.accepted.connect(self.accept)
        self.buttonsBox.rejected.connect(self.reject)
        self.vbox.addWidget(self.buttonsBox)

    def accept(self):
        """Accept the data provided through the dialog."""
        self.data = []
        for field in (self.nameField, self.jobField, self.emailField):
            if not field.text():
                QMessageBox.critical(
                    self,
                    "Error!",
                    f"You must provide a contact's {field.objectName()}",
                )
                self.data = None  # Reset .data
                return

            self.data.append(field.text())

        if not self.data:
            return

        super().accept()

class MyWin(QMainWindow):
    def __init__(self, parent=None):
        super(MyWin,self).__init__()
        self.setWindowTitle("QTableView Example")
        self.resize(800, 400)

        # Set up the model
        self.ContactsModel = ContactsModel()

        # Set up the view
        self.view = QTableView()
        self.view.setModel(self.ContactsModel.model)
        self.view.resizeColumnsToContents()
        self.view.setSelectionBehavior(QAbstractItemView.SelectRows)

        # Create buttons
        self.addButton = QPushButton("添加记录")
        self.addButton.clicked.connect(self.openAddDialog)
        self.deleteButton = QPushButton("删除记录")
        self.deleteButton.clicked.connect(self.deleteContact)
        self.clearAllButton = QPushButton("删除所有")
        self.clearAllButton.clicked.connect(self.deleteAll)

        # Search
        self.formlayout = QFormLayout(self)
        self.qry_input_name = QLineEdit()
        self.qry_input_name.setMaximumWidth(120)
        self.button_search = QPushButton("查询",self)
        self.button_search.setCheckable(True)
        self.button_search.clicked.connect(self.queryContact)

        # 布局
        self.mywidget = QWidget()
        self.setCentralWidget(self.mywidget)
        hbox = QHBoxLayout(self.mywidget)
        vbox = QVBoxLayout(self.mywidget)
        vbox.addWidget(self.addButton)
        vbox.addWidget(self.deleteButton)
        vbox.addWidget(QLabel("姓名"))
        vbox.addWidget(self.qry_input_name)
        # vbox.addLayout(self.formlayout)
        vbox.addWidget(self.button_search)

        vbox.addStretch()
        vbox.addWidget(self.clearAllButton)

        hbox.addWidget(self.view)
        hbox.addLayout(vbox)

        self.mywidget.setLayout(hbox)


    def openAddDialog(self):
        """Open the Add Contact dialog."""
        dialog = AddDialog(self)
        if dialog.exec() == QDialog.Accepted:
            self.ContactsModel.addContact(dialog.data)
            self.view.resizeColumnsToContents()

    def deleteContact(self):
        """Delete the selected contact from the database."""
        row = self.view.currentIndex().row()
        if row < 0:
            return
        messageBox = QMessageBox.warning(
            self,
            "Warning!",
            "Do you want to remove the selected contact?",
            QMessageBox.Ok | QMessageBox.Cancel,
        )

        if messageBox == QMessageBox.Ok:
            self.ContactsModel.deleteContact(row)
    def deleteAll(self):
        """delete all records in the contacts table"""
        QMessageBox.warning(
            self,
            "Info!",
            "暂时不支持清除全部记录",
            QMessageBox.Ok,
        )

    def queryContact(self,checked):
        """Prepare query condition, call query method of ContactsModel"""
        print("checled status: ",checked)
        if checked:
            self.button_search.setText("取消查询")
            input = self.qry_input_name.text()
            query = f"name like '%{input}%'"
        else:
            query = f"name like '%%'"
            self.button_search.setText("查询")
            self.qry_input_name.setText('')
        # call ContactsModel's query method
        self.ContactsModel.queryContact(query)


app = QApplication(sys.argv)
win = MyWin()
win.show()
sys.exit(app.exec_())
4. 可视化显示有外键的数据库表
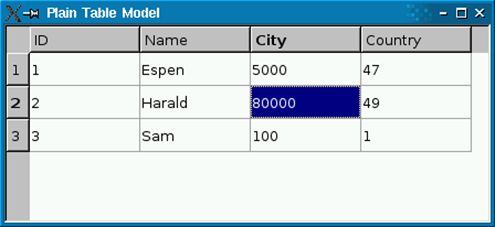
如下表, city, country两字段是foreign key字段,QSqlTableModel 对外键表默认只提供 id 字段 
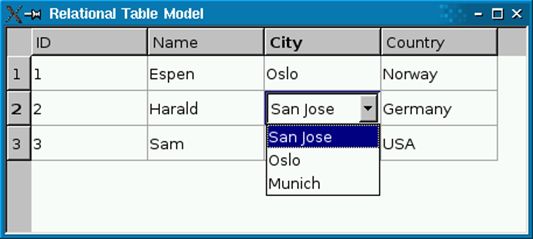
如何显示成如格式,也就是显示外键表的名字而不是id
使用 QSqlRelationalTableModel模型类, 用setRelation()方法来建立表间关系
mode = QSqlRelationalTableModel()
model.setTable("employee")
model.setRelation(2, QSqlRelation("city", "id", "name"))
model.setRelation(3, QSqlRelation("country", "id", "name"))
model.setRelation(2, QSqlRelation("city", "id", "name"))
表示第2列是foreign key, 使用city 表, 显示内容由 city.id更换为city.name。
接下来,如果需要编辑外键字段,即将city, country列变成下拉列表,从外键表中选择已存在的值,如何实现呢?
在该单元格使用QSqlRelationalDelegate 类。 实现代码如下:
view =  QTableView()
view.setModel(model)
view.setItemDelegate(QSqlRelationalDelegate(view))
总结
使用 QTableView 以及 QSqlDatabase 可视化访问数据库,这两个类帮助开发者隐藏很多细节,使用简单,开发效率高。
如果需要对外观进行美化,可以采用delegate进行渲染单元格,用stylesheet来渲染QT窗口与控件。
