APM性能监控
改不完的 Bug,写不完的矫情。公众号 杨正友 现在专注移动基础开发 ,涵盖音视频和 APM,信息安全等各个知识领域;只做全网最 Geek 的公众号,欢迎您的关注!
APM 简要介绍
APM 全称 Application Performance Management & Monitoring (应用性能管理/监控)
性能问题是导致 App 用户流失的罪魁祸首之一,如果用户在使用我们 App 的时候遇到诸如页面卡顿、响应速度慢、发热严重、流量电量消耗大等问题的时候,很可能就会卸载掉我们的 App。这也是我们在目前工作中面临的巨大挑战之一,尤其是低端机型。
商业化的 APM 平台:著名的 NewRelic,还有国内的听云、OneAPM 、阿里百川-码力 APM 的 SDK、百度的 APM 收费产品等等。
APM 工作方式:
- 首先在客户端(Android、iOS、Web 等)采集数据;
- 接着将采集到的数据整理上报到服务器(多种方式 json、xml,上传策略等等);
- 服务器接收到数据后建模、存储、挖掘分析,让后将数据进行可视化展示(spark+flink),供用户使用。
 image-20190914180724597
(图片来自 百度 APM 产品介绍https://cloud.baidu.com/product/apm.html)
那么移动端需要做的事情就是:
- 双端统一原则(技术选型 NDK c++)
- 数据采集 (采集指标、细化等等)
- 数据存储(写文件?mmap、fileIO 流)
- 数据上报(上报策略、上报方式)
那我们到底应该怎么做?一定要学会看开源的东西。让我们先看看大厂的开源怎么做的?我们在自己造轮子,完成自己的 APM 采集框架。
目前核心开源 APM 框架产品
- 腾讯 https://github.com/Tencent/matrix
- 360 https://github.com/Qihoo360/ArgusAPM
- 滴滴 https://github.com/didi/booster
你会发现自定义 Gradle 插件技术、ASM 技术、打包流程 Hook、Android 打包流程等。那思考一下,为什么大家做的主要的流程都是一样的,不一样的是具体的实现细节,比如如何插桩采集到页面帧率、流量、耗电量、GC log 等等。
ArgusAPM 性能监控平台介绍&SDK 开源-卜云涛.pdf
我们先简单来看下在 matrix 中,如何利用 Java Hook 和 Native Hook 完成 IO 磁盘性能的监控?
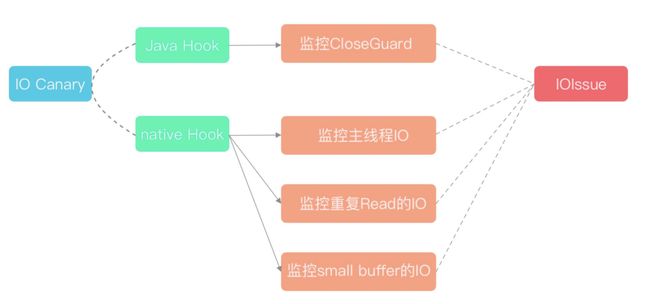 image-20190914182546349
Java Hook 的 hook 点是系统类CloseGuard,hook 的方式是使用动态代理。
https://github.com/Tencent/matrix/blob/b83c481938b21c0080540d0c2babb04caa5e72c9/matrix/matrix-android/matrix-io-canary/src/main/java/com/tencent/matrix/iocanary/detect/CloseGuardHooker.java#L74
private boolean tryHook() {
        try {
            Class closeGuardCls = Class.forName("dalvik.system.CloseGuard");
            Class closeGuardReporterCls = Class.forName("dalvik.system.CloseGuard$Reporter");
            Method methodGetReporter = closeGuardCls.getDeclaredMethod("getReporter");
            Method methodSetReporter = closeGuardCls.getDeclaredMethod("setReporter", closeGuardReporterCls);
            Method methodSetEnabled = closeGuardCls.getDeclaredMethod("setEnabled", boolean.class);

            sOriginalReporter = methodGetReporter.invoke(null);

            methodSetEnabled.invoke(null, true);

            // open matrix close guard also
            MatrixCloseGuard.setEnabled(true);

            ClassLoader classLoader = closeGuardReporterCls.getClassLoader();
            if (classLoader == null) {
                return false;
            }

            methodSetReporter.invoke(null, Proxy.newProxyInstance(classLoader,
                new Class[]{closeGuardReporterCls},
                new IOCloseLeakDetector(issueListener, sOriginalReporter)));

            return true;
        } catch (Throwable e) {
            MatrixLog.e(TAG, "tryHook exp=%s", e);
        }

        return false;
    }
这里的 CloseGuard 有啥用?为什么腾讯的人要 hook 这个。这个在后续的分线中我们在来详细的说。如果要解决这个疑问,做好的办法就是看源码。(==系统埋点方式,监控系统资源的异常回收==)
关于 native hook:
Native Hook 是采用 PLT(GOT) Hook 的方式 hook 了系统 so 中的 IO 相关的open、read、write、close方法。在代理了这些系统方法后,Matrix 做了一些逻辑上的细分,从而检测出不同的 IO Issue。
https://github.com/Tencent/matrix/blob/b83c481938b21c0080540d0c2babb04caa5e72c9/matrix/matrix-android/matrix-io-canary/src/main/cpp/io_canary_jni.cc#L290
 JNIEXPORT jboolean JNICALL
        Java_com_tencent_matrix_iocanary_core_IOCanaryJniBridge_doHook(JNIEnv *env, jclass type) {
            __android_log_print(ANDROID_LOG_INFO, kTag, "doHook");

            for (int i = 0; i < TARGET_MODULE_COUNT; ++i) {
                const char* so_name = TARGET_MODULES[i];
                __android_log_print(ANDROID_LOG_INFO, kTag, "try to hook function in %s.", so_name);
        //打开so文件,并在内存中映射成ELF文件格式
                loaded_soinfo* soinfo = elfhook_open(so_name);
                if (!soinfo) {
                    __android_log_print(ANDROID_LOG_WARN, kTag, "Failure to open %s, try next.", so_name);
                    continue;
                }
        //替换open函数
                elfhook_replace(soinfo, "open", (void*)ProxyOpen, (void**)&original_open);
                elfhook_replace(soinfo, "open64", (void*)ProxyOpen64, (void**)&original_open64);

                bool is_libjavacore = (strstr(so_name, "libjavacore.so") != nullptr);
                if (is_libjavacore) {
                    if (!elfhook_replace(soinfo, "read", (void*)ProxyRead, (void**)&original_read)) {
                        __android_log_print(ANDROID_LOG_WARN, kTag, "doHook hook read failed, try __read_chk");
                        //http://refspecs.linux-foundation.org/LSB_4.1.0/LSB-Core-generic/LSB-Core-generic/libc---read-chk-1.html 类似于read()
                        if (!elfhook_replace(soinfo, "__read_chk", (void*)ProxyRead, (void**)&original_read)) {
                            __android_log_print(ANDROID_LOG_WARN, kTag, "doHook hook failed: __read_chk");
                            elfhook_close(soinfo);
                            return false;
                        }
                    }

                    if (!elfhook_replace(soinfo, "write", (void*)ProxyWrite, (void**)&original_write)) {
                        __android_log_print(ANDROID_LOG_WARN, kTag, "doHook hook write failed, try __write_chk");
                        if (!elfhook_replace(soinfo, "__write_chk", (void*)ProxyWrite, (void**)&original_write)) {
                            __android_log_print(ANDROID_LOG_WARN, kTag, "doHook hook failed: __write_chk");
                            elfhook_close(soinfo);
                            return false;
                        }
                    }
                }

                elfhook_replace(soinfo, "close", (void*)ProxyClose, (void**)&original_close);

                elfhook_close(soinfo);
            }

            return true;
        }
关于 transform api:
http://google.github.io/android-gradle-dsl/javadoc/2.1/com/android/build/api/transform/Transform.html
我们编译 Android 项目时,如果我们想拿到编译时产生的 Class 文件,并在生成 Dex 之前做一些处理,我们可以通过编写一个Transform来接收这些输入(编译产生的 Class 文件),并向已经产生的输入中添加一些东西。
 image-20190914185405607
如何使用的?
https://github.com/Tencent/matrix/blob/master/matrix/matrix-android/matrix-gradle-plugin/src/main/java/com/tencent/matrix/trace/transform/MatrixTraceTransform.java
- 编写一个自定义的
Transform - 注册一个 Plugin 完成或者在 gradle 文件中直接注册。
//MyCustomPlgin.groovy
public class MyCustomPlgin implements Plugin<Project> {

    @Override
    public void apply(Project project) {
        project.getExtensions().findByType(BaseExtension.class)
                .registerTransform(new MyCustomTransform());
    }
}
project.extensions.findByType(BaseExtension.class).registerTransform(new MyCustomTransform()); //在build.gradle中直接写
MatrixTraceTransform 利用编译期字节码插桩技术,优化了移动端的 FPS、卡顿、启动的检测手段。在打包过程中,hook 生成 Dex 的 Task 任务,添加方法插桩的逻辑。我们的 hook 点是在 Proguard 之后,Class 已经被混淆了,所以需要考虑类混淆的问题。
MatrixTraceTransform主要逻辑在transform方法中:
@Override
    public void transform(TransformInvocation transformInvocation) throws TransformException, InterruptedException, IOException {
        long start = System.currentTimeMillis()
        //是否增量编译
        final boolean isIncremental = transformInvocation.isIncremental() && this.isIncremental()
        //transform的结果,重定向输出到这个目录
        final File rootOutput = new File(project.matrix.output, "classes/${getName()}/")
        if (!rootOutput.exists()) {
            rootOutput.mkdirs()
        }
        final TraceBuildConfig traceConfig = initConfig()
        Log.i("Matrix." + getName(), "[transform] isIncremental:%s rootOutput:%s", isIncremental, rootOutput.getAbsolutePath())
        //获取Class混淆的mapping信息,存储到mappingCollector中
        final MappingCollector mappingCollector = new MappingCollector()
        File mappingFile = new File(traceConfig.getMappingPath());
        if (mappingFile.exists() && mappingFile.isFile()) {
            MappingReader mappingReader = new MappingReader(mappingFile);
            mappingReader.read(mappingCollector)
        }

        Map jarInputMap = new HashMap<>()
        Map scrInputMap = new HashMap<>()

        transformInvocation.inputs.each { TransformInput input ->
            input.directoryInputs.each { DirectoryInput dirInput ->
                //收集、重定向目录中的class
                collectAndIdentifyDir(scrInputMap, dirInput, rootOutput, isIncremental)
            }
            input.jarInputs.each { JarInput jarInput ->
                if (jarInput.getStatus() != Status.REMOVED) {
                    //收集、重定向jar包中的class
                    collectAndIdentifyJar(jarInputMap, scrInputMap, jarInput, rootOutput, isIncremental)
                }
            }
        }
        //收集需要插桩的方法信息,每个插桩信息封装成TraceMethod对象
        MethodCollector methodCollector = new MethodCollector(traceConfig, mappingCollector)
        HashMap collectedMethodMap = methodCollector.collect(scrInputMap.keySet().toList(), jarInputMap.keySet().toList())
       //执行插桩逻辑,在需要插桩方法的入口、出口添加MethodBeat的i/o逻辑
        MethodTracer methodTracer = new MethodTracer(traceConfig, collectedMethodMap, methodCollector.getCollectedClassExtendMap())
        methodTracer.trace(scrInputMap, jarInputMap)
        //执行原transform的逻辑;默认transformClassesWithDexBuilderForDebug这个task会将Class转换成Dex
        origTransform.transform(transformInvocation)
        Log.i("Matrix." + getName(), "[transform] cost time: %dms", System.currentTimeMillis() - start)
    }
看到这里了,我们是不是应该总结下 APM 的核心技术是什么?
大厂面试之一:APM 的核心技术是什么?做过自研的 APM 吗?
APM 核心原理一句话总结:
你掌握了 APM 的核心原理,也可以做 Android 的无痕埋点了,本质是一样的,不一样的是 Hook 的地方不一样。
APM 监控维度和指标
App 基础性能指标集中为 8 类:网络性能、崩溃、启动加载、内存、图片、页面渲染、IM 和 VoIP(业务相关性和你的 APP 相关)、用户行为监控,基础维度包括 App、系统平台、App 版本和时间维度。
网络性能
网络服务成功率,平均耗时和访问量、上下行的速率监控。访问的链接、耗时等等。思考怎么结合 okhttp 来做?
网络监控业务背景
在不确定哪个网络 url 耗时比较慢的情况下,做一个全链路网络监控体系,这个是我们值得深思的问题,这边使用 AspectJ 和利用 OKhttp 自身的 EventListener 对网络信息进行二次封装上报
网络监控实现步骤
第一步: 将我们需要监控的数据源转换成 Bundle 对象方便传输
public interface BundleMapping {
    /**
     * 转换数据结构为Bundle
     */
    Bundle asBundle();
}
第二步: 确定我们需要监控的字段
| 字段 | 字段含义 | 备注 |
|---|---|---|
| total | 总网络时间 | 调用结束时间 减去 请求开始时间 |
| pathname | 请求地址 | / |
| dns | dnsEndTime - dnsStartTime | DNS 查询结束时间 减去 DNS 查询开始时间 |
| protocol | 请求协议 | / |
| tcp | 连接结束时间 | 调用结束时间 减去 连接开始时间 |
| no_dns_tcp_tls | 总网络时间 | 调用结束时间 减去 请求开始时间 |
| tls | 总网络时间 | 调用结束时间 减去 请求开始时间 |
| no_response | 是否无响应内容(304 或返回 body 为空) | / |
| ttfb | ttfb 首字节时间 | 响应结束时间 减去 请求开始时间 |
| download | 总网络时间 | 响应结束时间 减去 响应开始时间 |
| pure_network | 总网络时间 | 响应结束时间 减去 响应开始时间 |
| transfer_size | 传输大小 | / |
| failed | 请求失败信息 | / |
public class NetWorkData implements BundleMapping {

    //请求地址
    String url;

    //请求协议
    String protocol;

    //请求开始时间
    long callStartTime;

    //响应开始时间
    long responseStartTime;

    //响应结束时间
    long responseEndTime;

    //DNS查询开始时间
    long dnsStartTime;

    //DNS查询结束时间
    long dnsEndTime;

    //连接开始时间
    long connectStartTime;

    //连接结束时间
    long connectEndTime;

    //是否同时重用DNS、TCP、TLS
    boolean isDnsTcpTls;

    //SSL 连接开始时间
    long secureConnectStartTime;

    //SSL 连接结束时间
    long secureConnectEndTime;

    //是否无响应内容(304或返回body为空)
    boolean isNoResponse;

    //调用结束时间
    long callEndTime;

    //请求失败信息
    String failMessage;

    //传输大小
    long byteCount;


    @Override
    public Bundle asBundle() {

        Bundle bundle = new Bundle();
        //总网络时间
        bundle.putLong("total", callEndTime - callStartTime);
        bundle.putString("pathname", url);
        //dns
        bundle.putLong("dns", dnsEndTime - dnsStartTime);
        bundle.putString("protocol", protocol);

        //tcp
        bundle.putLong("tcp", connectEndTime - connectStartTime);
        bundle.putBoolean("no_dns_tcp_tls", isDnsTcpTls);

        //tls
        bundle.putLong("tls", secureConnectEndTime - secureConnectStartTime);
        bundle.putBoolean("no_response", isNoResponse);

        //ttfb首字节时间
        bundle.putLong("ttfb", responseEndTime - callStartTime);
        //download
        bundle.putLong("download", responseEndTime - responseStartTime);
        //pure_network
        bundle.putLong("pure_network", responseEndTime - callStartTime);
        //transfer_size
        bundle.putLong("transfer_size", byteCount);

        //连接失败
        bundle.putString("failed", failMessage);
        return bundle;
    }
}
第三步: 添加我们需要上报的标记,根据不同的域名去区分
    /**
     * 获取上报Tag
     */
    String getDataTag() {
        String tag;
        if (url == null) {
            tag = "biz";
        } else {
            if (url.contains("microkibaco_report")) {
                tag = "data";
            } else if (url.contains("blog")) {
                tag = "blog";
            } else {
                tag = "github";
            }
        }
        return "network_api_" + tag;
    }
第五步: 添加沪江 aspectj 插件
classpath 'com.hujiang.aspectjx:gradle-android-plugin-aspectjx:2.0.6'
    implementation 'org.aspectj:aspectjrt:1.8.9'
    implementation "com.squareup.okhttp3:okhttp:3.12.1"
第六步: 给 OkHttp 添加事件监听
  @Keep
  public class MkOkHttpEventListener extends EventListener {

      private NetWorkData mNetWorkData;

      public static final Factory FACTORY = new Factory() {
          @Override
          public EventListener create(Call call) {
              return new MkOkHttpEventListener();
          }
      };

      /**
       * 每个请求都会构建
       */
      private MkOkHttpEventListener() {
          mNetWorkData = new NetWorkData();
      }

      @Override
      public void callStart(Call call) {
          mNetWorkData.url = call.request().url().toString();
          mNetWorkData.callStartTime = SystemClock.elapsedRealtime();
      }

      @Override
      public void connectStart(Call call, InetSocketAddress inetSocketAddress, Proxy proxy) {
          mNetWorkData.connectStartTime = SystemClock.elapsedRealtime();
      }

      @Override
      public void connectEnd(Call call, InetSocketAddress inetSocketAddress, Proxy proxy,
              Protocol protocol) {
          mNetWorkData.connectEndTime = SystemClock.elapsedRealtime();
      }

      @Override
      public void connectFailed(Call call, InetSocketAddress inetSocketAddress, Proxy proxy,
              Protocol protocol, IOException ioe) {
      }

      @Override
      public void dnsStart(Call call, String domainName) {
          mNetWorkData.dnsStartTime = SystemClock.elapsedRealtime();
      }

      @Override
      public void dnsEnd(Call call, String domainName, List inetAddressList) {
          mNetWorkData.dnsEndTime = SystemClock.elapsedRealtime();
      }

      @Override
      public void secureConnectStart(Call call) {
          mNetWorkData.secureConnectStartTime = SystemClock.elapsedRealtime();
      }

      @Override
      public void secureConnectEnd(Call call, Handshake handshake) {
          mNetWorkData.secureConnectEndTime = SystemClock.elapsedRealtime();
      }

      @Override
      public void responseHeadersStart(Call call) {
          mNetWorkData.responseStartTime = SystemClock.elapsedRealtime();
      }


      @Override
      public void responseHeadersEnd(Call call, Response response) {
          if (response.code() == 304) {
              mNetWorkData.isNoResponse = true;
          }
          mNetWorkData.protocol = response.protocol().toString();
          mNetWorkData.responseEndTime = SystemClock.elapsedRealtime();
      }

      @Override
      public void responseBodyEnd(Call call, long byteCount) {
          //响应为空
          if (byteCount == 0) {
              mNetWorkData.isNoResponse = true;
          }
          mNetWorkData.byteCount = byteCount;
      }

      @Override
      public void callEnd(Call call) {
          mNetWorkData.callEndTime = SystemClock.elapsedRealtime();

          //上报
          APM.getReportStrategy().report(mNetWorkData.getDataTag(), mNetWorkData.asBundle());
      }


      @Override
      public void callFailed(Call call, IOException ex) {
          mNetWorkData.failMessage = ex.getMessage();

          //上报
          APM.getReportStrategy().report(mNetWorkData.getDataTag(), mNetWorkData.asBundle());
      }


  }
Firebase 有一定的时效性,所以我们把日志全部采集到 Json 里面交给 Bundle 统一上报
崩溃
崩溃数据的采集和分析,类似于 Bugly 平台的功能
启动加载
App 的启动我们做了大的力气进行了优化,多线程等等, Spark 的有向无环图(DAG)来处理业务的依赖性。对 App 的冷启动时长、Android 安装后首次启动时长和 Android Bundle(atlas 框架)启动加载时长进行监控。
内存
四大监测目标:内存峰值、内存均值、内存抖动、内存泄露。
IM 和 VoIP 等业务指标
这两项都属于业务型技术指标的监控,例如对各类 IM 消息到达率和 VoIP 通话的成功率、平均耗时和请求量进行监控。这里需要根据自己的 APP 的业务进行针对性的梳理。
用户行为监控
用于 App 统计用户行为,实际上就是监控所有事件并把事件发送到服务上去。这在以前是埋点做的事情,现在也规整成 APM 需要做的事情,比如用户的访问路径,类似于 PC 时代的 PV,UV 等概念。
图片
资源文件的监测,比如 Bitmap 冗余处理。haha 库处理,索引值。
页面渲染
界面流畅性监测、FPS 的监测、慢函数监测、卡顿监测、文件 IO 开销监测等导致页面渲染的各种问题。
微信 Matrix 框架解析
整体分析
  Matrix.Builder builder = new Matrix.Builder(application); // build matrix
  builder.patchListener(new TestPluginListener(this)); // add general pluginListener
  DynamicConfigImplDemo dynamicConfig = new DynamicConfigImplDemo(); // dynamic config

  // init plugin
  IOCanaryPlugin ioCanaryPlugin = new IOCanaryPlugin(new IOConfig.Builder()
                    .dynamicConfig(dynamicConfig)
                    .build());
  //add to matrix
  builder.plugin(ioCanaryPlugin);

  //init matrix
  Matrix.init(builder.build());

  // start plugin
  ioCanaryPlugin.start();
整理的结构如下:
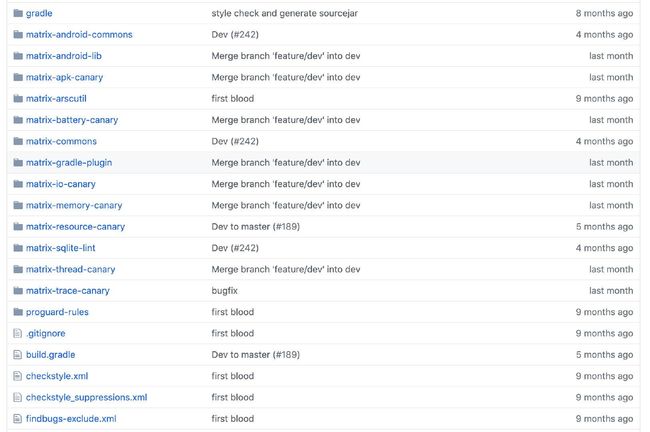 image-20190914200458489
核心功能:
Resource Canary:
   Activity 泄漏
   Bitmap 冗余
Trace Canary
   界面流畅性
   启动耗时
   页面切换耗时
   慢函数
   卡顿
SQLite Lint: 按官方最佳实践自动化检测 SQLite 语句的使用质量
IO Canary: 检测文件 IO 问题
   文件 IO 监控
   Closeable Leak 监控
整体架构分析:
matrix-android-lib
- Plugin 被定义为某种监控能力的抽象
- Issue 发生的某种被监控事件
- Report 一种观察者模式的实现,用于发现 Issue 时,通知观察者
- Matrix 单例模式的实现,暴漏给外部的接口
- matrix-config.xml 相关监控的配置项
- IDynamicConfig 开放给用户自定义的相关监控的配置项,其实例会被各个 Plugin 持
plugin 核心接口
- IPlugin 一种监控能力的抽象
- PluginListener 开放给用户的,感知监控模块初始化、启动、停止、发现问题等生命周期的能力。 用户可自行实现,并注入到 Matrix 中
- Plugin 1、对 IPlugin 的默认实现,以触发相关 PluginListener 生命周期 2、实现 IssuePublisher.OnIssueDetectListener 接口的 onDetectIssue 方法
- 该方法会在 具体监控事件发生时,被 Matrix.with().getPluginByClass(xxx).onDetectIssue(Issue)这样调用。注意这里是第一种通知方式
- 该方法内部对 Issue 相关环境变量进行赋值,譬如引发该 Issue 的 Plugin 信息
- 该方法最终触发 PluginListener#onReportIssue
public interface IPlugin {

    /**
     * 用于标识当前的监控,相当于名称索引(也可用classname直接索引)
     */
    String getTag();

    /**
     * 在Matrix对象构建时被调用
     */
    void init(Application application, PluginListener pluginListener);

    /**
     * 对activity前后台转换的感知能力
     */
    void onForeground(boolean isForeground);

    void start();

    void stop();

    void destroy();

}

public interface PluginListener {
    void onInit(Plugin plugin);

    void onStart(Plugin plugin);

    void onStop(Plugin plugin);

    void onDestroy(Plugin plugin);

    void onReportIssue(Issue issue);
}
Matrix 对外接口
public class Matrix {
    private static final String TAG = "Matrix.Matrix";

 /**********************************  单例实现 **********************/
 private static volatile Matrix sInstance;
    public static Matrix init(Matrix matrix) {
        if (matrix == null) {
            throw new RuntimeException("Matrix init, Matrix should not be null.");
        }
        synchronized (Matrix.class) {
            if (sInstance == null) {
                sInstance = matrix;
            } else {
                MatrixLog.e(TAG, "Matrix instance is already set. this invoking will be ignored");
            }
        }
        return sInstance;
    }
    public static boolean isInstalled() {
        return sInstance != null;
    }
    public static Matrix with() {
        if (sInstance == null) {
            throw new RuntimeException("you must init Matrix sdk first");
        }
        return sInstance;
    }


    /****************************  构造函数 **********************/
    private final Application     application;
 private final HashSet plugins;
    private final PluginListener  pluginListener;

 private Matrix(Application app, PluginListener listener, HashSet plugins) {
        this.application = app;
        this.pluginListener = listener;
        this.plugins = plugins;
        for (Plugin plugin : plugins) {
            plugin.init(application, pluginListener);
            pluginListener.onInit(plugin);
        }

    }

 /****************************  控制能力 **********************/


    public void startAllPlugins() {
        for (Plugin plugin : plugins) {
            plugin.start();
        }
    }

    public void stopAllPlugins() {
        for (Plugin plugin : plugins) {
            plugin.stop();
        }
    }

    public void destroyAllPlugins() {
        for (Plugin plugin : plugins) {
            plugin.destroy();
        }
    }

 /****************************  get | set **********************/

    public Plugin getPluginByTag(String tag) {
        for (Plugin plugin : plugins) {
            if (plugin.getTag().equals(tag)) {
                return plugin;
            }
        }
        return null;
    }

    public  T getPluginByClass(Class pluginClass) {
        String className = pluginClass.getName();
        for (Plugin plugin : plugins) {
            if (plugin.getClass().getName().equals(className)) {
                return (T) plugin;
            }
        }
        return null;
    }
 /****************************  其他 **********************/
 public static void setLogIml(MatrixLog.MatrixLogImp imp) {
        MatrixLog.setMatrixLogImp(imp);
    }

}
Utils 辅助功能
- MatrixLog 开放给用户的 log 能力
- MatrixHandlerThread 公共线程,往往用于异步线程执行一些任务
- DeviceUtil 获取相关设备信息
- MatrixUtil 判断主线程等其他 utils
IssuePublisher 被监控事件观察者
-
Issue 被监控事件 type:类型,用于区分同一个 tag 不同类型的上报 tag: 该上报对应的 tag stack:该上报对应的堆栈 process:该上报对应的进程名 time:issue 发生的时间
-
IssuePublisher 观察者模式
-
持有一个 发布 Listener(其实现往往是上文的 Plugin)
-
持有一个 已发布信息的 Map,在一次运行时长内,避免针对同一事件的重复发布
-
一般而言,某种监控的监控探测器往往继承该类,并在检测到事件发生时,调用 publishIssue(Issue)—>IssuePublisher.OnIssueDetectListener 接口的 onDetectIssue 方法—>最终触发 PluginListener#onReportIssue
-
Matrix 的模块 IO 监测核心源码分析
IO Canary:核心的作用是检测文件 IO 问题,包括:文件 IO 监控和 Closeable Leak 监控。要想理解 IO 的监测和看懂开源的代码,最重要的基础就是掌握 Native 和 Java 层面的 Hook。
Java 层面的 hook 主要是基于反射技术,大家都比较熟悉了,那我们来聊一聊 Native 层面的 Hook。在 JVM 层面,Android 使用 Android PLT (Procedure Linkage Table)Hook 和Inline Hook、ptrace三种主流的技术。
Matrix 采用 PLT 的技术来实现 SO 文件 API 的 Hook。
ELF: https://en.wikipedia.org/wiki/Executable_and_Linkable_Format
https://refspecs.linuxbase.org/elf/elf.pdf
ELF 文件的三种形式:
- 可重定位的对象文件(Relocatable file),也就是我们熟悉的那些.o 文件,当然.a 库也算(因为它是.o 的集合)
- 可执行的对象文件(Executable file),linux 下的可执行文件
- 可被共享的对象文件(Shared object file),动态链接库.so
我们思考下 C 的程序是需要进行编译和链接再到最后的运行的。那么 ELF 文件从这个参与程序运行的角度也是分为 2 种视图的。
 image-20190916143208858
ELF header 位于文件的最开始处,描述整个文件的组织结构。Program Header Table 告诉系统如何创建进程镜像,在执行程序时必须存在,在 relocatable files 中则不需要。每个 program header 分别描述一个 segment,包括 segment 在文件和内存中的大小及地址等等。执行视图中的 segment 其实是由很多个 section 组成。在一个进程镜像中通常具有 text segment 和 data segment 等等。
关于重定位的作用和概念
重定位就是把符号引用与符号定义链接起来的过程,这也是 android linker 的主要工作之一。当程序中调用一个函数时,相关的 call 指令必须在执行期将控制流转到正确的目标地址。所以,so 文件中必须包含一些重定位相关的信息,linker 据此完成重定位的工作。
https://docs.oracle.com/cd/E19683-01/816-1386/chapter6-54839/index.html
https://android.googlesource.com/platform/bionic/+/master/linker/linker.cpp
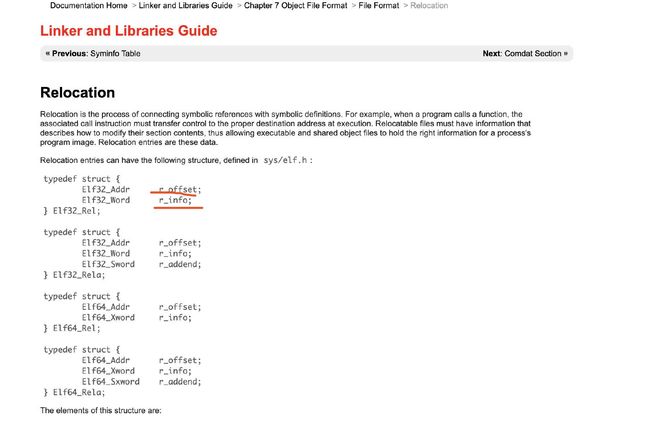 image-20190916144744091
  image-20190916151707293
符号表表项的结构为 elf32_sym:
typedef struct elf32_sym {
    Elf32_Word  st_name;    /* 名称 – index into string table */
    Elf32_Addr  st_value;   /* 偏移地址 */
    Elf32_Word  st_size;    /* 符号长度( 例如,函数的长度) */
    unsigned char   st_info;    /* 类型和绑定类型 */
    unsigned char   st_other;   /* 未定义 */
    Elf32_Half  st_shndx;   /* section header的索引号,表示位于哪个section中 */
} Elf32_Sym;
重定位核心代码:
http://androidxref.com/8.0.0_r4/xref/bionic/linker/linker.cpp#2513 (具体的重定位类型定义和计算方法可以参考 elf 说明文档的 4.6.1.2 小节)
 image-20190916152120420
Android PLT Hook 的基本原理
Linux 在执行动态链接的 ELF 的时候,为了优化性能使用了一个叫延时绑定的策略。当在动态链接的 ELF 程序里调用共享库的函数时,第一次调用时先去查找 PLT 表中相应的项目,而 PLT 表中再跳跃到 GOT 表中希望得到该函数的实际地址,但这时 GOT 表中指向的是 PLT 中那条跳跃指令下面的代码,最终会执行_dl_runtime_resolve()并执行目标函数。因此,PLT Hook 通过直接修改 GOT 表,使得在调用该共享库的函数时跳转到的是用户自定义的 Hook 功能代码。
 image-20190916153407043
IO 监控流程:
 image-20190916154924031
JNIEXPORT jboolean JNICALL
        Java_com_tencent_matrix_iocanary_core_IOCanaryJniBridge_doHook(JNIEnv *env, jclass type) {
            __android_log_print(ANDROID_LOG_INFO, kTag, "doHook");

            for (int i = 0; i < TARGET_MODULE_COUNT; ++i) {
                const char* so_name = TARGET_MODULES[i];
                __android_log_print(ANDROID_LOG_INFO, kTag, "try to hook function in %s.", so_name);

                loaded_soinfo* soinfo = elfhook_open(so_name);
                if (!soinfo) {
                    __android_log_print(ANDROID_LOG_WARN, kTag, "Failure to open %s, try next.", so_name);
                    continue;
                }
        //hook OS
                elfhook_replace(soinfo, "open", (void*)ProxyOpen, (void**)&original_open);
                elfhook_replace(soinfo, "open64", (void*)ProxyOpen64, (void**)&original_open64);

                bool is_libjavacore = (strstr(so_name, "libjavacore.so") != nullptr);
                if (is_libjavacore) {
                    if (!elfhook_replace(soinfo, "read", (void*)ProxyRead, (void**)&original_read)) {
                        __android_log_print(ANDROID_LOG_WARN, kTag, "doHook hook read failed, try __read_chk");
                        if (!elfhook_replace(soinfo, "__read_chk", (void*)ProxyRead, (void**)&original_read)) {
                            __android_log_print(ANDROID_LOG_WARN, kTag, "doHook hook failed: __read_chk");
                            elfhook_close(soinfo);
                            return false;
                        }
                    }
                   //hook OS
                    if (!elfhook_replace(soinfo, "write", (void*)ProxyWrite, (void**)&original_write)) {
                        __android_log_print(ANDROID_LOG_WARN, kTag, "doHook hook write failed, try __write_chk");
                        if (!elfhook_replace(soinfo, "__write_chk", (void*)ProxyWrite, (void**)&original_write)) {
                            __android_log_print(ANDROID_LOG_WARN, kTag, "doHook hook failed: __write_chk");
                            elfhook_close(soinfo);
                            return false;
                        }
                    }
                }
               //hook OS
                elfhook_replace(soinfo, "close", (void*)ProxyClose, (void**)&original_close);

                elfhook_close(soinfo);
            }

            return true;
        }
hook 的替换核心代码:(本质上就是置指针替换)
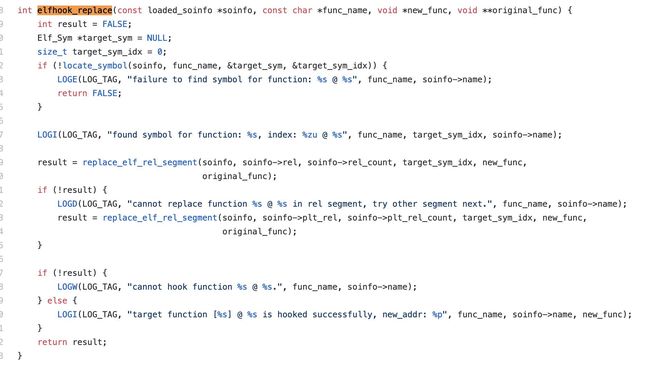 image-20190916155810095
看看代理方法:
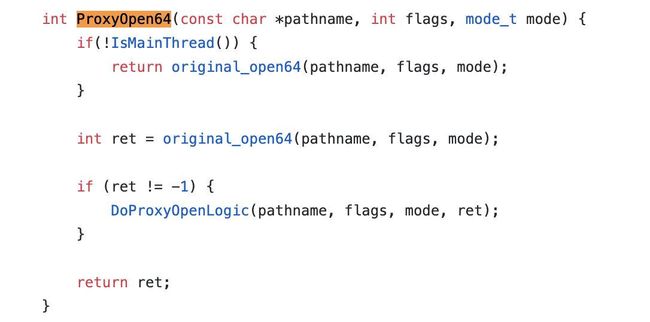 image-20190916155946965
很明显腾讯的人没有考虑到自线程的问题。这里可以优化的。具体的其他部分的细节请参见源码。
Matrix 的模块内存泄漏监测核心源码分析
https://github.com/Tencent/matrix/wiki/Matrix-Android-ResourceCanary
设计目的:
- 自动且较为准确地监测 Activity 泄漏,发现泄漏之后再触发 Dump Hprof 而不是根据预先设定的内存占用阈值盲目触发
- 自动获取泄漏的 Activity 和冗余 Bitmap 对象的引用链
- 能灵活地扩展 Hprof 的分析逻辑,必要时允许提取 Hprof 文件人工分析
为了解决线上监测和后台分析,Matrix 的 ResourceCanary 最终决定将监测步骤和分析步骤拆成两个独立的工具,以满足设计目标。
- Hprof 文件留在了服务端,为人工分析提供了机会
- 如果跳过触发 Dump Hprof,甚至可以把监测步骤在现网环境启用,以发现测试阶段难以触发的 Activity 泄漏
客户端解决的问题是内存泄漏的监测和 Hprof 文件的裁剪,具体看下面的流程图:
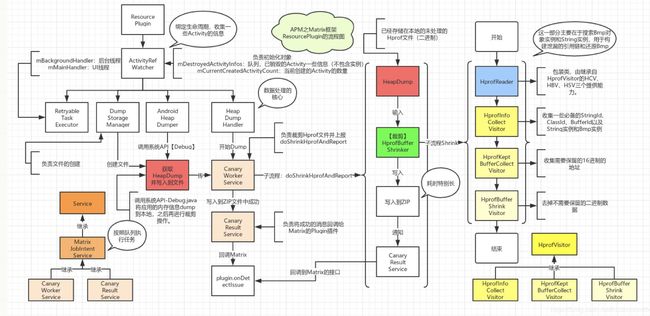 image-20190916162339863
ResourcePlugin
ResourcePlugin是该模块的入口,负责注册 Android 生命周期的监听以及配置部分参数和接口回调。
ActivityRefWatcher ActivityRefWatcher 负责的任务有弹出 Dump 内存的 Dialog、Dump 内存数据、读取内存数据裁剪 Hprof 文件、生成包含裁剪后的 Hprof 以及泄漏的 Activity 的信息(进程号、Activity 名、时间等)、通知主线程完成内存信息的备份并关闭 Dialog。
我们看下最为核心的内存泄漏监测代码:
//ActivityRefWatcher
private final Application.ActivityLifecycleCallbacks mRemovedActivityMonitor = new ActivityLifeCycleCallbacksAdapter() {
        private int mAppStatusCounter = 0;
        private int mUIConfigChangeCounter = 0;

        @Override
        public void onActivityCreated(Activity activity, Bundle savedInstanceState) {
            mCurrentCreatedActivityCount.incrementAndGet();
        }

        @Override
        public void onActivityStarted(Activity activity) {
            if (mAppStatusCounter <= 0) {
                MatrixLog.i(TAG, "we are in foreground, start watcher task.");
                mDetectExecutor.executeInBackground(mScanDestroyedActivitiesTask);
            }
            if (mUIConfigChangeCounter < 0) {
                ++mUIConfigChangeCounter;
            } else {
                ++mAppStatusCounter;
            }
        }

        @Override
        public void onActivityStopped(Activity activity) {
            if (activity.isChangingConfigurations()) {
                --mUIConfigChangeCounter;
            } else {
                --mAppStatusCounter;
                if (mAppStatusCounter <= 0) {
                    MatrixLog.i(TAG, "we are in background, stop watcher task.");
                    mDetectExecutor.clearTasks();
                }
            }
        }

        @Override
        public void onActivityDestroyed(Activity activity) {
          //当activity销毁的时候开始。。。
            pushDestroyedActivityInfo(activity);
            synchronized (mDestroyedActivityInfos) {
                mDestroyedActivityInfos.notifyAll();
            }
        }
    };
 private void pushDestroyedActivityInfo(Activity activity) {
        final String activityName = activity.getClass().getName();
        //该Activity确认存在泄漏,且已经上报
        if (isPublished(activityName)) {
            MatrixLog.d(TAG, "activity leak with name %s had published, just ignore", activityName);
            return;
        }
        final UUID uuid = UUID.randomUUID();
        final StringBuilder keyBuilder = new StringBuilder();
        //生成Activity实例的唯一标识
        keyBuilder.append(ACTIVITY_REFKEY_PREFIX).append(activityName)
            .append('_').append(Long.toHexString(uuid.getMostSignificantBits())).append(Long.toHexString(uuid.getLeastSignificantBits()));
        final String key = keyBuilder.toString();
        //构造一个数据结构,表示一个已被destroy的Activity
        final DestroyedActivityInfo destroyedActivityInfo
            = new DestroyedActivityInfo(key, activity, activityName, mCurrentCreatedActivityCount.get());
       //放入ConcurrentLinkedQueue数据结构中,用于后续的检查
        mDestroyedActivityInfos.add(destroyedActivityInfo);
    }
内存泄漏的核心代码:
private final RetryableTask mScanDestroyedActivitiesTask = new RetryableTask() {
@Override
public Status execute() {
// If destroyed activity list is empty, just wait to save power.
while (mDestroyedActivityInfos.isEmpty()) {
synchronized (mDestroyedActivityInfos) {
try {
mDestroyedActivityInfos.wait();
} catch (Throwable ignored) {
// Ignored.
}
}
}
// Fake leaks will be generated when debugger is attached.
//Debug调试模式,检测可能失效,直接return
if (Debug.isDebuggerConnected() && !mResourcePlugin.getConfig().getDetectDebugger()) {
MatrixLog.w(TAG, "debugger is connected, to avoid fake result, detection was delayed.");
return Status.RETRY;
}
//创建一个对象的弱引用
final WeakReferenceRetryableTaskExecutor
RetryableTaskExecutor中包含了两个 Handler 对象,一个mBackgroundHandler和mMainHandler,分别给主线程和后台的线程提交任务。默认重试次数是 3。
AndroidHeapDumper
AndroidHeapDumper这个其实就是封装了android.os.Debug的接口的类。主要是用系统提供的类android.os.DebugDump 内存信息到本地,android.os.Debug会在本地生成一个 Hprof 文件,也是 Matrix 需要分析和裁剪的原始文件。
注意:一般 Dump 一次要 5s ~ 15s 之间,线上建议不要使用,有一定的风险。
Dump 的时候,AndroidHeapDumper会展示一个 Dialog 提示当前正在 Dump 中,Dump 完毕就会将 Dialog 关闭。
Debug.dumpHprofData(hprofFile.getAbsolutePath());
Matrix 的模块 Trace 模块核心源码分析
Trace Canary: 用于监控界面流畅性、启动耗时、页面切换耗时、慢函数及卡顿等问题。(思考一下,技术上怎么实现)
入口函数探针分析:
public class TracePlugin extends Plugin {
    private static final String TAG = "Matrix.TracePlugin";

    private final TraceConfig traceConfig;
    private EvilMethodTracer evilMethodTracer;//慢函数
    private StartupTracer startupTracer; //启动监测
    private FrameTracer frameTracer; //fps
    private AnrTracer anrTracer; //anr

    public TracePlugin(TraceConfig config) {
        this.traceConfig = config;
    }
  ...
【关键知识点 1】: MessageQueue 中的 IdleHandler 接口有什么用?
在 Android 中,我们可以处理 Message,这个 Message 我们可以立即执行也可以 delay 一定时间执行。Handler 线程在执行完所有的 Message 消息,它会 wait,进行阻塞,直到有新的 Message 到达。如果这样子,那么这个线程也太浪费了。MessageQueue 提供了另一类消息,IdleHandler。也就是说当我们的 MessageQueue 中的消息被处理完后,就会触发一次或者多次回调消息。
应用场景:1、比如主线程在开始加载页面完成后,如果线程空闲就提前加载些二级页面的内容。
2、消息触发器 例如在 APM 中的作用
3、优化 Activity 的启动时间,在 Resume 中是不是可以增加 idle 的监听
Looper.myQueue().addIdleHandler(() -> {
            initializeData();
      return false;
        });
源码分析:
  Message next(){
        // Return here if the message loop has already quit and been disposed.
        // This can happen if the application tries to restart a looper after quit
        // which is not supported.
        final long ptr = mPtr;
        if (ptr == 0) {
            return null;
        }

        int pendingIdleHandlerCount = -1; // -1 only during first iteration
        int nextPollTimeoutMillis = 0;
        for (;;) {
            if (nextPollTimeoutMillis != 0) {
                Binder.flushPendingCommands();
            }

            nativePollOnce(ptr, nextPollTimeoutMillis);

            synchronized (this) {
                // Try to retrieve the next message.  Return if found.
                final long now = SystemClock.uptimeMillis();
                Message prevMsg = null;
                Message msg = mMessages;
                if (msg != null && msg.target == null) {
                    // Stalled by a barrier.  Find the next asynchronous message in the queue.
                    do {
                        prevMsg = msg;
                        msg = msg.next;
                    } while (msg != null && !msg.isAsynchronous());
                }
                if (msg != null) {
                    if (now < msg.when) {
                        // Next message is not ready.  Set a timeout to wake up when it is ready.
                        nextPollTimeoutMillis = (int) Math.min(msg.when - now, Integer.MAX_VALUE);
                    } else {
                        // Got a message.
                        mBlocked = false;
                        if (prevMsg != null) {
                            prevMsg.next = msg.next;
                        } else {
                            mMessages = msg.next;
                        }
                        msg.next = null;
                        if (DEBUG) Log.v(TAG, "Returning message: " + msg);
                        msg.markInUse();
                        return msg;
                    }
                } else {
                    // No more messages.
                    nextPollTimeoutMillis = -1;
                }

                // Process the quit message now that all pending messages have been handled.
                if (mQuitting) {
                    dispose();
                    return null;
                }

                // If first time idle, then get the number of idlers to run.
                // Idle handles only run if the queue is empty or if the first message
                // in the queue (possibly a barrier) is due to be handled in the future.
                if (pendingIdleHandlerCount < 0
                        && (mMessages == null || now < mMessages.when)) {
                    pendingIdleHandlerCount = mIdleHandlers.size();
                }
                if (pendingIdleHandlerCount <= 0) {
                    // No idle handlers to run.  Loop and wait some more.
                    mBlocked = true;
                    continue;
                }

                if (mPendingIdleHandlers == null) {
                    mPendingIdleHandlers = new IdleHandler[Math.max(pendingIdleHandlerCount, 4)];
                }
                mPendingIdleHandlers = mIdleHandlers.toArray(mPendingIdleHandlers);
            }

            // Run the idle handlers.
            // We only ever reach this code block during the first iteration.
            for (int i = 0; i < pendingIdleHandlerCount; i++) {
                final IdleHandler idler = mPendingIdleHandlers[i];
                mPendingIdleHandlers[i] = null; // release the reference to the handler

                boolean keep = false;
                try {
                    keep = idler.queueIdle();
                } catch (Throwable t) {
                    Log.wtf(TAG, "IdleHandler threw exception", t);
                }
        //根据IdleHandler中的回掉方法来判断是否移除
                if (!keep) {
                    synchronized (this) {
                        mIdleHandlers.remove(idler);
                    }
                }
            }

            // Reset the idle handler count to 0 so we do not run them again.
            pendingIdleHandlerCount = 0;

            // While calling an idle handler, a new message could have been delivered
            // so go back and look again for a pending message without waiting.
            nextPollTimeoutMillis = 0;
        }
    }
LooperMonitor类监测卡顿问题:
发生在 Android 主线程的每 16ms 重绘操作依赖于 Main Looper 中消息的发送和获取。如果 App 一切运行正常,无卡顿无丢帧现象发生,那么开发者的代码在主线程 Looper 消息队列中发送和接收消息的时间会很短,理想情况是 16ms,这是也是 Android 系统规定的时间。但是,如果一些发生在主线程的代码写的太重,执行任务花费时间太久,就会在主线程延迟 Main Looper 的消息在 16ms 尺度范围内的读和写。
我们如何检测卡顿的问题?
使用主线程的 Looper 监测系统发生的卡顿和丢帧。编程技巧是设置一个阈值,看是否可以打印 stack 信息。
网络上说使用 Android 的 Choreographer 监测 App 发生的 UI 卡顿丢帧问题,本质上还是利用了 Android 的主线程的 Looper 消息机制。Android 系统每隔 16.67 ms 都会发送一个 VSYNC 信号触发 UI 的渲染,正常情况下两个 VSYNC 信号之间是 16.67 ms ,如果超过 16.67 ms 则可以认为渲染发生了卡顿。
Choreographer.getInstance()
            .postFrameCallback(new Choreographer.FrameCallback() {
                @Override
                public void doFrame(long l) {
                     if(frameTimeNanos - mLastFrameNanos > 100) {
                        ...
                     }
                     mLastFrameNanos = frameTimeNanos;
                     Choreographer.getInstance().postFrameCallback(this);
                }
        });
本质:判断相邻的两次 FrameCallback.doFrame(long l) 间隔是否超过阈值,如果超过阈值则发生了卡顿,则可以在另外一个子线程中 dump 当前主线程的堆栈信息进行分析。
消息处理
UIThreadMonitor类
init():
public void init(TraceConfig config) {
        if (Thread.currentThread() != Looper.getMainLooper().getThread()) {
            throw new AssertionError("must be init in main thread!");
        }
        this.isInit = true;
        this.config = config;
        choreographer = Choreographer.getInstance();
        callbackQueueLock = reflectObject(choreographer, "mLock");
        callbackQueues = reflectObject(choreographer, "mCallbackQueues");                                                                    // 代码 1

        addInputQueue = reflectChoreographerMethod(callbackQueues[CALLBACK_INPUT], ADD_CALLBACK, long.class, Object.class, Object.class);             // 代码 2
        addAnimationQueue = reflectChoreographerMethod(callbackQueues[CALLBACK_ANIMATION], ADD_CALLBACK, long.class, Object.class, Object.class);     // 代码 3
        addTraversalQueue = reflectChoreographerMethod(callbackQueues[CALLBACK_TRAVERSAL], ADD_CALLBACK, long.class, Object.class, Object.class);     // 代码 4
        frameIntervalNanos = reflectObject(choreographer, "mFrameIntervalNanos");

        LooperMonitor.register(new LooperMonitor.LooperDispatchListener() {                                                                  // 代码 5
            @Override
            public boolean isValid() {
                return isAlive;
            }

            @Override
            public void dispatchStart() {
                super.dispatchStart();
                UIThreadMonitor.this.dispatchBegin();                                                                                       // 代码 6
            }

            @Override
            public void dispatchEnd() {
                super.dispatchEnd();
                UIThreadMonitor.this.dispatchEnd();                                                                                      // 代码 7
            }

        });

                ......

    }
- 代码 1:通过反射拿到了 Choreographer 实例的 mCallbackQueues 属性,mCallbackQueues 是一个回调队列数组 CallbackQueue[] mCallbackQueues,其中包括四个回调队列,
    第一个是输入事件回调队列 CALLBACK_INPUT = 0,
    第二个是动画回调队列 CALLBACK_ANIMATION = 1,
    第三个是遍历绘制回调队列 CALLBACK_TRAVERSAL = 2,
    第四个是提交回调队列 CALLBACK_COMMIT = 3。
这四个阶段在每一帧的 UI 渲染中是依次执行的,每一帧中各个阶段开始时都会回调 mCallbackQueues 中对应的回调队列的回调方法。
- 代码 2:通过反射拿到输入事件回调队列的 addCallbackLocked 方法
- 代码 3:通过反射拿到动画回调队列的 addCallbackLocked 方法
- 代码 4:通过反射拿到遍历绘制回调队列的addCallbackLocked 方法
- 代码 5:通过 LooperMonitor.register(LooperDispatchListener listener) 方法向 LooperMonitor 中设置 LooperDispatchListener listener
- 代码 6:在 Looper.loop() 中的消息处理开始时的回调
- 代码 7:在 Looper.loop() 中的消息处理结束时的回调
核心:
private void dispatchBegin() {
  //记录2个时间 线程起始时间 和CPU的开始时间
        token = dispatchTimeMs[0] = SystemClock.uptimeMillis();
        dispatchTimeMs[2] = SystemClock.currentThreadTimeMillis();
        AppMethodBeat.i(AppMethodBeat.METHOD_ID_DISPATCH);

        synchronized (observers) {
            for (LooperObserver observer : observers) {
                if (!observer.isDispatchBegin()) {
                    observer.dispatchBegin(dispatchTimeMs[0], dispatchTimeMs[2], token);
                }
            }
        }
    }
private void dispatchEnd() {                                                                                            // 代码 3
        if (isBelongFrame) {
            doFrameEnd(token);
        }

        dispatchTimeMs[3] = SystemClock.currentThreadTimeMillis();
        dispatchTimeMs[1] = SystemClock.uptimeMillis();

        AppMethodBeat.o(AppMethodBeat.METHOD_ID_DISPATCH);

        synchronized (observers) {
            for (LooperObserver observer : observers) {
                if (observer.isDispatchBegin()) {
                    observer.dispatchEnd(dispatchTimeMs[0], dispatchTimeMs[2], dispatchTimeMs[1], dispatchTimeMs[3], token, isBelongFrame);
                }
            }
        }

    }
核心点总结:
- 在 UIThreadMonitor 中有两个长度是三的数组
queueStatus和queueCost分别对应着每一帧中输入事件阶段、动画阶段、遍历绘制阶段的状态和耗时,queueStatus有三个值:DO_QUEUE_DEFAULT、DO_QUEUE_BEGIN 和 DO_QUEUE_END。 -
UIThreadMonitor实现Runnable接口,也是为了将UIThreadMonitor作为输入事件回调CALLBACK_INPUT的回调方法,设置到Choreographer中去的。
看到这里应该搞明白了卡顿的检测原理,那么 FPS 的计算呢?
每一帧的时间信息通过 HashSet 回调出去,看一下是在哪里向 observers 添加 LooperObserver 回调的。主要看一下 FrameTracer 这个类,其中涉及到了帧率 FPS 的计算相关的代码。
FPSCollector 是 FrameTracer 的一个内部类,实现了 IDoFrameListener 接口,主要逻辑是在 doFrameAsync() 方法中
- 代码 1:会根据当前 ActivityName 创建一个对应的 FrameCollectItem 对象,存放在 HashMap 中
- 代码 2:调用
FrameCollectItem#collect(),计算帧率 FPS 等一些信息 - 代码 3:如果此 Activity 的绘制总时间超过 timeSliceMs(默认是 10s),则调用
FrameCollectItem#report()上报统计数据,并从 HashMap 中移除当前 ActivityName 和对应的 FrameCollectItem 对象
private class FPSCollector extends IDoFrameListener {

        private Handler frameHandler = new Handler(MatrixHandlerThread.getDefaultHandlerThread().getLooper());
        private HashMap map = new HashMap<>();

        @Override
        public Handler getHandler() {
            return frameHandler;
        }

        @Override
        public void doFrameAsync(String focusedActivityName, long frameCost, int droppedFrames) {
            super.doFrameAsync(focusedActivityName, frameCost, droppedFrames);
            if (Utils.isEmpty(focusedActivityName)) {
                return;
            }

            FrameCollectItem item = map.get(focusedActivityName);       // 代码 1
            if (null == item) {
                item =