实现Array.of方法
Array.of()方法用于将一组值,转换为数组
- 这个方法的主要目的,是弥补数组构造函数
Array()的不足。因为参数个数的不同,会导致Array()的行为有差异。 Array.of()基本上可以用来替代Array()或new Array(),并且不存在由于参数不同而导致的重载。它的行为非常统一
Array.of(3, 11, 8) // [3,11,8]
Array.of(3) // [3]
Array.of(3).length // 1
实现
function ArrayOf(){
  return [].slice.call(arguments);
}
Function.prototype.bind
Function.prototype.bind = function(context, ...args) {
  if (typeof this !== 'function') {
    throw new Error("Type Error");
  }
  // 保存this的值
  var self = this;

  return function F() {
    // 考虑new的情况
    if(this instanceof F) {
      return new self(...args, ...arguments)
    }
    return self.apply(context, [...args, ...arguments])
  }
}
字符串解析问题
var a = {
    b: 123,
    c: '456',
    e: '789',
}
var str=`a{a.b}aa{a.c}aa {a.d}aaaa`;
// => 'a123aa456aa {a.d}aaaa'
实现函数使得将str字符串中的{}内的变量替换,如果属性不存在保持原样(比如{a.d})
类似于模版字符串,但有一点出入,实际上原理大差不差
const fn1 = (str, obj) => {
    let res = '';
    // 标志位,标志前面是否有{
    let flag = false;
    let start;
    for (let i = 0; i < str.length; i++) {
        if (str[i] === '{') {
            flag = true;
            start = i + 1;
            continue;
        }
        if (!flag) res += str[i];
        else {
            if (str[i] === '}') {
                flag = false;
                res += match(str.slice(start, i), obj);
            }
        }
    }
    return res;
}
// 对象匹配操作
const match = (str, obj) => {
    const keys = str.split('.').slice(1);
    let index = 0;
    let o = obj;
    while (index < keys.length) {
        const key = keys[index];
        if (!o[key]) {
            return `{${str}}`;
        } else {
            o = o[key];
        }
        index++;
    }
    return o;
}
图片懒加载
可以给img标签统一自定义属性data-src='default.png',当检测到图片出现在窗口之后再补充src属性,此时才会进行图片资源加载。
function lazyload() {
  const imgs = document.getElementsByTagName('img');
  const len = imgs.length;
  // 视口的高度
  const viewHeight = document.documentElement.clientHeight;
  // 滚动条高度
  const scrollHeight = document.documentElement.scrollTop || document.body.scrollTop;
  for (let i = 0; i < len; i++) {
    const offsetHeight = imgs[i].offsetTop;
    if (offsetHeight < viewHeight + scrollHeight) {
      const src = imgs[i].dataset.src;
      imgs[i].src = src;
    }
  }
}

// 可以使用节流优化一下
window.addEventListener('scroll', lazyload);
实现发布-订阅模式
class EventCenter{
  // 1. 定义事件容器,用来装事件数组
    let handlers = {}

  // 2. 添加事件方法,参数:事件名 事件方法
  addEventListener(type, handler) {
    // 创建新数组容器
    if (!this.handlers[type]) {
      this.handlers[type] = []
    }
    // 存入事件
    this.handlers[type].push(handler)
  }

  // 3. 触发事件,参数:事件名 事件参数
  dispatchEvent(type, params) {
    // 若没有注册该事件则抛出错误
    if (!this.handlers[type]) {
      return new Error('该事件未注册')
    }
    // 触发事件
    this.handlers[type].forEach(handler => {
      handler(...params)
    })
  }

  // 4. 事件移除,参数:事件名 要删除事件,若无第二个参数则删除该事件的订阅和发布
  removeEventListener(type, handler) {
    if (!this.handlers[type]) {
      return new Error('事件无效')
    }
    if (!handler) {
      // 移除事件
      delete this.handlers[type]
    } else {
      const index = this.handlers[type].findIndex(el => el === handler)
      if (index === -1) {
        return new Error('无该绑定事件')
      }
      // 移除事件
      this.handlers[type].splice(index, 1)
      if (this.handlers[type].length === 0) {
        delete this.handlers[type]
      }
    }
  }
}
循环打印红黄绿
下面来看一道比较典型的问题,通过这个问题来对比几种异步编程方法:红灯 3s 亮一次,绿灯 1s 亮一次,黄灯 2s 亮一次;如何让三个灯不断交替重复亮灯?
三个亮灯函数:
function red() {
    console.log('red');
}
function green() {
    console.log('green');
}
function yellow() {
    console.log('yellow');
}
这道题复杂的地方在于需要“交替重复”亮灯,而不是“亮完一次”就结束了。
(1)用 callback 实现
const task = (timer, light, callback) => {
    setTimeout(() => {
        if (light === 'red') {
            red()
        }
        else if (light === 'green') {
            green()
        }
        else if (light === 'yellow') {
            yellow()
        }
        callback()
    }, timer)
}
task(3000, 'red', () => {
    task(2000, 'green', () => {
        task(1000, 'yellow', Function.prototype)
    })
})
这里存在一个 bug:代码只是完成了一次流程,执行后红黄绿灯分别只亮一次。该如何让它交替重复进行呢?
上面提到过递归,可以递归亮灯的一个周期:
const step = () => {
    task(3000, 'red', () => {
        task(2000, 'green', () => {
            task(1000, 'yellow', step)
        })
    })
}
step()
注意看黄灯亮的回调里又再次调用了 step 方法 以完成循环亮灯。
(2)用 promise 实现
const task = (timer, light) =>
    new Promise((resolve, reject) => {
        setTimeout(() => {
            if (light === 'red') {
                red()
            }
            else if (light === 'green') {
                green()
            }
            else if (light === 'yellow') {
                yellow()
            }
            resolve()
        }, timer)
    })
const step = () => {
    task(3000, 'red')
        .then(() => task(2000, 'green'))
        .then(() => task(2100, 'yellow'))
        .then(step)
}
step()
这里将回调移除,在一次亮灯结束后,resolve 当前 promise,并依然使用递归进行。
(3)用 async/await 实现
const taskRunner =  async () => {
    await task(3000, 'red')
    await task(2000, 'green')
    await task(2100, 'yellow')
    taskRunner()
}
taskRunner()
参考 前端进阶面试题详细解答
将VirtualDom转化为真实DOM结构
这是当前SPA应用的核心概念之一
// vnode结构:
// {
//   tag,
//   attrs,
//   children,
// }

//Virtual DOM => DOM
function render(vnode, container) {
  container.appendChild(_render(vnode));
}
function _render(vnode) {
  // 如果是数字类型转化为字符串
  if (typeof vnode === 'number') {
    vnode = String(vnode);
  }
  // 字符串类型直接就是文本节点
  if (typeof vnode === 'string') {
    return document.createTextNode(vnode);
  }
  // 普通DOM
  const dom = document.createElement(vnode.tag);
  if (vnode.attrs) {
    // 遍历属性
    Object.keys(vnode.attrs).forEach(key => {
      const value = vnode.attrs[key];
      dom.setAttribute(key, value);
    })
  }
  // 子数组进行递归操作
  vnode.children.forEach(child => render(child, dom));
  return dom;
}
判断对象是否存在循环引用
循环引用对象本来没有什么问题,但是序列化的时候就会发生问题,比如调用JSON.stringify()对该类对象进行序列化,就会报错: Converting circular structure to JSON.
下面方法可以用来判断一个对象中是否已存在循环引用:
const isCycleObject = (obj,parent) => {
    const parentArr = parent || [obj];
    for(let i in obj) {
        if(typeof obj[i] === 'object') {
            let flag = false;
            parentArr.forEach((pObj) => {
                if(pObj === obj[i]){
                    flag = true;
                }
            })
            if(flag) return true;
            flag = isCycleObject(obj[i],[...parentArr,obj[i]]);
            if(flag) return true;
        }
    }
    return false;
}


const a = 1;
const b = {a};
const c = {b};
const o = {d:{a:3},c}
o.c.b.aa = a;

console.log(isCycleObject(o)
查找有序二维数组的目标值:
var findNumberIn2DArray = function(matrix, target) {
    if (matrix == null || matrix.length == 0) {
        return false;
    }
    let row = 0;
    let column = matrix[0].length - 1;
    while (row < matrix.length && column >= 0) {
        if (matrix[row][column] == target) {
            return true;
        } else if (matrix[row][column] > target) {
            column--;
        } else {
            row++;
        }
    }
    return false;
};
二维数组斜向打印:
function printMatrix(arr){
  let m = arr.length, n = arr[0].length
    let res = []

  // 左上角,从0 到 n - 1 列进行打印
  for (let k = 0; k < n; k++) {
    for (let i = 0, j = k; i < m && j >= 0; i++, j--) {
      res.push(arr[i][j]);
    }
  }

  // 右下角,从1 到 n - 1 行进行打印
  for (let k = 1; k < m; k++) {
    for (let i = k, j = n - 1; i < m && j >= 0; i++, j--) {
      res.push(arr[i][j]);
    }
  }
  return res
}
Array.prototype.reduce()
Array.prototype.reduce = function(callback, initialValue) {
  if (this == undefined) {
    throw new TypeError('this is null or not defined');
  }
  if (typeof callback !== 'function') {
    throw new TypeError(callbackfn + ' is not a function');
  }
  const O = Object(this);
  const len = this.length >>> 0;
  let accumulator = initialValue;
  let k = 0;
  // 如果第二个参数为undefined的情况下
  // 则数组的第一个有效值作为累加器的初始值
  if (accumulator === undefined) {
    while (k < len && !(k in O)) {
      k++;
    }
    // 如果超出数组界限还没有找到累加器的初始值,则TypeError
    if (k >= len) {
      throw new TypeError('Reduce of empty array with no initial value');
    }
    accumulator = O[k++];
  }
  while (k < len) {
    if (k in O) {
      accumulator = callback.call(undefined, accumulator, O[k], k, O);
    }
    k++;
  }
  return accumulator;
}
实现节流函数(throttle)
防抖函数原理:规定在一个单位时间内,只能触发一次函数。如果这个单位时间内触发多次函数,只有一次生效。
// 手写简化版
// 节流函数
const throttle = (fn, delay = 500) => {
  let flag = true;
  return (...args) => {
    if (!flag) return;
    flag = false;
    setTimeout(() => {
      fn.apply(this, args);
      flag = true;
    }, delay);
  };
};
适用场景:
- 拖拽场景:固定时间内只执行一次,防止超高频次触发位置变动
- 缩放场景:监控浏览器resize
- 动画场景:避免短时间内多次触发动画引起性能问题
数组扁平化
数组扁平化是指将一个多维数组变为一个一维数组
const arr = [1, [2, [3, [4, 5]]], 6];
// => [1, 2, 3, 4, 5, 6]
方法一:使用flat()
const res1 = arr.flat(Infinity);
方法二:利用正则
const res2 = JSON.stringify(arr).replace(/\[|\]/g, '').split(',');
但数据类型都会变为字符串
方法三:正则改良版本
const res3 = JSON.parse('[' + JSON.stringify(arr).replace(/\[|\]/g, '') + ']');
方法四:使用reduce
const flatten = arr => {
  return arr.reduce((pre, cur) => {
    return pre.concat(Array.isArray(cur) ? flatten(cur) : cur);
  }, [])
}
const res4 = flatten(arr);
方法五:函数递归
const res5 = [];
const fn = arr => {
  for (let i = 0; i < arr.length; i++) {
    if (Array.isArray(arr[i])) {
      fn(arr[i]);
    } else {
      res5.push(arr[i]);
    }
  }
}
fn(arr);
Array.prototype.map()
Array.prototype.map = function(callback, thisArg) {
  if (this == undefined) {
    throw new TypeError('this is null or not defined');
  }
  if (typeof callback !== 'function') {
    throw new TypeError(callback + ' is not a function');
  }
  const res = [];
  // 同理
  const O = Object(this);
  const len = O.length >>> 0;
  for (let i = 0; i < len; i++) {
    if (i in O) {
      // 调用回调函数并传入新数组
      res[i] = callback.call(thisArg, O[i], i, this);
    }
  }
  return res;
}
手写 Promise.then
then 方法返回一个新的 promise 实例,为了在 promise 状态发生变化时(resolve / reject 被调用时)再执行 then 里的函数,我们使用一个 callbacks 数组先把传给then的函数暂存起来,等状态改变时再调用。
那么,怎么保证后一个 **then** 里的方法在前一个 **then**(可能是异步)结束之后再执行呢? 我们可以将传给 then 的函数和新 promise 的 resolve 一起 push 到前一个 promise 的 callbacks 数组中,达到承前启后的效果:
- 承前:当前一个
promise完成后,调用其resolve变更状态,在这个resolve里会依次调用callbacks里的回调,这样就执行了then里的方法了 - 启后:上一步中,当
then里的方法执行完成后,返回一个结果,如果这个结果是个简单的值,就直接调用新promise的resolve,让其状态变更,这又会依次调用新promise的callbacks数组里的方法,循环往复。。如果返回的结果是个promise,则需要等它完成之后再触发新promise的resolve,所以可以在其结果的then里调用新promise的resolve
then(onFulfilled, onReject){
    // 保存前一个promise的this
    const self = this;
    return new MyPromise((resolve, reject) => {
      // 封装前一个promise成功时执行的函数
      let fulfilled = () => {
        try{
          const result = onFulfilled(self.value); // 承前
          return result instanceof MyPromise? result.then(resolve, reject) : resolve(result); //启后
        }catch(err){
          reject(err)
        }
      }
      // 封装前一个promise失败时执行的函数
      let rejected = () => {
        try{
          const result = onReject(self.reason);
          return result instanceof MyPromise? result.then(resolve, reject) : reject(result);
        }catch(err){
          reject(err)
        }
      }
      switch(self.status){
        case PENDING:
          self.onFulfilledCallbacks.push(fulfilled);
          self.onRejectedCallbacks.push(rejected);
          break;
        case FULFILLED:
          fulfilled();
          break;
        case REJECT:
          rejected();
          break;
      }
    })
   }
注意:
- 连续多个
then里的回调方法是同步注册的,但注册到了不同的callbacks数组中,因为每次then都返回新的promise实例(参考上面的例子和图) - 注册完成后开始执行构造函数中的异步事件,异步完成之后依次调用
callbacks数组中提前注册的回调
封装异步的fetch,使用async await方式来使用
(async () => {
    class HttpRequestUtil {
        async get(url) {
            const res = await fetch(url);
            const data = await res.json();
            return data;
        }
        async post(url, data) {
            const res = await fetch(url, {
                method: 'POST',
                headers: {
                    'Content-Type': 'application/json'
                },
                body: JSON.stringify(data)
            });
            const result = await res.json();
            return result;
        }
        async put(url, data) {
            const res = await fetch(url, {
                method: 'PUT',
                headers: {
                    'Content-Type': 'application/json'
                },
                data: JSON.stringify(data)
            });
            const result = await res.json();
            return result;
        }
        async delete(url, data) {
            const res = await fetch(url, {
                method: 'DELETE',
                headers: {
                    'Content-Type': 'application/json'
                },
                data: JSON.stringify(data)
            });
            const result = await res.json();
            return result;
        }
    }
    const httpRequestUtil = new HttpRequestUtil();
    const res = await httpRequestUtil.get('http://golderbrother.cn/');
    console.log(res);
})();
函数柯里化的实现
函数柯里化指的是一种将使用多个参数的一个函数转换成一系列使用一个参数的函数的技术。
function curry(fn, args) {
  // 获取函数需要的参数长度
  let length = fn.length;

  args = args || [];

  return function() {
    let subArgs = args.slice(0);

    // 拼接得到现有的所有参数
    for (let i = 0; i < arguments.length; i++) {
      subArgs.push(arguments[i]);
    }

    // 判断参数的长度是否已经满足函数所需参数的长度
    if (subArgs.length >= length) {
      // 如果满足,执行函数
      return fn.apply(this, subArgs);
    } else {
      // 如果不满足,递归返回科里化的函数,等待参数的传入
      return curry.call(this, fn, subArgs);
    }
  };
}

// es6 实现
function curry(fn, ...args) {
  return fn.length <= args.length ? fn(...args) : curry.bind(null, fn, ...args);
}
手写类型判断函数
function getType(value) {
  // 判断数据是 null 的情况
  if (value === null) {
    return value + "";
  }
  // 判断数据是引用类型的情况
  if (typeof value === "object") {
    let valueClass = Object.prototype.toString.call(value),
      type = valueClass.split(" ")[1].split("");
    type.pop();
    return type.join("").toLowerCase();
  } else {
    // 判断数据是基本数据类型的情况和函数的情况
    return typeof value;
  }
}
Function.prototype.apply()
第一个参数是绑定的this,默认为window,第二个参数是数组或类数组
Function.prototype.apply = function(context = window, args) {
  if (typeof this !== 'function') {
    throw new TypeError('Type Error');
  }
  const fn = Symbol('fn');
  context[fn] = this;

  const res = context[fn](...args);
  delete context[fn];
  return res;
}
判断是否是电话号码
function isPhone(tel) {
    var regx = /^1[34578]\d{9}$/;
    return regx.test(tel);
}
实现Node的require方法
require 基本原理

require 查找路径
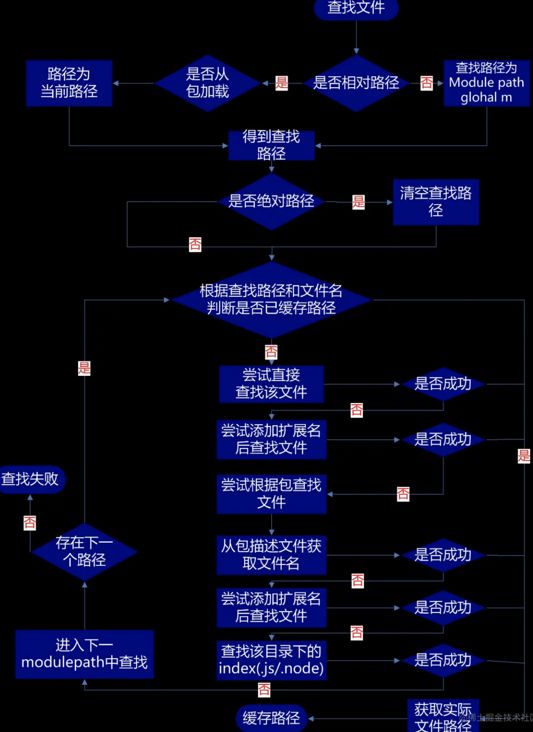
require和module.exports干的事情并不复杂,我们先假设有一个全局对象{},初始情况下是空的,当你require某个文件时,就将这个文件拿出来执行,如果这个文件里面存在module.exports,当运行到这行代码时将module.exports的值加入这个对象,键为对应的文件名,最终这个对象就长这样:
{
  "a.js": "hello world",
  "b.js": function add(){},
  "c.js": 2,
  "d.js": { num: 2 }
}当你再次require某个文件时,如果这个对象里面有对应的值,就直接返回给你,如果没有就重复前面的步骤,执行目标文件,然后将它的module.exports加入这个全局对象,并返回给调用者。这个全局对象其实就是我们经常听说的缓存。所以require和module.exports并没有什么黑魔法,就只是运行并获取目标文件的值,然后加入缓存,用的时候拿出来用就行
手写实现一个require
const path = require('path'); // 路径操作
const fs = require('fs'); // 文件读取
const vm = require('vm'); // 文件执行

// node模块化的实现
// node中是自带模块化机制的,每个文件就是一个单独的模块,并且它遵循的是CommonJS规范,也就是使用require的方式导入模块,通过module.export的方式导出模块。
// node模块的运行机制也很简单,其实就是在每一个模块外层包裹了一层函数,有了函数的包裹就可以实现代码间的作用域隔离

// require加载模块
// require依赖node中的fs模块来加载模块文件,fs.readFile读取到的是一个字符串。
// 在javascrpt中我们可以通过eval或者new Function的方式来将一个字符串转换成js代码来运行。

// eval
// const name = 'poetry';
// const str = 'const a = 123; console.log(name)';
// eval(str); // poetry;

// new Function
// new Function接收的是一个要执行的字符串,返回的是一个新的函数,调用这个新的函数字符串就会执行了。如果这个函数需要传递参数,可以在new Function的时候依次传入参数,最后传入的是要执行的字符串。比如这里传入参数b,要执行的字符串str
// const b = 3;
// const str = 'let a = 1; return a + b';
// const fun = new Function('b', str);
// console.log(fun(b, str)); // 4
// 可以看到eval和Function实例化都可以用来执行javascript字符串,似乎他们都可以来实现require模块加载。不过在node中并没有选用他们来实现模块化,原因也很简单因为他们都有一个致命的问题,就是都容易被不属于他们的变量所影响。
// 如下str字符串中并没有定义a,但是确可以使用上面定义的a变量,这显然是不对的,在模块化机制中,str字符串应该具有自身独立的运行空间,自身不存在的变量是不可以直接使用的
// const a = 1;
// const str = 'console.log(a)';
// eval(str);
// const func = new Function(str);
// func();

// node存在一个vm虚拟环境的概念,用来运行额外的js文件,他可以保证javascript执行的独立性,不会被外部所影响
// vm 内置模块
// 虽然我们在外部定义了hello,但是str是一个独立的模块,并不在村hello变量,所以会直接报错。
// 引入vm模块, 不需要安装,node 自建模块
// const vm = require('vm');
// const hello = 'poetry';
// const str = 'console.log(hello)';
// wm.runInThisContext(str); // 报错
// 所以node执行javascript模块时可以采用vm来实现。就可以保证模块的独立性了

// 分析实现步骤
// 1.导入相关模块,创建一个Require方法。
// 2.抽离通过Module._load方法,用于加载模块。
// 3.Module.resolveFilename 根据相对路径,转换成绝对路径。
// 4.缓存模块 Module._cache,同一个模块不要重复加载,提升性能。
// 5.创建模块 id: 保存的内容是 exports = {}相当于this。
// 6.利用tryModuleLoad(module, filename) 尝试加载模块。
// 7.Module._extensions使用读取文件。
// 8.Module.wrap: 把读取到的js包裹一个函数。
// 9.将拿到的字符串使用runInThisContext运行字符串。
// 10.让字符串执行并将this改编成exports

// 定义导入类,参数为模块路径
function Require(modulePath) {
    // 获取当前要加载的绝对路径
    let absPathname = path.resolve(__dirname, modulePath);

    // 自动给模块添加后缀名,实现省略后缀名加载模块,其实也就是如果文件没有后缀名的时候遍历一下所有的后缀名看一下文件是否存在
    // 获取所有后缀名
    const extNames = Object.keys(Module._extensions);
    let index = 0;
    // 存储原始文件路径
    const oldPath = absPathname;
    function findExt(absPathname) {
        if (index === extNames.length) {
            throw new Error('文件不存在');
        }
        try {
            fs.accessSync(absPathname);
            return absPathname;
        } catch(e) {
            const ext = extNames[index++];
            findExt(oldPath + ext);
        }
    }
    // 递归追加后缀名,判断文件是否存在
    absPathname = findExt(absPathname);

    // 从缓存中读取,如果存在,直接返回结果
    if (Module._cache[absPathname]) {
        return Module._cache[absPathname].exports;
    }

    // 创建模块,新建Module实例
    const module = new Module(absPathname);

    // 添加缓存
    Module._cache[absPathname] = module;

    // 加载当前模块
    tryModuleLoad(module);

    // 返回exports对象
    return module.exports;
}

// Module的实现很简单,就是给模块创建一个exports对象,tryModuleLoad执行的时候将内容加入到exports中,id就是模块的绝对路径
// 定义模块, 添加文件id标识和exports属性
function Module(id) {
    this.id = id;
    // 读取到的文件内容会放在exports中
    this.exports = {};
}

Module._cache = {};

// 我们给Module挂载静态属性wrapper,里面定义一下这个函数的字符串,wrapper是一个数组,数组的第一个元素就是函数的参数部分,其中有exports,module. Require,__dirname, __filename, 都是我们模块中常用的全局变量。注意这里传入的Require参数是我们自己定义的Require
// 第二个参数就是函数的结束部分。两部分都是字符串,使用的时候我们将他们包裹在模块的字符串外部就可以了
Module.wrapper = [
    "(function(exports, module, Require, __dirname, __filename) {",
    "})"
]

// _extensions用于针对不同的模块扩展名使用不同的加载方式,比如JSON和javascript加载方式肯定是不同的。JSON使用JSON.parse来运行。
// javascript使用vm.runInThisContext来运行,可以看到fs.readFileSync传入的是module.id也就是我们Module定义时候id存储的是模块的绝对路径,读取到的content是一个字符串,我们使用Module.wrapper来包裹一下就相当于在这个模块外部又包裹了一个函数,也就实现了私有作用域。
// 使用call来执行fn函数,第一个参数改变运行的this我们传入module.exports,后面的参数就是函数外面包裹参数exports, module, Require, __dirname, __filename
Module._extensions = {
    '.js'(module) {
        const content = fs.readFileSync(module.id, 'utf8');
        const fnStr = Module.wrapper[0] + content + Module.wrapper[1];
        const fn = vm.runInThisContext(fnStr);
        fn.call(module.exports, module.exports, module, Require,__filename,__dirname);
    },
    '.json'(module) {
        const json = fs.readFileSync(module.id, 'utf8');
        module.exports = JSON.parse(json); // 把文件的结果放在exports属性上
    }
}

// tryModuleLoad函数接收的是模块对象,通过path.extname来获取模块的后缀名,然后使用Module._extensions来加载模块
// 定义模块加载方法
function tryModuleLoad(module) {
    // 获取扩展名
    const extension = path.extname(module.id);
    // 通过后缀加载当前模块
    Module._extensions[extension](module);
}

// 至此Require加载机制我们基本就写完了,我们来重新看一下。Require加载模块的时候传入模块名称,在Require方法中使用path.resolve(__dirname, modulePath)获取到文件的绝对路径。然后通过new Module实例化的方式创建module对象,将模块的绝对路径存储在module的id属性中,在module中创建exports属性为一个json对象
// 使用tryModuleLoad方法去加载模块,tryModuleLoad中使用path.extname获取到文件的扩展名,然后根据扩展名来执行对应的模块加载机制
// 最终将加载到的模块挂载module.exports中。tryModuleLoad执行完毕之后module.exports已经存在了,直接返回就可以了


// 给模块添加缓存
// 添加缓存也比较简单,就是文件加载的时候将文件放入缓存中,再去加载模块时先看缓存中是否存在,如果存在直接使用,如果不存在再去重新,加载之后再放入缓存

// 测试
let json = Require('./test.json');
let test2 = Require('./test2.js');
console.log(json);
console.log(test2);
实现类的继承
实现类的继承-简版
类的继承在几年前是重点内容,有n种继承方式各有优劣,es6普及后越来越不重要,那么多种写法有点『回字有四样写法』的意思,如果还想深入理解的去看红宝书即可,我们目前只实现一种最理想的继承方式。
// 寄生组合继承
function Parent(name) {
  this.name = name
}
Parent.prototype.say = function() {
  console.log(this.name + ` say`);
}
Parent.prototype.play = function() {
  console.log(this.name + ` play`);
}

function Child(name, parent) {
  // 将父类的构造函数绑定在子类上
  Parent.call(this, parent)
  this.name = name
}

/**
 1. 这一步不用Child.prototype = Parent.prototype的原因是怕共享内存,修改父类原型对象就会影响子类
 2. 不用Child.prototype = new Parent()的原因是会调用2次父类的构造方法(另一次是call),会存在一份多余的父类实例属性
3. Object.create是创建了父类原型的副本,与父类原型完全隔离
*/
Child.prototype = Object.create(Parent.prototype);
Child.prototype.say = function() {
  console.log(this.name + ` say`);
}

// 注意记得把子类的构造指向子类本身
Child.prototype.constructor = Child;
// 测试
var parent = new Parent('parent');
parent.say()
var child = new Child('child');
child.say()
child.play(); // 继承父类的方法ES5实现继承-详细
第一种方式是借助call实现继承
function Parent1(){
    this.name = 'parent1';
}
function Child1(){
    Parent1.call(this);
    this.type = 'child1'
}
console.log(new Child1);
这样写的时候子类虽然能够拿到父类的属性值,但是问题是父类中一旦存在方法那么子类无法继承。那么引出下面的方法
第二种方式借助原型链实现继承:
function Parent2() {
    this.name = 'parent2';
    this.play = [1, 2, 3]
  }
  function Child2() {
    this.type = 'child2';
  }
  Child2.prototype = new Parent2();

  console.log(new Child2());
看似没有问题,父类的方法和属性都能够访问,但实际上有一个潜在的不足。举个例子:
var s1 = new Child2();
  var s2 = new Child2();
  s1.play.push(4);
  console.log(s1.play, s2.play); // [1,2,3,4] [1,2,3,4]
明明我只改变了s1的play属性,为什么s2也跟着变了呢?很简单,因为两个实例使用的是同一个原型对象
第三种方式:将前两种组合:
function Parent3 () {
    this.name = 'parent3';
    this.play = [1, 2, 3];
  }
  function Child3() {
    Parent3.call(this);
    this.type = 'child3';
  }
  Child3.prototype = new Parent3();
  var s3 = new Child3();
  var s4 = new Child3();
  s3.play.push(4);
  console.log(s3.play, s4.play); // [1,2,3,4] [1,2,3]
之前的问题都得以解决。但是这里又徒增了一个新问题,那就是Parent3的构造函数会多执行了一次(Child3.prototype = new Parent3();)。这是我们不愿看到的。那么如何解决这个问题?
第四种方式: 组合继承的优化1
function Parent4 () {
    this.name = 'parent4';
    this.play = [1, 2, 3];
  }
  function Child4() {
    Parent4.call(this);
    this.type = 'child4';
  }
  Child4.prototype = Parent4.prototype;
这里让将父类原型对象直接给到子类,父类构造函数只执行一次,而且父类属性和方法均能访问,但是我们来测试一下
var s3 = new Child4();
  var s4 = new Child4();
  console.log(s3)
子类实例的构造函数是Parent4,显然这是不对的,应该是Child4。
第五种方式(最推荐使用):优化2
function Parent5 () {
    this.name = 'parent5';
    this.play = [1, 2, 3];
  }
  function Child5() {
    Parent5.call(this);
    this.type = 'child5';
  }
  Child5.prototype = Object.create(Parent5.prototype);
  Child5.prototype.constructor = Child5;
这是最推荐的一种方式,接近完美的继承。