centos7.9--nginx--web相关基本操作
centos7.9–nginx1.18–web相关基础操作@TOCYK-清晰版本原创
centos7.9–nginx–web相关基础操作
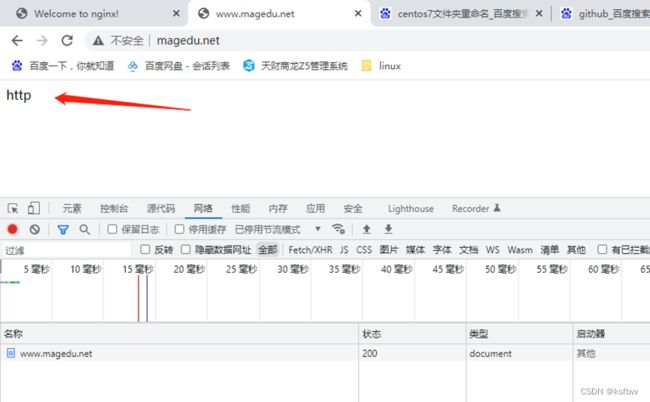
画图解释一次web请求的过程。涉及tcp/ip, dns, nginx,wsgi。
编译安装nginx, 详细解读常用参数。-详细的debug调试过程
[root@10 ~]# yum install epel-release -y
解释|命令
安装|sudo yum install -y nginx
检查安装:rpm -qi nginx
查看帮助:[root@10 ~]# nginx -h
[root@10 ~]# nginx -t
nginx: the configuration file /etc/nginx/nginx.conf syntax is ok
nginx: configuration file /etc/nginx/nginx.conf test is successful 启动脚本
[root@10 ~]# cat /usr/lib/systemd/system/nginx.service
配置:nginx
[root@10 ~]# grep -v “#” /etc/nginx/nginx.conf | grep -v “^$”
[root@10 ~]# ps -ef |grep nginx
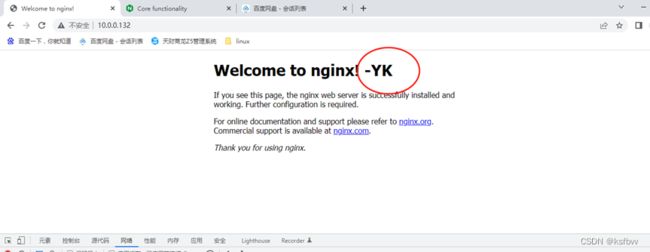
关闭防火墙,访问:
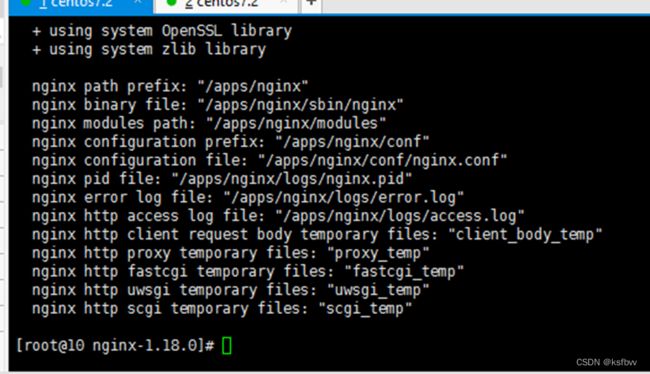
还是编译安装吧:版本、功能、路径都可以指定:
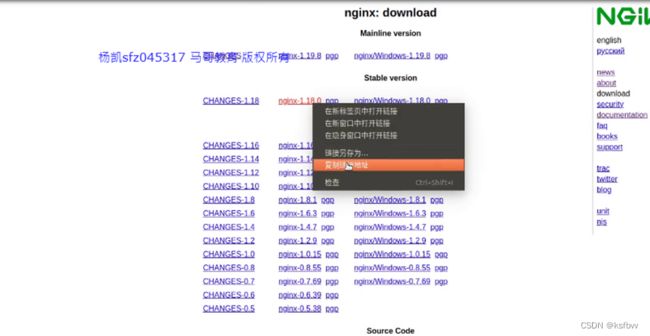
登录:www.nginx.org/en/download.html ,复制路径:
[root@10 ~]# cd /usr/local/src/
[root@10 src]# wget https://nginx.org/download/nginx-1.18.0.tar.gz
-bash: wget: command not found
yum install wget -y
[root@10 src]# wget https://nginx.org/download/nginx-1.18.0.tar.gz
[root@10 src]# ls
看下什么类型的怎么解压:
[root@10 src]# file nginx-1.18.0.tar.gz
nginx-1.18.0.tar.gz: gzip compressed data, from Unix, last modified: Tue Apr 21 22:09:06 2020
[root@10 src]# tar xvf nginx-1.18.0.tar.gz
[root@10 nginx-1.18.0]# ls
auto CHANGES CHANGES.ru conf configure contrib html LICENSE man README src
[root@10 nginx-1.18.0]#
[root@10 nginx-1.18.0]# ls
auto CHANGES CHANGES.ru conf configure contrib html LICENSE man README src
configure 是个脚本,里面有很多参数
[root@10 nginx-1.18.0]# cat configure
查看脚本支持的参数有哪些:[root@10 nginx-1.18.0]# ./configure --help
查看原来版本:nginx -V 没有版本
nginx -t 很实用,测试配置文件的正确性,一定要测试正确再运行
主配置文件:/etc/nginx/nginx.conf 着重会将
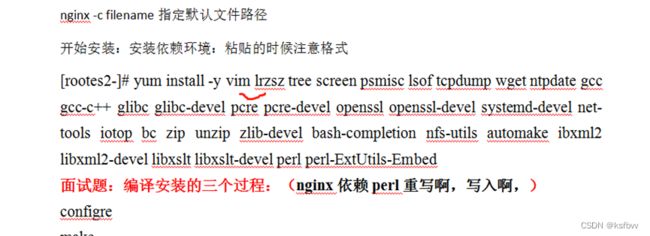
nginx -c filename 指定默认文件路径
开始安装:安装依赖环境:粘贴的时候注意格式
[rootes2-]# yum install -y vim lrzsz tree screen psmisc lsof tcpdump wget ntpdate gcc gcc-c++ glibc glibc-devel pcre pcre-devel openssl openssl-devel systemd-devel net-tools iotop bc zip unzip zlib-devel bash-completion nfs-utils automake ibxml2 libxml2-devel libxslt libxslt-devel perl perl-ExtUtils-Embed
面试题
:编译安装的三个过程:(nginx依赖perl重写啊,写入啊,)
configre
make
make install
配置支持的参数(功能)编译哪些模块
要先进到目录里:
[root@10 src]# ls
nginx-1.18.0 nginx-1.18.0.tar.gz
[root@10 src]# cd nginx-1.18.0
[root@10 nginx-1.18.0]#

再认真一点啊,大哥,还有把那个ss1改成ssl,终于搞定:
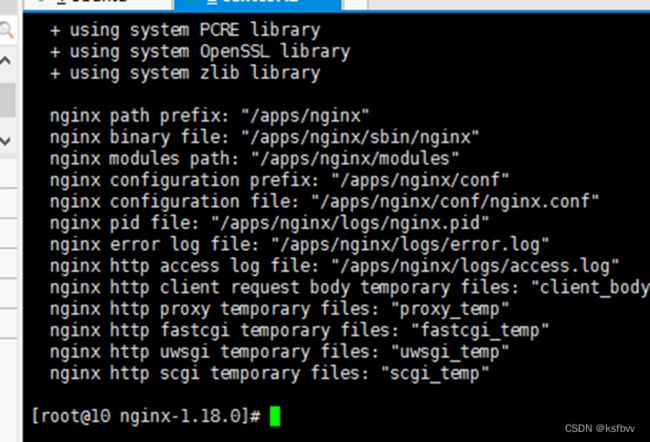
./configure --prefix=/apps/nginx
–user=nginx
–group=nginx
–with-http_ssl_module
–with-http_v2_module
–with-http_realip_module
–with-http_stub_status_module
–with-http_gzip_static_module
–with-pcre
–with-stream
–with-stream_ssl_module
–with-stream_realip_module
下面就是make 了
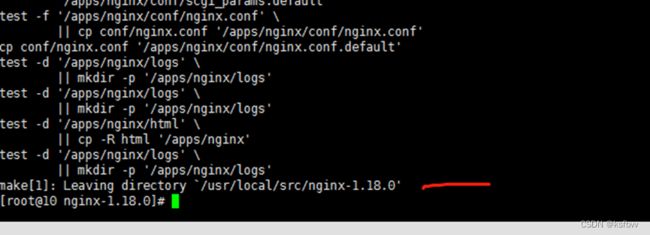
[root@10 nginx-1.18.0]# make

[root@10 nginx-1.18.0]# make install
[root@10 nginx-1.18.0]# /apps/nginx/sbin/nginx -t 先测下有没有问题
synta
x是OK的,但是这个指令还是报错了,因为没有这个账号
以普通用户启动nginx:
[root@10 nginx-1.18.0]# useradd nginx -s /sbin/nologin -u 2000
[root@10 nginx-1.18.0]# /apps/nginx/sbin/nginx -t
nginx: the configuration file /apps/nginx/conf/nginx.conf syntax is ok
nginx: configuration file /apps/nginx/conf/nginx.conf test is successful
[root@10 nginx-1.18.0]# /apps/nginx/sbin/nginx (-t 去掉跑起来)
加一个权限使普通用户可以访问
[root@10 nginx-1.18.0]# chown nginx.nginx -R /apps/nginx/
报错了:
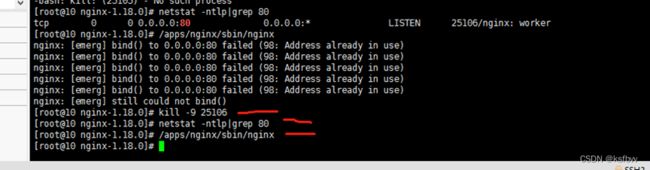
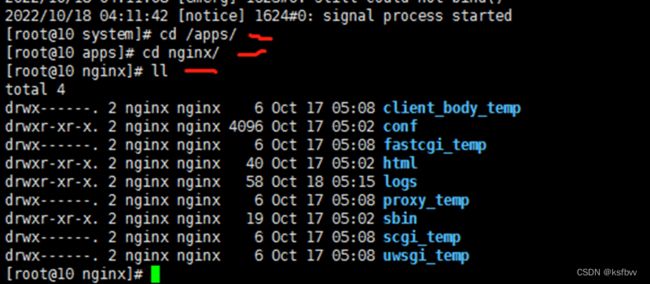
今天跟着视频学习Nginx时,启动Nginx报这个nginx: [emerg] still could not bind()。于是在网上找了解决方法在这里分享出来。报错界面:根据Nginx配置文件查看配置的端口默认的是80端口,然后我们输出指令查看端口占用情况。输入命令:netstat -ntlp|grep 80
然后我们可以发现64930端口给占用了。
2、输入kill命令杀死占用进程
kill -9 64930(进程号根据你自己的来输入)
3、重启Nginx
输入./nginx命令
原文链接:https://blog.csdn.net/OMGcome/article/details/123123461
查看端口是好的:

解决方法:[root@10 nginx-1.18.0]# kill -9 25106
全部kill掉,就不会报错了:
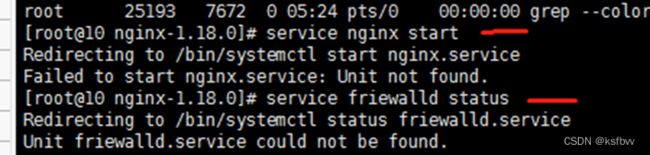
编译安装完的不能用service nginx status查看状态,而得用查看:
[root@10 nginx-1.18.0]# ps -ef |grep nginx
root 25155 1 0 05:19 ? 00:00:00 nginx: master process /apps/nginx/sbin/nginx
nginx 25156 25155 0 05:19 ? 00:00:00 nginx: worker process
root 25193 7672 0 05:24 pts/0 00:00:00 grep --color=auto nginx
可以看到已经启动了,也不能用如下命令启动:
而是得用当前目录跑它:
[root@10 nginx-1.18.0]# /apps/nginx/sbin/nginx
验证版本:
[root@10 nginx-1.18.0]# /apps/nginx/sbin/nginx -V

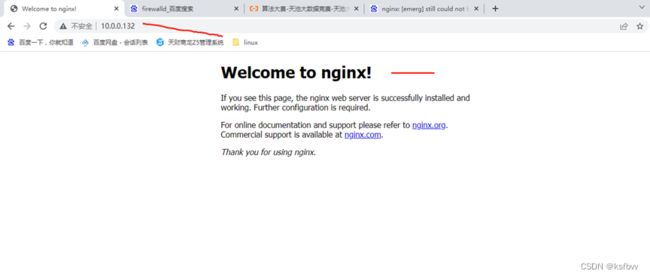
没有问题,访问页面,还是不行:

 关闭防火墙后访问:OK
再在命令行中输入命令“systemctl disable firewalld.service”命令,即可永久关闭防火墙。
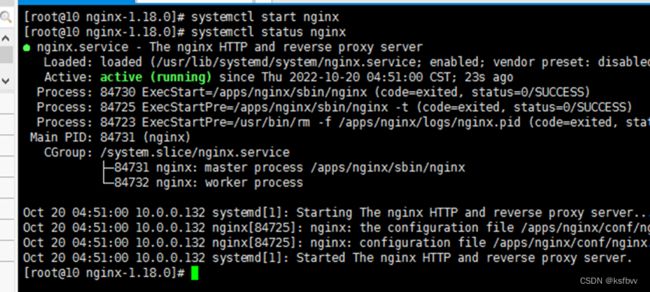
退出目录,新建nginx自启动脚本
[root@10 nginx-1.18.0]# systemctl daemon-reload
[root@10 nginx-1.18.0]# cd …
[root@10 src]# cd …
[root@10 local]# cd …
[root@10 usr]# cd …
[root@10 /]# cd …
[root@10 /]# cd -
/
[root@10 /]#
一种方式是在此文件下直接写命令
[root@10 system]# ll /etc/rc.d/rc.local
-rw-r–r–. 1 root root 473 Sep 1 22:57 /etc/rc.d/rc.local
[root@10 system]# chmod a+x /etc/rc.d/rc.local
[root@10 system]# ll /etc/rc.d/rc.local
-rwxr-xr-x. 1 root root 473 Sep 1 22:57 /etc/rc.d/rc.local
[root@10 system]#
还有一种方式是写service文件:进入目录:

可以看到我们的pid默认路径也是在apps/nginx/logs/nginx.pid 所以我们用老师的第二个路径
cd /lib/systemd/system/ ,,新建nginx.service touch
[root@10 /]# cd /lib/systemd/system/
[root@10 system]# touch nginx.service
[root@10 system]# ls

[root@10 system]# vim nginx.service
[Unit]
Description=nginx - high performance web server
Documentation=http://nginx.org/en/docs/
After=network-online.target remote-fs.target nss-lookup.target
Wants=network-online.target
[Service]
Type=forking
PIDFile=/apps/nginx/run/nginx.pid
Execstart=/apps/nginx/sbin/nginx -c /apps/nginx/conf/nginx.conf
ExecReload=/bin/kill -s HUP $MAINPID
Execstop=/bin/kill -s TERM $MAINPID
[Install]
WantedBy=multi-user.target
先把nginx停了
[root@10 system]# /apps/nginx/sbin/nginx -s stop
vim nginx.service
要修改路径:
复制一个会话,检查.conf的路径是否正确:


[Unit]
Description=nginx - high performance web server
Documentation=http://nginx.org/en/docs/
After=network-online.target remote-fs.target nss-lookup.target
Wants=network-online.target
[Service]
Type=forking
PIDFile=/apps/nginx/logs/nginx.pid
Execstart=/apps/nginx/sbin/nginx -c /apps/nginx/conf/nginx.conf
ExecReload=/bin/kill -s HUP $MAINPID
Execstop=/bin/kill -s TERM $MAINPID
[Install]
WantedBy=multi-user.target
这里遇到一个问题,新建nginx.service后,/apps/nginx/logs/下的nginx.pid不见了,有可能是新建之前没有关闭nginx,手动回退后恢复,代码也考出来了,现在重试一遍:
[root@10 logs]# cat nginx.pid
26108
[root@10 logs]#
开始测试:确认全部关了,这里OK

这里也没有了

看来不能关闭nginx去写脚本,用reload试试,先拍个照
启动:[root@10 system]# /apps/nginx/sbin/nginx

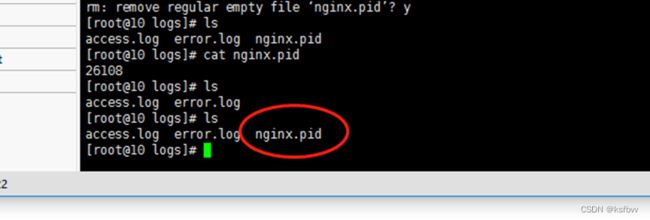
这里又有了,重新touch
[root@10 system]# cd /lib/systemd/system/
[root@10 system]# touch nginx.service
[root@10 system]# vim nginx.service
验证自启动脚本:
[root@10 system]# systemctl daemon-reload

按照操作报错:
initrd-udevadm-cleanup-db.service rescue.service systemd-binfmt.service wpa_supplicant.service
[root@10 system]# vim nginx.service
[root@10 system]# systemctl daemon-reload
[root@10 system]# systemctl start nginx
Failed to start nginx.service: Unit is not loaded properly: Invalid argument.
See system logs and ‘systemctl status nginx.service’ for details.
[root@10 system]# systemctl enable nginx
Created symlink from /etc/systemd/system/multi-user.target.wants/nginx.service to /usr/lib/systemd/system/nginx.service.
[root@10 system]# systemctl status nginx
● nginx.service - nginx - high performance web server
Loaded: error (Reason: Invalid argument)
Active: inactive (dead)
Docs: http://nginx.org/en/docs/
Oct 17 08:19:37 10.0.0.132 systemd[1]: [/usr/lib/systemd/system/nginx.service:10] Unknown lvalue ‘Execstart’ in section ‘Service’
Oct 17 08:19:37 10.0.0.132 systemd[1]: [/usr/lib/systemd/system/nginx.service:12] Unknown lvalue ‘Execstop’ in section ‘Service’
Oct 17 08:19:37 10.0.0.132 systemd[1]: nginx.service lacks both ExecStart= and ExecStop= setting. Refusing.
Oct 17 08:20:42 10.0.0.132 systemd[1]: [/usr/lib/systemd/system/nginx.service:10] Unknown lvalue ‘Execstart’ in section ‘Service’
Oct 17 08:20:42 10.0.0.132 systemd[1]: [/usr/lib/systemd/system/nginx.service:12] Unknown lvalue ‘Execstop’ in section ‘Service’
Oct 17 08:20:42 10.0.0.132 systemd[1]: nginx.service lacks both ExecStart= and ExecStop= setting. Refusing.
[root@10 system]#
教练推荐用第一种nginx.service写法:(记得改成自己pid的路径)
[root@10 ~]# cd /lib/systemd/system
[root@10 system]# ls
[Unit]
Description=The nginx HTTP and reverse proxy server
After=network.target remote-fs.target nss-lookup.target
[ Service]
Type=forking
PIDFile=/apps/nginx/logs/nginx.pid
#Nginx will fail to start if /run/nginx. pid already exists but has the wrong
#SELinux context. This might happen when running nginx-t’ from the cmdline.
#https://bugzilla. redhat. com/show _bug. cgi? id=1268621
ExecStartPre=/usr/bin/rm -f /apps/nginx/logs/nginx.pid
ExecStartPre=/apps/nginx/sbin/nginx -t
ExecStart=/apps/nginx/sbin/nginx
ExecReload=/bin/kill -s HUP $MAINPID
KillSignal=SIGQUIT
TimeoutStopSec=5
KillMode=process
PrivateTmp=true
[Install]
WantedBy=multi-user.target
验证自启动脚本:
[root@10 system]# systemctl daemon-reload
[root@10 system]# systemctl start nginx
Failed to start nginx.service: Unit is not loaded properly: Invalid argument.
See system logs and ‘systemctl status nginx.service’ for details.
[root@10 system]# systemctl enable nginx
全局配置、http详细配置,还是报错:咱们来一行一行解除

添加行数::set nu 回车,先改第五行,发现多了个空格,改完运行直接OK了 有错误不要慌,还是要耐心debug,从行数小的bug开始改
还是能正常访问: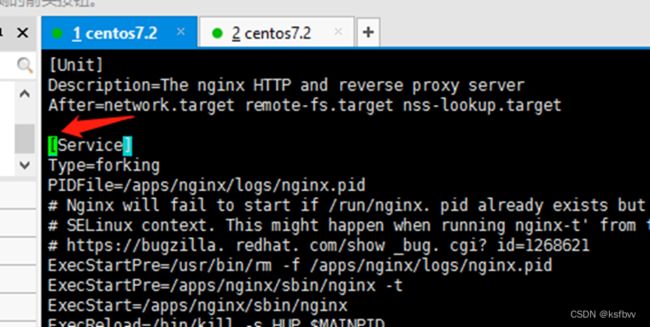

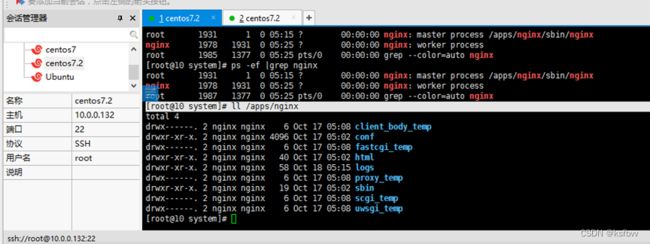
[root@10 system]# ps -ef |grep nginx

然后练一下启动、停止,看看正常不正常
[root@10 system]# systemctl stop nginx.service
[root@10 system]# ps -ef |grep nginx
root 1854 1377 0 05:13 pts/0 00:00:00 grep --color=auto nginx
[root@10 system]# systemctl start nginx.service
[root@10 system]# systemctl reload nginx.service
查看nginx 文件:[root@10 system]# ll /apps/nginx
日志路径:[root@10 system]# ll /apps/nginx/logs/
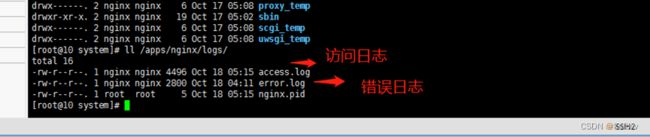
[root@10 system]# tail /apps/nginx/logs/access.log

这个报错就是网页头部的小图标:
,自己的网页没有,但不影响访问,我们后续来讲怎么解决。
nginx.conf十分重要,配置也很多,配不好,nginx就起不来,先拍个快照
除了配置文件,还有一些其他的协议配置文件,这个一般不要动:

[root@10 conf]# vim fastcgi.conf 这里面不要动,动了就麻烦了

[root@10 conf]# vim mime.types 告诉浏览器文件类型以及如何打开

[root@10 conf]# vim nginx.conf 重头戏,举例:
特殊情况:一个指令传递多个值:log格式:
记住一个指令必须以分号结尾,编辑完成之后一定先测一下,再reload:
[root@10 conf]# /apps/nginx/sbin/nginx/ -t
MIME 类型参考文档:https://developer.mozilla.org/zhCN/docs/Web/HTTP/Basics_of_HTTP/MIME_Types
指令和变量文档:https://nginx.org/en/docs/

在指令界面可以搜索(ctrl+F),输入user,下拉选择

点开,会告诉你user的用法和含义:

单个进程最大的连接数,如果是4核,那么最大并发数就是:4*1024=4096个,很小,一般都改成65536,我们改成100000也可以
http最重要的配置文件:虚拟主机啊都是在这里,默认http模块就在nginx.conf中
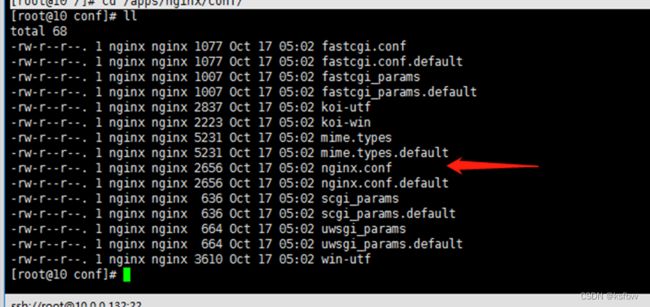
路径:[root@10 /]# cd /apps/nginx/conf/ ,ls ,vim
这个文件可以有多个serve块,一个nginx正常可以跑10000多个网站。一万五六两万个。两万多个虚拟主机,四个nginx就够了。一个server文件又可以包含多个location(流程)
,模型:一个域名有多个location(定位),动静分离也是基于它的。
匹配域名,就是下图头部中的host:

PV量:page view 客户端先发一个pv,一般大型公司一天就是几千万,几个亿,一个PV包含各种资源,html路径:[root@10 conf]# ll /apps/nginx/ ,,注意它是一个相对的不是固定的
进入index.html:这个文件一般都是由公司开发写的
[root@10 conf]# ll /apps/nginx/html/
total 8
-rw-r–r–. 1 nginx nginx 494 Oct 17 05:02 50x.html
-rw-r–r–. 1 nginx nginx 612 Oct 17 05:02 index.html
[root@10 conf]# vim /apps/nginx/html/index.html
这个页面改完后,刷新将会显示你改过的界面,比如我改的
效果:
基于nginx完成动静分离部署 lamp。php到后端php-fpm, static/ 在nginx本地。
•在另一台机器安装MySQL,搜索mariadb:yum search mysql,
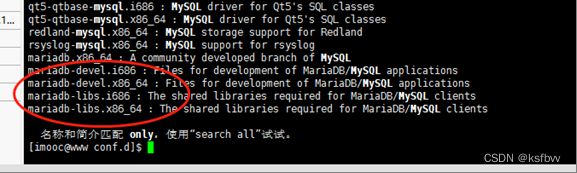 删除它yum remove mariadb-libs.x86_64,
 2.mysql源的下载;https://dev.mysql.com/downloads/repo/yum/
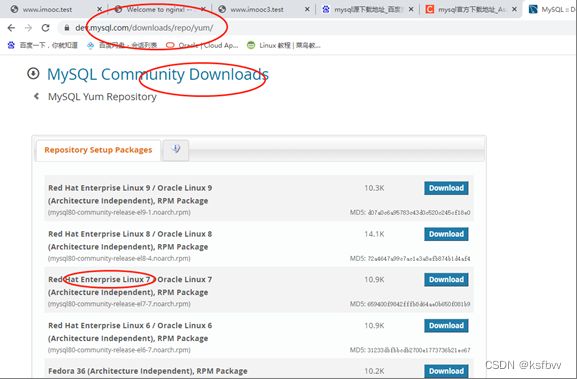
点击download ,进入后直接点击最下方右击选择复制链接即可
 进入Xshell,把链接复制进去,如下:
[imooc@www conf.d]$ cd /tmp
[imooc@www tmp]$ wget https://dev.mysql.com/get/mysql80-community-release-el7-7.noarch.rpm ,运行,看到已下载完成,如下:

安装源:yum localinstall mysql80-community-release-el7-7.noarch.rpm
源安装完成,yum search mysql,查询一下,看到服务已经有了

安装:sudo yum install mysql-community-server,完毕,
 启动mysql:sudo service mysqld start
查看状态:ps -ef | grep mysql (-e 显示所有进程,-f 显示所有格式)
restart看时间变化
 修改mysql密码:sudo cat /var/log/mysqld.log | grep password
密码:5dCXXo?kmffc
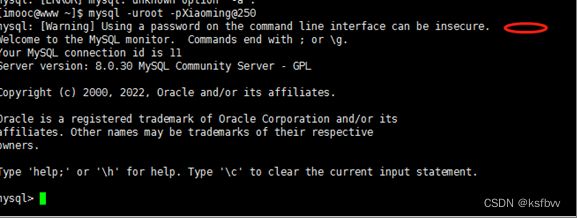
进入mysql:mysql -uroot -p5dCXXo?kmffc ,成功进入mysql:
 基本命令(mysql):报错,提示设置密码
 又报错,ALTER USER USER() IDENTIFIED BY ‘Yangk@130’;
成功了,但是提示直接使用密码的方式不安全。以后这样登录:
[imooc@www ~]$ mysql -uroot -p
Enter password:
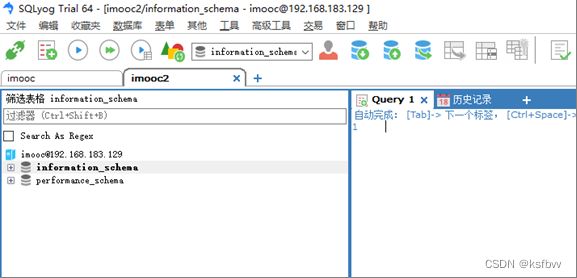
mysql -h127.0.0.1 -uroot -p 中间IP可以替换成连接远程数据库,安装SQLyog,填入参数提示为开启远程连接。

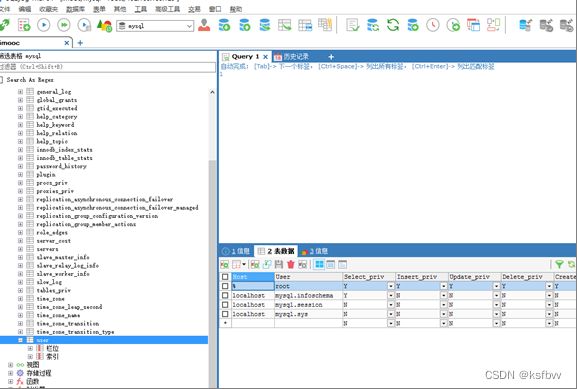
开启:use mysql;show tables;select * from user \G;
只用这两个信息
 此时看到了四条记录:使用最后一条,将更新使所有终端都可以访问user表

update user set host = ‘%’ where Host = “localhost” and User =“root”;
再次执行查询会发现:

再打开远程连接工具访问,还是不行,刷新权限:flush privileges;测试OK,或者重启服务也行。
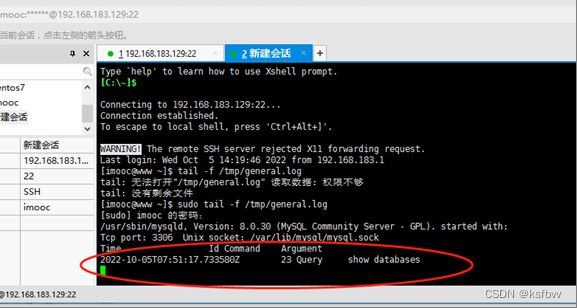
 开启genelog:set global general_log_file=“/tmp/general.log”;#路径
set global general_log=on; #全局,关闭改成off就行了
再打开一个终端:sudo tail -f /tmp/general.log
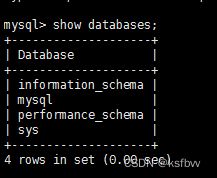
在原终端运行:show databases;,彼端会多一条命令:OK
 mysql创建用户:
create user ‘imooc’@‘%’ identified by ‘123456’; (%代表任何主机)
报错:
![]()
记住设置密码简单的命令变为:set global validate_password.policy=0;
set global validate_password.length=1;
再次创建,成功:
 刷新按钮:
刷新按钮:

新增的用户什么都看不到:
赋予权限:
grant all privileges on . to ‘imooc’@‘%’ identified by ‘123456’ with grant option;
报错:,正确的:grant all privileges on . to ‘imooc’@‘%’ with grant option; 新版的添加和创权分开,不用定义密码了。
flush privileges;
只想赋部分权限:
grant select on mysql.* to ‘imooc’@‘%’; 报错:
![]() 解决办法:grant system_user on . to ‘root’;(对root先授权),再执行上面预计就OK
解决办法:grant system_user on . to ‘root’;(对root先授权),再执行上面预计就OK
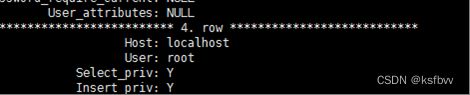
查看某个用户的权限:
mysql> show grants for ‘jack’@‘%
收回权限:
revoke all privileges on . FROM imooc;
root密码忘了怎么办?
sudo vim /etc/my.cnf
增加一行:跳出授权表的验证
 sudo service mysqld restart
mysql -uroot -p 可以直接进入mysql了 use mysql;show tables;
SET PASSWORD = PASSWORD(“456789”); 报错,数据库正在运行当中
select version();-------查看mysql版本 8.0.30
mysql> use mysql
Database changed
mysql> update user set authentication_string=’’ where user = ‘root’;#将密码先置空,有点麻烦,配合着看:
ysql> alter user ‘root’@‘%’ identified by ‘456789’;
ERROR 1290 (HY000): The MySQL server is running with the --skip-grant-tables option so it cannot execute this statement
mysql> FLUSH PRIVILEGES;
Query OK, 0 rows affected (0.00 sec)
mysql> alter user ‘root’@‘%’ identified by ‘456789’;
ERROR 1819 (HY000): Your password does not satisfy the current policy requirements
mysql> set global validate_password.policy=0;
Query OK, 0 rows affected (0.01 sec)
mysql> set global validate_password.length=1;
Query OK, 0 rows affected (0.00 sec)
mysql> use mysqlalter user ‘root’@‘%’ identified by ‘456789’;
ERROR 1064 (42000): You have an error in your SQL syntax; check the manual that corresponds to your MySQL server version for the right syntax to use near ‘user ‘root’@’%’ identified by ‘456789’’ at line 1
mysql> alter user ‘root’@‘%’ identified by ‘456789’;
Query OK, 0 rows affected (0.01 sec)
退出,重新登录,输入新密码:456789好了
sudo vim /etc/my.cnf 记得把跳过验证关掉(注释掉)。
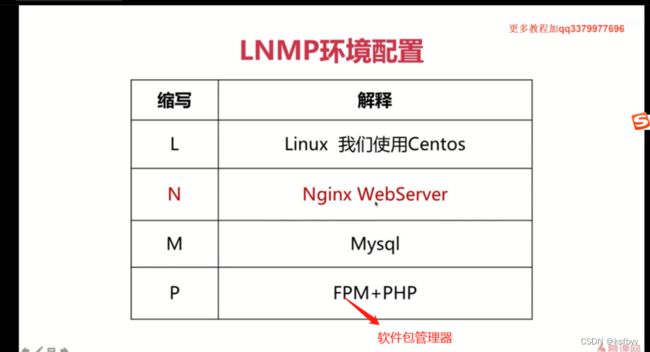
PHP的安装部署
20. PHP:php基础环境配置、php扩展安装:
Laravel5环境配置、Yii2环境配置、TP5环境配置(吉祥三宝)
 第一步:搜索 yum search php 发现本来就是有的;yum info php ,版本信息都有
 但我们php版本要大于5.6,所以不满足,安装源:
sudo rpm -Uvh http://mirror.webtatic.com/yum/el7/epel-release.rpm
第二个源:sudo rpm -Uvh http://mirror.webtatic.com/yum/el7/webtatic-release.rpm
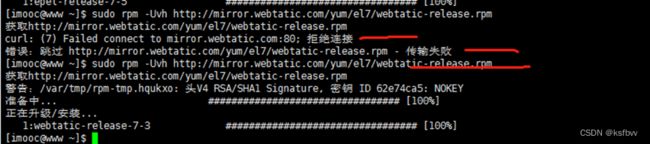 拒绝链接,就再连一次。
以上两个源根本就用不了,试试别的源:
rpm -ivh http://d1.fedoraproject.org/pub/epel/7/x86_64/e/epel-release-7-5.noarch.rpm
这也用不了,尝试编译安装:
wget -o php7.tar.gz http://cn2.php.net/get/php-7.1.1.tar.gz/from/this/mirror

tar -xvf php7.tar.gz
已保存 “/etc/yum.repos.d/epel.repo” [664/664])
 按照这个大神的感觉是安装上了,但是看版本还是没变:
https://www.likecs.com/show-305600419.html
下载php
yum install -y wget
wget http://cn2.php.net/distributions/php-7.1.21.tar.gz
解压
tar -zxvf php-7.1.21.tar.gz
cd php-7.1.21
编译:
安装epel
yum install -y epel-release
wget -O /etc/yum.repos.d/epel.repo http://mirrors.aliyun.com/repo/epel-7.repo
安装编译依赖
yum install -y libxml2 libxml2-devel openssl openssl-devel bzip2 bzip2-devel
libcurl libcurl-devel libjpeg libjpeg-devel libpng libpng-devel freetype freetype-devel
gmp gmp-devel libmcrypt libmcrypt-devel readline readline-devel libxslt libxslt-devel gcc
创建目录
mkdir -p /data/service/php/etc./configure
–prefix=/data/service/php
–with-config-file-path=/data/service/php/etc
–enable-fpm
–with-fpm-user=nginx
–with-fpm-group=nginx
–enable-inline-optimization
–disable-debug
–disable-rpath
–enable-shared
–enable-soap
–with-libxml-dir
–with-xmlrpc
–with-openssl
–with-mcrypt
–with-mhash
–with-pcre-regex
–with-sqlite3
–with-zlib
–enable-bcmath
–with-iconv
–with-bz2
–enable-calendar
–with-curl
–with-cdb
–enable-dom
–enable-exif
–enable-fileinfo
–enable-filter
–with-pcre-dir
–enable-ftp
–with-gd
–with-openssl-dir
–with-jpeg-dir
–with-png-dir
–with-zlib-dir
–with-freetype-dir
–enable-gd-native-ttf
–enable-gd-jis-conv
–with-gettext
–with-gmp
–with-mhash
–enable-json
–enable-mbstring
–enable-mbregex
–enable-mbregex-backtrack
–with-libmbfl
–with-onig
–enable-pdo
–with-mysqli=mysqlnd
–with-pdo-mysql=mysqlnd
–with-zlib-dir
–with-pdo-sqlite
–with-readline
–enable-session
–enable-shmop
–enable-simplexml
–enable-sockets
–enable-sysvmsg
–enable-sysvsem
–enable-sysvshm
–enable-wddx
–with-libxml-dir
–with-xsl
–enable-zip
–enable-mysqlnd-compression-support
–with-pear
–enable-opcache
make && make install
增加环境变量
cat < /etc/profile.d/php.sh
export PATH=/data/service/php/bin:$PATH
EOF
生效环境变量
. /etc/profile
配置php-fpm
cp php.ini-production /data/service/php/etc/php.ini
cp /data/service/php/etc/php-fpm.conf.default /data/service/php/etc/php-fpm.conf
cp /data/service/php/etc/php-fpm.d/www.conf.default /data/service/php/etc/php-fpm.d/www.conf
配置php-fpm服务
注意:这个文件是根据上面C++编译配置动态生成的文件,里面写了上面配置的路径
cp sapi/fpm/init.d.php-fpm /etc/init.d/php-fpm# 启动权限
chmod +x /etc/init.d/php-fpm
启动:
增加开机启动
systemctl enable php-fpm
systemctl start php-fpm
再回到sudo yum install php56w-fpm ,两个yes
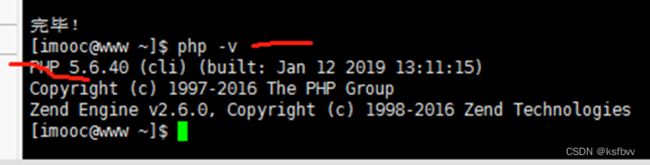
php -v 报错:未找到命令,要安装基础扩展
安装PHP扩展:
sudo yum install php56w.x86_64 php56w-cli.x86_64 php56w-common.x86_64
php56w-gd.x86_64 php56w-mbstring.x86_64 php56w-mcrypt.x86_64 php56w-
mysql.x86_64 php56w-pdo.x86_64 ,,,等待
以上基础扩展前三个:基础包、cli命令行包(它就会打印我们的版本)、common也是个基础包;gd是php里面进行图片处理的核心库、mbstring字符串、mcrypt加密、pdo基于mysql属于安全,
这个时候:php -v,就可以打印出来了
 启动fpm:ps -ef |grep fpm
sudo service php-fpm start fpm默认会启动master进程,下面的子进程才是真正处理我们php的子进程。

nginx 利用rewrite完成 全栈ssl配置。
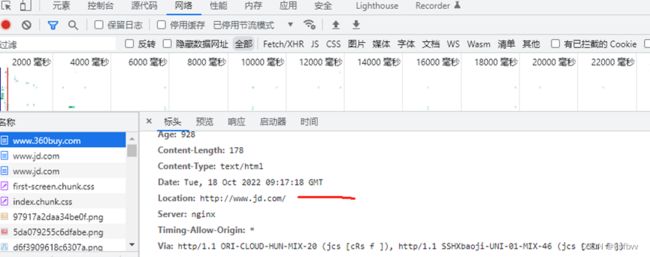
京东以前的网址:https://www.360buy.com/ ,还可以使用,输入后会跳转到J.com,这就是基于rewrite实现的。
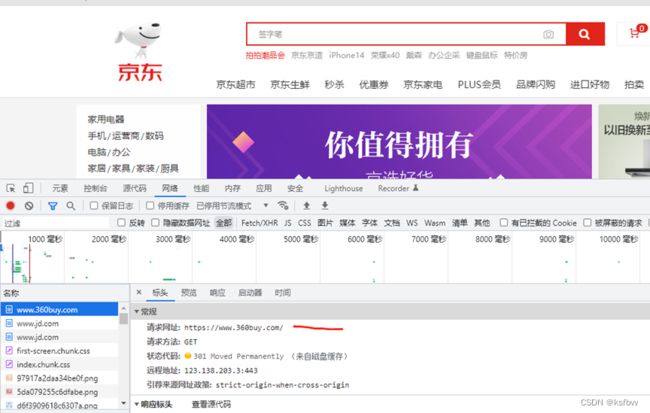 永久转定向:
locating确定host 复习一下:
 要先安装PCRE依赖,前面已经安装过了:
 指令区别:if没有else 就是单if
if(条件){
}
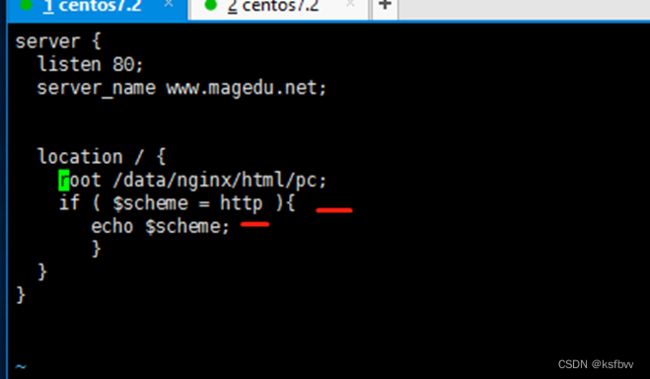
rewrite最多循环10次就会报错,举例:如果协议是http,就把它ehco出来
先找到我们的路径:/apps/nginx/conf/http/ 没有这个路径,返回到第五课看看,第六课后半截老师创建了两个目录:
[root@10 /]# mkdir /data/nginx/html -p 用来保存html静态文件。(PPt42页最下方)
mkdir -p :递归创建目录,即使上级目录不存在,会按目录层级自动创建目录
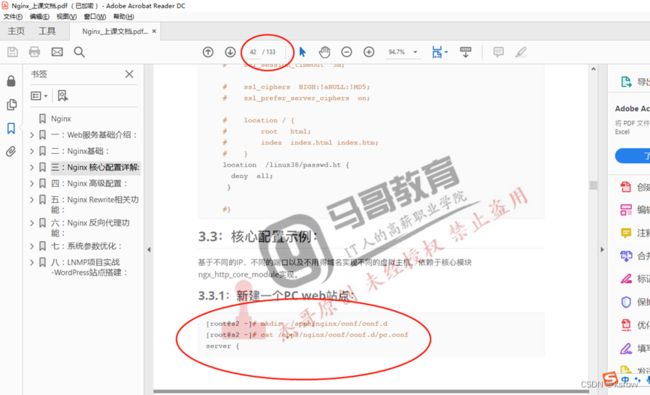 第二个目录:[root@10 /]# cd /apps/nginx/conf/
[root@10 conf]# vim nginx.conf 但是我们很少直接在这里面去写几千行代码,所以会重建目录保存自己写的那些http 直接在conf目录下创建http文件夹
[root@10 conf]# mkdir http
[root@10 conf]# cd http/
[root@10 http]# vim pc.conf 创建pc.conf文件,后缀名要一致,后期会用include把nginx文件导入进去,写个配置:
server {
listen 80;
server_name www.magedu.net;
location / {
root /data/nginx/html/pc; #这里是自己的资源路径,需要配置,如下:
}
}
~
[root@10 http]# mkdir /data/nginx/html/pc
然后在里面创建静态资源:
vim /data/nginx/html/pc/index.html
这个就是我们的PC站点
写入内容:
pc web m43
然后把它导入进去,需要修改主配置文件才会生效 [root@10 http]# cd .. [root@10 conf]# vim nginx.conf^C [root@10 conf]# ll /apps/nginx/ total 4 drwx------. 2 nginx nginx 6 Oct 17 05:08 client_body_temp drwxr-xr-x. 3 nginx nginx 4096 Oct 19 05:24 conf drwx------. 2 nginx nginx 6 Oct 17 05:08 fastcgi_temp drwxr-xr-x. 2 nginx nginx 40 Oct 18 07:26 html drwxr-xr-x. 2 nginx nginx 58 Oct 18 05:15 logs drwx------. 2 nginx nginx 6 Oct 17 05:08 proxy_temp drwxr-xr-x. 2 nginx nginx 19 Oct 17 05:02 sbin drwx------. 2 nginx nginx 6 Oct 17 05:08 scgi_temp drwx------. 2 nginx nginx 6 Oct 17 05:08 uwsgi_temp [root@10 conf]# ll /apps/nginx/conf/http/ total 4 -rw-r--r--. 1 root root 103 Oct 19 05:52 pc.conf [root@10 conf]# ll /apps/nginx/conf/http/*.conf #后期匹配.conf才导入 -rw-r--r--. 1 root root 103 Oct 19 05:52 /apps/nginx/conf/http/pc.conf [root@10 conf]# vim nginx.conf 在http的最下面一行导入:位置如图: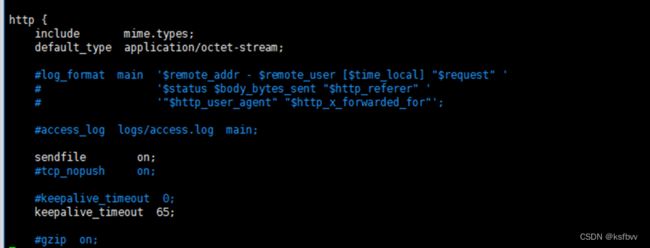
 导入代码:include /apps/nginx/conf/http/*.conf
 先检测一下: 报错
[root@10 conf]# /apps/nginx/sbin/nginx -t
nginx: [emerg] unexpected “}” in /apps/nginx/conf/nginx.conf:117
nginx: configuration file /apps/nginx/conf/nginx.conf test failed
[root@10 conf]#
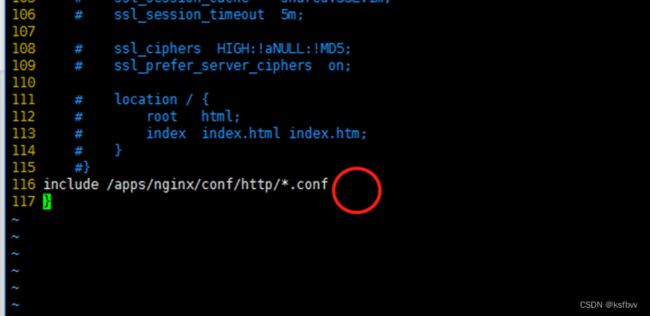
没加分号。。。。再次检测,成功
 [root@10 conf]# /apps/nginx/sbin/nginx -s reload
本机host加个解析:linux:

windows:
 测试成功:
测试成功:
 现在回到rewrite的配置:先找到我们的路径:/apps/nginx/conf/http/ OK了
[root@10 conf]# cd /apps/nginx/conf/http/
[root@10 http]#
好习惯:先来个快照:自己的http域名解析配置完成
 修改内容:[root@10 http]# vim pc.conf
检测,又报错:
 unknown directive “echo” 回到第九课:echo模块的安装,二次开发nginx模块编译进nginx,使用add命令编译:查看add命令:
[root@10 /]# cd usr/local/src
[root@10 src]# cd nginx-1.18.0/
[root@10 nginx-1.18.0]# ./configure --help |grep add
 安装:[root@10 nginx-1.18.0]# yum install git -y
找到项目的地址:老师给的github的源用不了,在码云上找源OK:

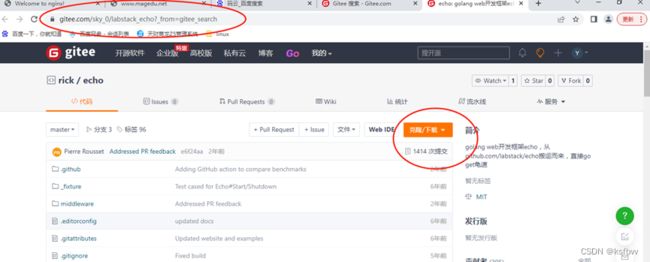 https://gitee.com/sky_0/labstack_echo?_from=gitee_search
但记住不要和nginx装在同一个目录
[root@10 nginx-1.18.0]# cd …
[root@10 src]# pwd
/usr/local/src
[root@10 src]# git clone https://gitee.com/sky_0/labstack_echo.git

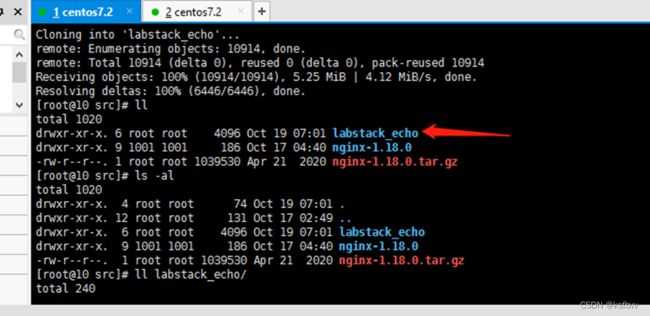 这个源的目录不对啊,教练给了个zip压缩包,上传、解压:
[root@10 src]# rz
[root@10 src]# ll
 重命名:
重命名:
[root@10 src]# mv echo-nginx-module-master echo-nginx-module
![]() 可以看看当中的C语言写的模块:
可以看看当中的C语言写的模块:
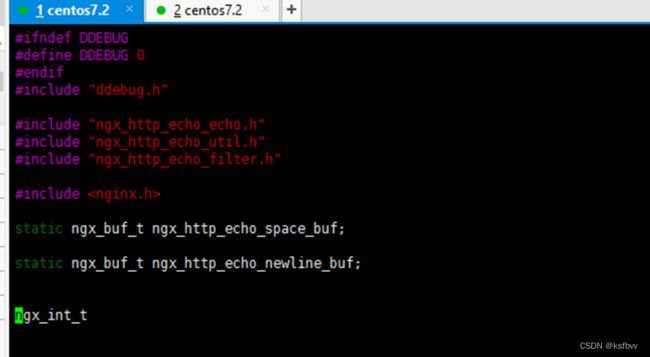
vim echo-nginx-module/src/ngx_http_echo_echo.c
 加入这是单位开发写的模块,现在开始编译:,找到–add这个功能:
[root@10 src]# cd nginx-1.18.0/
[root@10 nginx-1.18.0]# ./configure --help |grep add
然后把你源码的绝对路径写上去:
[root@10 nginx-1.18.0]# ll /usr/local/src/echo-nginx-module
 然后把你的文件重新编译,记得一定先在编辑器上写好再往运行环境拷贝,否则复制一半执行容易出问题。
./configure
–prefix=/apps/nginx
–user=nginx --group=nginx
–with-http_ssl_module
–with-http_v2_module
–with-http_realip_module
–with-http_stub_status_module
–with-http_gzip_static_module
–with-pcre
–with-stream
–with-stream_ssl_module
–with-stream_realip_module
–with-http_perl_module
–add-module=/usr/local/src/echo-nginx-module
 成功了,编译进去
[root@10 nginx-1.18.0]# make

[root@10 nginx-1.18.0]# make install
 make install完了之后呢,我们就编译一下,看看它支不支持echo指令了
先关掉nginx,再编译。[root@10 nginx-1.18.0]# systemctl stop nginx
[root@10 nginx-1.18.0]# vim /apps/nginx/conf/http/pc.conf
在最后一行加入:
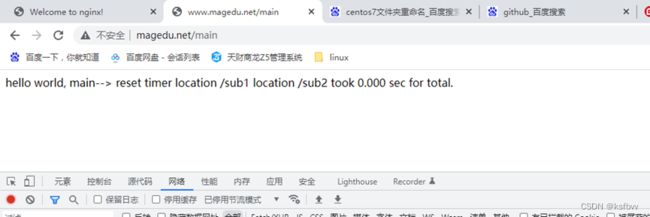
location /main {
echo reset timer;
echo location /sub1;
echo location /sub2;
echo"took $echo_timer_elapsed sec for total.";
}
location /sub1 {
echo_sleep 1;
echo sub1;
}
location /sub2 {
echo_sleep 1;
echo sub2;
}
保存测试:

报错,:set nu 回车,少了个下划线,又报错:

少了个空格,测试,OK
 重启:
重启:
[root@10 nginx-1.18.0]# systemctl start nginx
[root@10 nginx-1.18.0]# systemctl status nginx
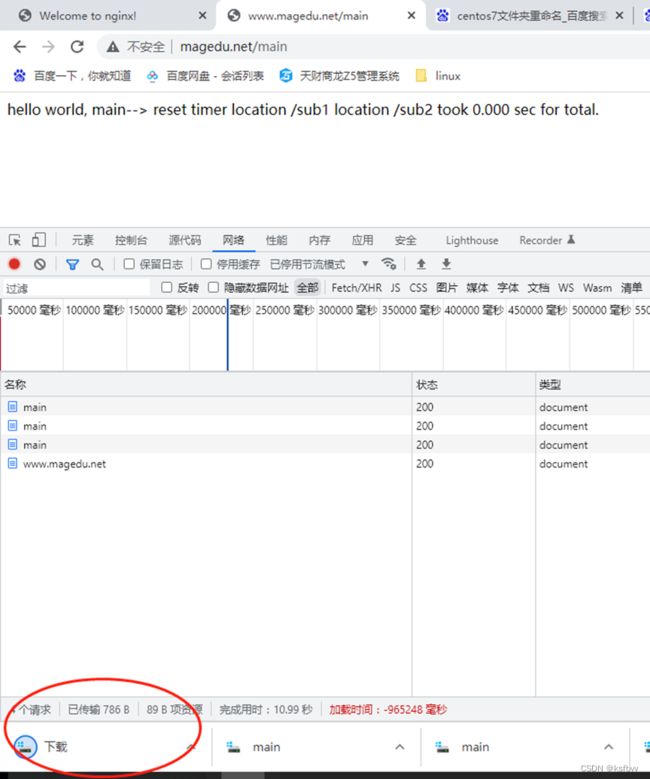
 OK,访问www.magedu.net/mian 可以看到已经生效了,可以echo出来了:
 现在再回到rewrite,判断,输出。
[root@10 nginx-1.18.0]# cd /apps/nginx/conf/http/
[root@10 http]# vim pc.conf
[root@10 http]# /apps/nginx/sbin/nginx -t
[root@10 http]# /apps/nginx/sbin/nginx -s reload
这时候访问,会下载文件,打开

显示协议http,把default_type text/html;加上,让它以文本的方式打开,不要下载
 [root@10 http]# /apps/nginx/sbin/nginx -s reload
[root@10 http]#
刷新,访问,成功
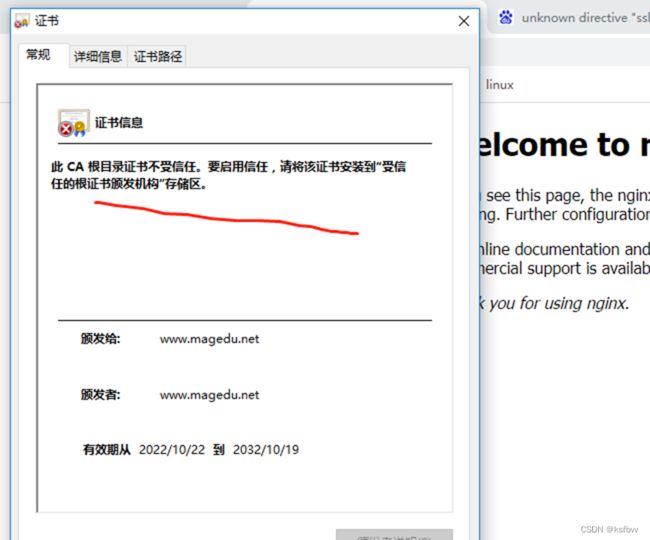
如果写上https就不行,那怎么办呢?也要匹配https

https好像不支持,回到12节课,查看https的开启

首次输入的不是https,会发生两次交互、证书的交互,转换成https
查看nginx是否安装http_ssl_module模块
[root@10 http]# cd /apps/nginx/sbin/
[root@10 sbin]# ./nginx -V
实验:让它们自签名证书
第一步:创建服务器证书秘钥文件
[root@10 certs]# openssl genrsa -des3 -out ca.key 1024
Enter pass phrase for ca.key: 123456
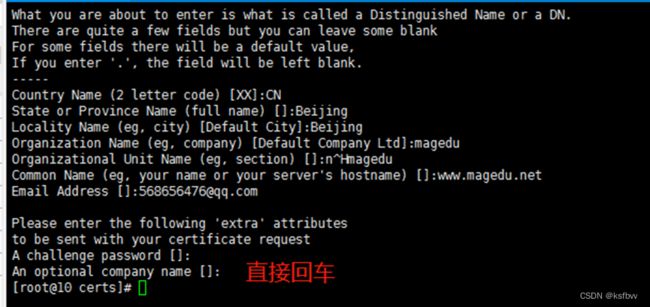
创建服务器证书的申请文件
[root@10 certs]# openssl req -new -key ca.key -out ca.csr
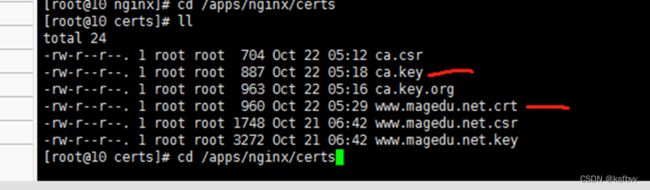
 [root@10 certs]# ll
 备份一份服务器秘钥文件[root@10 certs]# cp ca.key ca.key.org

去除文件口令:
[root@10 certs]# openssl rsa -in ca.key.org -out ca.key
Enter pass phrase for ca.key.org:
writing RSA key
[root@10 certs]#
生成证书文件:
[root@10 certs]# openssl x509 -req -days 3650 -in ca.csr -signkey ca.key -out www.magedu.net.crt
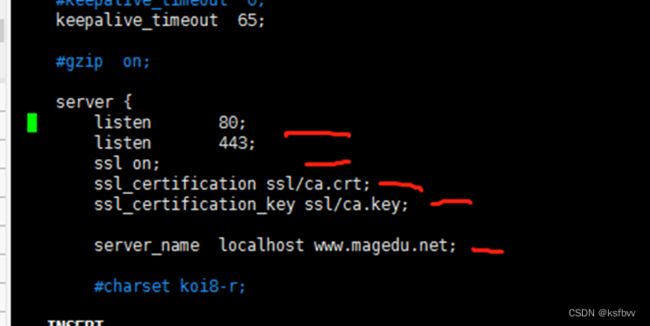
终于OK了,修改nginx.conf
[root@10 nginx]# cd conf/
[root@10 conf]# ll
[root@10 conf]# vim nginx.conf
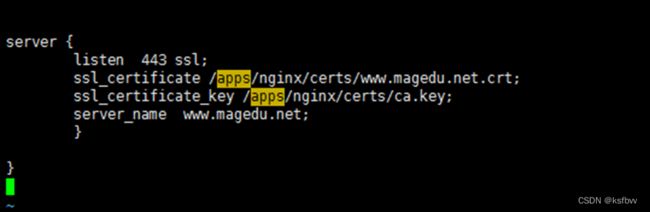
server {
listen 80;
listen 443;
ssl on;
ssl_certification ssl/ca.crt;
ssl_certification_key ssl/ca.key;
server_name localhost www.magedu.net;
 终于OK了,修改nginx.conf
[root@10 nginx]# cd conf/
[root@10 conf]# ll
[root@10 conf]# vim nginx.conf
server {
listen 80;
listen 443;
ssl on;
ssl_certification ssl/ca.crt;
ssl_certification_key ssl/ca.key;
server_name localhost www.magedu.net;
保存检测:[root@10 conf]# /apps/nginx/sbin/nginx -t
报错:

 改成这个样子,再删掉ssl on,就会少第一条警告
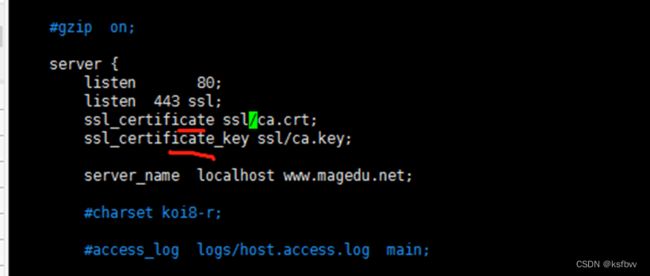 然能拼错,还是报错,换绝对路径

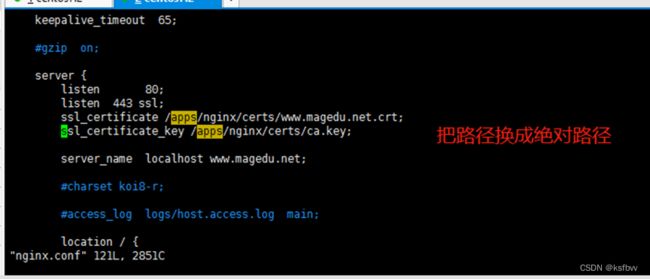 终于检测通过:

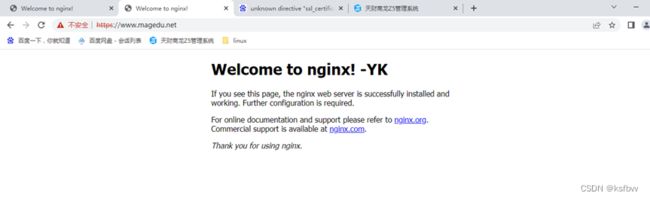
重启:[root@10 certs]# /apps/nginx/sbin/nginx -s reload

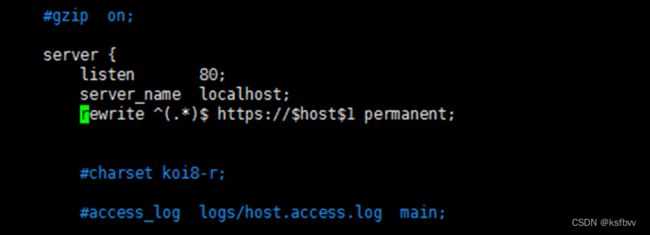
回到rewrite实现http跳转https:如果直接修改:
rewrite ^(.*)$ https://$host$1 permanent; 就会导致重定向过多,
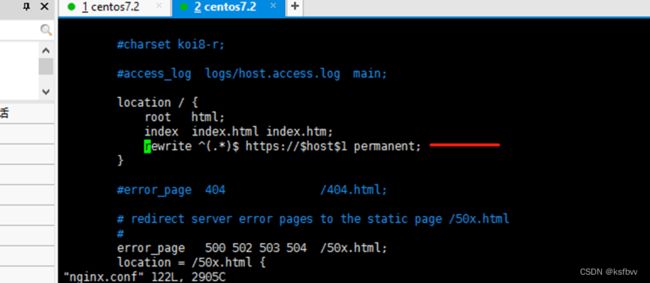
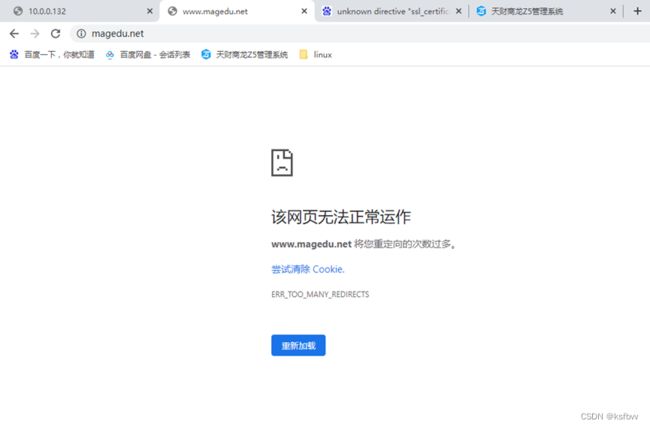 网页根本无法正常运转,如果将80和443端口分开,配置基于不同端口的虚拟主机,这样就可以实现访问80端口进行跳转,而访问443端口,则直接进行访问。

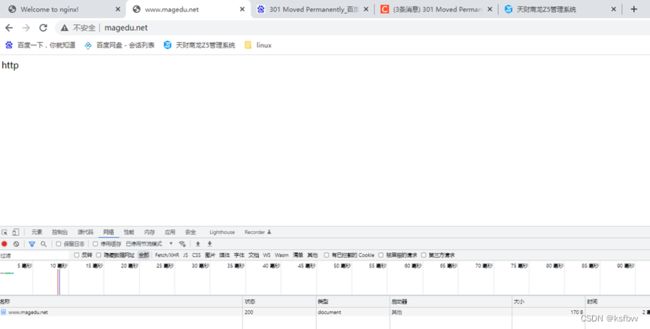
这样,就OK了
多域名https:[root@10 certs]# /apps/nginx/sbin/nginx -V

全栈https实现关键:
if($scheme = http){
rewrite / https://www.magedu.net permanent;
}
通过zabbix监控nginx状态,web网站健康状态。
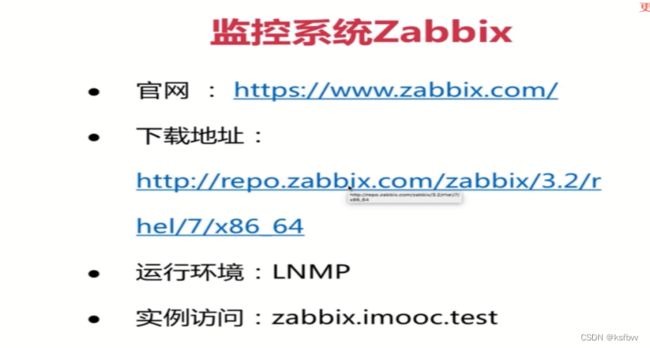 下载地址:http://repo.zabbix.com/zabbix/
http://repo.zabbix.com/zabbix/3.2/rhel/7/x86_64
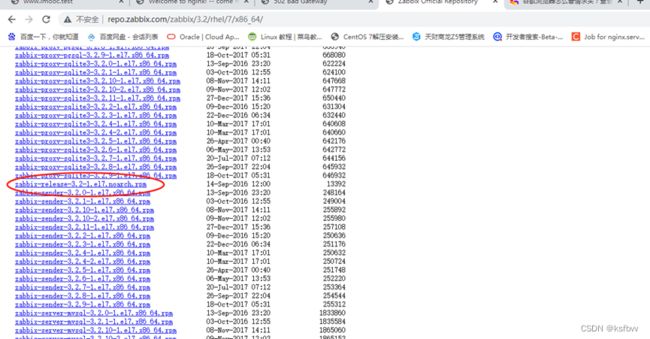
 sudo rpm -ivh http://repo.zabbix.com/zabbix/3.2/rhel/7/x86_64/zabbix-release-3.2-1.el7.noarch.rpm
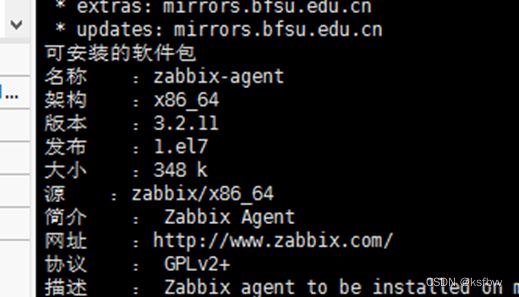
 yum search zabbix 查看各种版本信息
yum info zabbix-agent 查看版本信息
 [root@www nginx]# sudo yum install zabbix-server-mysql zabbix-web-mysql

server端发到web端进行展示
设置管理机(客户端):
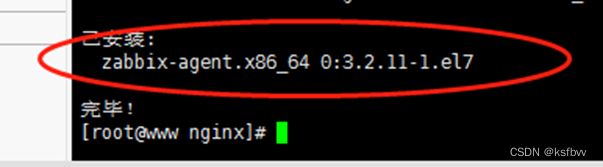
sudo yum install zabbix-agent
 将数据库操起来:ls ,, ps -ef |grep mysql
[root@www nginx]# mysql -uroot -p
Enter password: 456789
create database zabbix;
show databases;
 exit
exit
cd /usr/share/doc/zabbix-server-mysql-3.2.10/
[root@www /]# find . -name “zabbix*” 寻找以zabbix开头的文件
 [root@www /]# cd /usr/share/doc/zabbix-server-mysql-3.2.11
 接下来教大家一个新的命令,将我们的数据库导入到这里面来
[root@www zabbix-server-mysql-3.2.11]# zcat create.sql.gz | mysql -uroot -p zabbix
Enter password:
[root@www zabbix-server-mysql-3.2.11]#
导入需要等待一会 验证一下:
mysql -uroot -p
use zabbix ; ,show tables; , 有很多表,证明我们已经导入成功了 ,exit
启动服务端:
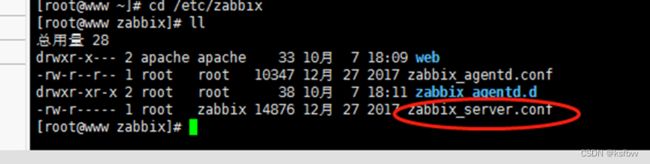
[root@www ~]# cd /etc/zabbix
[root@www zabbix]# ll
 配置它,
配置它,
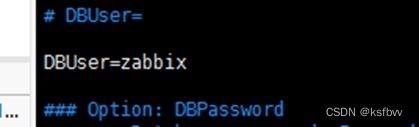 这里改成root

DBhost也配置一下:127.0.0.1
启动服务:
sudo service zabbix-server start
[root@www zabbix]# sudo vim zabbix_server.conf
[root@www zabbix]# sudo service zabbix-server start
经过这个网址的一系列操作:https://blog.csdn.net/qq_59634122/article/details/124661054
 报错减少到了两条
[root@www ~]# firewall-cmd --state
not running
[root@www ~]#
继续往下走:
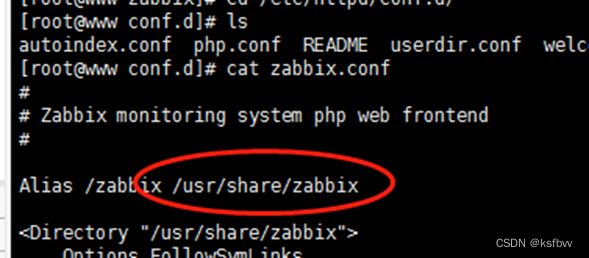
[root@www zabbix]# cd /etc/httpd/conf.d/
[root@www conf.d]# ls
autoindex.conf php.conf README userdir.conf welcome.conf zabbix.conf
[root@www conf.d]#
cat zabbix.conf 默认目录
 [root@www conf.d]# cd /usr/share/zabbix ,, ll很多PHP文件
上面zabbix访问不成功主要是mysql数据库空用户名导致,今天删除空用户后测试OK
select user,host from mysql.user;
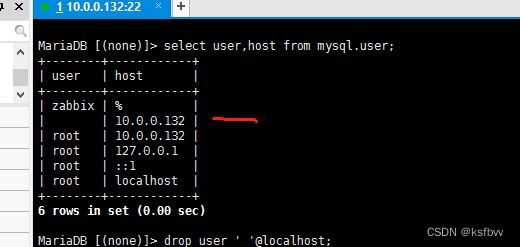
可以看到上图中空用户名,输入命令将其删除

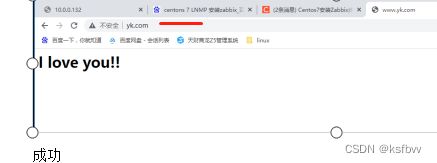
php网页访问连接数据库测试成功
2. 安装zabbix
2.1 安装依赖包 + 组件
yum -y install net-snmp net-snmp-devel curl curl-devel libxml2 libxml2-devel libevent-devel.x86_64 javacc.noarch javacc-javadoc.noarch javacc-maven-plugin.noarch javacc*
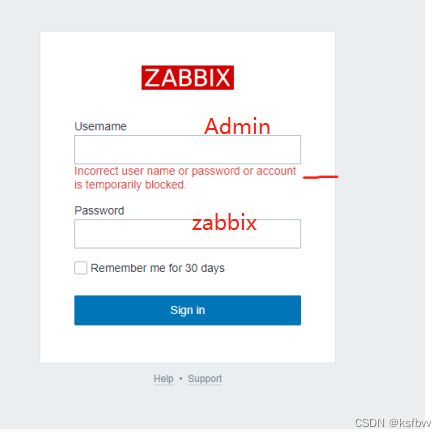
访问:http://www.yk.com/zabbix/


登录报错,进入数据库更改MD5密码MariaDB [zabbix]> update users set passwd=md5(“zabbix”) where userid=‘1’;

再次输入:访问成功!

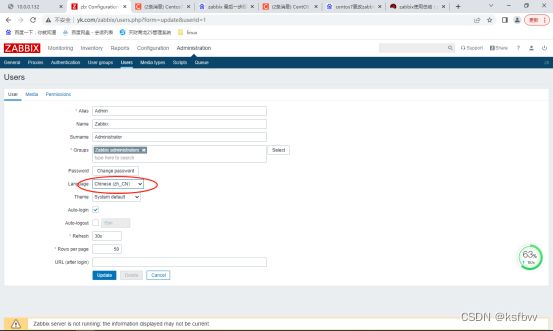
进入设置,修改为中文,大功告成:
简要描述后期学习的计划。
1.保证进度:完成比完美更重要,迅速拓宽知识宽度;
2.把握重点,夯实基础;
3.动手实操永远是第一位的;
4.工作中查漏补缺,关键点位增加深度;