RabbitMQ消息模型、SpringAMQP、消息转换器,加油,奥利给o(´^`)o
文章目录
-
- 0.前言:
- 1.MQ概念
- 2.RabbitMQ消息模型
-
- 1.publisher和consumer通过RabbitMQ实现
- 3.SpringAMQP
-
- 1.Basic Queue简单对列模型
- 2.WorkQueue
- 4.发布/订阅 1.Fanout(广播)
- 5.Direct
- 6.Topic
- 4.消息转换器
halo大家好,最近学习在学习cloud,今天分享一下关于rabbitmq相关知识~
0.前言:
环境:centos7
镜像:RabbitMQ镜像(docker pull rabbitmq:3-management)
部署技术:Docker
1.MQ概念
MQ,中文是消息队列(MessageQueue),字面来看就是存放消息的队列。也就是事件驱动架构中的Broker。
我们可以理解为MQ就是一个存放消息的暂存区,如果没有消费者来拿这条消息,它就会一直存放在这里,这样就可以形成一种异步通信的目的,而不是一旦消息发送就必须接收的同步通信。
比较常见的MQ实现:
- ActiveMQ
- RabbitMQ
- RocketMQ
- Kafka
下面是几种常见的MQ的对比:

追求可用性:Kafka、 RocketMQ 、RabbitMQ
追求可靠性:RabbitMQ、RocketMQ
追求吞吐能力:RocketMQ、Kafka
追求消息低延迟:RabbitMQ、Kafka
2.RabbitMQ消息模型
我目前学的是RabbitMQ我就先分享这个吧(ಥ_ಥ)
RabbitMQ官方提供 了5个不同的Demo示例,对应了不同的消息模型:

1.publisher和consumer通过RabbitMQ实现
我们来看下生产者和消费者二者在消息传递是的流程图
中间的queue就是消息队列,用来存放消息的(^_−)☆

我们先看下这个小demo的结构,我们在测试文件中来发送消息

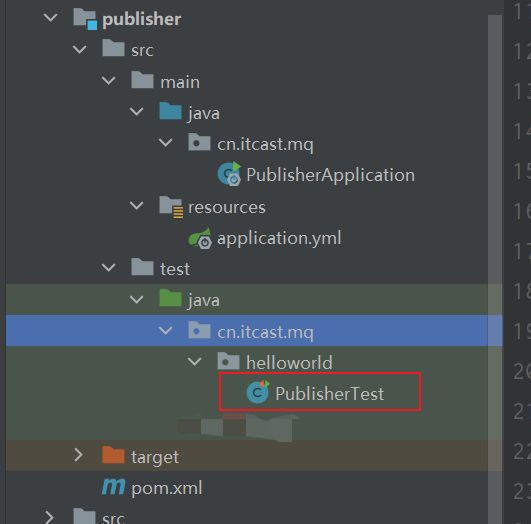
publisher实现
思路步骤:
- 建立连接
- 创建channel
- 声明队列
- 发送消息
- 关闭连接和channel
package cn.itcast.mq.helloworld;

import com.rabbitmq.client.Channel;
import com.rabbitmq.client.Connection;
import com.rabbitmq.client.ConnectionFactory;
import org.junit.Test;
import java.io.IOException;
import java.util.concurrent.TimeoutException;

public class PublisherTest {
    @Test
    public void testSendMessage() throws IOException, TimeoutException {
        // 1.建立连接
        ConnectionFactory factory = new ConnectionFactory();
        // 1.1.设置连接参数,分别是:主机名、端口号、vhost、用户名、密码
        factory.setHost("192.168.83.136");
        factory.setPort(5672);
        factory.setVirtualHost("/");
        factory.setUsername("itcast");
        factory.setPassword("123321");
        // 1.2.建立连接
        Connection connection = factory.newConnection();

        // 2.创建通道Channel
        Channel channel = connection.createChannel();

        // 3.创建队列
        String queueName = "simple.queue";
        channel.queueDeclare(queueName, false, false, false, null);

        // 4.发送消息
        String message = "hello, rabbitmq!";
        channel.basicPublish("", queueName, null, message.getBytes());
        System.out.println("发送消息成功:【" + message + "】");

        // 5.关闭通道和连接
        channel.close();
        connection.close();
    }
}
这样我们的发送者就写好了,也就是 写application.yaml配置—>写PublisherTest
接下来实现consumer
思路步骤:
-
建立连接
-
创建channel
-
声明队列
-
订阅消息
在消费者测试文件中写消费者

package cn.itcast.mq.helloworld;

import com.rabbitmq.client.*;
import java.io.IOException;
import java.util.concurrent.TimeoutException;

public class ConsumerTest {

    public static void main(String[] args) throws IOException, TimeoutException {
        // 1.建立连接
        ConnectionFactory factory = new ConnectionFactory();
        // 1.1.设置连接参数,分别是:主机名、端口号、vhost、用户名、密码
        factory.setHost("192.168.83.136");
        factory.setPort(5672);
        factory.setVirtualHost("/");
        factory.setUsername("itcast");
        factory.setPassword("123321");
        // 1.2.建立连接
        Connection connection = factory.newConnection();

        // 2.创建通道Channel
        Channel channel = connection.createChannel();

        // 3.创建队列
        String queueName = "simple.queue";
        channel.queueDeclare(queueName, false, false, false, null);

        // 4.订阅消息
        channel.basicConsume(queueName, true, new DefaultConsumer(channel) {
            @Override
            public void handleDelivery(String consumerTag, Envelope envelope,
                                       AMQP.BasicProperties properties, byte[] body) throws IOException {
                // 5.处理消息
                String message = new String(body);
                System.out.println("接收到消息:【" + message + "】");
            }
        });
        System.out.println("等待接收消息。。。。");
    }
}
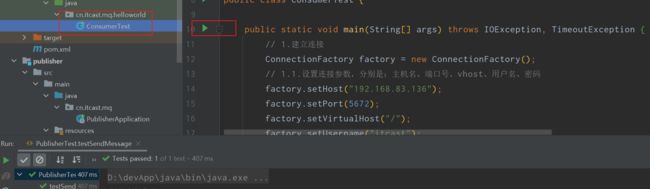
publisher发送消息,可以看到已经成功发送

这是RabbitMQ的ui界面,我用的docker拉取的镜像来部署的RabbitMQ,我这里就不仔细部署了,需要的同学可以评论区说下,我考虑写一篇专门用docker拉取镜像来启动RabbitMQ的博客↓↓↓↓
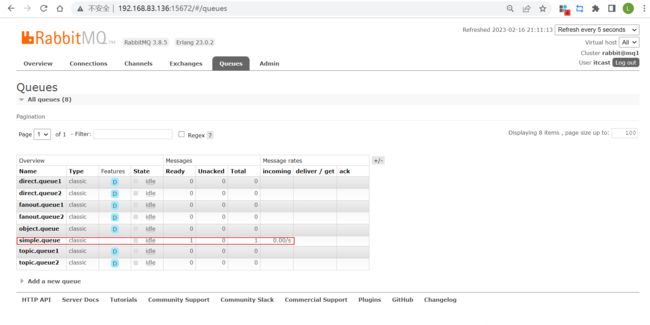
这里我们也可以看到ready为1,也就是存在一条消息↑↑↑↑↑↑
这时候我们我们启动消费者来将这条消息订阅消费掉
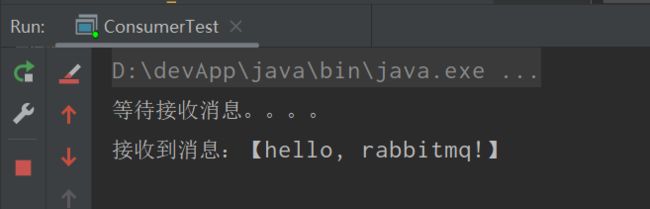

我们可以看到这条消息被消费了并且ready变为了0
总结:
基本消息队列的消息发送流程:
-
建立connection
-
创建channel
-
利用channel声明队列
-
利用channel向队列发送消息
基本消息队列的消息接收流程:
-
建立connection
-
创建channel
-
利用channel声明队列
-
定义consumer的消费行为handleDelivery()
-
利用channel将消费者与队列绑定
3.SpringAMQP
我们在上面实现了简单的消息发送与接收,但是发现了一个问题,就是消息发送和接收都要写很多的代码,像建立连接,创建channel这些都要自己写,但是这些的写法却都是固定的,我们可以通过SpringAMQP来简化代码书写提高效率。
SpringAMQP是基于RabbitMQ封装的一套模板,并且还利用SpringBoot对其实现了自动装配,使用起来非常方便。
SpringAmqp的官方地址:https://spring.io/projects/spring-amqp
SpringAMQP提供了三个功能:
- 自动声明队列、交换机及其绑定关系
- 基于注解的监听器模式,异步接收消息
- 封装了RabbitTemplate工具,用于发送消息
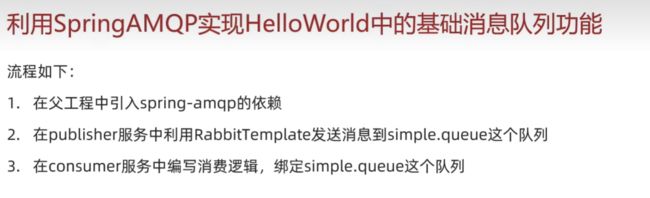
1.Basic Queue简单对列模型
在父工程mq-demo中引入依赖
<dependency>
    <groupId>org.springframework.bootgroupId>
    <artifactId>spring-boot-starter-amqpartifactId>
dependency>
消息发送
首先配置MQ地址,在publisher服务的application.yml中添加配置:
logging:
  pattern:
    dateformat: MM-dd HH:mm:ss:SSS
spring:
  rabbitmq:
    host: 192.168.83.136 # 主机名
    port: 5672 # 端口
    virtual-host: / # 虚拟主机
    username: itcast # 用户名
    password: 123321 # 密码
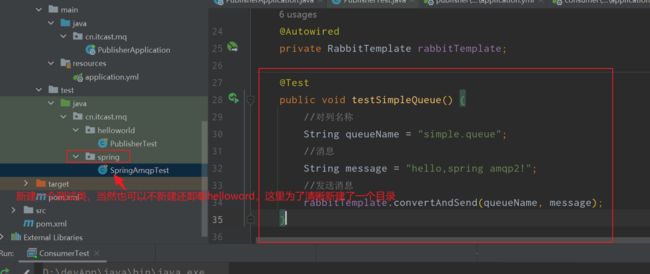
然后在publisher服务中编写测试类SpringAmqpTest,并利用RabbitTemplate实现消息发送:
package cn.itcast.mq.spring;

import org.junit.Test;
import org.junit.runner.RunWith;
import org.springframework.amqp.rabbit.core.RabbitTemplate;
import org.springframework.beans.factory.annotation.Autowired;
import org.springframework.boot.test.context.SpringBootTest;
import org.springframework.test.context.junit4.SpringRunner;

@RunWith(SpringRunner.class)
@SpringBootTest
public class SpringAmqpTest {

    @Autowired
    private RabbitTemplate rabbitTemplate;

    @Test
    public void testSimpleQueue() {
        // 队列名称
        String queueName = "simple.queue";
        // 消息
        String message = "hello, spring amqp!";
        // 发送消息
        rabbitTemplate.convertAndSend(queueName, message);
    }
}
消息接收
首先配置MQ地址,在consumer服务的application.yml中添加配置:
logging:
  pattern:
    dateformat: MM-dd HH:mm:ss:SSS
spring:
  rabbitmq:
    virtual-host: /
    port: 5672
    host: 192.168.83.136
    username: itcast
    password: 123321
然后在consumer服务的cn.itcast.mq.listener包中新建一个类SpringRabbitListener,代码如下:
package cn.itcast.mq.listener;

import org.springframework.amqp.rabbit.annotation.RabbitListener;
import org.springframework.stereotype.Component;

@Component
public class SpringRabbitListener {

    @RabbitListener(queues = "simple.queue")
    public void listenSimpleQueueMessage(String msg) throws InterruptedException {
        System.out.println("spring 消费者接收到消息:【" + msg + "】");
    }
}
测试
启动consumer服务,然后在publisher服务中运行测试代码,发送MQ消息
成功接收消息

2.WorkQueue
Work queues,也被称为(Task queues),任务模型。简单来说就是让多个消费者绑定到一个队列,共同消费队列中的消息。

当消息处理比较耗时的时候,可能生产消息的速度会远远大于消息的消费速度。长此以往,消息就会堆积越来越多,无法及时处理。
此时就可以使用work 模型,多个消费者共同处理消息处理,速度就能大大提高了。
消息发送
这次我们循环发送,模拟大量消息堆积现象。
在publisher服务中的SpringAmqpTest类中添加一个测试方法:
发送50条消息
    @Test
    public void testWorkQueue() throws InterruptedException {
        //对列名称
        String queueName = "simple.queue";
        //消息
        String message = "hello,spring amqp2!";
        for (int i = 0; i < 50; i++) {
            //发送消息
            rabbitTemplate.convertAndSend(queueName, message + i);
            Thread.sleep(20);//1秒发送50条
        }
    }
消息接收
要模拟多个消费者绑定同一个队列,我们在consumer服务的SpringRabbitListener中添加2个新的方法:
    @RabbitListener(queues = "simple.queue")
    public void listenWorkQueueMessage1(String msg) throws InterruptedException {
//        System.out.println("spring 消费者接收到消息,[" + msg + "]");
        System.out.println("spring 消费者1接收到消息,[" + msg + "]" + LocalTime.now());
        Thread.sleep(20);//一秒处理50条
    }

    @RabbitListener(queues = "simple.queue")
    public void listenWorkQueueMessage2(String msg) throws InterruptedException {
        System.out.println("spring 消费者2接收到消息,[" + msg + "]" + LocalTime.now());
        Thread.sleep(200);//一秒处理5条
    }
注意到这个消费者sleep了1000秒,模拟任务耗时。
测试


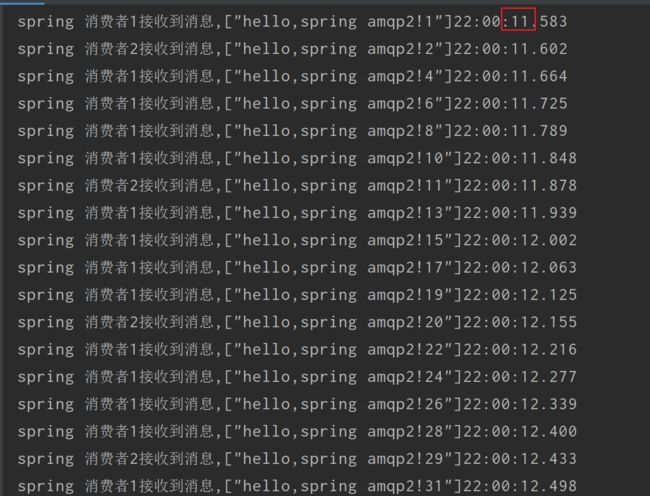
启动ConsumerApplication后,在执行publisher服务中刚刚编写的发送测试方法testWorkQueue。
可以看到消费者1很快完成了自己的25条消息。消费者2却在缓慢的处理自己的25条消息。
也就是说消息是平均分配给每个消费者,并没有考虑到消费者的处理能力。并且处理时间也远超过了1s,效率很低,这是因为消费者2一秒只能处理5条,效率不高,拖了后腿,显然不是能者多劳。这里面涉及到了一种思想,消息预取,就是说消费者不管自己的能力有多大,都先把消息拿过来,然后再处理,不考虑堆积问题。
要解决这个问题,需要写一个配置
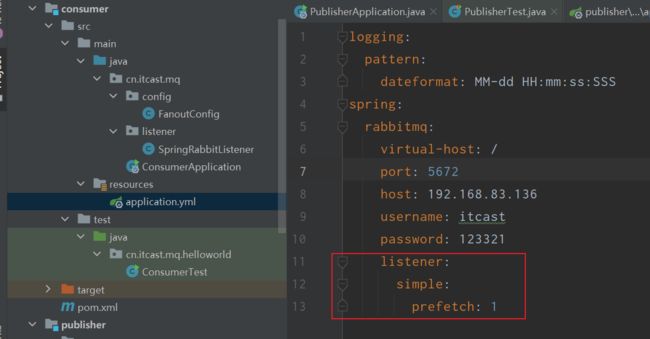
在spring中有一个简单的配置,可以解决这个问题。我们修改consumer服务的application.yml文件,添加配置:
spring:
  rabbitmq:
    listener:
      simple:
        prefetch: 1 # 每次只能获取一条消息,处理完成才能获取下一个消息
重启consumer启动类,并发送消息
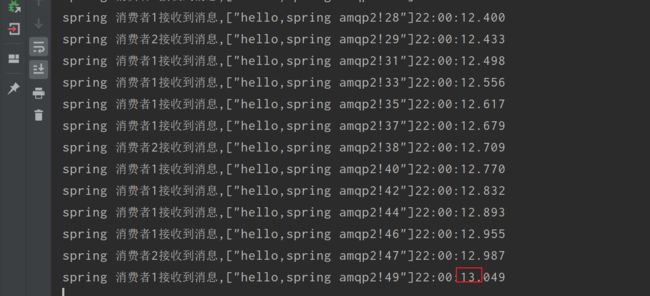
这次可以明显看到消费者1消费了更多的消息,总耗时在在1s左右
总结
Work模型的使用:
- 多个消费者绑定到一个队列,同一条消息只会被一个消费者处理
- 通过设置prefetch来控制消费者预取的消息数量
4.发布/订阅 1.Fanout(广播)
发布订阅的模型如图:

可以看到,在订阅模型中,多了一个exchange角色,而且过程略有变化:
Exchange(交换机)只负责转发消息,不具备存储消息的能力,因此如果没有任何队列与Exchange绑定,或者没有符合路由规则的队列,那么消息会丢失!
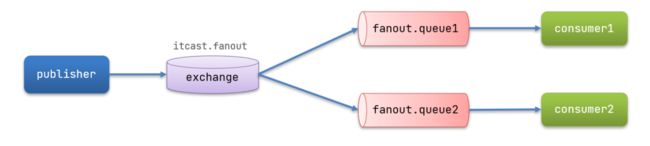
广播模型↓↓↓↓↓↓
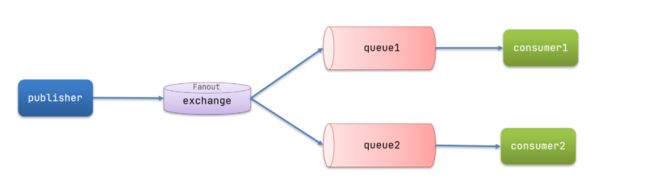
在广播模式下,消息发送流程是这样的:
- 1) 可以有多个队列
- 2) 每个队列都要绑定到Exchange(交换机)
- 3) 生产者发送的消息,只能发送到交换机,交换机来决定要发给哪个队列,生产者无法决定
- 4) 交换机把消息发送给绑定过的所有队列
- 5) 订阅队列的消费者都能拿到消息
我这里创建两个消息队列:
- 创建一个交换机 itcast.fanout,类型是Fanout
- 创建两个队列fanout.queue1和fanout.queue2,绑定到交换机itcast.fanout
1.声明队列和交换机
在consumer中创建一个类,声明队列和交换机:
创建交换机和声明队列有两种方式,一种是通过创建bean的方式,一种是通过注解的方式,注解更方便
我主要说用注解创建,通过bean的也简单说下
一:通过创建bean
package cn.itcast.mq.config;

import org.springframework.amqp.core.Binding;
import org.springframework.amqp.core.BindingBuilder;
import org.springframework.amqp.core.FanoutExchange;
import org.springframework.amqp.core.Queue;
import org.springframework.context.annotation.Bean;
import org.springframework.context.annotation.Configuration;

@Configuration
public class FanoutConfig {
    /**
     * 声明交换机
     * @return Fanout类型交换机
     */
    @Bean
    public FanoutExchange fanoutExchange(){
        return new FanoutExchange("itcast.fanout");
    }

    /**
     * 第1个队列
     */
    @Bean
    public Queue fanoutQueue1(){
        return new Queue("fanout.queue1");
    }

    /**
     * 绑定队列和交换机
     */
    @Bean
    public Binding bindingQueue1(Queue fanoutQueue1, FanoutExchange fanoutExchange){
        return BindingBuilder.bind(fanoutQueue1).to(fanoutExchange);
    }

    /**
     * 第2个队列
     */
    @Bean
    public Queue fanoutQueue2(){
        return new Queue("fanout.queue2");
    }

    /**
     * 绑定队列和交换机
     */
    @Bean
    public Binding bindingQueue2(Queue fanoutQueue2, FanoutExchange fanoutExchange){
        return BindingBuilder.bind(fanoutQueue2).to(fanoutExchange);
    }
}
消息发送
在publisher服务的SpringAmqpTest类中添加测试方法:
@Test
public void testFanoutExchange() {
    // 队列名称
    String exchangeName = "itcast.fanout";
    // 消息
    String message = "hello, everyone!";
    rabbitTemplate.convertAndSend(exchangeName, "", message);
}
消息接收
在consumer服务的SpringRabbitListener中添加两个方法,作为消费者:
@RabbitListener(queues = "fanout.queue1")
public void listenFanoutQueue1(String msg) {
    System.out.println("消费者1接收到Fanout消息:【" + msg + "】");
}

@RabbitListener(queues = "fanout.queue2")
public void listenFanoutQueue2(String msg) {
    System.out.println("消费者2接收到Fanout消息:【" + msg + "】");
}
=================================================================================
通过注解创建
在监听器中写入
    @RabbitListener(bindings = @QueueBinding(
            value = @Queue(name = "fanout.queue1"), //消息队列1
            exchange = @Exchange(name = "itcast.fanout", type = ExchangeTypes.FANOUT)//绑定交换机,名为itcast.fanout  类型为广播
    ))
    public void listenFanoutQueue1(String msg) {
        System.out.println("消费者接收到fanout.queue1的消息:【" + msg + "】");
    }
    @RabbitListener(bindings = @QueueBinding(
            value = @Queue(name = "fanout.queue2"),//消息队列2
            exchange = @Exchange(name = "itcast.fanout", type = ExchangeTypes.FANOUT)
    ))
    public void listenFanoutQueue2(String msg) {
        System.out.println("消费者接收到fanout.queue2的消息:【" + msg + "】");
    }
发送消息
    @Test
    public void testFanoutExchange() {
        //队列名称
        String exchangeName = "itcast.fanout";
        //消息
        String message = "hello every one!";
        rabbitTemplate.convertAndSend(exchangeName, "",message);
    }

总结
交换机的作用是什么?
- 接收publisher发送的消息
- 将消息按照规则路由到与之绑定的队列
- 不能缓存消息,路由失败,消息丢失
- FanoutExchange的会将消息路由到每个绑定的队列
声明队列、交换机、绑定关系的Bean是什么?
- Queue
- FanoutExchange
- Binding
- 注解@RabbitListener可以直接绑定交换机个publisher、队列,更方便
5.Direct
在Fanout模式中,一条消息,会被所有订阅的队列都消费。但是,在某些场景下,我们希望不同的消息被不同的队列消费。这时就要用到Direct类型的Exchange。

在Direct模型下:
- 队列与交换机的绑定,不能是任意绑定了,而是要指定一个
RoutingKey(路由key) - 消息的发送方在 向 Exchange发送消息时,也必须指定消息的
RoutingKey。 - Exchange不再把消息交给每一个绑定的队列,而是根据消息的
Routing Key进行判断,只有队列的Routingkey与消息的Routing key完全一致,才会接收到消息
接下来我们做简单演示
-
利用@RabbitListener声明Exchange、Queue、RoutingKey
-
在consumer服务中,编写两个消费者方法,分别监听direct.queue1和direct.queue2
-
在publisher中编写测试方法,向itcast. direct发送消息
模型如图
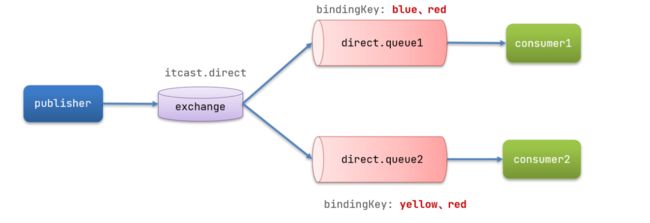
在consumer的SpringRabbitListener中添加两个消费者,同时基于注解来声明队列和交换机:
@RabbitListener(bindings = @QueueBinding(
            value = @Queue(name = "direct.queue1"),
            exchange = @Exchange(name = "itcast.direct", type = ExchangeTypes.DIRECT),
            key = {"red", "blue"}
    ))
    public void listenDirectQueue1(String msg) {
        System.out.println("消费者接收到direct.queue1的消息:【" + msg + "】");
    }

    @RabbitListener(bindings = @QueueBinding(
            value = @Queue(name = "direct.queue2"),
            exchange = @Exchange(name = "itcast.direct", type = ExchangeTypes.DIRECT),
            key = {"red", "yellow"}
    ))
    public void listenDirectQueue2(String msg) {
        System.out.println("消费者接收到direct.queue2的消息:【" + msg + "】");
    }
消息发送
在publisher服务的SpringAmqpTest类中添加测试方法:
@Test
public void testSendDirectExchange() {
    // 交换机名称
    String exchangeName = "itcast.direct";
    // 消息
    String message = "红色警报!日本乱排核废水,导致海洋生物变异,惊现哥斯拉!";
    // 发送消息
    rabbitTemplate.convertAndSend(exchangeName, "red", message);//两个队列都有red关键字,所以都会收到这条消息
}

如果关键字换成yellow,则只有队列2会收到这条消息

总结
描述下Direct交换机与Fanout交换机的差异?
- Fanout交换机将消息路由给每一个与之绑定的队列
- Direct交换机根据RoutingKey判断路由给哪个队列
- 如果多个队列具有相同的RoutingKey,则与Fanout功能类似
基于@RabbitListener注解声明队列和交换机有哪些常见注解?
- @Queue
- @Exchange
6.Topic
Topic类型的Exchange与Direct相比,都是可以根据RoutingKey把消息路由到不同的队列。只不过Topic类型Exchange可以让队列在绑定Routing key 的时候使用通配符!
Routingkey 一般都是有一个或多个单词组成,多个单词之间以”.”分割,例如: ik.ikun
通配符规则:
#:匹配一个或多个词
*:匹配不多不少恰好1个词
举例:
ik.#:能够匹配ik.ikun.cxk 或者 ik.ikun
ik.*:只能匹配ik.ikun
图示

- Queue1:绑定的是
china.#,因此凡是以china.开头的routing key都会被匹配到。包括china.news和china.weather - Queue2:绑定的是
#.news,因此凡是以.news结尾的routing key都会被匹配。包括china.news和japan.news
接下来我们简单实现演示一下~
-
用@RabbitListener声明Exchange、Queue、RoutingKey
-
在consumer服务中,编写两个消费者方法,分别监听topic.queue1和topic.queue2
-
在publisher中编写测试方法,向itcast. topic发送消息

消息发送
在publisher服务的SpringAmqpTest类中添加测试方法:
/**
     * topicExchange
     */
    @Test
    public void testSendTopicExchange() {
        // 交换机名称
        String exchangeName = "itcast.topic";
        // 消息
        String message = "喜报!孙悟空大战哥斯拉,胜!";
        // 发送消息
        rabbitTemplate.convertAndSend(exchangeName, "www.news", message);
    }
消息接收
    @RabbitListener(bindings = @QueueBinding(value = @Queue(name = "topic.queue1"),
            exchange = @Exchange(name = "itcast.topic",
                    type = ExchangeTypes.TOPIC), key = "china.#"))
    public void listenTopicQueue1(String msg) {
        System.out.println("消费者接收到topic.queue1的消息:【" + msg + "】");
    }

    @RabbitListener(bindings = @QueueBinding(value = @Queue(name = "topic.queue2"),
            exchange = @Exchange(name = "itcast.topic",
                    type = ExchangeTypes.TOPIC), key = "#.news"))
    public void listenTopicQueue2(String msg) {
        System.out.println("消费者接收到topic.queue2的消息:【" + msg + "】");
    }
我们分析知道,只会是队列2收到,凡事一.news结尾的队列会收到此消息,队列2符合

总结
描述下Direct交换机与Topic交换机的差异?
- Topic交换机接收的消息RoutingKey必须是多个单词,以
**.**分割 - Topic交换机与队列绑定时的bindingKey可以指定通配符
#:代表0个或多个词*:代表1个词
4.消息转换器
Spring会把你发送的消息序列化为字节发送给MQ,接收消息的时候,还会把字节反序列化为Java对象。
只不过,默认情况下Spring采用的序列化方式是JDK序列化。众所周知,JDK序列化存在下列问题:
- 数据体积过大
- 有安全漏洞
- 可读性差
rabbitmq只支持字节类型,spring允许发object对象,说明spring会将对象序列化,使用的是jdk序列化
我们修改消息发送的代码,发送一个Map对象:
声明队列,绑定交换机
    @RabbitListener(queues = "object.queue")
    public void listenObkectQueue(Map<String, Object> msg) {
        System.out.println("消费者接收到object.queue的消息:【" + msg + "】");
    }
}
发送消息,这个时候consumer不要开启,因为已开启监听器发现消息就消费了,我们就看不到消息体的样子了
    @Test
    public void testSendObjectQueue() throws InterruptedException {
        // 准备消息
        Map<String, Object> msg = new HashMap<>();
        msg.put("name", "cxk");
        msg.put("age", 21);
        // 发送消息
        rabbitTemplate.convertAndSend("object.queue", msg);
    }
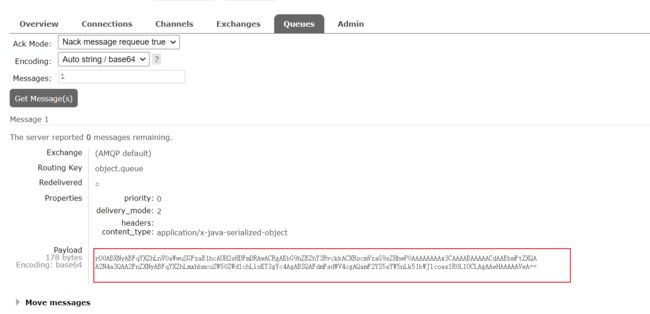
发现队列中的消息极其复杂,不够明确
怎么解决?
我们需要配置JSON转换器 引依赖、创建消息队列、在启动类写转换器、写监听器、publisher发送消息
显然,JDK序列化方式并不合适。我们希望消息体的体积更小、可读性更高,因此可以使用JSON方式来做序列化和反序列化。对象---->字节---->对象 序列化与反序列化
在父工程pom文件引入依赖
        <dependency>
            <groupId>com.fasterxml.jackson.coregroupId>
            <artifactId>jackson-databindartifactId>
        dependency>
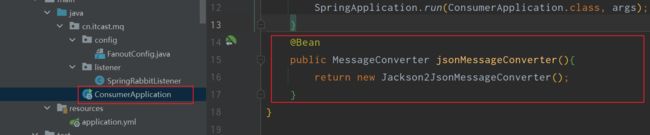
配置消息转换器。
在publsher和consumer启动类中添加一个Bean即可

接收消息
以为我们在父工程中引入了json依赖,所以我们不需要在publisher和consumer中引入依赖了,添加上也没事
<dependency>
    <groupId>com.fasterxml.jackson.dataformatgroupId>
    <artifactId>jackson-dataformat-xmlartifactId>
    <version>2.9.10version>
dependency>
再次发送消息

这个时候队列中的消息就不再显得那么冗长了~
这个时候启动consumer可以看到也可以成功收到消息~

好啦这是关于MQ的消息模型和消息转换器、AMQP的简单实用,继续加油啊再见Fight!!(o-)尸~''☆ミ☆ミ