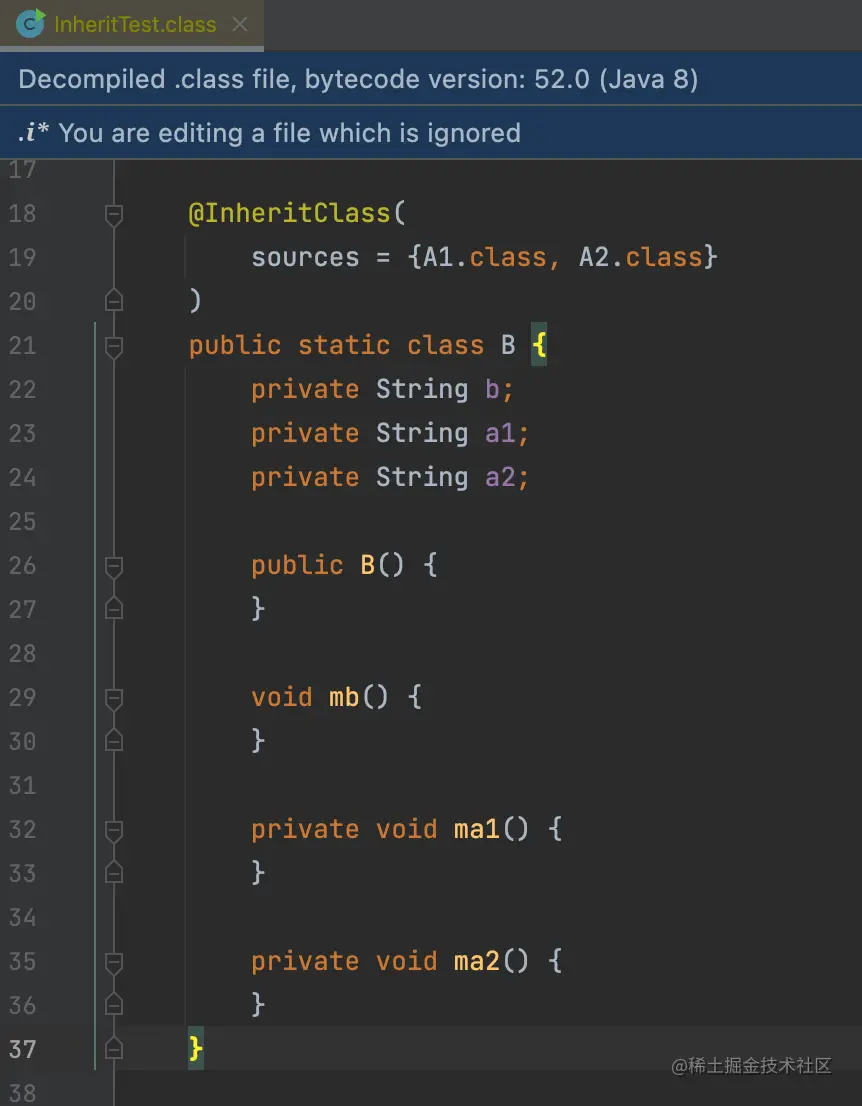
可以看到当我们在B类上添加注解@InheritClass并指定A1.class和A2.class之后,我们的B实例就有了A1和A2的属性和方法
就好像B同时继承了A1和A2
这。。。难道是黑魔法?(为什么脑子里会突然冒出来巴啦啦能量?)
来人,把.class文件带上来
其实就是把A1和A2的属性和方法都复制到了B上,和继承没有半毛钱关系!
这玩意儿有啥用
说起来现在实现的功能和当初的目的还是有点出入的
众所周知,Lombok中提供了@Builder的注解来生成一个类对应的Builder
但是我想在build之前校验某些字段就不太好实现
于是我就考虑,能不能实现一个注解,只是生成对应的字段和方法(毕竟最麻烦的就是要复制一堆的属性),而build方法由我们自己来实现,类似下面的代码
public class A {
private String a;

public A(String a) {
    this.a = a;
}

@BuilderWith(A.class)
public static class Builder {

    //注解自动生成 a 属性和 a(String a) 方法

    public A build() {
        if (a == null) {
            throw new IllegalArgumentException("a is null");
        }
        return new A(a);
    }
}
}
复制代码
这样的话,我们不仅不用手动处理大量的属性,还可以在build之前加入额外的逻辑,不至于像Lombok的@Builder那么不灵活
然后在后面实现的过程中就发现:
可以把一个类的属性复制过来,那也可以把一个类的方法复制过来!
可以复制一个类,那也可以复制多个类!
于是就发展成了现在这样,给人一种多继承的错觉
所以说这种方式也会存在很多限制和冲突,比如相同名称但不同类型的字段,相同名称相同入参但不同返回值的方法,或是调用了super的方法等等,毕竟只是一个缝合怪
这也许就是Java不支持多继承的主要原因,不然要校验要注意的地方就太多了,一不小心就会有歧义,出问题
目前我主要能想到两种使用场景
Builder
Builder本来就是我最初的目的,所以肯定要想着法儿的实现
public class A {
private String a;

public A(String a) {
    this.a = a;
}

@InheritField(sources = A.class, flags = InheritFlag.BUILDER)
public static class Builder {

    //注解自动生成 a 属性和 a(String a) 方法

    public A build() {
        if (a == null) {
            throw new IllegalArgumentException("a is null");
        }
        return new A(a);
    }
}
}
复制代码
这个用法和之前设想的没有太大区别,就是对应的注解有点不太一样
@InheritField可以用来复制属性,然后flags = InheritFlag.BUILDER表示同时生成属性对应的方法
参数组合
另一种场景就是用来组合参数
比如我们现在有两个实体A和B
@Data
public class A {
private String a1;

private String a2;

...

private String a20;
}
@Data
public class B {
private String b1;

private String b2;

...

private String b30;
}
复制代码
之前遇到过一些类似的场景,有一些比较老的项目,要加参数但是不能改参数的结构
一般情况下,如果要一个入参接收所有的参数我们会这样写
@Data
public class Params extends B {
private String a1;

private String a2;

...

private String a20;
}
复制代码
新写一个类继承属性多的B,然后把A的属性复制过去
但是如果修改了A就要同时修改这个新的类
如果用我们的这个就是这样的
@InheritField(sources = {A.class, B.class}, flags = {InheritFlag.GETTER, InheritFlag.SETTER})
public class Params {
}
复制代码
不需要手动复制了,A和B如果有修改也会自动同步
当然这个功能也是很只因肋了,因为我想不出还有其他的用法了,哭
手把手教你实现
要实现这个功能需要分别实现对应的注解处理器和IDEA插件
注解处理器用于在编译的时候根据注解生成对应的代码
IDEA插件用于在标记注解后能够有对应的提示
Annotation Processor
我们先来实现注解处理器
public class InheritProcessor extends AbstractProcessor {
@Override
public boolean process(Set annotations, RoundEnvironment roundEnv) {
    //自定义的处理流程
}

@Override
public Set getSupportedAnnotationTypes() {
    //需要扫描的注解的全限定名
    return new HashSet<>();
}
}
复制代码
首先我们要继承javax.annotation.processing.AbstractProcessor这个类
其中getSupportedAnnotationTypes方法中返回需要扫描的注解的全限定名
然后就可以在process方法中添加自己的逻辑了,第一个参数Set annotations就是扫描到的注解
我们先拿到这些注解标注的类
public class InheritProcessor extends AbstractProcessor {
@Override
public boolean process(Set annotations, RoundEnvironment roundEnv) {
    for (TypeElement annotation : annotations) {
        //获得标注了注解的类
        Set targetClassElements = roundEnv.getElementsAnnotatedWith(annotation);
    }
}
}
复制代码
通过第二个参数RoundEnvironment的方法getElementsAnnotatedWith就能获得标注了注解的类
接着我们来获得这些类的语法树,获得这些类的语法树之后,我们就可以通过语法树来修改这个类了
JavacElements elementUtils = (JavacElements) processingEnv.getElementUtils();
JCTree.JCClassDecl targetClassDef = (JCTree.JCClassDecl) elementUtils.getTree(targetClassElement);
复制代码
processingEnv是AbstractProcessor中自带的,直接用就行了,通过processingEnv可以获得JavacElements对象
再通过JavacElements就可以获得类的语法树JCTree.JCClassDecl
为了后面更好区分,我们把这些标注了注解的类叫做【目标类】,把注解上标记的类叫做【来源类】,我们要将【来源类】中的字段和方法复制到【目标类】中
我们只要拿到【来源类】的语法树,就可以获得对应的字段和方法然后添加到【目标类】的语法树中
先通过【目标类】获得类上的注解然后筛选出我们需要的注解,这里我的注解因为支持了@Repeatable,所以还要多解析一步
//获得类上所有的注解
List annotations = targetClassElement.getAnnotationMirrors();
//解析@Repeatable获得实际的注解
List
复制代码
拿到注解之后,就可以获得注解上的属性
private Map
Map attributes = new LinkedHashMap<>();
for (Map.Entry entry : annotation.getElementValues().entrySet()) {
    Symbol.MethodSymbol key = (Symbol.MethodSymbol) entry.getKey();
    attributes.put(key.getQualifiedName().toString(), entry.getValue().getValue());
}
return attributes;
}
复制代码
通过方法getElementValues就可以获得注解方法和返回值的键值对,其中键为方法,所以直接强转Symbol.MethodSymbol就行了
而对应的值是特定了类型
值的类型值的类类Attribute.Class字符串Attribute.Constant枚举Attribute.Enum
还有一些我没有用到所以这里就没有列出来了
所以我们拿到的值有的时候不能直接用,比如我们现在要获得【来源类】的语法树
Attribute.Class attributeClass = ...
Type.ClassType sourceClass = (Type.ClassType)attribute.getValue();
JCTree.JCClassDecl sourceClassDef = (JCTree.JCClassDecl) elementUtils.getTree(sourceClass.asElement());
复制代码
通过上述的方式我们就可以拿到注解上的【来源类】的语法树
接着我们就可以把【来源类】上的字段和方法复制到【目标类】了
for (JCTree sourceDef : sourceClassDef.defs) {
//如果是非静态的字段
if (InheritUtils.isNonStaticVariable(sourceDef)) {
    JCTree.JCVariableDecl sourceVarDef = (JCTree.JCVariableDecl) sourceDef;
    //Class 中未定义
    if (!InheritUtils.isFieldDefined(targetClassDef, sourceVarDef)) {
        //添加字段
        targetClassDef.defs = targetClassDef.defs.append(sourceVarDef);
    }
}

//方法类似,这里不具体展示了
}
复制代码
通过【来源类】语法树的defs属性就能获得所有的字段和方法,筛选出我们需要的字段和方法之后再通过【目标类】语法树的defs属性的append方法添加就行了
这样我们就把一个类的字段和方法复制到了另一个类上
最后一步,我们需要在resources/META-INF/services下添加一个javax.annotation.processing.Processor的文件,并在文件中添加我们实现类的全限定类名
这一步也可以使用下面的方式自动生成
compileOnly 'com.google.auto.service:auto-service:1.0.1'
annotationProcessor 'com.google.auto.service:auto-service:1.0.1'
复制代码
@AutoService(Processor.class)
public class InheritProcessor extends AbstractProcessor {
}
复制代码
引入auto-service包后,在我们实现的InheritProcessor上标注@AutoService(Processor.class)注解就会在编译的时候自动生成对应的文件
到此我们的注解处理器就开发完成了
我们只需要用compileOnly和annotationProcessor引入我们的包就可以啦
Intellij Plugin
虽然我们实现了注解处理器,但是IDEA上是不会有提示的,这就需要另外开发IDEA的插件来实现对应的功能了
推荐一下大佬写的小册《IntelliJ IDE 插件开发指南》,能够比较系统的了解IDEA的插件开发
这是我的 推广链接,如果大家真的要买的,那就顺手点我的 推广链接 买吧,嘿嘿
所以项目搭建之类的我就不啰嗦了
IDEA提供了很多接口用于扩展,这里我们要用到的就是PsiAugmentProvider这个接口
public class InheritPsiAugmentProvider extends PsiAugmentProvider {
@Override
protected @NotNull  List getAugments(@NotNull PsiElement element, @NotNull Class type) {
    return new ArrayList<>();
}
}
复制代码
getAugments方法就是用于获得额外的元素
其中第一个参数PsiElement element就是扩展的主体,以我们当前需要实现的功能来说,如果这个参数是类并且类上标注了我们指定的注解,那么我们就需要进行处理
第二个参数是需要的类型,以我们当前需要实现的功能来说,如果这个类型是字段或方法,那么我们就需要进行处理
直接看代码会清晰一点
public class InheritPsiAugmentProvider extends PsiAugmentProvider {
@Override
protected @NotNull  List getAugments(@NotNull PsiElement element, @NotNull Class type) {
    //只处理类
    if (element instanceof PsiClass) {
        if (type.isAssignableFrom(PsiField.class)) {
            //如果标记了注解,则返回额外的字段
        }
        if (type.isAssignableFrom(PsiMethod.class)) {
            //如果标记了注解,则返回额外的方法
        }
    }
    return new ArrayList<>();
}
}
复制代码
也就是说扩展的字段和方法是分开来获取的,另外需要注意是额外的字段和方法,不是全部的字段和方法
接下来我们需要先获得类上的注解
private Collection
Collection annotations = new ArrayList<>();
for (PsiAnnotation annotation : targetClass.getAnnotations()) {
    if ("注解的全限定名".contains(annotation.getQualifiedName())) {
        annotations.add(annotation);
    }
    if ("@Repeatable注解的全限定名".contains(annotation.getQualifiedName())) {
        handleRepeatableAnnotation(annotation, annotations);
    }
}
return annotations;
}
/**
- 获得 Repeatable 中的实际注解
*/
private void handleRepeatableAnnotation(PsiAnnotation annotation, Collection
PsiAnnotationMemberValue value = annotation.findAttributeValue("value");
if (value != null) {
    PsiElement[] children = value.getChildren();
    for (PsiElement child : children) {
        if (child instanceof PsiAnnotation) {
            annotations.add((PsiAnnotation) child);
        }
    }
}
}
复制代码
获得注解之后,我们就可以通过注解获得注解的属性了
Collection
private Collection
    Collection types = new HashSet<>();
    findTypes0(element, types);
    return types;
}
private void findTypes0(PsiElement element, Collection
if (element == null) {
    return;
}
if (element instanceof PsiTypeElement) {
    PsiType type = ((PsiTypeElement) element).getType();
    types.add(type);
}
for (PsiElement child : element.getChildren()) {
    findTypes0(child, types);
}
}
复制代码
这里需要注意,Psi是文件树而不是语法树
比如这样的写法@InheritClass(sources = {A.class, B.class})
我们通过findAttributeValue("sources")得到的是{A.class, B.class},最上层是{},{}的子节点才是A.class, B.class,所以Psi体现的是文件的结构
接着我们就可以获得对应的字段和方法了
PsiClass sourceClass = PsiUtil.resolveClassInType(PsiType);
/**
- 获得所有字段
*/
public static Collection
if (psiClass instanceof PsiExtensibleClass) {
    return new ArrayList<>(((PsiExtensibleClass) psiClass).getOwnFields());
} else {
    return filterPsiElements(psiClass, PsiField.class);
}
}
/**
- 获得所有方法
*/
public static Collection
if (psiClass instanceof PsiExtensibleClass) {
    return new ArrayList<>(((PsiExtensibleClass) psiClass).getOwnMethods());
} else {
    return filterPsiElements(psiClass, PsiMethod.class);
}
}
private static
return Arrays.stream(psiClass.getChildren()).filter(desiredClass::isInstance).map(desiredClass::cast).collect(Collectors.toList());}
复制代码
上面这几个方法我都是从Lombok里面复制过来的,至于else分支我也看不懂,可能会有多种情况,我也没遇到过,hhh
然后我们就可以对字段和方法进行复制啦
String fieldName = field.getName();
LightFieldBuilder fieldBuilder = new LightFieldBuilder(
manager,
fieldName,
field.getType());
//访问限定
fieldBuilder.setModifierList(new LightModifierList(field));
//初始化
fieldBuilder.setInitializer(field.getInitializer());
//所属的Class
fieldBuilder.setContainingClass(targetClass);
//是否 Deprecated
fieldBuilder.setIsDeprecated(field.isDeprecated());
//注释
fieldBuilder.setDocComment(field.getDocComment());
//导航
fieldBuilder.setNavigationElement(field);
复制代码
LightMethodBuilder methodBuilder = new LightMethodBuilder(
manager,
JavaLanguage.INSTANCE,
method.getName(),
method.getParameterList(),
method.getModifierList(),
method.getThrowsList(),
method.getTypeParameterList());
//返回值
methodBuilder.setMethodReturnType(method.getReturnType());
//所属的 Class
methodBuilder.setContainingClass(targetClass);
//导航
methodBuilder.setNavigationElement(method);
复制代码
这里大家一定要新实例化所有的字段和方法,不要直接返回【来源类】的字段和方法,因为【来源类】的字段和方法是和【来源类】关联的,而我们返回的是【目标类】的字段和方法,两者不匹配会导致IDEA直接报错
最后我们只需要在plugin.xml中添加这个扩展就行了


