MongoDB分片集群部署及实践
文章目录
- MongoDB分片集群部署及实践
- 一、前言
- 二、了解分片集群
-
- 1.简介
- 2.分片集群组件
- 3.副本集模式
- 三.安装部署
-
- 1.分片集群环境
- 2.安装
-
- 1)CPU 检测
- 2)修改机器名称
- 3)配置 hosts 文件
- 4)配置防火墙
- 5)创建目录
- 6)安装 MongoDB
- 3.Config Server 配置
-
- 1)mgd-config-01 机器
- 2)mgd-config-02 机器
- 3)mgd-config-03 机器
- 4)配置config副本集
- 4.Shard1 配置
-
- 1)mgd-shard-01 机器
- 2)mgd-shard-02 机器
- 3)mgd-shard-03 机器
- 4)配置shard1副本集
- 5.Shard2 配置
-
- 1)mgd-shard-04 机器
- 2)mgd-shard-05 机器
- 3)mgd-shard-06 机器
- 4)配置shard2副本集
- 6.Mongos 配置
-
- 1)mgd-mongos-01 机器
- 2)mgd-mongos-02 机器
- 3)配置分片集群
- 7.测试分片集群
- 三、监控
-
- 安装
- 说明
- 四、性能测试
-
- 安装
- 使用
- 五、应用实践
-
- 1.分片键
- 2.索引
- 3.分片集群平衡器
- 4.节点数据修复
- 5.节点间数据拷贝
- 6.内存淘汰策略
- 7.节点内存释放
- 8.运维
MongoDB分片集群部署及实践
一、前言
- 部署环境:CentOS-7-x86_64-DVD-1804.iso
- 监控环境:windows 10
- MongoDB版本:5.0.9
- 官方
MongoDB 下载:https://www.mongodb.com/download-center/community/releases/archive
MongoDB 词汇表:https://www.mongodb.com/docs/manual/reference/glossary
MongoDB 副本集:https://www.mongodb.com/docs/manual/replication/
MongoDB 分片:https://www.mongodb.com/docs/manual/sharding/
MongoDB 存储 - 常见问题:https://www.mongodb.com/docs/manual/faq/storage/
MongoDB Database Tools:https://www.mongodb.com/docs/database-tools/
mongostat:https://www.mongodb.com/docs/database-tools/mongostat/
性能最佳实践:https://www.mongodb.com/blog/post/performance-best-practices-hardware-and-os-configuration
- 技术分享
千亿级数据迁移mongodb成本节省及性能优化实践:https://zhuanlan.zhihu.com/p/382398295
MongoDB 备份与恢复:https://www.runoob.com/mongodb/mongodb-mongodump-mongorestore.html
CentOS 基础操作命令:https://blog.csdn.net/u011424614/article/details/94555916
对换home分区与root分区的存储空间:https://blog.csdn.net/u011424614/article/details/125853913
CentOS 分区扩容:https://blog.csdn.net/u011424614/article/details/113275862
Dell R740安装CentOS:https://blog.csdn.net/u011424614/article/details/113306808
二、了解分片集群
1.简介
- 分片是一种跨多台机器分布数据的方法。MongoDB 使用分片来支持具有非常大的数据集和高吞吐量操作的部署
- 分片优势:
- 读和写:提升读和写的性能
- 存储容量:实现水平扩容
- 高可用:各组件集群部署,实现高可用
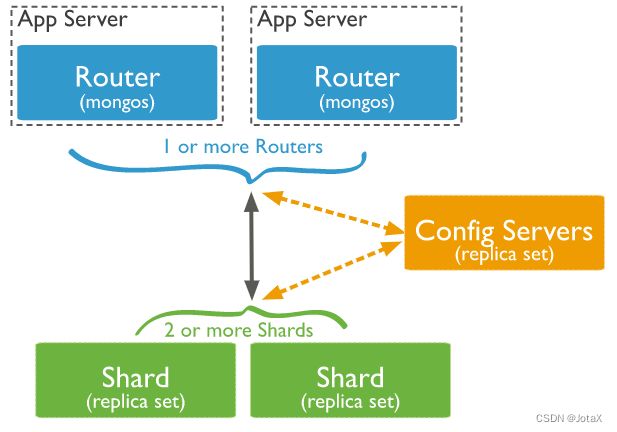
2.分片集群组件
- config servers(配置服务):存储集群的元数据和配置设置。从 MongoDB 3.4 开始,配置服务器必须部署为副本集 (CSRS)
- shard(分片):存储数据。从 MongoDB 3.6 开始,分片必须部署为副本集
- mongos(查询路由):为客户端应用程序和分片集群之间提供接口
3.副本集模式
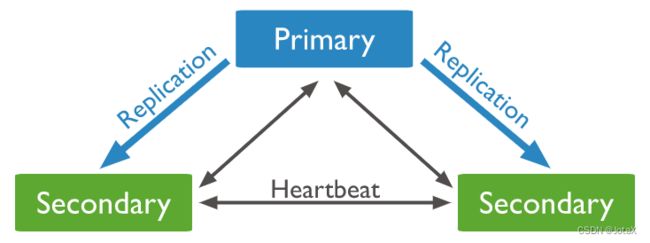
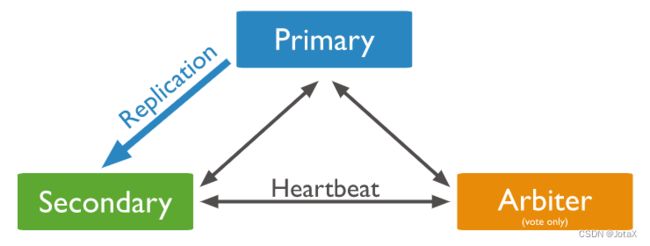
- 副本集成员的最小数量是三个成员
- Primary(主节点):主节点是副本集中唯一接收写入操作的成员,从节点通过
oplog同步数据 - Secondary(从节点):同步复制主节点的数据,实现高可用的特性;从节点的所有成员都可以接受读取操作,但是默认情况下,应用程序会将其读取操作定向到主节点
- Arbiter(仲裁者):仲裁者只在选举中投票;仲裁者不会存储数据,也不能成为主节点
(1)一主两从(PSS)
-
三个数据存储节点
-
如果主节点不可用,则副本集选择某个从节点作为主节点,并继续正常操作。旧的主节点在可用时,可重新加入到副本集
(2)一主一从一仲裁(PSA)
- 两个数据存储节点
- 主节点、从节点和仲裁者的部署,可确保在主节点或从节点不可用时,副本集仍然可用
- 仲裁者消耗非常少的服务器资源
三.安装部署
1.分片集群环境
-
config server 副本集(3台机器) 、2个 shard(每个分片3台机器=6台机器)、2 个 mongos (2台机器)
-
资源占用情况
- config server 副本集:主要存储路由相关元数据,会消耗少量硬盘、内存和CPU
- mongos:主要负责路由转发,只消耗CPU,对内存和硬盘的性能要求不高
- shard:主要进行数据存储等一系列数据操作,对CPU、内存和硬盘的性能要求较高
- shard 副本集(PSA模式)的 arbiter:只在选举中投票,对CPU、内存和硬盘的性能都要求不高
- 表格的硬件配置仅供参考,以实际为准
| 角色 | 机器名 | IP | 端口 | 内存 (GB) | CPU (核) | 硬盘 |
|---|---|---|---|---|---|---|
| config server | mgd-config-01 | 192.168.2.11 | 27018 | 8 | 8 | 50 G |
| config server | mgd-config-02 | 192.168.2.12 | 27018 | 8 | 8 | 50 G |
| config server | mgd-config-03 | 192.168.2.13 | 27018 | 8 | 8 | 50 G |
| shard【shard1】 | mgd-shard-01 | 192.168.2.14 | 27019 | 64 | 16 | 4 T |
| shard【shard1】 | mgd-shard-02 | 192.168.2.15 | 27019 | 64 | 16 | 4 T |
| shard【shard1】 | mgd-shard-03 | 192.168.2.16 | 27019 | 64 | 16 | 4 T |
| shard【shard2】 | mgd-shard-04 | 192.168.2.17 | 27020 | 64 | 16 | 4 T |
| shard【shard2】 | mgd-shard-05 | 192.168.2.18 | 27020 | 64 | 16 | 4 T |
| shard【shard2】 | mgd-shard-06 | 192.168.2.19 | 27020 | 64 | 16 | 4 T |
| mongos | mgd-mongos-01 | 192.168.2.20 | 27017 | 8 | 8 | 20 G |
| mongos | mgd-mongos-02 | 192.168.2.21 | 27017 | 8 | 8 | 20 G |
- 参考《性能最佳实践:硬件和操作系统配置》
-
为了获取最佳性能,每个机器应该只运行一个 MongoDB 进程
-
通过使用虚拟化或容器技术进行适当的大小调整和资源分配,多个 MongoDB 进程可以安全地在单个物理服务器上运行,而无需争抢资源
-
用户在同一主机上部署多个 MongoDB 进程。在这种情况下,您必须进行多项配置更改以确保每个进程都有足够的资源
- 节省成本的方案(减少机器数量)
- 使用 6 台高性能机器部署 PSS 模式的 shard ,config server 和 mongos 组件使用虚拟化或容器技术进行部署
- 使用 4 台高性能机器部署 PSA 模式的 shard ,shard 的仲裁者、config server 和 mongos 组件使用虚拟化或容器技术进行部署
- 全部组件使用虚拟化或容器技术进行部署
2.安装
- 安装目录:/data/mongodb
- 分片集群组件的配置和数据目录:/data/mongdb/cluster
1)CPU 检测
- 检测 CPU 是否支持 AVX 指令集
grep avx /proc/cpuinfo
- 输出标红的 avx 字符即为支持,否则无法正常启动 MongoDB
2)修改机器名称
如果机器 IP 变化后,更新 hosts 映射文件即可;MongoDB 配置文件使用机器名进行绑定
- 分别在相应的机器上执行指令
#-- mgd-config-01
hostnamectl set-hostname mgd-config-01 --static
hostnamectl set-hostname mgd-config-01 --transient
#-- mgd-config-02
hostnamectl set-hostname mgd-config-02 --static
hostnamectl set-hostname mgd-config-02 --transient
#-- mgd-config-03
hostnamectl set-hostname mgd-config-03 --static
hostnamectl set-hostname mgd-config-03 --transient
#-- mgd-shard-01
hostnamectl set-hostname mgd-shard-01 --static
hostnamectl set-hostname mgd-shard-01 --transient
#-- mgd-shard-02
hostnamectl set-hostname mgd-shard-02 --static
hostnamectl set-hostname mgd-shard-02 --transient
#-- mgd-shard-03
hostnamectl set-hostname mgd-shard-03 --static
hostnamectl set-hostname mgd-shard-03 --transient
#-- mgd-shard-04
hostnamectl set-hostname mgd-shard-04 --static
hostnamectl set-hostname mgd-shard-04 --transient
#-- mgd-shard-05
hostnamectl set-hostname mgd-shard-05 --static
hostnamectl set-hostname mgd-shard-05 --transient
#-- mgd-shard-06
hostnamectl set-hostname mgd-shard-06 --static
hostnamectl set-hostname mgd-shard-06 --transient
#-- mgd-mongos-01
hostnamectl set-hostname mgd-mongos-01 --static
hostnamectl set-hostname mgd-mongos-01 --transient
#-- mgd-mongos-02
hostnamectl set-hostname mgd-mongos-02 --static
hostnamectl set-hostname mgd-mongos-02 --transient
- 查询状态
hostnamectl status
3)配置 hosts 文件
- 在全部机器上执行
cat > /etc/hosts <<EOF
127.0.0.1   localhost localhost.localdomain localhost4 localhost4.localdomain4
::1         localhost localhost.localdomain localhost6 localhost6.localdomain6
192.168.2.11 mgd-config-01
192.168.2.12 mgd-config-02
192.168.2.13 mgd-config-03
192.168.2.14 mgd-shard-01
192.168.2.15 mgd-shard-02
192.168.2.16 mgd-shard-03
192.168.2.17 mgd-shard-04
192.168.2.18 mgd-shard-05
192.168.2.19 mgd-shard-06
192.168.2.20 mgd-mongos-01
192.168.2.21 mgd-mongos-02
EOF
4)配置防火墙
- 当前环境为关闭防火墙的方式;生产环境请使用配置端口的方式,操作参考《CentOS 基础操作命令》
- 在全部机器上执行
#-- 禁用防火墙
systemctl stop firewalld.service
systemctl disable firewalld.service

#-- 防火墙状态
systemctl status firewalld.service

#-- (备用-可忽略)启用防火墙
systemctl enable firewalld.service
systemctl start firewalld.service
5)创建目录
- mgd-config-01 至 mgd-config-03 的 3 台机器上执行
mkdir -p /data/mongodb/cluster/config/{data,logs}
- mgd-shard-01 至 mgd-shard-03 的 3 台机器上执行
mkdir -p /data/mongodb/cluster/shard1/{data,logs}
- mgd-shard-04 至 mgd-shard-06 的 3 台机器上执行
mkdir -p /data/mongodb/cluster/shard2/{data,logs}
- mgd-mongos-01 和 mgd-mongos-02 的 2 台机器上执行
mkdir -p /data/mongodb/cluster/mongos/{data,logs}
6)安装 MongoDB
-
以下指令,在全部机器上执行
-
请先在官网 下载 MongoDB ,然后,上传到服务器;或者使用 wget 进行下载
#-- 安装依赖包
yum install -y libcurl openssl xz-libs
#-- 解压
tar -zxvf mongodb-linux-x86_64-rhel70-5.0.9.tgz -C /data/mongodb --strip=1
- 配置环境变量
echo "PATH=$PATH:/data/mongodb/bin" > /etc/profile.d/mongodb.sh
source /etc/profile.d/mongodb.sh
- 查询版本号
mongo --version
- 创建用户组和用户
groupadd mongod
useradd -g mongod mongod
- 文件夹授权
chown -R mongod:mongod /data/mongodb
3.Config Server 配置
1)mgd-config-01 机器
- 创建配置文件
cat > /data/mongodb/cluster/config/mongod.conf <- 启动
mongod -f /data/mongodb/cluster/config/mongod.conf
2)mgd-config-02 机器
- 创建配置文件
cat > /data/mongodb/cluster/config/mongod.conf <- 启动
mongod -f /data/mongodb/cluster/config/mongod.conf
3)mgd-config-03 机器
- 创建配置文件
cat > /data/mongodb/cluster/config/mongod.conf <- 启动
mongod -f /data/mongodb/cluster/config/mongod.conf
4)配置config副本集
- 连接其中一台 MongoDB
mongo 192.168.2.11 --port 27018
- 配置副本集
rs.initiate(
  {
    _id: "config",
    configsvr: true,
    members: [
      { _id : 0, host : "mgd-config-01:27018" },
      { _id : 1, host : "mgd-config-02:27018" },
      { _id : 2, host : "mgd-config-03:27018" }
    ]
  }
)
- 查询副本集状态
rs.status()
4.Shard1 配置
1)mgd-shard-01 机器
- 创建 shard1 的配置文件,注意:cacheSizeGB,根据实际内存情况修改
cat > /data/mongodb/cluster/shard1/mongod.conf <- 启动
mongod -f /data/mongodb/cluster/shard1/mongod.conf
2)mgd-shard-02 机器
- 创建 shard1 的配置文件,注意:cacheSizeGB,根据实际内存情况修改
cat > /data/mongodb/cluster/shard1/mongod.conf <- 启动
mongod -f /data/mongodb/cluster/shard1/mongod.conf
3)mgd-shard-03 机器
- 创建 shard1 的配置文件,注意:cacheSizeGB,根据实际内存情况修改
cat > /data/mongodb/cluster/shard1/mongod.conf <- 启动
mongod -f /data/mongodb/cluster/shard1/mongod.conf
4)配置shard1副本集
- 连接其中一台 MongoDB
mongo 192.168.2.14 --port 27019
- 配置 PSS 模式的副本集
rs.initiate(
  {
    _id: "shard1",
    members: [
      { _id : 0, host : "mgd-shard-01:27019" },
      { _id : 1, host : "mgd-shard-02:27019" },
      { _id : 2, host : "mgd-shard-03:27019" }
    ]
  }
)
- (备用-可忽略)配置 PSA 模式的副本集
rs.initiate(
  {
    _id: "shard1",
    members: [
      { _id : 0, host : "mgd-shard-01:27019" },
      { _id : 1, host : "mgd-shard-02:27019" },
      { _id : 2, host : "mgd-shard-03:27019","arbiterOnly":true }
    ]
  }
)
- 复制集状态
rs.status()
5.Shard2 配置
1)mgd-shard-04 机器
- 创建 shard2 的配置文件,注意:cacheSizeGB,根据实际内存情况修改
cat > /data/mongodb/cluster/shard2/mongod.conf <- 启动
mongod -f /data/mongodb/cluster/shard2/mongod.conf
2)mgd-shard-05 机器
- 创建 shard2 的配置文件,注意:cacheSizeGB,根据实际内存情况修改
cat > /data/mongodb/cluster/shard2/mongod.conf <- 启动
mongod -f /data/mongodb/cluster/shard2/mongod.conf
3)mgd-shard-06 机器
- 创建 shard2 的配置文件,注意:cacheSizeGB,根据实际内存情况修改
cat > /data/mongodb/cluster/shard2/mongod.conf <- 启动
mongod -f /data/mongodb/cluster/shard2/mongod.conf
4)配置shard2副本集
- 连接其中一台 MongoDB
mongo 192.168.2.17 --port 27020
- 配置 PSS 模式的副本集
rs.initiate(
  {
    _id: "shard2",
    members: [
      { _id : 0, host : "mgd-shard-04:27020" },
      { _id : 1, host : "mgd-shard-05:27020" },
      { _id : 2, host : "mgd-shard-06:27020" }
    ]
  }
)
- (备用-可忽略)配置 PSA 模式的副本集
rs.initiate(
  {
    _id: "shard2",
    members: [
      { _id : 0, host : "mgd-shard-04:27020" },
      { _id : 1, host : "mgd-shard-05:27020" },
      { _id : 2, host : "mgd-shard-06:27020","arbiterOnly":true }
    ]
  }
)
- 复制集状态
rs.status()
6.Mongos 配置
1)mgd-mongos-01 机器
- 创建配置文件,注意:configDB,根据实际情况修改
cat > /data/mongodb/cluster/mongos/mongod.conf <- 启动
mongos -f /data/mongodb/cluster/mongos/mongod.conf
2)mgd-mongos-02 机器
- 创建配置文件,注意:configDB,根据实际情况修改
cat > /data/mongodb/cluster/mongos/mongod.conf <- 启动
mongos -f /data/mongodb/cluster/mongos/mongod.conf
3)配置分片集群
- 连接其中一台 Mongos
mongo 192.168.2.20 --port 27017
- 添加分片到分片集群
sh.addShard( "shard1/mgd-shard-01:27019,mgd-shard-02:27019,mgd-shard-03:27019")
sh.addShard( "shard2/mgd-shard-04:27020,mgd-shard-05:27020,mgd-shard-06:27020")
- 查询分片集群状态
sh.status()
7.测试分片集群
- 连接其中一台 mongos
mongo 192.168.2.20 --port 27017
- 使用 admin 数据库,指定数据库启用分片,集合中设置分片键和分片规则
use admin
sh.enableSharding("testdb")
sh.shardCollection("testdb.order", {"_id": "hashed" })
- 插入测试数据
use testdb
for (i = 1; i <= 10000; i=i+1){
    db.order.insert({'price': 1})
}
- 查看集合的数据量和分片情况 (shard1,shard2)
use testdb
db.order.count()
db.order.stats()
三、监控
软件:MongoDB Database Tools
部署环境:Windows 10
安装
- 修改 hosts 文件(属性中取消勾选只读),文件夹路径:C:\Windows\System32\drivers\etc
192.168.2.11 mgd-config-01
192.168.2.12 mgd-config-02
192.168.2.13 mgd-config-03
192.168.2.14 mgd-shard-01
192.168.2.15 mgd-shard-02
192.168.2.16 mgd-shard-03
192.168.2.17 mgd-shard-04
192.168.2.18 mgd-shard-05
192.168.2.19 mgd-shard-06
192.168.2.20 mgd-mongos-01
192.168.2.21 mgd-mongos-02
- 下载 MongoDB Database Tools ,并安装
- cmd 窗口,cd 安装工具的文件夹,执行指令连接 mongos
mongostat:https://www.mongodb.com/docs/database-tools/mongostat/
mongostat -h 192.168.2.21:27017 --discover
说明
参数说明:https://www.mongodb.com/docs/database-tools/mongostat/#fields
| 参数 | 说明 |
|---|---|
| insert | 每秒插入数据库的对象数 |
| query | 每秒查询操作数 |
| update | 每秒更新操作的数量 |
| delete | 每秒删除操作的次数 |
| getmore | 每秒游标批处理操作的数量 |
| command | 每秒的命令数 |
| flushes | 每个轮询间隔之间触发的 WiredTiger 检查点的数量 |
| dirty | WiredTiger 缓存中包含脏字节的百分比 |
| used | 正在使用的 WiredTiger 缓存的百分比 |
| vsize | 进程在最后一次使用时使用的虚拟内存量(以 MB 为单位) |
| res | 进程在最后一次使用时使用的常驻内存量(以 MB 为单位) |
| locked | 全局写锁的时间百分比 |
| conn | 打开的连接总数 |
四、性能测试
软件:YCSB
部署环境:mgd-mongos-02 机器
使用:https://github.com/brianfrankcooper/YCSB/wiki/Running-a-Workload
参数说明:https://github.com/brianfrankcooper/YCSB/wiki/Core-Properties
安装
- 下载安装包,创建安装目录,解压
curl -O --location https://github.com/brianfrankcooper/YCSB/releases/download/0.17.0/ycsb-0.17.0.tar.gz

mkdir /opt/ycsb

tar -zxvf ycsb-0.17.0.tar.gz -C /opt/ycsb --strip=1
使用
- 使用 admin 数据库,指定数据库启用分片,集合中设置分片键和分片规则
use admin
sh.enableSharding("ycsb")
sh.shardCollection("ycsb.usertable", {"_id": "hashed" })
- 查询状态
use ycsb
db.usertable.stats()
- 插入数据
recordcount:插入文档数量;threadcount:运行线程数;
fieldcount:字段数量;outputLoad.txt:输出结果(可选)
cd /opt/ycsb

./bin/ycsb load mongodb -s -P workloads/workloada -p  mongodb.url=mongodb://192.168.2.21:27017/ycsb?w=0 -p threadcount=1 -p fieldcount=20 -p recordcount=100000 > outputLoad.txt
- 测试性能
workloads/workloada:加载场景配置文件
例如:workloada 是 50% 读操作和 50% 更新操作的场景
其它场景文件,可以结合参数说明进行解读
cd /opt/ycsb

./bin/ycsb run mongodb -s -P workloads/workloada -p  mongodb.url=mongodb://192.168.2.21:27017/ycsb?w=0 -p threadcount=1 -p operationcount=1000 > outputRun.txt
- 输出 outputRun.txt 结果
[OVERALL],RunTime(ms), 10110
[OVERALL],Throughput(ops/sec), 98.91196834817013
[UPDATE], Operations, 491
[UPDATE], AverageLatency(ms), 0.054989816700611
[UPDATE], MinLatency(ms), 0
[UPDATE], MaxLatency(ms), 1
[UPDATE], 95thPercentileLatency(ms), 1
[UPDATE], 99thPercentileLatency(ms), 1
[UPDATE], Return=0, 491
[UPDATE], 0, 464
[UPDATE], 1, 27
[UPDATE], 2, 0
[UPDATE], 3, 0
[UPDATE], 4, 0
...
- 总执行时间为 10.11 秒
- 平均吞吐量为 98.9 次操作/秒(跨所有线程)
- 有 491 次更新操作,以及相关的平均、最小、最大、第 95 和第 99 个百分位延迟
- 所有 491 更新操作的返回码为零(在这种情况下成功)
- 464 个操作在不到 1 毫秒的时间内完成,而 27 个操作在 1 到 2 毫秒之间完成。
五、应用实践
1.分片键
分片键:Shard Keys — MongoDB Manual
分片键可实现在集群中的各个分片之间平均分配数据块
- 哈希分片
# 建库时,指定分片键
use admin
sh.enableSharding("testdb")
sh.shardCollection("testdb.user", {"_id": "hashed" })
- 范围分片
# 建库时,指定分片键
use admin
sh.enableSharding("testdb")
sh.shardCollection("testdb.user", {"userid":1, "createTime":1})
2.索引
索引:Indexes — MongoDB Manual
切记提前创建索引,因为当单个集合数据量变大时,创建索引会非常耗时
- 单字段索引
# userid 升序
db.user.createIndex({"userid":1})
- 复合索引
# name 升序,age 降序
db.user.createIndex({ "name": 1, "age": -1 })
# 注意:
# 过滤条件为 name,或包含 name 的查询会使用索引(索引的第一个字段),以下都会用到索引
db.user.find({ name: '张三' }).explain()
db.user.find({ name: "张三", level: 10 }).explain()
db.user.find({ name: "张三", age: 23 }).explain()

# 查询条件为 age 时,不会使用上边创建的索引,而是使用的全表扫描
db.user.find({ age: 23 }).explain()
- 地理索引
db.user.createIndex({"location":"2dsphere"})
- 完整例子
# 切换到 admin 库
use admin
sh.status()
# 建库
sh.enableSharding("testdb")
# 创建集合和分片键
sh.shardCollection("testdb.user", {"userid":1, "createTime":1})

# 切换到 testdb 库
use testdb
# 创建集合索引
db.user.createIndex({"userid":1, "createTime":1})
db.user.createIndex({"userid":1})
db.user.createIndex({"name":1})
db.user.createIndex({"age":1})
db.user.createIndex({"location":"2dsphere"})
3.分片集群平衡器
分片集群平衡器:Sharded Cluster Balancer — MongoDB Manual
MongoDB 平衡器是一个后台进程,用于监控 每个分片集合的数据。
- 基础指令
| 指令 | 作用 |
|---|---|
| sh.getBalancerState() | 检查平衡器是否启用 |
| sh.isBalancerRunning() | 检查平衡器是否在运行 |
| sh.stopBalancer() | 禁用平衡器 |
| sh.startBalancer() 、sh.setBalancerState(true) | 启用平衡器 |
| sh.disableBalancing(“databaseName.collectionName”) | 指定集合禁用平衡器 |
| sh.enableBalancing(“databaseName.collectionName”) | 指定集合启用平衡器 |
- 启用平衡器
# 连接其中一台 mongos
mongo 192.168.2.20 --port 27017

# 切换到 config 库
use config

# 启用平衡器
sh.setBalancerState(true)
# 设置启动时间段
db.settings.update(
   { _id: "balancer" },
   { $set: { activeWindow : { start : "00:00", stop : "06:00" } } },
   { upsert: true }
)
- 禁用平衡器
# 连接其中一台 mongos
mongo 192.168.2.20 --port 27017

# 切换到 config 库
use config

# 禁用平衡器
sh.stopBalancer()
4.节点数据修复
- Mongo shard 服务启动失败或报错时,可以先修复数据,在重启服务
报错:Aborted (core dumped)
# 先删除 datapath 下的全部 .lock 文件,在执行修复指令
mongod --repair --dbpath /data/mongodb/cluster/shard1/data
5.节点间数据拷贝
- 如果数据修复失败,用于拷贝其它节点的数据(需要停止被拷贝节点的服务)
scp -r /data/mongodb/cluster/shard1/data root@mgd-shard-03:/data/mongodb/cluster/shard1
6.内存淘汰策略
- 默认参数和值
| 参数 | 默认值 | 含义 |
|---|---|---|
| eviction_target | 80 | 当 cache used 超过 eviction_target,后台evict线程开始淘汰 CLEAN PAGE |
| eviction_trigger | 95 | 当 cache used 超过 eviction_trigger,用户线程也开始淘汰 CLEAN PAGE |
| eviction_dirty_target | 5 | 当 cache dirty 超过 eviction_dirty_target,后台evict线程开始淘汰 DIRTY PAGE |
| eviction_dirty_trigger | 20 | 当 cache dirty 超过 eviction_dirty_trigger, 用户线程也开始淘汰 DIRTY PAGE |
| evict.threads_min | 4 | |
| evict.threads_max | 4 |
- 优化
| 参数 | 默认值 | 含义 |
|---|---|---|
| eviction_target | 75 | 当 cache used 超过 eviction_target,后台evict线程开始淘汰 CLEAN PAGE |
| eviction_trigger | 90 | 当 cache used 超过 eviction_trigger,用户线程也开始淘汰 CLEAN PAGE |
| eviction_dirty_target | 3 | 当 cache dirty 超过 eviction_dirty_target,后台evict线程开始淘汰 DIRTY PAGE |
| eviction_dirty_trigger | 15 | 当 cache dirty 超过 eviction_dirty_trigger, 用户线程也开始淘汰 DIRTY PAGE |
| evict.threads_min | 4 | |
| evict.threads_max | 16 |
- 连接 shard 的 mongo 服务
# 如果机器名无法连接,需要把机器名换成 IP
mongo 192.168.2.14 --port 27019
mongo 192.168.2.15 --port 27019
mongo 192.168.2.16 --port 27019
mongo 192.168.2.17 --port 27020
mongo 192.168.2.18 --port 27020
mongo 192.168.2.19 --port 27020
- 执行
db.adminCommand({setParameter: 1, wiredTigerEngineRuntimeConfig: "eviction_target=75,eviction_trigger=90,eviction_dirty_target=3,eviction_dirty_trigger=15,eviction=(threads_min=4,threads_max=16),checkpoint=(wait=30)"})
- 动态调整其它参数
db.adminCommand({"setParameter": 1, "wiredTigerEngineRuntimeConfig": "cache_size=8G"})
7.节点内存释放
- 查看 Mongo 服务是否被 CentOS 杀掉进程
cd /var/log
grep "mongod" messages
Jul 28 01:40:20 mgd-shard-03 abrt-hook-ccpp: Process 3368 (mongod) of user 0 killed by SIGABRT - ignoring (abrtd is not running)

Aug 30 17:10:48 mgd-rc-04 abrt-hook-ccpp: Process 23380 (mongod) of user 0 killed by SIGABRT - dumping core
Aug 30 17:11:56 mgd-rc-04 abrt-server: Executable '/data/mongodb/bin/mongod' doesn't belong to any package and ProcessUnpackaged is set to 'no'
- 暂时未找到比较好的内存释放方法
sync && sync && sync
echo 3 > /proc/sys/vm/drop_caches
swapoff -a
swapon -a
8.运维
-
角色启动顺序:config --> shard --> mongos
-
查看进程信息
ps -ef | grep mongod | grep -v grep
- 内存占用
top