nodejs学习巩固笔记-nodejs基础,Node.js 高级编程(核心模块、模块加载机制)
目录
-
- Nodejs 基础
-
- 大前端开发过程中的必备技能
- nodejs 的架构
- 为什么是 Nodejs
- Nodejs 异步 IO
- Nodejs 事件驱动架构
- 全局对象
- 全局变量之 process
- 核心模块
-
- 核心模块 - path
- 全局变量之 Buffer
- 创建 buffer
- Buffer 实例方法
- Buffer 静态方法
- Buffer-split 实现
- 核心模块之FS模块
- 文件操作 API
- md 转 html
- 文件打开与关闭
- 大文件读写操作
- 文件拷贝自定义实现
- 目录操作 API
- 同步实现目录创建
- 异步实现目录创建
- 异步实现目录删除
- 模块化历程
- Commonjs 规范
- Node.js 与 CommonJS
- 模块分类及加载流程
- 模块加载源码分析
- VM 模块使用
- 模块加载模拟实现
- 事件模块 Events
- 发布订阅
- EventEmitter 源码调试分析
- EventEmitter 模拟
- 浏览器中的事件环
- Nodejs 中的事件环
- Nodejs 事件环梳理
- Nodejs 与 浏览器 事件环区别
- Nodejs 事件环常见问题
- 核心模块 Stream
- stream 之可读流
- stream 之可写流
- stream 之双工流和转换流
- 文件可读流创建和消费
- 文件可读流事件与应用
- 文件可写流
- write 执行流程
- 控制写入速度
- 背压机制
- 模拟文件可读流
- 链表结构
- 单向链表实现
- 单向链表实现队列
- 文件可写流实现
- pipe 方法使用
- 通信
-
- 通信基本原理
- 网络通讯方式
- 网络层次模型
- 数据封装与解封装
- TCP 三次握手与四次挥手
- 创建 TCP 三次握手与四次挥手
- TCP 粘包及解决
- 封包拆包实现
- 封包解决粘包
- http 协议
- 获取 http 请求信息
- 设置 http 响应
- 代理客户端
- 代理客户端解决跨域
- Http 静态服务
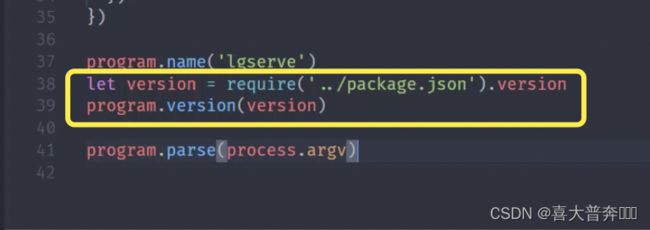
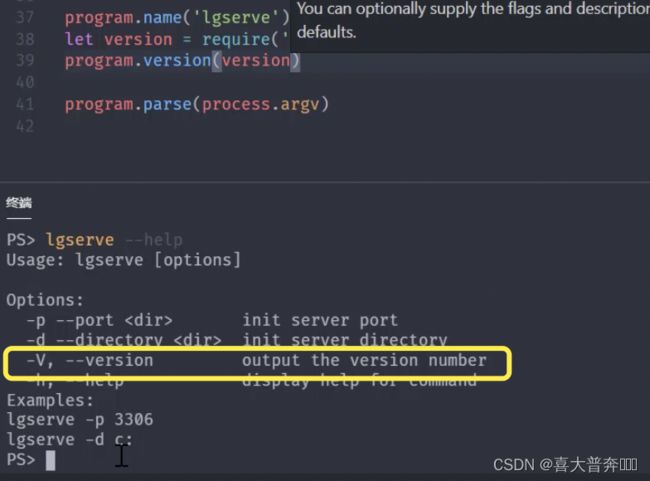
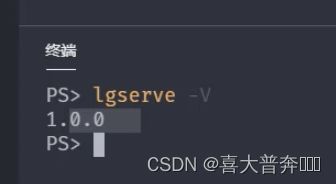
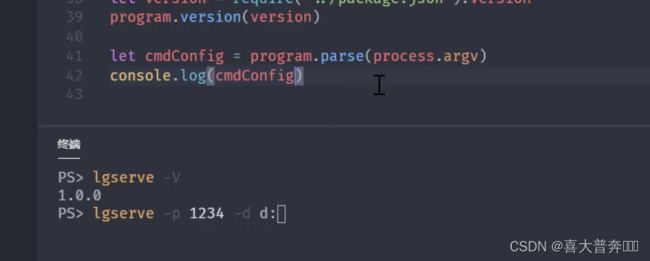
- lgserver 命令行配置
- lgserver 启动 web 服务
- lgserve 处理文件资源
- lgserve 处理目录资源
- lgserve 模板数据渲染
Nodejs 基础
大前端开发过程中的必备技能
- 轻量级、高性能 WEB 服务器
- 前后端 JavaScript 同构开发
- 便捷高效的前端工程化
综上所述,可以看出来 nodejs 对前端开发的重要性和必要性
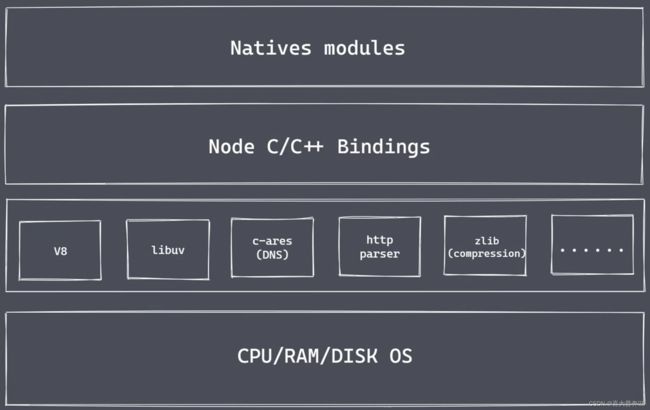
nodejs 的架构
Natives modules
- 当前层内容由 js 实现
- 提供应用程序可直接调用的库,如: fs、path、http等
- js 语言无法直接操作底层硬件设置
Builtin modules “胶水层” - 桥梁,主要是由 c++ 的代码编写而成
通过这个桥梁,就可以让 nodejs 核心模块获取到具体的服务支持,从而完成更底层的操作

- V8: 执行 JS 代码,提供桥梁接口
- Libuv: 事件循环、事件队列、异步IO
- 第三方模块: zlib、http、c-ares 等

为什么是 Nodejs

IO是计算机操作过程中最缓慢的环节
经典的餐厅就餐例子:
来一个人配一个服务员,来一个人配一个服务员,这时候服务员大部分时间都浪费在了点餐上面,然后就衍生出了 reactor 模式(应答者模式),单线程完成多线程工作;
一个服务员,哪边点餐完毕哪边叫服务员就行,只不过是在用户点餐的过程中,服务员在服务于其他的客人,这样的操作就避免了多个上下文之间在进行上下文切换的时候需要考虑的一些状态保存、时间消耗以及状态锁等这样的问题
这样的模式历史上是有很多版本的方案的,因为 nodejs 在这一方面做得是最好的,所以就保留了下来
当然,如果客户上来就点餐,不做思考,这时候显然一个服务员是肯定不够用的,这样 对应到我们的程序里叫做:CPU密集型,所以对于 Nodejs 的使用,更多是处理 IO密集型的高并发请求而不是大量且复杂的业务逻辑处理。
但是这些并不影响我们将 nodejs 应用于同构开发和前端工程化当中,它仍然是我们大前端开发的一个基石。
Nodejs 异步 IO

操作系统:阻塞IO、非阻塞IO
非阻塞IO:重复调用 IO 操作,判断 IO 是否结束 - 轮询
技术:read、select、poll、kqueue、event ports
虽然轮询能确定 IO 是否完成,然后将获取完成之后的数据再返回回去,但是对于代码而言,它还是同步的效果,因为在轮询的过程当中程序还是等待着 IO 的效果;
所以我们期望的是直接发起 非阻塞的调用,但是也无需去遍历或者说唤醒的方式来轮询的判断当前的 IO 是否结束了, 而是在调用发起之后直接可以进行下一个任务的处理,然后等待 IO 的结果出来之后,再去通过某种信号或者说回调的方式将数据传回当前的代码去使用就可以了。
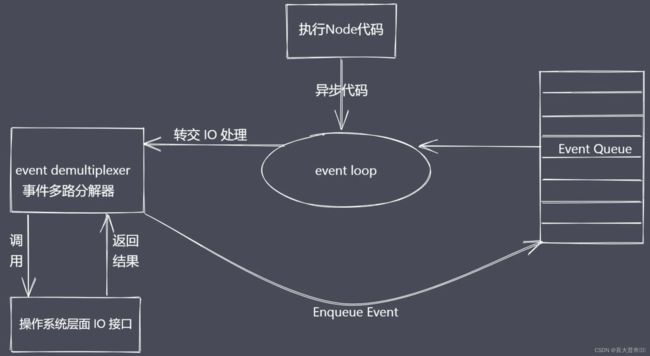
异步 IO 总结
- IO 是应用程序的瓶颈所在
- 异步 IO 提高性能,无需原地等待结果返回
- IO 操作属于操作系统级别,平台都有对应实现
- Nodejs 单线程配合事件驱动架构以及 Libuv 实现了异步IO
Nodejs 事件驱动架构
事件驱动架构是软件开发中的通用模式 - 见上个图
事件驱动、发布订阅、观察者:主体发布消息,其它实例接收消息
const EventEmitter = require('events');
const myEvent = new EventEmitter();

myEvent.on('事件1', () => {
  console.log('事件1 执行了')
});

myEvent.on('事件2', () => {
  console.log('事件2 执行了')
});

myEvent.on('事件1', () => {
  console.log('事件1-1 执行了')
});

myEvent.emit('事件1');
全局对象
- 与浏览器平台的 window 不完全相同
- Nodejs 全局对象上挂载许多属性
全局对象是 JacaScript 中的特殊对象,因为它可以在任何地方被直接访问到,而且也无需对他做提前定义;浏览器平台下叫 window,nodejs 中叫 global。
Global 根本作用就是作为 全局变量 的宿主:全局对象可以看作是全局变量的宿主
常见全局变量
__filename: 返回正在执行脚本文件的绝对路径
__dirname: 返回正在执行脚本所在目录
timer 类函数:执行顺序与事件循环间的关系
process: 提供与当前进程互动的接口
require: 实现模块的加载
module、exports: 处理模块的导出
…
默认情况下,this 是个空对象,跟 global 是不一样的,这里注意一下,nodejs 里 this 不是 global,因为这里涉及模块的一个东西,后边再说
全局变量之 process
1、获取进程信息
2、执行进程操作
// 1 资源: cpu 内存
console.log(process.memoryUsage())
/*
{
  rss: 27885568, // 常驻内存
  heapTotal: 4964352, // 脚本执行时申请的内存大小
  heapUsed: 4007704, // 脚本执行过程中实际使用的内存大小
  external: 299796, // 扩展内存 - 底层C或者C++所占据的空间大小
  arrayBuffers: 11158 // 缓冲区 - 独立的空间大小,老版本是跟 external 在一起的,新版本独立出来了,后续讲解 Buffer
}
*/
console.log(process.cpuUsage())
/*
{ user: 33754, system: 6882 } // 用户和系统所占用CPU的时间片断
*/
// 2、运行环境:运行目录、node环境、cpu架构、用户环境、系统平台
console.log(process.cwd()) // 运行目录
console.log(process.version) // node版本
console.log(process.versions) // 内部各个运行环境版本
/*
{
  node: '16.15.1',
  v8: '9.4.146.24-node.21',
  uv: '1.43.0',
  zlib: '1.2.11',
  brotli: '1.0.9',
  ares: '1.18.1',
  modules: '93',
  nghttp2: '1.47.0',
  napi: '8',
  llhttp: '6.0.4',
  openssl: '1.1.1o+quic',
  cldr: '40.0',
  icu: '70.1',
  tz: '2021a3',
  unicode: '14.0',
  ngtcp2: '0.1.0-DEV',
  nghttp3: '0.1.0-DEV'
}
*/
console.log(process.arch) // 架构
console.log(process.env.NODE_ENV)
console.log(process.env.PATH)
console.log(process.env.HOME)  // mac平台使用 - HOME win平台使用 - USERPROFILE
console.log(process.platform) // 平台
// 3 运行状态: 启动参数、PID、运行时间
// 运行 node ***.js 1 2
console.log(process.argv)
/*
数组:默认有两个参数:第一个是 node 启动程序对应的路径,第二个是当前脚本/当前进程执行的文件所在绝对路径
从第三项开始,就是自定义追加的参数
*/
console.log(process.argv0)  // execArgv
console.log(process.pid)  // ppid

setTimeout(() => {
  console.log(process.uptime()) // 从运行开始到结束所消耗的时间
}, 3000)
// 4、事件:不是说 process 里有哪些事件,主要是习惯一下事件驱动的编辑/发布订阅的模式,也为后续事件模块做个铺垫
// 4、事件
process.on('exit', (code)=>{
  console.log('触发exit事件',code)
  setTimeout(()=>{ // 无效,exit事件内部不能执行异步代码
    console.log('退出之后执行')
  }, 1000)
})
process.on('beforeExit', (code)=>{
  console.log('触发beforeExit事件',code)
})
process.exit() // 主动触发退出进程的话不会触发 beforeExit,也不会触发当前代码后方的代码
console.log('当前脚本执行完毕')
// 5、标准输入、输出、错误
// console.log = function(data){ // 重写了 consile.log 函数
//   process.stdout.write('---'+data+'\n')
// }
// console.log(11)
// console.log(22)
// 测试管道 同级新建文件 test.txt,随便写点儿内容:测试文件test.txt的内容
const fs = require('fs')
fs.createReadStream('test.txt') // 创建可读流,读取任意可读文件
  .pipe(process.stdout) // pipe-管道,标准的读取流通过pipe管道流给process.stdout,接收到标准的读取流进行标准输出
# 执行脚本文件
node ***.js
process.stdin.pipe(process.stdout); // stdin 获取到用户输入的东西转换成流,通过管道pipe交给stdout进行输出,输入什么它自动输出什么
process.stdin.setEncoding('utf-8') // 设定一下编码
process.stdin.on('readable', ()=>{ // readable 内置函数
  let chunk = process.stdin.read()
  if(chunk !== null){
    process.stdout.write('data_'+chunk)
  }
})
核心模块
核心模块 - path
内置模块: 处理文件/目录的路径,掌握其中常见的 API 即可,用到其它的再查
- basename() 获取路径中基础名称
- dirname() 获取目录名称
- extname() 获取扩展名称
- isAbsolute() 是否是绝对路径
- join() 拼接多个路径片段
- resolve() 返回绝对路径
- parse() 解析路径,拿到对应信息:跟路径、后缀名、目录…等等
- format() 序列化路径,跟 parse 相反操作
- normalize() 规范化路径
const path = require('path')

console.log(__filename) // 当前脚本完整路径

// 1 获取路径中的基础名称
/**
 * 01 返回的就是接收路径当中的最后一部分
 * 02 第二个参数表示扩展名,如果说没有设置则返回完整的文件名称带后缀
 * 03 第二个参数做为后缀时,如果没有在当前路径中被匹配到,那么就会忽略
 * 04 处理目录路径的时候如果说,结尾处有路径分割符,则也会被忽略掉
 */
console.log(path.basename(__filename)) // 当前脚本文件名称:带后缀
console.log(path.basename(__filename, '.js')) // 当前脚本文件名称:不带后缀
console.log(path.basename(__filename, '.css')) // 当前脚本文件名称,找不到 .css,所以忽略第二个参数
console.log(path.basename('/a/b/c')) // 最后一个目录名 c
console.log(path.basename('/a/b/c/')) // 忽略分隔符,输出最后一个目录名 c


// 2 获取路径目录名 (路径)
/**
 * 01 返回路径中最后一个部分的上一层目录所在路径
 */
console.log(path.dirname(__filename)) // 返回当前脚本的上一层目录的路径
console.log(path.dirname('/a/b/c')) // 返回 /a/b
console.log(path.dirname('/a/b/c/')) // 返回 /a/b

// 3 获取路径的扩展名
/**
 * 01 返回 path路径中相应文件的后缀名
 * 02 如果 path 路径当中存在多个点,它匹配的是最后一个点,到结尾的内容
 */
console.log(path.extname(__filename)) // .js
console.log(path.extname('/a/b')) // ''(空)
console.log(path.extname('/a/b/index.html.js.css')) // .css
console.log(path.extname('/a/b/index.html.js.')) // .

// 4 解析路径
/**
 * 01 接收一个路径,返回一个对象,包含不同的信息
 * 02 root dir base ext name
 */
const obj1 = path.parse('/a/b/c/index.html')
const obj2 = path.parse('/a/b/c/')
const obj3 = path.parse('./a/b/c/')
console.log(obj1)
/*
{
    root: '/',
    dir: '/a/b/c',
    base: 'index.html',
    ext: '.html',
    name: 'index'
}
*/
console.log(obj2)
/*
{
    root: '/',
    dir: '/a/b',
    base: 'c',
    ext: '',
    name: 'c'
}
*/
console.log(obj3)
/*
{
    root: '',
    dir: './a/b',
    base: 'c',
    ext: '',
    name: 'c'
}
*/

// 5 序列化路径
const obj = path.parse('./a/b/c/')
console.log(path.format(obj)) // 将上方解析出来的路径对象再序列化为一个路径

// 6 判断当前路径是否为绝对
console.log(path.isAbsolute('foo')) // false
console.log(path.isAbsolute('/foo')) // true
console.log(path.isAbsolute('///foo')) // true
console.log(path.isAbsolute('')) // false
console.log(path.isAbsolute('.')) // false
console.log(path.isAbsolute('../bar')) // false

// 7 拼接路径
console.log(path.join('a/b', 'c', 'index.html')) // a/b/c/index.html
console.log(path.join('/a/b', 'c', 'index.html')) // /a/b/c/index.html
console.log(path.join('/a/b', 'c', '../', 'index.html')) // /a/b/index.html
console.log(path.join('/a/b', 'c', './', 'index.html')) // /a/b/c/index.html
console.log(path.join('/a/b', 'c', '', 'index.html')) // /a/b/c/index.html
console.log(path.join('')) // .

// 8 规范化路径
console.log(path.normalize('')) // .
console.log(path.normalize('a/b/c/d')) // a/b/c/d
console.log(path.normalize('a///b/c../d')) // a/b/c../d
console.log(path.normalize('a//\\/b/c\\/d')) // a/\/b/c\/d
console.log(path.normalize('a//\b/c\\/d')) // a/c\/d

// 9 绝对路径
console.log(path.resolve()) // 当前脚本所在目录绝对路径 - 不含当前脚本名称
/**
 * resolve([from], to)
 */
console.log(path.resolve('/a', '../b')) // /b
console.log(path.resolve('index.html')) // /**/**.../index.html
全局变量之 Buffer
Buffer 缓冲区:Buffer 让 JavaScript 可以操作二进制
二进制数据、流操作、Buffer
JavaScript 语言起初服务于浏览器平台,主要操作数据类型其实是字符串;Nodejs 平台下 JavaScript 可实现 IO 操作,这里就使用到了 Buffer。
IO 行为操作的就是二进制数据
Stream 流操作并非 Nodejs 独创,可以理解为一种数据类型,跟字符串数字一样的数据类型,但是它可以分段,流操作配合管道实现数据分段传输
数据的端到端传输会有生产者和消费者,生产和消费的过程往往存在等待的过程,产生等待时数据存放在哪里?!~Buffer 缓冲区
Nodejs 中 Buffer 是一片内存空间,属于 V8 之外的,不占据 V8 堆内存大小的,Buffer 的空间申请不是由 Node 完成的,但是在使用上,它的空间分配又是由我们编写的 JS 代码控制的,因此在空间回收的时候, 还是由 V8 的 GC 来管理和回收,我们是无法参与到其中的工作的。
- 无需 require 的全局变量
- 实现 Nodejs 平台下的二进制数据操作
- 不占据 V8 堆内存大小的内存空间
- 内存的使用由 Node 来控制,由 V8 的 GC 回收
- 一般配合 Stream 流使用,充当数据缓冲区

创建 buffer
- alloc: 创建指定字节大小的 buffer
- allocUnsafe: 创建指定大小的 buffer (不安全)
- from: 接收数据,创建 buffer
nodejs v6 版本之前是 new 关键字创建的实例对象,但是给出来的权限太大了,因此在高版本做了处理,因此这里不建议通过 new 关键字创建 buffer 实例对象。
const b1 = Buffer.alloc(10)
const b2 = Buffer.allocUnsafe(10)
console.log(b1)
console.log(b2)

// from
const b1 = Buffer.from('中')
console.log(b1)

const b1 = Buffer.from([0xe4, 0xb8, 0xad])
// const b1 = Buffer.from([0x60, 0b1001, 12])
console.log(b1)
console.log(b1.toString())
/* const b1 = Buffer.from('中')
console.log(b1)
console.log(b1.toString()) */

const b1 = Buffer.alloc(3)
const b2 = Buffer.from(b1) // 并不是共享空间,而是拷贝

console.log(b1)
console.log(b2)

b1[0] = 1
console.log(b1)
console.log(b2)
Buffer 实例方法
- fill: 使用数据填充 buffer: 把给定的数据全都填充到 buffer 里面去,如果没有填满,会反复从头填充,如果填满了并超出了,则最多填满,多余的丢掉
- write: 向 buffer 中写入数据:写几个就是几个,不会重复/循环写入,含头且含尾,buffer 长度不足会报错
- toString: 从 buffer 中提取数据
- slice: 截取 buffer: (弃用,使用 subarray 代替 slice)
- indexOf: 在 buffer 中查找数据
- copy: 拷贝 buffer 中的数据
let buf = Buffer.alloc(6)

// fill
buf.fill('1234')
console.log(buf)
console.log(buf.toString())

buf.fill('1234', 1) // 从位置 1 开始
console.log(buf)
console.log(buf.toString())

buf.fill('1234', 1, 3) // 从位置 1 开始,3 结束,含头不含尾
console.log(buf)
console.log(buf.toString())

buf.fill(123)
console.log(buf)
console.log(buf.toString())
/*
  16进制 7b 是 123,7b utf8编码转实体就是 {,因此是 6个 {
{{{{{{
*/

// write
buf.write('123', 1, 4)
console.log(buf)
console.log(buf.toString())

// toString
buf = Buffer.from('测试数据')
console.log(buf)
console.log(buf.toString('utf-8'))
console.log(buf.toString('utf-8', 3))
console.log(buf.toString('utf-8', 3, 9))

// slice/subarray
buf = Buffer.from('测试数据')
let b1 = buf.subarray()
let b2 = buf.subarray(3)
let b3 = buf.subarray(3,9)
let b4 = buf.subarray(-3)
console.log(b1)
console.log(b1.toString())
console.log(b2)
console.log(b2.toString())
console.log(b3)
console.log(b3.toString())
console.log(b4)
console.log(b4.toString())

// indexOf
buf = Buffer.from('zgp你好啊你好啊你好啊哈哈哈测试数据')
console.log(buf)
console.log(buf.indexOf('你', 1)) // 3
console.log(buf.indexOf('好', 1)) // 6
console.log(buf.indexOf('好', 14)) // 15  第二个参数是偏移量,一个汉字是三个字节,找不到值为 -1

b2.copy(b1)
b2.copy(b3, 3)
b2.copy(b6, 3)
b2.copy(b4, 3, 3)
b2.copy(b5, 0, 3, 9)
// b2-数据源,参数1-目标,参数2-目标写入起始位置,参数3-数据源读取起始位置,参数4-数据源读取结束位置(含头不含尾)
console.log(b1.toString()) // 测试
console.log(b2.toString()) // 测试数据
console.log(b3.toString()) // 测
console.log(b4.toString()) // 试
console.log(b5.toString()) // 试数
console.log(b6.toString())
Buffer 静态方法
- concat: 通过数组的方式将多个 buffer 拼接成一个新的 buffer
- isBuffer: 判断当前数据是否为 buffer
let b1 = Buffer.from('测试')
let b2 = Buffer.from('数据')
let a = Buffer.concat([b1, b2])
let b = Buffer.concat([b1, b2], 9)
console.log(a) // Buffer-split 实现
- 自定义 Buffer 之 split
ArrayBuffer.prototype.split = function(separator){
  let len = Buffer.from(separator).length
  let results = []
  let start = 0
  let offset = 0
  while(offset = this.indexOf(separator, start) !== -1){
    results.push(this.slice(start, offset))
    start = offset+len
  }
  results.push(this.slice(start))
  return results
}

let a = '逛吃逛吃逛吃,哈哈哈,逛吃逛吃逛吃'
let arr = a.split('吃')
console.log(arr) // [ '逛', '逛', '逛', ',哈哈哈,逛', '逛', '逛', '' ]
核心模块之FS模块
Nodejs 里两个重要概念:Buffer 和 Stream ,缓冲区和数据流,和 FS 有什么关系?
FS 是内置核心模块,提供文件系统操作的 API。
如果我们想去操作文件系统中的二进制数据,那么就需要使用到 FS 所提供的 API,在这个过程中,Buffer 和 Stream 又是密不可分的。在后续的 API 使用过程中就会具体的感知到这些。

FS模块结构
- FS 基本操作类
- FS 常用 API
文件相关的:
权限位:用户对于文件所具备的操作权限(rwx: 读、写、执行,8进制表示:4、2、1)

标识符:Nodejs 中 flag 表示对文件的操作方式
- r: 表示可读
- w: 表示可写
- s: 表示同步
- +: 表示执行相反的操作
- x: 表示排它操作
- a: 表示追加操作
例如:
目标文件不存在的时候,如果当前是 r+ 的行为,是不会创建这个文件的,会直接抛出异常,但是如果是 w+,它就会先创建这个文件
如果目标文件已经存在,我们再去采用 r+,是不会清空当前文件,可是如果采用 w+的操作,它就会自动把文件中已有内容清空,然后再去执行写操作。
后续应用到了再查即可
文件描述符/操作符:fd 就是操作系统分配给被打开文件的标识,从 3 开始
文件操作 API
文件读写与拷贝监控
这里只看异步操作,同步的自行查阅文档
- readFile: 从指定文件中读取数据
- writeFile: 向指定文件中写入数据
- appendFile: 追加的方式向指定文件中写入数据
- copyFile: 将某个文件中的数据拷贝至另一文件
- watchFile: 对指定文件进行监听
const fs = require('fs')
const path = require('path')

// readFile
fs.readFile(path.resolve('data.txt'), 'utf-8', (err, data) => {
  console.log(err)
  if (!null) {
    console.log(data)
  }
})

// writeFile
// 默认,清空并直接写入覆盖原数据
// fs.writeFile('data.txt', '测试写入数据', (err)=>{
//   if(!err){
//     fs.readFile('data.txt', 'utf-8', (err, data)=>{
//       console.log(data)
//     })
//   }
// })
// 路径不存在则直接创建
// fs.writeFile('data1.txt', '测试写入数据', (err)=>{
//   if(!err){
//     fs.readFile('data.txt', 'utf-8', (err, data)=>{
//       console.log(data)
//     })
//   }
// })
// 传递参数
fs.writeFile('data.txt', '123456', {
  mode: 438,
  // flag: 'r+', // 不做清空操作,做写入操作,从头开始覆盖,
  flag: 'w+', // 做清空操作,然后做写入操作
  encoding: 'utf-8'
}, (err) => {
  if (!err) {
    fs.readFile('data.txt', 'utf-8', (err, data) => {
      console.log(data)
    })
  }
})

// appendFile
fs.appendFile('data.txt', 'hello node.js',{},  (err) => {
  console.log('写入成功')
  fs.readFile('data.txt', 'utf-8', (err, data) => {
    console.log(data)
  })
})
// copyFile
fs.copyFile('data.txt', 'test.txt', (err) => {
  console.log('拷贝成功')
  fs.readFile('test.txt', 'utf-8', (err, data) => {
    console.log(data)
  })
})
// watchFile
fs.watchFile('data.txt', {interval: 20}, (curr, prev) => {
  console.log(prev, curr)
  if (curr.mtime !== prev.mtime) {
    console.log('文件被修改了')
    fs.unwatchFile('data.txt') // 销毁监听
  }
})
md 转 html
用到第三方依赖:
- marked: 将 md 格式内容转 html 格式
- browser-sync: 启动浏览器浏览服务
// md2html.js
const fs = require('fs')
const path = require('path')
const marked = require('marked')
const browserSync = require('browser-sync')
/**
* 1、读取 md 和 css 内容
* 2、将上述读取出来的内容替换占位符,生成一个最终需要展示的 html 字符串
* 3、将 html 字符串写入到指定的 html 文件
* 4、监听 md 文档内容的变化,更新 html 内容
* 5、使用 browser-sync 实时显示 html 内容
*/
let mdPath = path.join(__dirname, process.argv[2])
let cssPath = path.resolve('github.css')
let htmlPath = mdPath.replace(path.extname(mdPath), '.html')
console.log(mdPath)
console.log(cssPath)
console.log(htmlPath)
// 1、读取 md 和 css 内容
fs.readFile(mdPath, 'utf-8', (err, data)=>{
// 2、将上述读取出来的内容替换占位符,生成一个最终需要展示的 html 字符串
let htmlStr = marked(data)
// 3、读取 css 内容
fs.readFile(cssPath, 'utf-8', (err, data)=>{
let retHtml = temp.replace('{{content}}', htmlStr).replace('{{style}}', data)
// 3、将 html 字符串写入到指定的 html 文件
fs.writeFile(htmlPath, retHtml, (err)=>{
console.log('html 写入成功')
})
})
})
fs.watchFile(mdPath, (curr, prev)=>{
if(curr.mtime !== prev.mtime){
console.log('文件修改了')
// 1、读取 md 和 css 内容
fs.readFile(mdPath, 'utf-8', (err, data)=>{
// 2、将上述读取出来的内容替换占位符,生成一个最终需要展示的 html 字符串
let htmlStr = marked(data)
// 3、读取 css 内容
fs.readFile(cssPath, 'utf-8', (err, data)=>{
let retHtml = temp.replace('{{content}}', htmlStr).replace('{{style}}', data)
// 3、将 html 字符串写入到指定的 html 文件
fs.writeFile(htmlPath, retHtml, (err)=>{
console.log('html 写入成功')
})
})
})
}
})
browserSync.init({
browser: '',
server: __dirname,
watch: true,
index: path.basename(htmlPath)
})
const temp = `
/* github.css 文件内容 */
:root {
  --side-bar-bg-color: #fafafa;
  --control-text-color: #777;
}

@include-when-export url(https://fonts.loli.net/css?family=Open+Sans:400italic,700italic,700,400&subset=latin,latin-ext);

@font-face {
  font-family: 'Open Sans';
  font-style: normal;
  font-weight: normal;
  src: local('Open Sans Regular'),url('./github/400.woff') format('woff');
}

@font-face {
  font-family: 'Open Sans';
  font-style: italic;
  font-weight: normal;
  src: local('Open Sans Italic'),url('./github/400i.woff') format('woff');
}

@font-face {
  font-family: 'Open Sans';
  font-style: normal;
  font-weight: bold;
  src: local('Open Sans Bold'),url('./github/700.woff') format('woff');
}

@font-face {
  font-family: 'Open Sans';
  font-style: italic;
  font-weight: bold;
  src: local('Open Sans Bold Italic'),url('./github/700i.woff') format('woff');
}

html {
  font-size: 16px;
}

body {
  font-family: "Open Sans","Clear Sans","Helvetica Neue",Helvetica,Arial,sans-serif;
  color: rgb(51, 51, 51);
  line-height: 1.6;
}

#write {
  max-width: 860px;
  margin: 0 auto;
  padding: 30px;
  padding-bottom: 100px;
}
#write > ul:first-child,
#write > ol:first-child{
  margin-top: 30px;
}

a {
  color: #4183C4;
}
h1,
h2,
h3,
h4,
h5,
h6 {
  position: relative;
  margin-top: 1rem;
  margin-bottom: 1rem;
  font-weight: bold;
  line-height: 1.4;
  cursor: text;
}
h1:hover a.anchor,
h2:hover a.anchor,
h3:hover a.anchor,
h4:hover a.anchor,
h5:hover a.anchor,
h6:hover a.anchor {
  text-decoration: none;
}
h1 tt,
h1 code {
  font-size: inherit;
}
h2 tt,
h2 code {
  font-size: inherit;
}
h3 tt,
h3 code {
  font-size: inherit;
}
h4 tt,
h4 code {
  font-size: inherit;
}
h5 tt,
h5 code {
  font-size: inherit;
}
h6 tt,
h6 code {
  font-size: inherit;
}
h1 {
  padding-bottom: .3em;
  font-size: 2.25em;
  line-height: 1.2;
  border-bottom: 1px solid #eee;
}
h2 {
 padding-bottom: .3em;
  font-size: 1.75em;
  line-height: 1.225;
  border-bottom: 1px solid #eee;
}
h3 {
  font-size: 1.5em;
  line-height: 1.43;
}
h4 {
  font-size: 1.25em;
}
h5 {
  font-size: 1em;
}
h6 {
 font-size: 1em;
  color: #777;
}
p,
blockquote,
ul,
ol,
dl,
table{
  margin: 0.8em 0;
}
li>ol,
li>ul {
  margin: 0 0;
}
hr {
  height: 2px;
  padding: 0;
  margin: 16px 0;
  background-color: #e7e7e7;
  border: 0 none;
  overflow: hidden;
  box-sizing: content-box;
}

li p.first {
  display: inline-block;
}
ul,
ol {
  padding-left: 30px;
}
ul:first-child,
ol:first-child {
  margin-top: 0;
}
ul:last-child,
ol:last-child {
  margin-bottom: 0;
}
blockquote {
  border-left: 4px solid #dfe2e5;
  padding: 0 15px;
  color: #777777;
}
blockquote blockquote {
  padding-right: 0;
}
table {
  padding: 0;
  word-break: initial;
}
table tr {
  border-top: 1px solid #dfe2e5;
  margin: 0;
  padding: 0;
}
table tr:nth-child(2n),
thead {
  background-color: #f8f8f8;
}
table tr th {
  font-weight: bold;
  border: 1px solid #dfe2e5;
  border-bottom: 0;
  margin: 0;
  padding: 6px 13px;
}
table tr td {
  border: 1px solid #dfe2e5;
  margin: 0;
  padding: 6px 13px;
}
table tr th:first-child,
table tr td:first-child {
  margin-top: 0;
}
table tr th:last-child,
table tr td:last-child {
  margin-bottom: 0;
}

.CodeMirror-lines {
  padding-left: 4px;
}

.code-tooltip {
  box-shadow: 0 1px 1px 0 rgba(0,28,36,.3);
  border-top: 1px solid #eef2f2;
}

.md-fences,
code,
tt {
  border: 1px solid #e7eaed;
  background-color: #f8f8f8;
  border-radius: 3px;
  padding: 0;
  padding: 2px 4px 0px 4px;
  font-size: 0.9em;
}

code {
  background-color: #f3f4f4;
  padding: 0 2px 0 2px;
}

.md-fences {
  margin-bottom: 15px;
  margin-top: 15px;
  padding-top: 8px;
  padding-bottom: 6px;
}


.md-task-list-item > input {
margin-left: -1.3em;
}

@media print {
  html {
      font-size: 13px;
  }
  table,
  pre {
      page-break-inside: avoid;
  }
  pre {
      word-wrap: break-word;
  }
}

.md-fences {
background-color: #f8f8f8;
}
#write pre.md-meta-block {
padding: 1rem;
  font-size: 85%;
  line-height: 1.45;
  background-color: #f7f7f7;
  border: 0;
  border-radius: 3px;
  color: #777777;
  margin-top: 0 !important;
}

.mathjax-block>.code-tooltip {
bottom: .375rem;
}

.md-mathjax-midline {
  background: #fafafa;
}

#write>h3.md-focus:before{
left: -1.5625rem;
top: .375rem;
}
#write>h4.md-focus:before{
left: -1.5625rem;
top: .285714286rem;
}
#write>h5.md-focus:before{
left: -1.5625rem;
top: .285714286rem;
}
#write>h6.md-focus:before{
left: -1.5625rem;
top: .285714286rem;
}
.md-image>.md-meta {
  /*border: 1px solid #ddd;*/
  border-radius: 3px;
  padding: 2px 0px 0px 4px;
  font-size: 0.9em;
  color: inherit;
}

.md-tag {
  color: #a7a7a7;
  opacity: 1;
}

.md-toc {
  margin-top:20px;
  padding-bottom:20px;
}

.sidebar-tabs {
  border-bottom: none;
}

#typora-quick-open {
  border: 1px solid #ddd;
  background-color: #f8f8f8;
}

#typora-quick-open-item {
  background-color: #FAFAFA;
  border-color: #FEFEFE #e5e5e5 #e5e5e5 #eee;
  border-style: solid;
  border-width: 1px;
}

/** focus mode */
.on-focus-mode blockquote {
  border-left-color: rgba(85, 85, 85, 0.12);
}

header, .context-menu, .megamenu-content, footer{
  font-family: "Segoe UI", "Arial", sans-serif;
}

.file-node-content:hover .file-node-icon,
.file-node-content:hover .file-node-open-state{
  visibility: visible;
}

.mac-seamless-mode #typora-sidebar {
  background-color: #fafafa;
  background-color: var(--side-bar-bg-color);
}

.md-lang {
  color: #b4654d;
}

.html-for-mac .context-menu {
  --item-hover-bg-color: #E6F0FE;
}

#md-notification .btn {
  border: 0;
}

.dropdown-menu .divider {
  border-color: #e5e5e5;
}

.ty-preferences .window-content {
  background-color: #fafafa;
}

.ty-preferences .nav-group-item.active {
  color: white;
  background: #999;
}
# 运行指令
node md2html.js index.md
文件打开与关闭
为什么要提供打开与关闭的操作?
因为 read 或 write 都是一次性的将内容读取写入到内存里,对于大文件来说显然是不合理的,因此后期需要一种边读边写或者边写边读的操作。
这时候就该将文件的 打开、读取、写入、关闭 看作是各自独立的环节;所以就有了 open | close
const fs = require('fs')
const path = require('path')

// open
/* fs.open(path.resolve('data.txt'), 'r', (err, fd) => {
  console.log(fd)
}) */

// close
fs.open('data.txt', 'r', (err, fd) => {
  console.log(fd)
  fs.close(fd, err => {
    console.log('关闭成功')
  })
})
大文件读写操作
readFile 和 writeFile 适合小体积的文件操作,对于大体积的文件适合边读边存,因此 nodejs 里就有了 open、read、write、close。

const fs = require('fs')

// read : 所谓的读操作就是将数据从磁盘文件中写入到 buffer 中
let buf = Buffer.alloc(10)

/**
 * read 参数:
 * fd 定位当前被打开的文件
 * buf 用于表示当前缓冲区
 * offset 表示当前从 buf 的哪个位置开始执行写入
 * length 表示当前次写入的长度
 * position 表示当前从文件的哪个位置开始读取
 */
// fs.open('data.txt', 'r', (err, rfd) => {
//   console.log(rfd)
//   fs.read(rfd, buf, 1, 4, 3, (err, readBytes, data) => {
//     console.log(readBytes)
//     console.log(data)
//     console.log(data.toString())
//   })
// })

/**
 * read 参数:
 * fd 定位当前被打开的文件
 * buf 用于表示当前缓冲区
 * offset 表示当前从 buf 的哪个位置开始执行
 * length 表示当前次写入的长度
 * position 表示当前从文件的哪个位置开始写入,一般不动,都是顶格写
 */
// write 将缓冲区里的内容写入到磁盘文件中
buf = Buffer.from('1234567890')
fs.open('b.txt', 'w', (err, wfd) => {
  fs.write(wfd, buf, 2, 4, 0, (err, written, buffer) => {
    console.log(written)
    // fs.close(wfd)
  })
})
文件拷贝自定义实现
默认情况下,Nodejs 自身提供了 copyFile 这样的 API,但是这对于大文件不太合适,因此这里就利用 node 提供的文件读写的几个 api,来完成拷贝行为。
const fs = require('fs')

/**
 * 01 打开 a 文件,利用 read 将数据保存到 buffer 暂存起来
 * 02 打开 b 文件,利用 write 将 buffer 中数据写入到 b 文件中
 */
let buf = Buffer.alloc(10)

// 01 打开指定的文件
/* fs.open('a.txt', 'r', (err, rfd) => {
  // 03 打开 b 文件,用于执行数据写入操作
  fs.open('b.txt', 'w', (err, wfd) => {
    // 02 从打开的文件中读取数据
    fs.read(rfd, buf, 0, 10, 0, (err, readBytes) => {
      // 04 将 buffer 中的数据写入到 b.txt 当中
      fs.write(wfd, buf, 0, 10, 0, (err, written) => {
        console.log('写入成功')
      })
    })
  })
}) */

// 02 数据的完全拷贝
/* fs.open('a.txt', 'r', (err, rfd) => {
  fs.open('b.txt', 'a+', (err, wfd) => {
    fs.read(rfd, buf, 0, 10, 0, (err, readBytes) => {
      fs.write(wfd, buf, 0, 10, 0, (err, written) => {
        fs.read(rfd, buf, 0, 5, 10, (err, readBytes) => {
          fs.write(wfd, buf, 0, 5, 10, (err, written) => {
            console.log('写入成功')
          })
        })
      })
    })
  })
}) */

const BUFFER_SIZE = buf.length
let readOffset = 0

fs.open('a.txt', 'r', (err, rfd) => {
  fs.open('b.txt', 'w', (err, wfd) => {
    function next () {
      fs.read(rfd, buf, 0, BUFFER_SIZE, readOffset, (err, readBytes) => {
        if (!readBytes) {
          // 如果条件成立,说明内容已经读取完毕
          fs.close(rfd, ()=> {})
          fs.close(wfd, ()=> {})
          console.log('拷贝完成')
          return
        }
        readOffset += readBytes
        fs.write(wfd, buf, 0, readBytes, (err, written) => {
          next()
        })
      })
    }
    next()
  })
})
后边会有更好的操作方式:流操作
目录操作 API
- access: 判断文件或目录是否具有操作权限
- stat: 获取目录及文件信息
- mkdir: 创建目录
- rmdir: 删除目录
- readdir: 读取目录中内容
- unlink: 删除指定文件
const fs = require('fs')

// 一、access
// fs.access('a.txt', (err) => {
//   if (err) {
//     console.log(err)
//   } else {
//     console.log('有操作权限')
//   }
// })

// 二、stat
/* fs.stat('a.txt', (err, statObj) => {
  console.log(statObj.size)
  console.log(statObj.isFile())
  console.log(statObj.isDirectory())
}) */

// 三、mkdir
// fs.mkdir('a/b/c', {recursive: true}, (err) => {
//   if (!err) {
//     fs.closeSync(fs.openSync('a/b/c/a.txt','w'))
//     fs.closeSync(fs.openSync('a/b/c/b.txt','w'))
//     console.log('创建成功')
//   }else{
//     console.log(err)
//   }
// })

// 四、rmdir
fs.rm('a', {recursive: true}, (err) => {
  if (!err) {
    console.log('删除成功')
  } else {
    console.log(err)
  }
})

// 五、readdir
// fs.readdir('a/b/c', (err, files) => {
//   console.log(files)
// })

// 六、unlink
// fs.unlink('a/b/c/a.txt', (err) => {
//   if (!err) {
//     console.log('删除成功')
//   } else {
//     console.log(err)
//   }
// })
同步实现目录创建
const fs = require('fs')
const path = require('path')

/**
 * 01 将来调用时需要接收类似于 a/b/c ,这样的路径,它们之间是采用 / 去行连接
 * 02 利用 / 分割符将路径进行拆分,将每一项放入一个数组中进行管理  ['a', 'b', 'c']
 * 03 对上述的数组进行遍历,我们需要拿到每一项,然后与前一项进行拼接 /
 * 04 判断一个当前对拼接之后的路径是否具有可操作的权限,如果有则证明存在,否则的话就需要执行创建
 */

function makeDirSync (dirPath) {
  let items = dirPath.split(path.sep)
  for(let i = 1; i <= items.length; i++) {
    let dir = items.slice(0, i).join(path.sep)
    try {
      fs.accessSync(dir)
    } catch (err) {
      fs.mkdirSync(dir)
    }
  }
}

makeDirSync('a\\b\\c')
异步实现目录创建
const fs = require('fs')
const path = require('path')
const {promisify} = require('util')

/* function mkDir (dirPath, cb) {
  let parts = dirPath.split('/')
  let index = 1

  function next () {
    if (index > parts.length) return cb && cb()

    let current = parts.slice(0, index++).join('/')

    fs.access(current, (err) => {
      if (err) {
        fs.mkdir(current, next)
      }else{
        next()
      }
    })
  }
  next()
}

mkDir('a/b/c', () => {
  console.log('创建成功')
}) */


// 将 access 与 mkdir 处理成 async... 风格

const access = promisify(fs.access)
const mkdir = promisify(fs.mkdir)

async function myMkdir (dirPath, cb) {
  let parts = dirPath.split('/')
  for(let index = 1; index <= parts.length; index++) {
    let current = parts.slice(0, index).join('/')
    try {
      await access(current)
    } catch (err) {
      await mkdir(current)
    }
  }
  cb && cb()
}

myMkdir('a/b/c', () => {
  console.log('创建成功')
})
异步实现目录删除
const { dir } = require('console')
const fs = require('fs')
const path = require('path')


/**
 * 自定义函数,接收路径,执行删除
 * 1、判断接收路径是否是一个文件,文件直接删除即可
 * 2、如果是一个目录,需要读取目录中的内容,然后再执行删除
 * 3、将删除函数定义成一个函数,通过递归的方式进行复用
 * 4、将当前名称拼接成在删除时可用路径
 */

function myRmDir (dirPath, cb) {
  console.log('当前路径:', dirPath);
  // 判断当前 dirPath 类型
  fs.stat(dirPath, (err, statObj)=>{
    if(err){
      cb('路径不存在')
      return
    }
    if(statObj.isDirectory()){
      // 判断,如果是一个目录
      fs.readdir(dirPath, (err, files)=>{
        console.log('读取出来的 files: ',files)
        let dirs = files.map((item)=>{
          return path.join(dirPath, item)
        })
        console.log('转换之后的 dirs: ',dirs)
        let index = 0
        function next () {
          console.log('下标:index -- dirs.length',index, ' -- ', dirs.length)
          if(index == dirs.length){
            console.log('删除目录:', dirPath)
            return fs.rmdir(dirPath, cb)
          }
          let current = dirs[index ++]
          myRmDir(current, next)
        }
        next()
      })
    } else {
      // 是一个文件,直接删除即可
      console.log('删除文件:', dirPath)
      fs.unlink(dirPath, cb)
    }
  })
}

myRmDir('tmp', (err)=>{
  console.log(err, '删除成功了');
})
模块化历程
为什么需要模块化?
传统开发常见问题:
- 命名冲突和污染
- 代码冗余,无效请求多
- 文件间的依赖关系复杂
难维护且不方便复用
模块就是小而精且利于维护的代码片段
利用函数、对象、自执行函数实现分块
常见模块化规范
-
Commonjs 规范
-
AMD 规范
-
CMD 规范
-
ES modules 规范
Nodejs 就是使用的 Commonjs 规范;Commonjs 规范中模块加载都是同步完成的,所以在浏览器中就不是太适合使用了。 -
模块化是前端走向工程化中的重要一环
-
早期 JavaScript 语言层面没有模块化规范
-
Commonjs、AMD、CMD、都是模块化规范
-
ES6 中将模块化纳入标准规范
-
当下常用规范是 Commonjs 与 ESM
Commonjs 规范
主要应用于 Nodejs 中,是语言层面上的规范;
- 模块引用 require
- 模块定义 exports
- 模块标识 require 的具体参数
Nodejs 与 CommonJS
- 任意一个文件就是一个模块,具有独立作用域
- 使用 require 导入其他模块
- 将模块 ID 传入 require 实现目标模块定位
module 属性
- 任意 js 文件就是一个模块,可以直接使用 module 属性
- id: 返回模块标识符,一般是一个绝对路径
- filename: 返回文件模块的绝对路径
- loaded: 返回布尔值,标识模块是否完成加载
- parent: 返回对象存放调用当前模块的模块
- children: 返回数组,存放当前模块调用的其他模块
- exports: 返回当前模块需要暴露的内容
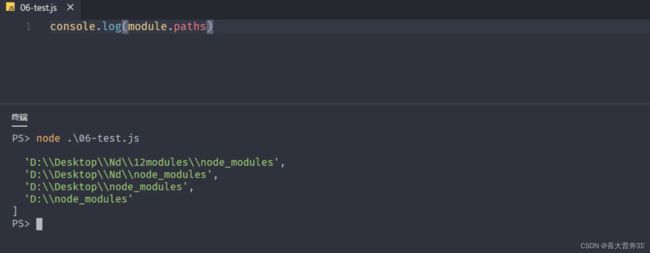
- paths: 返回数组,存放不同目录下的 node_modules 位置
module.exports 与 exports 有何区别?
exports 是 nodejs 所提供的一个变量,直接指向了 module.exports 所对应的内存地址。
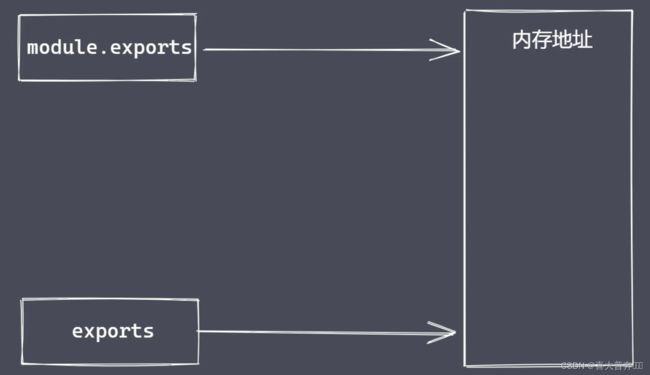
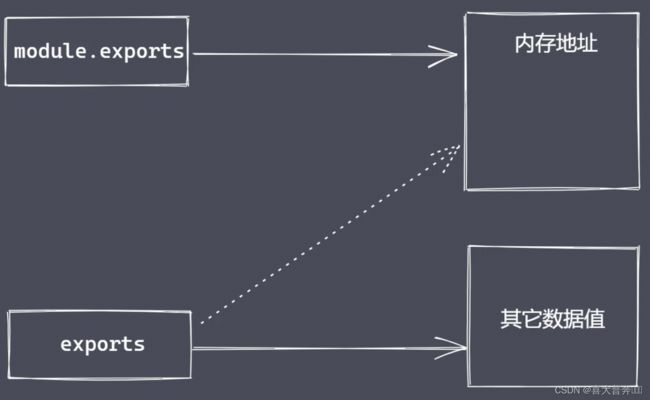
但是不能直接给 exports 赋值的,因为这样就切断了 exports 和 module.exports 之间的联系,这样它就变成了一个局部的变量了,无法再向外部提供数据。
require 属性:
- 基本功能是读入并且执行一个模块文件
- resolve: 返回模块文件绝对路径
- extensions: 一句不同后缀名执行解析操作
- main: 返回主模块对象
CommonJS 规范:
- CommonJS 规范起初是为了弥补 JS 语言模块化缺陷
- CommonJS 是语言层面的规范,当前主要用于 Nodejs
- CommonJS 规定模块化分为引入、定义、标识符三个部分
- Module 在任意模块中可直接使用包含模块信息
- Require 接收标识符,加载目标模块
- Exports 与 module.exports 都能导出模块数据
- CommonJS 规范定义模块的加载是同步完成
Node.js 与 CommonJS
- 使用 module.exports 与 require 实现模块导入与导出
- module 属性及其常见信息获取
- exports 导出数据及其与 module.exports 区别
- CommonJS 规范下的模块同步加载
// m.js
// 一、模块的导入与导出
/* const age = 18
const addFn = (x, y) => {
  return x + y
}

module.exports = {
  age: age,
  addFn: addFn
} */

// 二、module
/* module.exports = 1111
console.log(module) */

// 三、exports
// exports.name = 'zce'
/* exports = {
  name: 'syy',
  age: 18
} */

// 四、同步加载
/* let name = 'lg'
let iTime = new Date()

while(new Date() -iTime < 4000) {}

module.exports = name
console.log('m.js被加载导入了') */

/* console.log(require.main == module) */

module.exports = 'lg'
// node-common.js
// 一、导入
/* let obj = require('./m')
console.log(obj) */

// 二、module
// let obj = require('./m')

// 三、exports
/* let obj = require('./m')
console.log(obj) */

// 四、同步加载
/* let obj = require('./m')
console.log('01.js代码执行了') */

let obj = require('./m')
console.log(require.main == module)
模块分类及加载流程
分类:
- 内置模块
- 文件模块
加载速度:
- 核心模块: Node 远吗编译时写入到二进制文件中
- 文件模块:代码运行时,动态加载
加载流程:
- 路径分析:一句标识符确定模块位置
- 文件定位:确定目标模块中具体的文件及文件类型
- 编译执行:采用对应的方式完成文件的编译执行
路径分析 - 标识符
- 路径标识符
- 非路径标识符:常见于核心模块
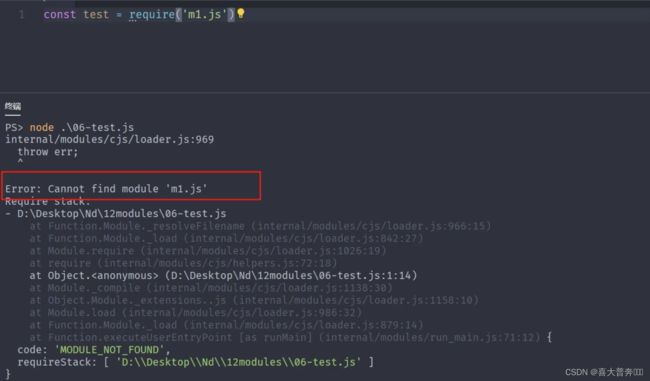
- 项目下存在 m1.js,导入时使用 require(‘m1’) 语法
- m1.js -> m1.json -> m1.node
- 查找 package.json 文件,使用 JSON.parse() 解析
- main.js -> main.json -> main.node
- 将 index 作为目标模块中的具体文件名称
- 最终还是没找到,抛出异常
编译执行
- 将某个具体类型文件按照相应的方式进行编译和执行
- 创建新对象,按路径载入,完成编译执行
JS 文件的编译执行
- 使用 fs 模块同步读入目标文件内容
- 对内容进行语法包装,生成可执行 JS 函数
- 调用函数时传入 exports、module、require 的属性值
JSON 文件编译执行
- 将读取到的内容通过 JSON.parse() 解析,返回给 exports 对象即可
缓存优先原则
- 提高模块加载速度
- 当前模块不存在,则经历一次完整加载流程
- 模块加载完成后,使用路径作为索引进行缓存
总结:
- 路径分析:确定目标模块位置
- 文件定位:确定目标模块中的具体文件
- 编译执行:对模块内容进行编译,返回可用 exports 对象
模块加载源码分析
VM 模块使用
作用:创建独立运行的沙箱环境
text.txt 文件
var age = 18
vm.js 文件
const fs = require('fs')
const vm = require('vm')

let age = 33
let content = fs.readFileSync('test.txt', 'utf-8')
console.log(content);
// eval
// eval(content)

// new Function
// console.log(age)
// let fn = new Function('age', "return age + 1")
// console.log(fn(age))

// vm.runInThisContext("age += 10")

// console.log(age)
模块加载模拟实现
以文件模块加载为例
- 路径分析
- 缓存优化
- 文件定位
- 编译执行
const exp = require('constants');
const fs = require('fs');
const path = require('path');
const vm = require('vm');

function Module(id){
    this.id = id
    this.exports = {}
}

Module._resolveFilename = function(filename){
    // 利用 path 将 filename 转为绝对路径
    let absPath = path.resolve(__dirname, filename)
    console.log(absPath)
    // 判断当前路径对应内容是否存在
    if(fs.existsSync(absPath)){
        return absPath
    } else {
        // 文件定位
        let suffix = Object.keys(Module._extensions)
        for(let i=0; i< suffix.length; i++){
            let newPath = absPath + suffix[i]
            if(fs.existsSync(newPath)){
                return newPath
            }
        }
    }

    throw new Error(`${filename} is not exists`)
}

Module._extensions = {
    '.js'(module){
        // 读取
        let content = fs.readFileSync(module.id, 'utf-8')
        // 包装
        content = Module.wrapper[0]+content + Module.wrapper[1]

        // vm
        let compileFn = vm.runInThisContext(content)
        console.log(compileFn)
        // 准备参数的值
        let exports = module.exports
        let dirname = path.dirname(module.id)
        let filename = module.id
        console.log('myRequire',myRequire)
        compileFn.call(exports, exports, myRequire, module, filename, dirname)
    },
    '.json'(module){
        let content = JSON.parse(fs.readFileSync(module.id, 'utf-8'))
        module.exports = content
    }
}

Module.wrapper = [
    "(function (exports, require, module, __filename, __dirname){",
    "})"
]

Module._cache = {}

Module.prototype.load = function(){
    let extname = path.extname(this.id)
    Module._extensions[extname](this)
}

function myRequire(filename){
    // 1、绝对路径
    let mPath = Module._resolveFilename(filename)
    // 2、缓存优先
    let cacheModule = Module._cache[mPath]
    if(cacheModule) return cacheModule.exports

    // 3、创建空对象加载目标模块
    let module = new Module(mPath)

    // 4、缓存已加载过的模块
    Module._cache[mPath] = module

    // 5、执行加载/编译执行
    module.load()

    // 6、返回数据
    return module.exports
}


let obj = myRequire('./v')
// 测试缓存优先
let obj2 = myRequire('./v')
console.log(obj);
事件模块 Events
通过 EventEmitter 类实现事件统一管理
events 与 EventEmitter
- node.js 是基于事件驱动的异步操作架构,内置 events 模块
- events 模块提供了 EventEmitter 类
- node.js 中很多内置核心模块继承 EventEmitter
EventEmitter 常见 API
- on: 添加当事件被触发时调用的回调函数
- emit: 触发事件,按照注册的顺序同步调用每个事件监听器
- once: 添加当事件在注册之后首次被触发时调用的回调函数
- off: 移除特定的监听器
const EventEmitter = require('events')

const ev = new EventEmitter()

// on
/* ev.on('事件1', () => {
  console.log('事件1执行了---2')
})

ev.on('事件1', () => {
  console.log('事件1执行了')
})

// emit
ev.emit('事件1')
ev.emit('事件1') */

// once
/* ev.once('事件1', () => {
  console.log('事件1执行了')
})
ev.once('事件1', () => {
  console.log('事件1执行了--2')
})

ev.emit('事件1')
ev.emit('事件1') */

// off
/* let cbFn = (...args) => {
  console.log(args)
}
ev.on('事件1', cbFn) */

/* ev.emit('事件1')
ev.off('事件1', cbFn) */
// ev.emit('事件1', 1, 2, 3)

/* ev.on('事件1', function () {
  console.log(this)
})
ev.on('事件1', function () {
  console.log(2222)
})

ev.on('事件2', function () {
  console.log(333)
})

ev.emit('事件1') */

const fs = require('fs')

const crt = fs.createReadStream()
crt.on('data')
发布订阅
定义对象间一对多的依赖关系,解决什么问题?解决没有 promise 之前的回调问题。
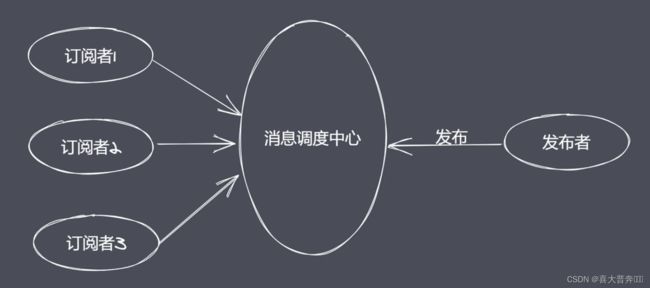
发布订阅要素:
- 缓存队列,存放订阅者信息
- 具有增加、删除订阅的能力
- 状态改变时通知所有订阅者执行监听
对比观察者模式:
1、发布订阅中存在调度中心,观察者模式里边不存在
2、状态发生改变时,发布订阅无须主动通知(调度中心决定)
class PubSub{
    constructor(){
        this._events = {}
    }

    // 注册
    subscribe(event, callback){
        if (this._events[event]) {
            // 如果当前 event 已存在,只需要往后添加当前次监听操作
            this._events[event].push(callback)
        } else {
            this._events[event] = [callback]
        }
    }

    // 发布
    publish(event, ...args){
        const items = this._events[event]
        if(items && items.length){
            items.forEach(callback => {
                callback.call(this, ...args)
            })
        }
    }
}

let ps = new PubSub()

ps.subscribe('事件1', ()=>{
    console.log('事件1 执行了');
})
ps.subscribe('事件1', ()=>{
    console.log('事件1 执行了 -- 2');
})

ps.publish('事件1')
ps.publish('事件1')
EventEmitter 源码调试分析
EventEmitter 模拟
function MyEvent (){
    // 准备一个数据结构缓存订阅者信息
    this._events = Object.create(null)

}

MyEvent.prototype.on = function(type, callback){
    // 判断当前事件是否已经存在,然后再决定如何做缓存
    if(this._events[type]){
        this._events[type].push(callback)
    } else {
        this._events[type] = [callback]
    }
}

MyEvent.prototype.emit = function (type, ...args) {
    // 判断当前值是否存在,如果存在再执行遍历,如果不存在就没必要往下走了
    if(this._events[type] && this._events[type].length){
        this._events[type].forEach(callback => {
            callback.call(this, ...args)
        });
    }
}

MyEvent.prototype.off = function (type, callback) {
    // 判断当前 type 是否存在,如果存在,则取消指定的监听
    if(this._events && this._events[type]){
        this._events[type] = this._events[type].filter(item => {
            return item !== callback && item.link !== callback
        })
    }
}
MyEvent.prototype.once = function (type, callback) {
    let foo = function (...args) {
        callback.call(this, ...args)
        this.off(type, foo)
    }
    foo.link = callback
    // 注册,触发之后能立马注销掉
    this.on(type, foo)
}

let myEv = new MyEvent()

let fn = (...args)=>{
    console.log('事件1触发了', args)
}

// myEv.on('事件1', fn)
// myEv.on('事件1', ()=>{
//     console.log('事件1 触发了 -- 2');
// })
// myEv.emit('事件1', 1,2,3)
// myEv.emit('事件1', 1,2,3)

// myEv.on('事件1', fn)
// myEv.emit('事件1', '前')
// myEv.off('事件1', fn)
// myEv.emit('事件1', '后')

// myEv.once('事件1', fn)

// myEv.emit('事件1',1,2,3)
// myEv.emit('事件1',1,2,3)
// myEv.emit('事件1',1,2,3)
// myEv.once('事件1', fn)

myEv.once('事件1', fn)
myEv.off('事件1', fn)

myEv.emit('事件1',1,2,3)
myEv.emit('事件1',1,2,3)
myEv.emit('事件1',1,2,3)
浏览器中的事件环
宏任务、微任务
setTimeout(() => {
  console.log('s1')
  Promise.resolve().then(() => {
    console.log('p1')
  })
  Promise.resolve().then(() => {
    console.log('p2')
  })
})

setTimeout(() => {
  console.log('s2')
  Promise.resolve().then(() => {
    console.log('p3')
  })
  Promise.resolve().then(() => {
    console.log('p4')
  })
})
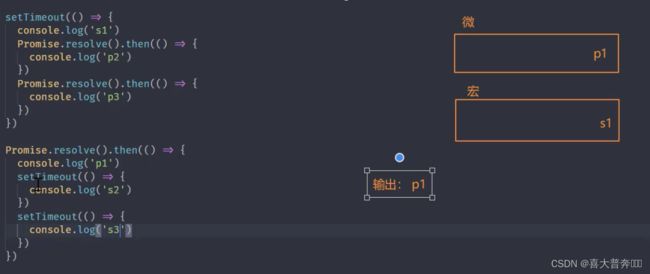
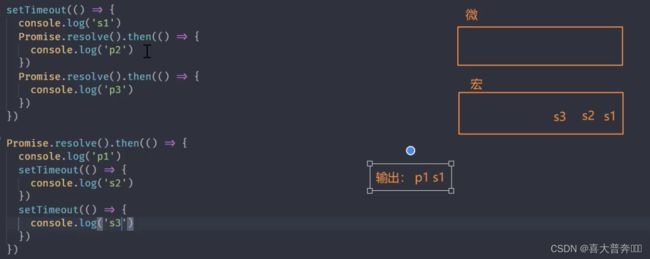
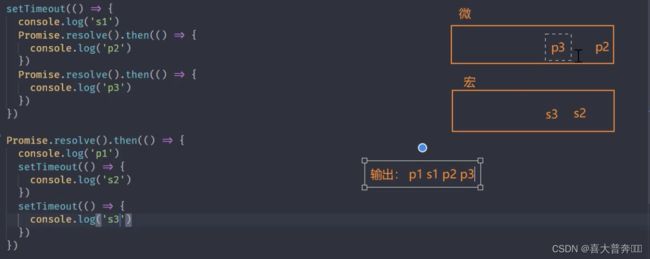
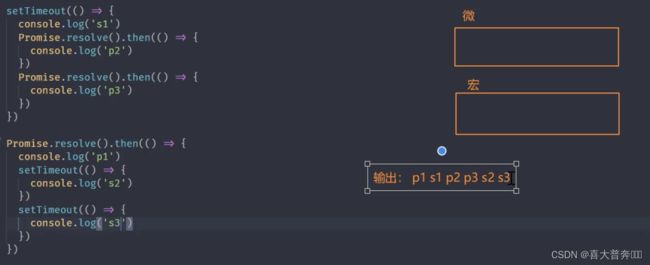
每当宏任务列表当中任何一个宏任务执行完成之后都会去清空一次微任务,会切换到微任务列表里边看一下有没有需要执行的微任务,有的话先执行微任务
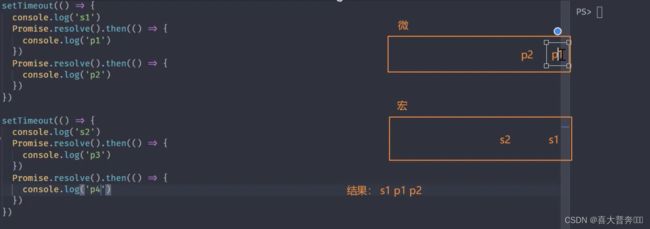

这里用到的东西在浏览器端和node环境下执行顺序是一致的,所以在终端直接执行测试即可
完整事件环执行顺序
- 从上至下执行所有的同步代码
- 执行过程中将遇到的宏任务与微任务添加至相应的队列
- 同步代码执行完毕后,执行满足条件的微任务回调
- 微任务队列执行完毕后执行所有满足需求的宏任务回调
- 循环事件环操作
- 注意:每执行一个宏任务之后就会立刻检查微任务队列
setTimeout(() => {
  console.log('s1')
  Promise.resolve().then(() => {
    console.log('p2')
  })
  Promise.resolve().then(() => {
    console.log('p3')
  })
})

Promise.resolve().then(() => {
  console.log('p1')
  setTimeout(() => {
    console.log('s2')
  })
  setTimeout(() => {
    console.log('s3')
  })
})
Nodejs 中的事件环
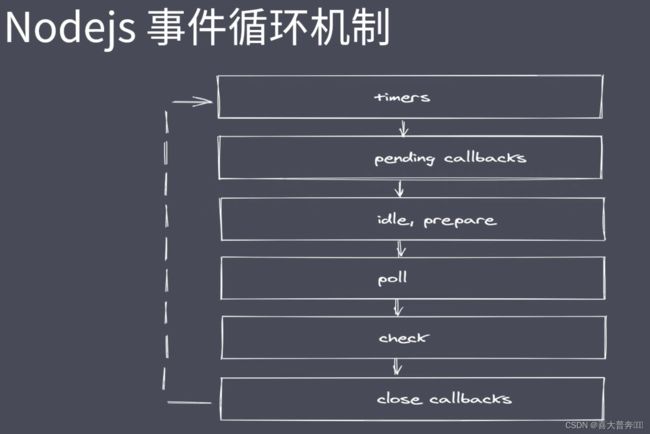
- timers: 执行 setTimout 与 setInterval 回调
- pending callbacks: 执行系统操作的回调,例如:tcp ydp
- idle,prepare: 只在系统内部进行使用
- poll: 执行与 I/O 相关的回调
- check: 执行 setImmediate 中的回调
- close callbacks: 执行 close 事件的回调
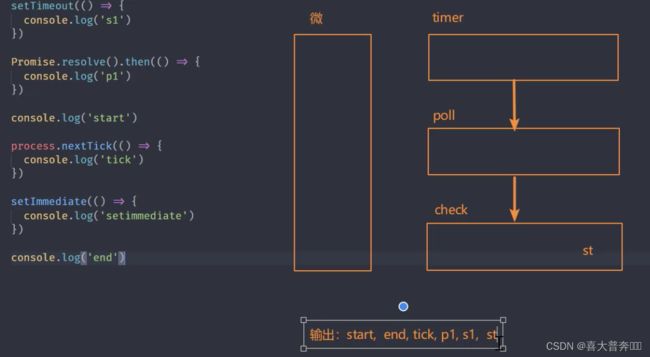
Nodejs 完整事件环
- 执行同步代码,将不同的任务添加至相应的队列
- 所有同步代码执行后会去执行满足条件微任务
- 所有微任务代码执行后会执行 timer 队列中满足的宏任务
- timer 中的所有宏任务执行完成后就会依次切换队列
- 注意:在完成队列切换之前会先清空微任务代码
setTimeout(() => {
  console.log('s1')
})

Promise.resolve().then(() => {
  console.log('p1')
})

console.log('start')// 1

// node 平台下的微任务
process.nextTick(() => {
  console.log('tick') // 3
})

setImmediate(() => {
  console.log('setimmediate')
})

console.log('end') // 2

// start,  end, tick, p1, s1,  st
注意:process.nextTick 优先级高于 promise,感觉微任务也分成了两个微任务队列一样
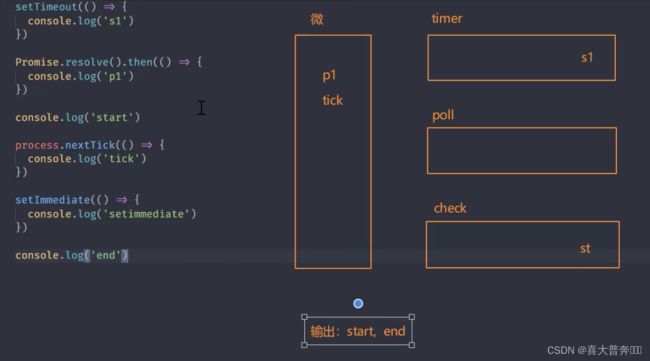

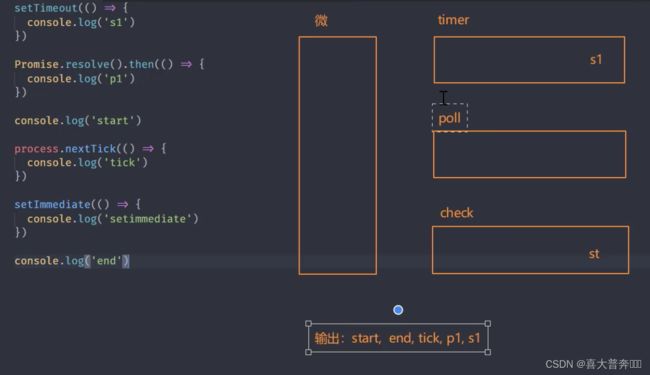
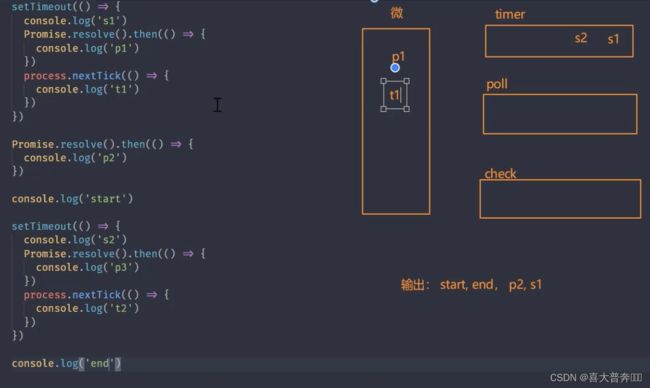
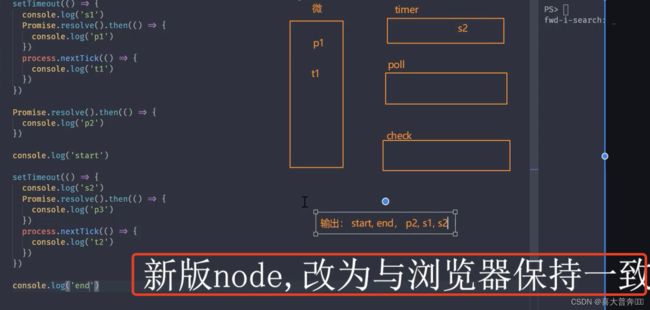
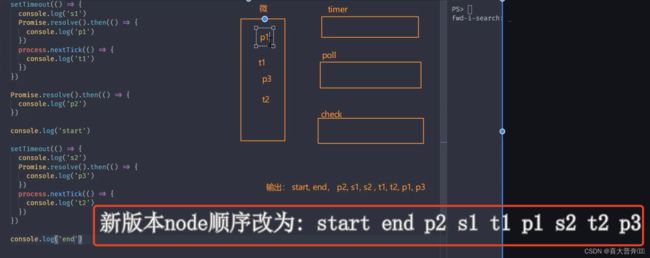
Nodejs 事件环梳理
setTimeout(() => {
  console.log('s1')
  Promise.resolve().then(() => {
    console.log('p1')
  })
  process.nextTick(() => {
    console.log('t1')
  })
})

Promise.resolve().then(() => {
  console.log('p2')
})

console.log('start')

setTimeout(() => {
  console.log('s2')
  Promise.resolve().then(() => {
    console.log('p3')
  })
  process.nextTick(() => {
    console.log('t2')
  })
})

console.log('end')

// start, end, p2, s1, s2 , t1, t2, p1, p3
//新版本 node: start, end, p2, s1, t1, p1, s2, t2, p3
Nodejs 与 浏览器 事件环区别
- 任务队列数不同
- Nodejs 微任务执行时机不同
- 微任务优先级不同
任务队列数
- 浏览器中只有两个任务队列
- Nodejs 中有6个事件队列
微任务执行时机
- 两者都会在同步代码执行完毕后执行微任务
- 浏览器平台下每当一个宏任务执行完毕后就清空微任务
- Nodejs 平台在事件队列切换时会去清空微任务(新版 Node 不是)
微任务优先级
- 浏览器事件环中,微任务存放于事件队列,先进先出
- Nodejs 中 process.nextTick 先于 promise.then
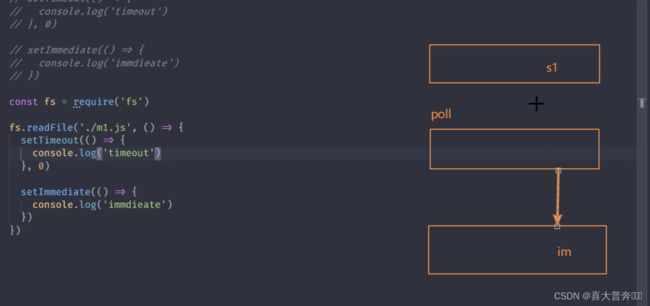
Nodejs 事件环常见问题
// 复现
setTimeout(() => {
  console.log('timeout')
}, 0)

setImmediate(() => {
  console.log('immdieate')
})
const fs = require('fs')

fs.readFile('./eventEmitter.js', () => {
  setTimeout(() => {
    console.log('timeout')
  }, 0)

  setImmediate(() => {
    console.log('immdieate')
  })
})
核心模块 Stream
linux 中的流操作:ls | grep *.js
Node.js 诞生之初就是为了提高 IO 性能,文件操作系统和网络模块实现了流接口;Node.js 中的流就是处理流式数据的抽象接口。
- 同步读取资源文件,用户需要等待数据读取完成
- 资源文件最终一次性加载至内存,开销较大


流处理数据的优势 - 时间效率:流的分段处理可以同时操作多个数据 chunk
- 空间效率:同一时间流无需占据大内存空间
- 使用方便:流配合管理,扩展程序变得简单
Node.js 内置了 stream,它实现了流操作对象
- Readable: 可读流,能够实现数据的读取
- Writeable: 可写流,能够实现数据的写操作
- Duplex: 双工流,既可读又可写
- Tranform: 转换流,可读可写,还能实现数据转换
特点:
- Stream 模块实现了四个具体的抽象(类)
- 所有流都继承自 EventEmitter
Demo:
const fs = require('fs')

let rs = fs.createReadStream('./test.txt') // 创建可读流
let ws = fs.createWriteStream('./test1.txt') // 创建可写流

rs.pipe(ws)
stream 之可读流
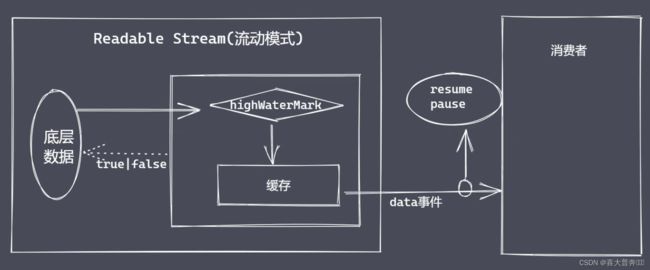
两种消费数据方式为了满足不同的使用场景:流动模式、暂停模式
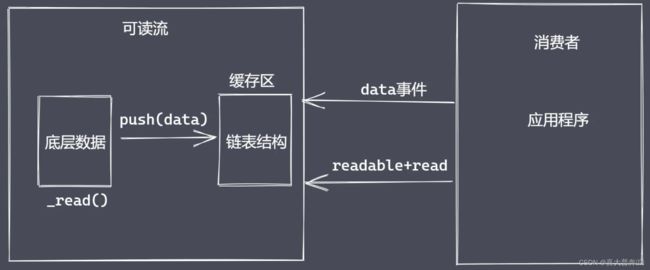
消费数据
- readable 事件:当流中存在可读取数据时触发
- data 事件:当流中数据块传给消费者后触发
- 其他
总结:
- 明确数据生产与消费流程
- 利用 API 实现自定义的可读流
- 明确数据消费的事件使
const {Readable} = require('stream')

// 模拟底层数据
let source = ['zgp','hello','world']

// 自定义类继承 Readable
class MyReadable extends Readable {
    constructor(source){
        super()
        this.source = source
    }
    _read(){
        let data = this.source.shift() || null
        this.push(data)
    }
}

let myReadable = new MyReadable(source)
myReadable.on('readable', ()=>{
    let data = null
    // while((data = myReadable.read()) !== null){
    while((data = myReadable.read(2)) !== null){
        console.log(data.toString())
    }
})

myReadable.on('data', (chunk)=>{
    console.log(chunk.toString());
})
stream 之可写流
- 继承 stream 模块的 Writeable
- 重写 _write 方法,调用 write 执行写入
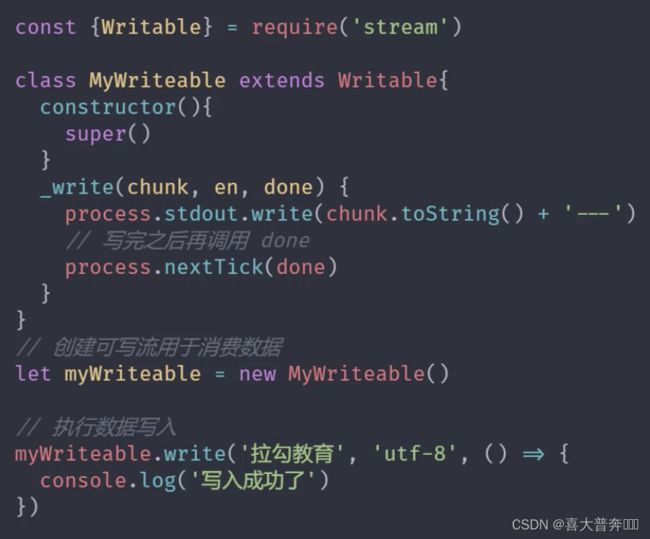
可写流事件 - pipe 事件:可读流调用 pipe() 方法时触发
- unpipe 事件:可读流调用 unpipe() 方法时触发
const {Writable} = require('stream')

class MyWriteable extends Writable {
    constructor(){
        super()
    }
    _write(chunk, encoding, done){
        process.stdout.write(chunk.toString() + ' -- \n')
        process.nextTick(done)
    }
}

let myWriteable = new MyWriteable()

myWriteable.write('喜大普奔', 'utf-8', ()=>{
    console.log('end');
})
stream 之双工流和转换流
Duplex && Transform
Nodejs中的 stream 是流操作的抽象接口集合,可读、可写、双工、转换是单一抽象具体体现。
流操作的核心功能就是处理数据,Nodejs 诞生初衷就是解决密集型 IO 事务。不论是文件 IO 还是网络 IO,本质上都是数据的传输操作,Nodejs 内部都提前准备了相应的模块来处理这两种 IO 操作。处理数据模块也都继承了流和 EventEmitter。
这样一来在实际的应用中,我们更多的是直接使用某个继承 Stream 操作的模块而不是先自定义某个流的操作再去具体使用。
stream、四种类型流、实现流操作的模块
Duplex 是双工流,既能生产又能消费
自定义双工流
区别:
Duplex 中的读和写是相互独立的,它的读操作读取的数据是不能被写操作直接当作数据源使用的,但是在 Transform 中这个操作是可以的,也就是说在转换流的底层将读写操作进行了连通,除此之外,转换流还可以对数据进行相应的转换操作,这个是我们自己实现的。
自定义转换流
- 继承 Transform 类
- 重写 _transform 方法,调用 push 和 callback
- 重写 _flush 方法(非必需,只是对剩余数据进行处理)
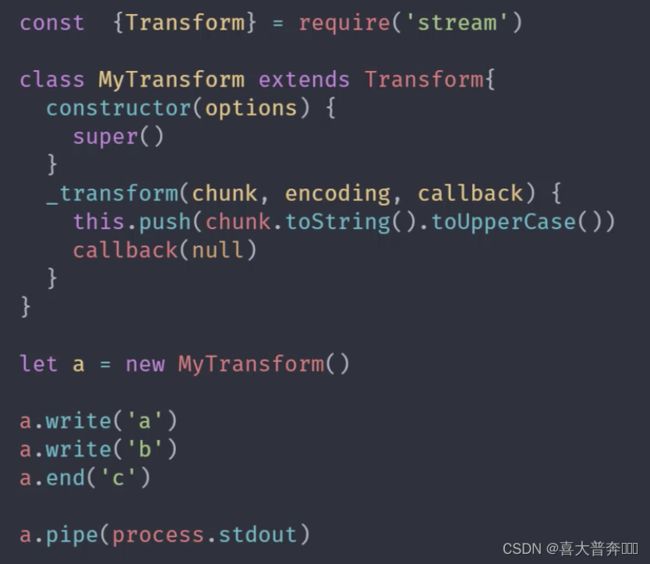
Nodejs 中的四种流 - Readable 可读流
- Writeable 可写流
- Duplex 双工流
- Transform 转换流
// Duplex
const {Duplex} = require('stream')

class MyDuplex extends Duplex{
    constructor(source){
        super()
        this.source = source
    }
    _read(){
        let data = this.source.shift() || null
        this.push(data)
    }
    _write(chunk, encoding, next){
        process.stdout.write(chunk)
        process.nextTick(next)
    }
}

let source = ['zgp','hello', 'world']
let myDu = new MyDuplex(source)

myDu.on('data', (chunk)=>{
    console.log(chunk.toString());
})

myDu.write('测试数据', ()=>{
    console.log(111)
})
const {Transform} = require('stream');

class MyTransform extends Transform{
    constructor(){
        super()
    }
    _transform(chunk, encoding, callback){
        this.push(chunk.toString().toUpperCase())
        callback(null)
    }
}

let t = new MyTransform()

t.write('a')

t.on('data', (chunk)=>{
    console.log(chunk.toString());
})
文件可读流创建和消费
就是继承了 Readable 和 EventEmitter 类的 API
const fs = require('fs');

let rs = fs.createReadStream('test.txt', {
    flags: 'r',
    encoding: null, // 编码,null 为二进制
    fd: null, // 标识符,默认从 3 开始
    mode: 438, // 权限位
    autoClose: true, // 自动关闭
    start: 0, // 开始
    // end: 3, // 结束
    highWaterMark: 4, // 水位线,每次读多少字节的数据,Readable 里是 16KB,fs里边修改成了 64,这里为自定义
})
// 流动模式,一口气把数据取完,还有一个暂停模式
// rs.on('data', (chunk)=>{
//     console.log(chunk.toString());
//     rs.pause() // 暂停流动模式
//     setTimeout(()=>{
//         rs.resume() // 打开流动模式
//     }, 500)
// })

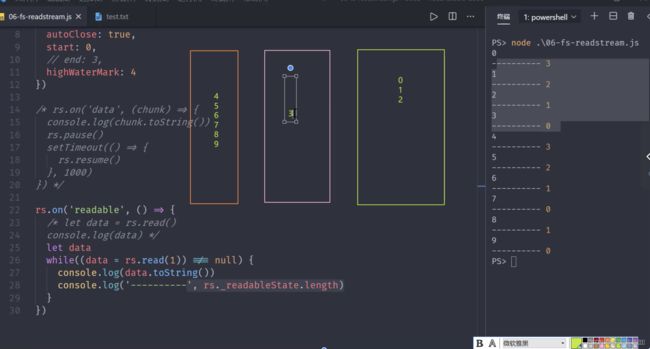
rs.on('readable', ()=>{
    // let data = rs.read()
    // console.log(data);
    let data
    while((data = rs.read(3)) !== null){ // read(4) 里边的数字修改了 createReadStream 里边的水位线
        console.log(data.toString());
        console.log(' ------ ------ ',rs._readableState.length);
    }
})
文件可读流事件与应用
const fs = require('fs');

let rs = fs.createReadStream('test.txt', {
    flags: 'r',
    encoding: null, // 编码,null 为二进制
    fd: null, // 标识符,默认从 3 开始
    mode: 438, // 权限位
    autoClose: true, // 自动关闭
    start: 0, // 开始
    // end: 3, // 结束
    highWaterMark: 4, // 水位线,每次读多少字节的数据,Readable 里是 16KB,fs里边修改成了 64,这里为自定义
})

// 只要调用了 createReadStream 就会触发 open
rs.on('open', (fd)=> {
    console.log(fd+'文件打开了');
})
rs.on('close', ()=> {
    console.log('文件关闭了');
})
let bufferArr = []
rs.on('data', (chunk)=>{
    console.log(chunk.toString()); // 消费完数据,触发 close 事件
    bufferArr.push(chunk)
})
rs.on('end', ()=>{
    console.log('数据消费完毕之后触发 end'); // 消费完数据,触发 end 事件,在 close 事件之前

    console.log('最后得到的要处理的数据',Buffer.concat(bufferArr).toString());
})
rs.on('error', (err)=>{
    console.log('出错了', err); // 出错信息
})
文件可写流
就是继承了 Writable 和 EventEmitter 类的 API
const fs = require('fs');

const ws = fs.createWriteStream('test1.txt', {
    flags: 'w',
    mode: 438,
    fd: null,
    encoding: 'utf-8',
    start: 0,
    highWaterMark: 3
})

//
// ws.write('测试', ()=>{ // 消耗数据
//     console.log('数据写完了');
// })
// ws.write('数据', ()=>{ // 消耗数据
//     console.log('数据写完了1');
// })
// ws.write('123456', ()=>{ // 消耗数据
//     console.log('数据写完了2');
// })

// ws.write(1, ()=>{ // The "chunk" argument must be of type string or an instance of Buffer or Uint8Array. Received type number (1)
//     console.log('数据写完了');
// })

/**
 * 对于可写流来说,可写入的数据类型不受限制,
 * Writable 里边有不同的模式,如果是 Object ,可以写任意的值,如果是 buffer ,就可以写字符串或者 buffer 或者 Uint8Array,
 * 这里用的是文件的可写流,文件的可写流其实是对 Writable 的重新实现和继承,它这里变要求传入的值是字符串或者 buffer 的形式
 */

// let buf = Buffer.from('abc')
// // 字符串或者 buffer
// ws.write(buf, ()=>{
//     console.log('数据写完了');
// })

// ws.on('open', (fd)=>{
//     console.log(fd+'打开了');
// })

ws.write('1')

// 跟可读流不同,这里触发需要数据写入操作全部完成之后再执行,需要 end 表明写入操作执行完毕
// ws.on('close', ()=>{
//     console.log('文件关闭了');
// })

// end 执行之后就意味着数据写入操作执行完成
// ws.end()

// ws.write('2')

ws.end('测试数据') // end 还有机会再写入一次

ws.on('error', (err)=>{
    console.log('出错了',err);
})
write 执行流程
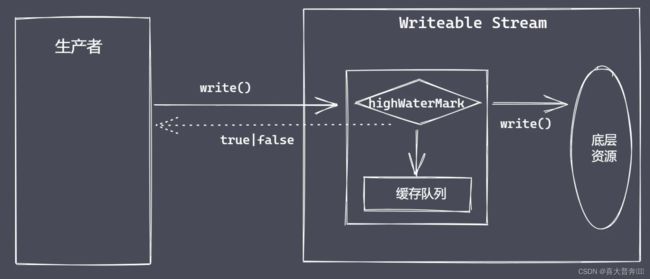
通过分析 write 流程可以更好的理解数据从上游的生产者传递到我们当前的消费者之后整个过程是如何发生的,从而明白为什么要限流/控制速度。

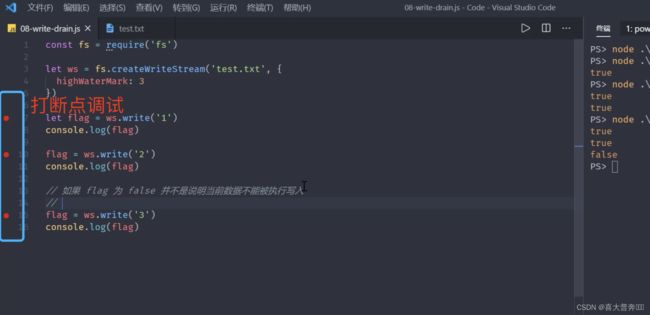
const fs = require('fs');

const ws = fs.createWriteStream('test.txt', {
    highWaterMark: 3
})


/**
 * 1、第一次调用 write 方法时,是将数据直接写入到文件中
 * 2、第二次开始 write 方法就是将数据写入至缓存中
 * 3、生产速度和消费速度是不一样的,一般情况下,生产速度要比消费速度快很多
 * 4、当 flag 为 false 之后,并不意味着数据不能被写入了,但是应该告知数据的生产者,当前的消费速度已经跟不上生产速度了,所以这时候,
 *    一般我们会将可读流的模式修改为暂停模式
 * 5、当数据生产者暂停之后,消费者会慢慢的消化它内部缓存中的数据,直到可以再次被执行写入操作
 * 6、当缓冲区可以继续写入数据时,如何让生产者知道?drain 事件
*/
let flag = ws.write('1')
console.log(flag);
let flag1 = ws.write('2')
console.log(flag1);
// 如果 flag 为 false,并不是说数据不能被写入
let flag2 = ws.write('3')
console.log(flag2);
ws.on('drain', ()=>{
    console.log(111)
})
控制写入速度
drain 事件是在满足条件时,在执行 write 操作时被触发的行为。关于它的使用,经常会有一个疑问:这个事件即使不被触发我们的写入操作也是照样能完成的,为什么还要多此一举设计这个事件呢?
在实际应用中,drain 事件也不是很常用,因为有一个更好的 pipe 方法来处理数据。
但是,pipe 方法到底解决了什么问题才做到了不需要频繁的使用 drain 事件。
举个例子:
drain事件就好比红绿灯路口的警察叔叔,红绿灯没有坏的情况下他是不需要出来营业的,因为在系统的指挥下都能有条不紊的被消费掉,显然,pipe 方法就相当于红绿灯系统,它可以把所有的事情都搞定,但是如果有一天这个系统坏掉了,这时候,警察叔叔就要营业了,然后他会根据实际需求来控制各个路口的进入流量,最后再按照各个顺序一点一点的进行放行。
主要作用就是控制速度,进行限流,具体手段就是指定一个 highWaterMark ,然后配合着 write 返回值进行使用。
/**
 * 需求:“测试数据” 写入指定文件
 * 1、一次性写入
 * 2、分批写入
 * 对比:
 */

const fs = require('fs');

// const ws = fs.createWriteStream('test.txt') // 默认配置
const ws = fs.createWriteStream('test.txt', {
    highWaterMark: 3
}) // 默认配置

// ws.write('测试数据')

let source = '测试数据'.split('')

let num = 0
let flag = true
function excuteWrite () {
    flag = true
    while (num < source.length && flag) {
        flag = ws.write(source[num])
        num ++
    }
}
excuteWrite()
ws.on('drain', ()=>{
    console.log('drain 执行了')
    excuteWrite()
})

// 更好的 pipe 方法
背压机制
具体就是 pipe 方法,Nodejs 的 stream 已实现了背压机制
数据读写时可能存在的问题
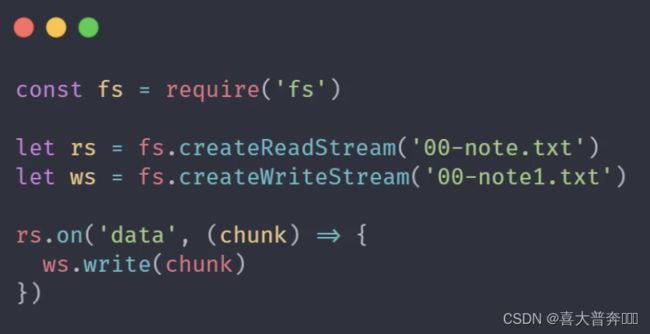
乍一看,没问题,仔细考虑,数据读取速度是远远大于写入速度的
内存溢出、GC频繁调用、其它进程变慢
基于这种场景,就需要一种可以让数据的生产者和消费者之间平滑流动的机制,这就是所谓的背压机制。
// 背压机制
const fs = require('fs');

const rs = fs.createReadStream('test.txt', {
    highWaterMark: 4
})

const ws = fs.createWriteStream('test1.txt', {
    highWaterMark: 1
})

/**
 * 背压机制实现原理
 */
// let flag = true
// rs.on('data', (chunk)=>{
//     flag = ws.write(chunk, ()=>{
//         console.log('写完了')
//     })
//     !flag && rs.pause()
// })
// ws.on('drain', ()=>{
//     console.log('drain 执行了')
//     rs.resume()
// })

rs.pipe(ws)
模拟文件可读流
参考原生可读流的使用实现一个自己的可读流
注意:目的不是替代原生方法,更多是希望在实现的过程中可以更好的理解数据生产流程以及在实现过程中所涉及到的原理
一
const fs = require('fs');

const EventEmitter = require('events');

class MyFileReadStream extends EventEmitter{
    constructor(path, options = {}){
        super()
        this.path = path
        this.flags = options.flags || 'r'
        this.mode = options.mode || 438
        this.autoClose = options.autoClose || 438
        this.start = options.start || 0
        this.end = options.end
        this.highWaterMark = options.highWaterMark || 64 * 1024
        this.open()
    }
    open(){
        // 原生 open 方法来打开指定位置的文件
        fs.open(this.path, this.flags, this.mode, (err, fd)=>{
            if(err) {
                this.emit('error', err)
                return
            }
            this.fd = fd
            this.emit('open', fd)
        })
    }
}

const rs = new MyFileReadStream('test.txt')

rs.on('open', (fd)=>{
    console.log('open - ', fd);
})
rs.on('error', (err)=>{
    console.log(err);
})
二
const fs = require('fs');
const EventEmitter = require('events');

class MyFileReadStream extends EventEmitter{
    constructor(path, options = {}){
        super()
        this.path = path
        this.flags = options.flags || 'r'
        this.mode = options.mode || 438
        this.autoClose = options.autoClose || 438
        this.start = options.start || 0
        this.end = options.end
        this.highWaterMark = options.highWaterMark || 64 * 1024
        this.readOffset = 0

        this.open()
        // 在外边监听新事件的时候会被触发,监听什么事件,type就是什么事件
        this.on('newListener', (type)=>{
            if(type === 'data'){
                this.read()
            }
        })
    }
    open(){
        // 原生 open 方法来打开指定位置的文件
        fs.open(this.path, this.flags, this.mode, (err, fd)=>{
            if(err) {
                this.emit('error', err)
                return
            }
            this.fd = fd
            this.emit('open', fd)
        })
    }
    read(){
        console.log(this.fd)
        if(typeof this.fd !== 'number') return this.once('open', this.read)
        let buf = Buffer.alloc(this.highWaterMark)

        fs.read(this.fd, buf, 0, this.highWaterMark, this.readOffset, (err, readBytes)=>{
            if(readBytes){
                this.readOffset += readBytes
                this.emit('data', buf)
                this.read()
            } else {
                this.emit('end')
                this.close()
            }
        })
    }
    close(){
        fs.close(this.fd, ()=>{
            this.emit('close')
        })
    }
}

const rs = new MyFileReadStream('test.txt')

rs.on('open', (fd)=>{
    console.log('open - ', fd);
})
rs.on('error', (err)=>{
    console.log(err);
})

rs.on('data', (chunk)=>{
    console.log('data', chunk)
})

// setTimeout(()=>{
//     rs.on('data', (chunk)=>{
//         console.log('data', chunk)
//     })
// })

// rs.on('fn', ()=>{

// })

// rs.on('end', ()=>{
//     console.log('end');
// })
rs.on('close', ()=>{
    console.log('close');
})
rs.on('end', ()=>{
    console.log('end');
})
三
const fs = require('fs');
const EventEmitter = require('events');

class MyFileReadStream extends EventEmitter {
    constructor(path, options = {}) {
        super()
        this.path = path
        this.flags = options.flags || 'r'
        this.mode = options.mode || 438
        this.autoClose = options.autoClose || 438
        this.start = options.start || 0
        this.end = options.end
        this.highWaterMark = options.highWaterMark || 64 * 1024
        this.readOffset = 0

        this.open()
        // 在外边监听新事件的时候会被触发,监听什么事件,type就是什么事件
        this.on('newListener', (type) => {
            if (type === 'data') {
                this.read()
            }
        })
    }
    open() {
        // 原生 open 方法来打开指定位置的文件
        fs.open(this.path, this.flags, this.mode, (err, fd) => {
            if (err) {
                this.emit('error', err)
                return
            }
            this.fd = fd
            this.emit('open', fd)
        })
    }
    read() {
        // console.log(this.fd)
        if (typeof this.fd !== 'number') return this.once('open', this.read)
        let buf = Buffer.alloc(this.highWaterMark)
        let howMuchToRead = this.end ? Math.min(this.end - this.readOffset + 1, this.highWaterMark) : this.highWaterMark
        fs.read(this.fd, buf, 0, howMuchToRead, this.readOffset, (err, readBytes) => {
            if (readBytes) {
                this.readOffset += readBytes
                this.emit('data', buf.subarray(0, readBytes))
                this.read()
            } else {
                this.emit('end')
                this.close()
            }
        })
    }
    close() {
        fs.close(this.fd, () => {
            this.emit('close')
        })
    }
}

const rs = new MyFileReadStream('test.txt', {
    end: 7,
    highWaterMark: 3
})

// rs.on('open', (fd)=>{
//     console.log('open - ', fd);
// })
// rs.on('error', (err)=>{
//     console.log(err);
// })

rs.on('data', (chunk) => {
    console.log('data', chunk)
})

// setTimeout(()=>{
//     rs.on('data', (chunk)=>{
//         console.log('data', chunk)
//     })
// })

// rs.on('fn', ()=>{

// })

// rs.on('end', ()=>{
//     console.log('end');
// })
// rs.on('close', ()=>{
//     console.log('close');
// })
// rs.on('end', ()=>{
//     console.log('end');
// })
通过上述的过程,我们并不是为了自己的 MyFileReadStream 去替代原生的流操作,更多的还是在实现的过程中,了解一下文件可读流内部的生产过程以及流程和消耗的过程中所涉及到的一些问题。
链表结构
存储数据的结构
在文件可写流 write 方法工作的时候,有些被写入的内容是需要在缓冲区中排队等待的,遵循先进先出规则;为了保存这些数据,新版 Node 中就采用了链表结构存储这些数据。
为什么不采用数组存储数据?
数组缺点:
- 数组存储数据的长度具有上线
- 数组存在塌陷问题
(在 js 中,数组被实现成了对象,使用效率上会低一些)
链表是一系列节点的集合,每个节点都具有指向下一个节点的属性
链表分类
- 双向链表
- 单向链表
- 循环链表
单向链表
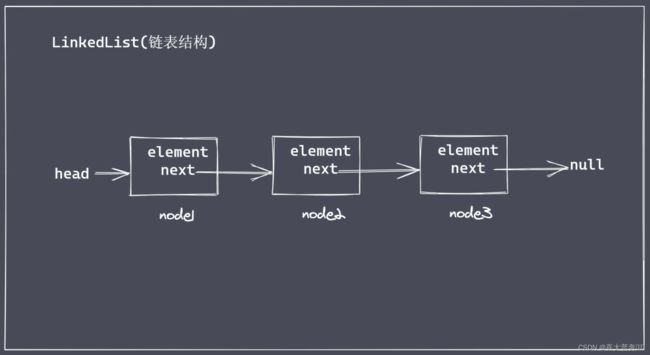
从上图可以推出来,双向链表是多了 prev 属性,而循环链表是将头尾连接起来
主要还是为了存放数据,常见动作:增加删除修改和查询清空等等操作。
单向链表实现
一方面是为了自定义文件可写流的时候去存储那些排队需要去写入的数据,另一方面也是积累一种常见存储数据的结构。
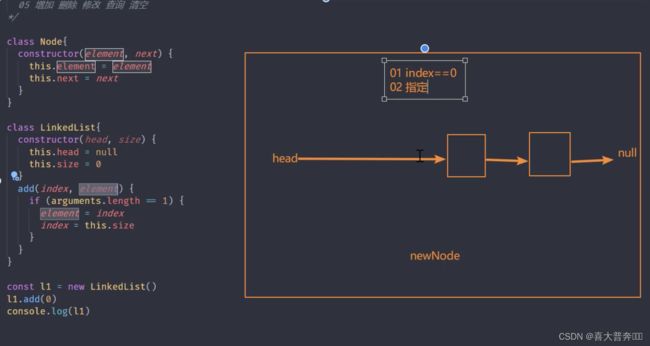
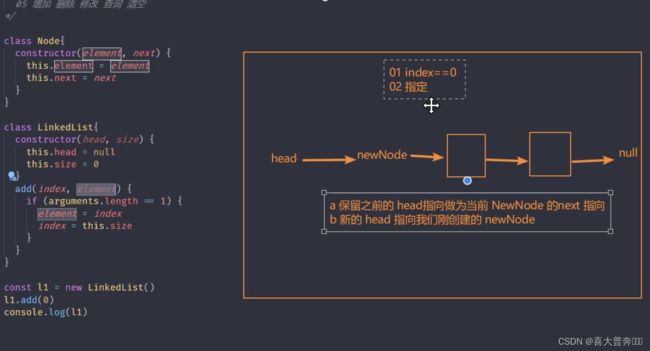
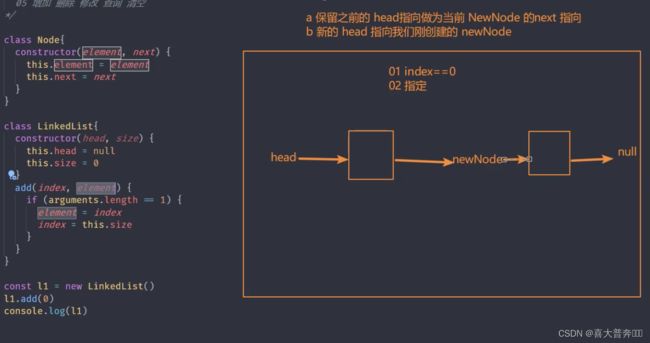
一
/**
 * 链表
 * 01 node + head + null
 * 02 head --> null
 * 03 size
 * node 节点
 * 04 next element
 * 05 增加 删除 修改 查询 清空
 */

class Node {
    constructor(element, next) {
        this.element = element
        this.next = next
    }
}

class LinkedList {
    constructor(head, size){
        this.head = null
        this.size = 0
    }
    // 添加
    add(index, element){
        if(arguments.length == 1){
            element = index
            index = this.size
        }
        if(index < 0 || index > this.size){
            throw new Error('cross the border')
        }
        if (index == 0) {
            let head = this.head // 保存原有 head 指向
            this.head = new Node(element, head) // 新 node 指向原来的 head 指向的地方,也就是老的 head
        } else {
            let prevNode = this._getNode(index - 1)
            prevNode.next = new Node(element, prevNode.next)
        }
        this.size ++
    }
}

const l1 = new LinkedList()
l1.add('node1')
console.log(l1);
二
/**
 * 链表
 * 01 node + head + null
 * 02 head --> null
 * 03 size
 * node 节点
 * 04 next element
 * 05 增加 删除 修改 查询 清空
 */

class Node {
    constructor(element, next) {
        this.element = element
        this.next = next
    }
}

class LinkedList {
    constructor(head, size){
        this.head = null
        this.size = 0
    }
    _getNode(index){
        if(index < 0 || index > this.size){
            throw new Error('cross the border')
        }
        let currentNode = this.head
        for(let i=0; i< index; i++){
            currentNode = currentNode.next
        }
        return currentNode
    }
    // 添加
    add(index, element){
        if(arguments.length == 1){
            element = index
            index = this.size
        }
        if(index < 0 || index > this.size){
            throw new Error('cross the border')
        }
        if (index == 0) {
            let head = this.head // 保存原有 head 指向
            this.head = new Node(element, head) // 新 node 指向原来的 head 指向的地方,也就是老的 head
        } else {
            let prevNode = this._getNode(index - 1)
            prevNode.next = new Node(element, prevNode.next)
        }
        this.size ++
    }
    remove(index){
        if(index < 0 || index > this.size){
            throw new Error('cross the border')
        }
        if (index == 0) {
            let head = this.head
            this.head = head.next
        } else {
            let prevNode = this._getNode(index - 1)
            prevNode.next = prevNode.next.next
        }
        this.size --
    }
}

const l1 = new LinkedList()
l1.add('node1')
l1.add('node2')
l1.add('node3')
// l1.remove(0)
l1.remove(1)
console.dir(l1, {depth: 5});
三
/**
 * 链表
 * 01 node + head + null
 * 02 head --> null
 * 03 size
 * node 节点
 * 04 next element
 * 05 增加 删除 修改 查询 清空
 */

class Node {
    constructor(element, next) {
        this.element = element
        this.next = next
    }
}

class LinkedList {
    constructor(head, size){
        this.head = null
        this.size = 0
    }
    _getNode(index){
        if(index < 0 || index > this.size){
            throw new Error('cross the border')
        }
        let currentNode = this.head
        for(let i=0; i< index; i++){
            currentNode = currentNode.next
        }
        return currentNode
    }
    // 添加
    add(index, element){
        if(arguments.length == 1){
            element = index
            index = this.size
        }
        if(index < 0 || index > this.size){
            throw new Error('cross the border')
        }
        if (index == 0) {
            let head = this.head // 保存原有 head 指向
            this.head = new Node(element, head) // 新 node 指向原来的 head 指向的地方,也就是老的 head
        } else {
            let prevNode = this._getNode(index - 1)
            prevNode.next = new Node(element, prevNode.next)
        }
        this.size ++
    }
    remove(index){
        if(index < 0 || index > this.size){
            throw new Error('cross the border')
        }
        if (index == 0) {
            let head = this.head
            this.head = head.next
        } else {
            let prevNode = this._getNode(index - 1)
            prevNode.next = prevNode.next.next
        }
        this.size --
    }
    set(index, element){
        if(index < 0 || index > this.size){
            throw new Error('cross the border')
        }
        let node = this._getNode(index)
        node.element = element
    }
    get(index){
        if(index < 0 || index > this.size){
            throw new Error('cross the border')
        }
        return this._getNode(index)
    }
    clear(){
        this.head = null
        this.size = 0
    }
}

const l1 = new LinkedList()
l1.add('node1')
l1.add('node2')
l1.add('node3')
// l1.set(2,'node3 - 1')
// let l = l1.get(1)
// console.log(l);
l1.clear()
console.dir(l1, {depth: 5});
单向链表实现队列
这里通过单向链表实现一个先进先出的队列结构的操作,主要作用是用于在实现文件可写流的核心方法 write 的时候,能够用于存储那些需要排队写入的数据。
/**
 * 链表
 * 01 node + head + null
 * 02 head --> null
 * 03 size
 * node 节点
 * 04 next element
 * 05 增加 删除 修改 查询 清空
 */

class Node {
    constructor(element, next) {
        this.element = element
        this.next = next
    }
}

class LinkedList {
    constructor(head, size){
        this.head = null
        this.size = 0
    }
    _getNode(index){
        if(index < 0 || index > this.size){
            throw new Error('cross the border')
        }
        let currentNode = this.head
        for(let i=0; i< index; i++){
            currentNode = currentNode.next
        }
        return currentNode
    }
    // 添加
    add(index, element){
        if(arguments.length == 1){
            element = index
            index = this.size
        }
        if(index < 0 || index > this.size){
            throw new Error('cross the border')
        }
        if (index == 0) {
            let head = this.head // 保存原有 head 指向
            this.head = new Node(element, head) // 新 node 指向原来的 head 指向的地方,也就是老的 head
        } else {
            let prevNode = this._getNode(index - 1)
            prevNode.next = new Node(element, prevNode.next)
        }
        this.size ++
    }
    remove(index){
        if(index < 0 || index > this.size){
            throw new Error('cross the border')
        }
        let rmNode = null
        if (index == 0) {
            rmNode = this.head
            if(!rmNode) return undefined
            this.head = rmNode.next
        } else {
            let prevNode = this._getNode(index - 1)
            rmNode = prevNode.next
            prevNode.next = rmNode.next
        }
        this.size --
        return rmNode
    }
    set(index, element){
        if(index < 0 || index > this.size){
            throw new Error('cross the border')
        }
        let node = this._getNode(index)
        node.element = element
    }
    get(index){
        if(index < 0 || index > this.size){
            throw new Error('cross the border')
        }
        return this._getNode(index)
    }
    clear(){
        this.head = null
        this.size = 0
    }
}

class Queue {
    constructor(){
        this.linkedList = new LinkedList()
    }
    // 进队列:利用我们的链表结构调用它的 add 方法,把数据添加到链表身上,链表上有了数据以后,就相当于我们的队列里边有了数据
    enQueue(data){
        this.linkedList.add(data)
    }
    deQueue(){
        return this.linkedList.remove(0)
    }
}

let q = new Queue()
q.enQueue('nide1')
q.enQueue('nide2')
q.enQueue('nide3')
// console.dir(q, {depth: 5});
let a = q.deQueue()
console.log(a);
a = q.deQueue()
console.log(a);
a = q.deQueue()
console.log(a);
a = q.deQueue()
console.log(a);
文件可写流实现
核心操作就是实现一个自己的 write 方法,再次强调一下:每当我们实现一个 Nodejs 本身已经存在的方法,并不是在实际的开发中进行替代,而是为了更好的加深对 Node 内部已经存在的方法的理解。
比如现在我们要实现的 write 方法,本身是一个异步的方法,但是当我们同事执行多个 write 的时候,Node 内部就把它处理成了串行的方式,这也是我们在实际开发中经常会采用的一种并发的解决方案。这里就通过自定义 write 方法的实现,去明确它的解决原理以及实现过程。
一
const fs = require('fs');
const EventsEmitter = require('events');
const Queue = require('./linkedList');

class MyWriteStream extends EventsEmitter {
    constructor(path, options = {}){
        super()
        this.path = path
        this.flags = options.flags || 'w'
        this.mode = options.mode || 438
        this.autoClose = options.autoClose || true
        this.start = options.start || 0
        this.end = options.end
        this.encoding = options.encoding || 'utf8'
        this.highWaterMark = options.highWaterMark || 16 * 1024
        this.open()
    }
    open(){
        console.log('open')
        // 原生 的 fs.open 完成操作
        fs.open(this.path, this.flags, (err, fd)=>{
            if(err) return this.emit('error', err)
            this.fd = fd
            this.emit('open', fd)
        })
    }
}

let ws = new MyWriteStream('test.txt')

ws.on('open', (fd)=>{
    console.log(fd, '打开了');
})
二
const fs = require('fs');
const EventsEmitter = require('events');
const Queue = require('./linkedList');

class MyWriteStream extends EventsEmitter {
    constructor(path, options = {}){
        super()
        this.path = path
        this.flags = options.flags || 'w'
        this.mode = options.mode || 438
        this.autoClose = options.autoClose || true
        this.start = options.start || 0
        this.end = options.end
        this.encoding = options.encoding || 'utf8'
        this.highWaterMark = options.highWaterMark || 16 * 1024
        this.open()
        this.writeOffset = this.start // 偏移量
        this.writing = false // 正在执行写入操作与否
        this.writeLen = 0 // 累计写入量
        this.needDrain = false // 是否触发 drain 事件
        this.cache = new Queue() // 缓存数据结构
    }
    open(){
        // console.log('open')
        // 原生 的 fs.open 完成操作
        fs.open(this.path, this.flags, (err, fd)=>{
            if(err) return this.emit('error', err)
            this.fd = fd
            this.emit('open', fd)
        })
    }
    // 参数不做判断,全部假设参与就是自己的预期参数,就考虑 string 和 buffer 就行
    write(chunk, encoding, callback){
        chunk = Buffer.isBuffer(chunk) ? chunk : Buffer.from(chunk)
        this.writeLen += chunk.length
        // console.log(this.writeLen);
        let flag = this.writeLen < this.highWaterMark
        this.needDrain = !flag

        if (this.writing) {
            // 当前正在执行写入,所以内容应该排队,所以内容应该放缓存队列
            // this.cache.enQueue()
            console.log('执行排队');
        } else {
            // 当前没有在写入状态,执行写入
            this.writing = true
            this._write()
        }

        return flag
    }
    // 真正要执行的写入操作
    _write(chunk, encoding, callback){
        console.log('正在执行写入');
    }
}

let ws = new MyWriteStream('test.txt', {
    // highWaterMark: 2
    highWaterMark: 4
})

ws.on('open', (fd)=>{
    // console.log(fd, '打开了');
})

ws.write('1', 'utf8', ()=>{
    console.log('写入成功');
})
ws.write('2', 'utf8', ()=>{
    console.log('写入成功');
})
let flag = ws.write('3', 'utf8', ()=>{
    console.log('写入成功');
})
console.log(flag);
三
const fs = require('fs');
const EventsEmitter = require('events');
const Queue = require('./linkedList');

class MyWriteStream extends EventsEmitter {
    constructor(path, options = {}){
        super()
        this.path = path
        this.flags = options.flags || 'w'
        this.mode = options.mode || 438
        this.autoClose = options.autoClose || true
        this.start = options.start || 0
        this.end = options.end
        this.encoding = options.encoding || 'utf8'
        this.highWaterMark = options.highWaterMark || 16 * 1024
        this.open()
        this.writeOffset = this.start // 偏移量
        this.writing = false // 正在执行写入操作与否
        this.writeLen = 0 // 累计写入量
        this.needDrain = false // 是否触发 drain 事件
        this.cache = new Queue() // 缓存数据结构
    }
    open(){
        // console.log('open')
        // 原生 的 fs.open 完成操作
        fs.open(this.path, this.flags, (err, fd)=>{
            if(err) return this.emit('error', err)
            this.fd = fd
            this.emit('open', fd)
        })
    }
    // 参数不做判断,全部假设参与就是自己的预期参数,就考虑 string 和 buffer 就行
    write(chunk, encoding, callback){
        chunk = Buffer.isBuffer(chunk) ? chunk : Buffer.from(chunk)
        this.writeLen += chunk.length
        // console.log(this.writeLen);
        let flag = this.writeLen < this.highWaterMark
        this.needDrain = !flag

        if (this.writing) {
            // 当前正在执行写入,所以内容应该排队,所以内容应该放缓存队列
            // console.log('执行排队');
            this.cache.enQueue({chunk, encoding, callback})
        } else {
            // 当前没有在写入状态,执行写入
            this.writing = true
            this._write(chunk, encoding, ()=>{
                callback()
                // 清空排队的内容
                this._clearBuffer()
            })
        }

        return flag
    }
    // 真正要执行的写入操作
    _write(chunk, encoding, callback){
        // console.log('正在执行写入');
        // console.log(this.fd) // 因为 open 是一个异步操作,所以这里可能拿不到
        if(typeof this.fd !== 'number'){
            return this.once('open', ()=>{
                return this._write(chunk, encoding, callback)
            })
        }
        fs.write(this.fd, chunk, this.start, chunk.length, this.writeOffset, (err, writeLen)=>{
            // console.log('写入成功');
            this.writeOffset += writeLen
            this.writeLen -= writeLen

            callback && callback()
        })
    }
    _clearBuffer(){
        // 先看一下缓存里边内容,有就写入,没有就清空了
        let data = this.cache.deQueue()
        // console.log(data);
        if(data){
            this._write(data.element.chunk, data.element.encoding,()=>{
                data.element.callback && data.element.callback()
                this._clearBuffer()
            })
        } else {
            if(this.needDrain){
                this.needDrain = false
                this.emit('drain')
            }
        }
    }
}

let ws = new MyWriteStream('test.txt', {
    // highWaterMark: 2
    // highWaterMark: 1
})

ws.on('open', (fd)=>{
    console.log('打开文件获得标识符:',fd);
})

let flag = ws.write('1', 'utf8', ()=>{
    console.log('写入成功1');
})
flag = ws.write('20', 'utf8', ()=>{
    console.log('写入成功2');
})
flag = ws.write('测试数据', 'utf8', ()=>{
    console.log('写入成功3');
})

console.log(flag);

ws.on('drain', ()=>{
    console.log('drain');
})
pipe 方法使用
文件读写操作终极语法糖
const fs = require('fs');
// const ReadStream = require('ReadStream');

const rs = fs.createReadStream('f9.txt', {
    highWaterMark: 4 // 可读流默认 64 kb
})

const ws = fs.createWriteStream('test.txt', {
    highWaterMark: 1 // 可写流默认 16kb
})

rs.pipe(ws)
const fs = require('fs');
const EventEmitter = require('events');

class ReadStream extends EventEmitter {
    constructor(path, options = {}) {
        super()
        this.path = path
        this.flags = options.flags || 'r'
        this.mode = options.mode || 438
        this.autoClose = options.autoClose || 438
        this.start = options.start || 0
        this.end = options.end
        this.highWaterMark = options.highWaterMark || 64 * 1024
        this.readOffset = 0

        this.open()
        // 在外边监听新事件的时候会被触发,监听什么事件,type就是什么事件
        this.on('newListener', (type) => {
            if (type === 'data') {
                this.read()
            }
        })
    }
    open() {
        // 原生 open 方法来打开指定位置的文件
        fs.open(this.path, this.flags, this.mode, (err, fd) => {
            if (err) {
                this.emit('error', err)
                return
            }
            this.fd = fd
            this.emit('open', fd)
        })
    }
    read() {
        // console.log(this.fd)
        if (typeof this.fd !== 'number') return this.once('open', this.read)
        let buf = Buffer.alloc(this.highWaterMark)
        let howMuchToRead = this.end ? Math.min(this.end - this.readOffset + 1, this.highWaterMark) : this.highWaterMark
        fs.read(this.fd, buf, 0, howMuchToRead, this.readOffset, (err, readBytes) => {
            if (readBytes) {
                this.readOffset += readBytes
                this.emit('data', buf.subarray(0, readBytes))
                this.read()
            } else {
                this.emit('end')
                this.close()
            }
        })
    }
    close() {
        fs.close(this.fd, () => {
            this.emit('close')
        })
    }
    pipe(ws){
        this.on('data', (data)=>{
            let flag = ws.write(data)
            // 当写入量超过预期缓存量,就先不要写了
            if (!flag) {
                this.pause()
            }
        })
        ws.on('drain', ()=>{
            this.resume()
        })
    }
}

module.exports = ReadStream
const fs = require('fs');
const myReadStream = require('./ReadStream');

// const rs = fs.createReadStream('f9.txt', {
//     highWaterMark: 4
// })

// const ws = fs.createWriteStream('test.txt', {
//     highWaterMark: 1
// })

// rs.pipe(ws) // 原生的 pipe

// 看内部数据还是可以监听 data 事件的

const rs = new myReadStream('f9.txt')

const ws = fs.createWriteStream('test.txt')

rs.pipe(ws)
通信
通信基本原理
最终解决的问题还是主机与主机之间的网络通信。
通信必要条件
网络通讯方式
- 交换机通讯
- 路由器通讯
如何建立多台主机互连?

如何定位局域网中的其它主机?
通过 Mac 地址来唯一标识一台主机
交换机的接口数量有上限,局域网存在大量主机会造成广播风暴。
明确目标主机 IP 地址

这里不是详细的解释网络通信发生的每个细节,这里更多的是明确网络通信的流程和核心的概念。
网络层次模型
主要是对网络的分层有一个清晰的结构认识,不需要掌握每层是如何完成具体工作的。
OSI 七层模型
- 应用层:用户与网络的接口
- 表示层:数据加密、转换、压缩
- 会话层:控制网络连接建立与终止
- 传输层:控制数据传输可靠性
- 网络层:确定目标网络
- 数据链路层:确定目标主机
- 物理层:各种物理设备和标准
作用:更加清晰规范的完成网络通信
TCP/IP 4层,是在此基础之上,将前三层统一叫做应用层,将数据链路和物理层合并叫做接入层,中间的网络层叫主机层。
数据从 A 至 B,先封装再解封。
数据封装与解封装
这里采用的 TCP/IP 的五层划分模式
- 应用层:产出数据
- 传输层:TCP/UDP,包裹上目标端口,源端口
- 网络层:IP,包裹上 目标 IP,源 IP
- 数据链路层:Mac 地址,包裹上 目标 Mac,源 Mac
- 物理层:网卡,二进制数据/高低电压
封装和解封装流程是相反的,封装是包裹数据,解封装是拆解数据
http 只是应用层中最常见的协议,TCP 只是传输层中的一个重要协议,网络通信本身又比较复杂,但是不影响我们使用任意一门编程语言开发,因为关于通信方面的事情,开发语言本身或者开发框架都已经做了实现,我们只需要去使用即可。
TCP 三次握手与四次挥手
这里了解三次握手建立和四次挥手的过程,不深究底层实现。
TCP 协议
- TCP 属于传输层协议
- TCP 是面向连接的协议
- TCP 用于处理实时通信
数据传输可靠性高,效率上相对于 UDP 来说稍微低一些

常见控制字段
- SYN = 1 表示请求建立连接
- FIN = 1 表示请求断开连接
- ACK = 1 表示数据信息确认
三次握手
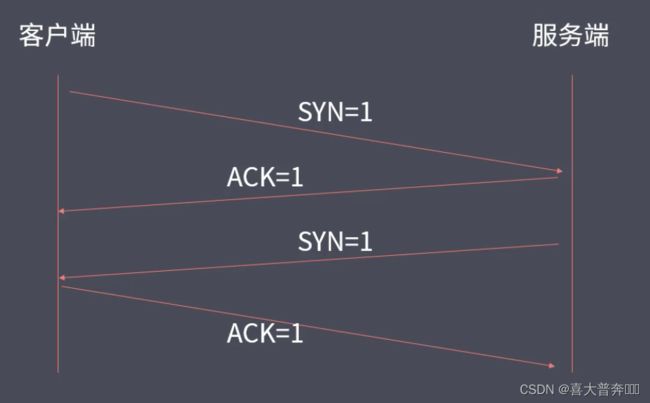
看起来是四次握手,只不过服务端在给客户端发送 ACK = 1 的同时发送 SYN = 1,就成了最终的三次握手

四次挥手
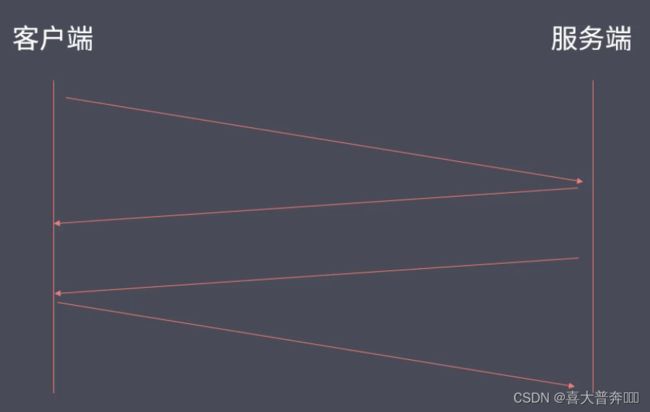
1-客户端发送断开连接请求给服务端
2-服务端发送消息确认给客户端
3-服务端发送断开连接请求给客户端
4-客户端发送消息确认给服务端
四次挥手的2-3不能合并,因为一个服务端要服务于多个客户端,不能保证某一个客户端发送断开请求之后服务端立即将结果数据全部传输回给这个客户端
TCP协议
- TCP 处于传输层,基于端口,面向连接
- 主机之间要想通信,需要先建立双向数据通道
- TCP 的握手和挥手本质上都是四次
创建 TCP 三次握手与四次挥手
Net 模块实现了底层通信接口
通信过程
- 创建服务端:接收和会写客户端数据
- 创建客户端:发送和接收服务端数据
- 数据传输:内置服务事件和方法读写数据
通信事件
- listening 事件:调用 server.listen 方法之后触发
- connection 事件:新的连接建立时触发
- close 事件:当 server 关闭时触发
- error 事件:当错误出现时触发
通信事件&方法
- data 事件:当接收到数据的时候触发该事件
- write 方法:在 socket 上发送数据,默认是 UTF8 编码
- end 操作:当 socket 的一端发送 FIN 包时触发,结束可读端
// server.js
const net = require('net');

// 创建服务端实例
const server = net.createServer()

const PORT = 1234
const HOST = 'localhost'

server.listen(PORT, HOST)

server.on('listening', ()=>{
    console.log(`服务端已开启:${HOST}:${PORT}`)
})


// 接收消息 | 回写消息
server.on('connection', (socket)=>{
    socket.on('data', (chunk)=>{
        let msg = chunk.toString()
        console.log(msg)
        // 回数据
        socket.write(Buffer.from('你好:' + msg))
    })
})

server.on('close', ()=>{
    console.log('服务端关闭了');
})


server.on('error', (err)=>{
    if(err.code == 'EADDRINUSS'){
        console.log('地址正在被使用');
    } else {
        console.log(err);
    }
})
// client.js
const net = require('net');

const client = net.createConnection({
    port: 1234,
    host: '127.0.0.1'
})

client.on('connect', ()=>{
    client.write('客户端')
})

client.on('data', (chunk)=>{
    console.log(chunk.toString());
})

client.on('error', (err)=>{
    console.log(err);
})

client.on('close', ()=>{
    console.log('客户端断开连接了');
})
TCP 粘包及解决
通信包含数据发送端和接收端两部分,发送端不是实时的将手里的数据发送给接收端,而是存在缓存区,等待数据量达到一定程度之后再执行一次发送操作,同样的,接收端也是缓存之后再消费,好处是减少 IO 操作带来的性能操作;但是对于数据的使用就会产生粘包的问题。
还有一个问题,什么样的条件下会触发发送操作?
TCP拥塞机制决定发送时机。

一、延时发送
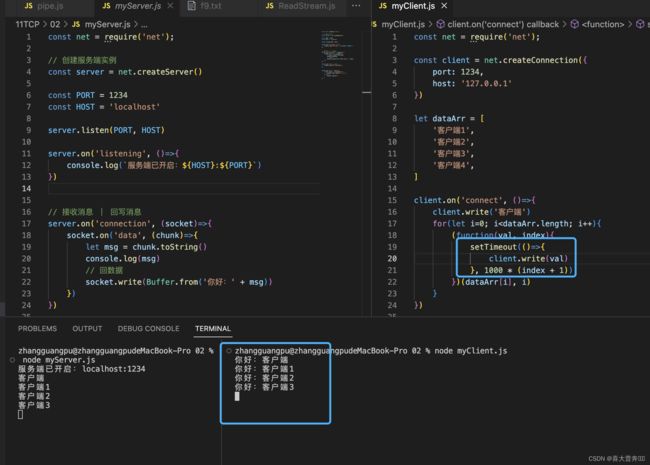
// client.js
const net = require('net');

const client = net.createConnection({
    port: 1234,
    host: '127.0.0.1'
})

let dataArr = [
    '客户端1',
    '客户端2',
    '客户端3',
    '客户端4',
]

client.on('connect', ()=>{
    client.write('客户端')
    for(let i=0; i<dataArr.length; i++){
        (function(val, index){
            setTimeout(()=>{
                client.write(val)
            }, 1000 * (index + 1))
        })(dataArr[i], i)
    }
})

client.on('data', (chunk)=>{
    console.log(chunk.toString());
})

client.on('error', (err)=>{
    console.log(err);
})

client.on('close', ()=>{
    console.log('客户端断开连接了');
})
缺点也是很明显的,降低了数据的传输效率
封包拆包实现
这里使用先封包然后再拆包的数据传输方式解决粘包问题。
核心思想就是按照约定好的规则,把数据打包,将来在使用数据的时候按照指定规则进行拆包即可。
这里使用的是长度编码的方式约定通讯双方的数据传输方式。


数据传输过程
- 进行数据编码,获取二进制数据包
- 按规则拆解数据,获取指定长度的数据
Buffer 数据读写
- writeInt16BE:将 value 从指定位置写入
- readInt16BE:从指定位置开始读取数据
同样的还有 32 BE 的,但是当前使用 16 BE 就可以满足了
// MtTransform.js
class MyTransformCode {
    constructor(){
        // Header 总长度
        this.packageHeaderLen = 4
        // 编号
        this.serialNum = 0
        // 消息体长度
        this.serialLen = 2
    }
    // 编码
    encode(data, serialNum){
        let body = Buffer.from(data)
        // 01 先按照指定的长度申请一片内存空间作为 header 来使用
        const headerBuf = Buffer.alloc(this.packageHeaderLen)

        // 02
        headerBuf.writeInt16BE(serialNum || this.serialNum)

        // 03 将当前这一次传输过来的数据总长度作为消息体 body 的长度写到 header 里的另一个空间当中
        headerBuf.writeInt16BE(body.length, this.serialLen)

        if(serialNum == undefined){
            this.serialNum ++
        }

        return Buffer.concat([headerBuf, body])
    }

    // 解码
    decode(buffer){
        const headerBuf = buffer.subarray(0, this.packageHeaderLen)
        const bodyBuf = buffer.subarray(this.packageHeaderLen)

        return {
            serialNum: headerBuf.readInt16BE(), // 不用参数,写的时候我们按照16进制,往高位上写,读的时候它按照相应的规则把我们写过去的数据读出来
            bodyLength: headerBuf.readInt16BE(this.serialLen), // 跳过编号所在位置
            body: bodyBuf.toString()
        }
    }

    // 获取当前数据包长度的方法
    getPackageLen(buffer){
        /**
         * 加入当前消息体占 1 个字节,body 长度是 1,之前规定 packageHeader 长度为 4 个字节,所以 如果传进来的 buffer 长度都还没有超过 4 个字节的情况下,有两种
         * 一、包不完成
         * 二、数据没传输完成
         * 不管是哪种情况,都说明我们不能从这样的 buffer 里拿数据,所以这里直接把 length 作为 0 来返回就可以了
         */
        if (buffer.length < this.packageHeaderLen) {
            return 0
        } else {
            return this.packageHeaderLen + buffer.readInt16BE(this.serialLen)
        }
    }
}

module.exports = MyTransformCode
// test.js

const MyTransformCode = require('./cusTransform');

let ts = new MyTransformCode()

let str1 = '测试数据'

let encodeBuf = ts.encode(str1, 1)

// console.log(encodeBuf);
// console.log(Buffer.from(str1));

let decodeObj = ts.decode(encodeBuf)
console.log(decodeObj);

let len = ts.getPackageLen(encodeBuf)
console.log(len);
封包解决粘包
// server.js
const net = require('net');
const MyTransform = require('./myTransform');
const server = net.createServer()

let ts = new MyTransform()
let overageBuffer = null

server.listen(1234, 'localhost')

server.on('listening', ()=>{
    console.log('服务端运行在:localhost:1234')
})

server.on('connection', (socket)=>{
    socket.on('data', (chunk) => {
        // let msg = chunk.toString()
        // console.log(msg);
        if(overageBuffer){
            chunk = Buffer.concat([overageBuffer, chunk])
        }
        let packageLen = 0
        while(packageLen = ts.getPackageLen(chunk)){
            const packageCont = chunk.subarray(0,packageLen)
            chunk = chunk.subarray(packageLen)

            const ret = ts.decode(packageCont)
            console.log(ret);
            socket.write(ts.encode('您好: '+ret.body, ret.serialNum))
        }
        overageBuffer = chunk
        // socket.write(Buffer.from('你好:'+msg))
    })
})
// client.js
const net = require('net');
const MyTransform = require('./myTransform');
const client = net.createConnection({
    port: 1234,
    host: 'localhost'
})
let ts = new MyTransform()
let overageBuffer = null

client.on('connect', ()=>{
    console.log('连接成功');
    // client.write('测试客户端1')
    // client.write('测试客户端2')
    // client.write('测试客户端3')
    // client.write('测试客户端4')
    client.write(ts.encode('测试客户端1', 1))
    client.write(ts.encode('测试客户端2', 2))
    client.write(ts.encode('测试客户端3', 3))
    client.write(ts.encode('测试客户端4', 4))
})

client.on('data', (chunk)=>{
    // console.log(chunk.toString());
    if(overageBuffer){
        chunk = Buffer.concat([overageBuffer, chunk])
    }
    let packageLen = 0
    while(packageLen = ts.getPackageLen(chunk)){
        const packageCont = chunk.subarray(0,packageLen)
        chunk = chunk.subarray(packageLen)

        const ret = ts.decode(packageCont)
        console.log(ret);
    }
    overageBuffer = chunk
})
http 协议
通过代码的方式直观的看一下什么是 http 协议,以及如何利用 nodejs 中的模块开启 http 服务。
// net-httpserver
const net = require('net');

// 创建服务端
const server = net.createServer()

server.listen(1234, ()=>{
    console.log('服务启动了....')
})

server.on('connection', (socket)=>{
    socket.on('data', (data)=>{
        console.log(data.toString());

    })
    socket.end('test http request')
})
// http-server
const http = require('http');

// 创建服务端
const server = http.createServer((req, res)=>{
    // 针对请求和相应完成各自的操作
    console.log(111)
})

server.listen(1234, ()=>{
    console.log('服务启动了:localhost: 1234');
})
获取 http 请求信息
const http = require('http');
const url = require('url');

const server = http.createServer((req, res)=>{
    /**
     * req: 请求信息,req 是可读流,res 是可写流
     * 请求行、请求头、请求空行、请求体,正常我们是不会获取请求空行的
     * 看一下其他三部分哪些是内容是需要拿的
     */
    // 请求路径
    let {pathname, query} = url.parse(req.url, true)
    console.log(pathname, query); // 请求地址: http://localhost:1234/index.html?a=1,输出: /index.html [Object: null prototype] { a: '1' }
    // 请求方式
    console.log(req.method); //  请求地址: http://localhost:1234/index.html?a=1,输出: GET
    // 版本号
    // console.log(req.httpVersion); //  请求地址: http://localhost:1234/index.html?a=1,输出: 1.1
    // 请求头
    // console.log(req.headers); //  请求地址: http://localhost:1234/index.html?a=1,输出: 很多东西
    // 请求体数据获取
    // 使用 curl 模拟发送 post 请求
    // curl -v -X POST -d "'name':'zgp'" localhost:1234/
    let arr = []
    req.on('data', (data)=>{
        arr.push(data)
    })
    req.on('end', ()=>{
        console.log(Buffer.concat(arr).toString()); // 'name':'zgp'
    })
})

server.listen(1234, ()=>{
    console.log('server is running in: localhost: 1234')
})
设置 http 响应
服务端接收到了客户端发送请求之后,就会按照一定的规则来回写数据
const http = require('http');

const server = http.createServer((req, res)=>{
    console.log('有请求进来了')
    // req 是可读流,res 是可写流
    // res.write('ok')
    // res.end()
    // res.end('test ok')
    // res.end('测试数据') // 娴嬭瘯鏁版嵁 乱码,因为没按照协议来
    // res.statusCode = 200
    res.statusCode = 302
    res.setHeader('Content-Type', 'text/html; charset=utf-8') // 设置完之后限制中文正常
    res.end('测试数据')
})

server.listen(1234, ()=>{
    console.log('server is running ...');
})
代理客户端
其实就是利用 Nodejs 提供的功能我们自己去实现一个 http 的客户端,然后由它向某个服务端发送请求。
好处就是当我们出现跨域现象去解决。做法就是浏览器客户端去向我们自己创建的客户端发送请求,这个代理客户端就充当了浏览器要访问的服务端,再让我们自己创建的这个服务端中间人去向另外一个服务端发送请求,这个服务端是有可能存在跨域现象的一个外部服务端,但是呢,要知道在服务端去发送请求的时候是不存在跨域现象的,这时候外部服务端就会把这个结果处理完之后先返回给我们这个代理客户端,再由代理客户端把数据处理之后回写给我们的浏览器客户端。相当于浏览器客户端直接拿到外部服务器的数据了。这样就解决了跨域问题。
// agentServer.js
// 模拟外部服务端
const http = require('http');
const url = require('url');
const querystring = require('querystring');
const server = http.createServer((req, res)=>{
    // console.log('请求进来了');
    let {pathname, query} = url.parse(req.url)
    console.log(pathname, ' ---- >', query);
    // post
    let arr = []
    req.on('data', (data)=>{
        arr.push(data)
    })
    req.on('end', ()=>{
        // console.log(Buffer.concat(arr).toString());
        let obj = Buffer.concat(arr).toString()
        // console.log(req.headers);
        if(req.headers['content-type'] == 'application/json'){
            let data = JSON.parse(obj)
            data.add = '前端开发工程师'
            // console.log(JSON.stringify(data));
            res.end(JSON.stringify(data))
        } else if(req.headers['content-type'] == 'application/x-www-form-urlencoded'){
            let ret = querystring.parse(obj)
            console.log(ret);
            res.end(JSON.stringify(ret))
        }
    })
})

server.listen(1234, ()=>{
    console.log('server is running...');
})
// agentClient.js
// 代理服务端
const http = require('http');

// http.get({
//     host: 'localhost',
//     port: 1234,
//     path: '/?a=1'
// }, (res)=>{

// })

let options = {
    host: 'localhost',
    port: 1234,
    path: '/?a=1',
    method: 'POST',
    headers: {
        // 'Content-Type': 'application/json'
        'Content-Type': 'application/x-www-form-urlencoded'
    }
}
let req = http.request(options, (res)=>{
    let arr = []
    res.on('data', (data)=>{
        arr.push(data)
    })
    res.on('end', () => {
        console.log('回写数据',Buffer.concat(arr).toString());
    })
})

// req.end('测试数据')
// req.end('{"name":"zgp"}')
req.end('a=1&b=2')
代理客户端解决跨域
// 外部服务端
// server.js,和 client 设置不同的端口,模拟跨域
const http = require('http');

const server = http.createServer((req, res)=>{
    console.log('请求进来了');
    let arr = []
    req.on('data', (data)=>{
        arr.push(data)
    })
    req.on('end', ()=>{
        let obj = Buffer.concat(arr).toString()
        console.log(obj);
        res.end('外部服务端返回数据')
    })
})

server.listen(1234, ()=>{
    console.log('外部服务端启动了...');
})
// 本地代理服务端
const http = require('http');

let options = {
    port: 1234,
    host: 'localhost',
    method: 'POST',
    path: '/'
}

const server = http.createServer((request, response)=>{
    let req = http.request(options, (res)=>{
        let arr = []
        res.on('data', (data)=>{
            arr.push(data)
        })
        res.on('end', ()=>{
            let ret = Buffer.concat(arr).toString()
            // console.log(obj);
            response.setHeader('Content-Type', 'text/html; charset=utf-8')
            response.end(ret)
        })
    })

    req.end('测试数据')
})

server.listen(2345, ()=>{
    console.log('本地服务端启动了...');
})
Http 静态服务
使用 http 模块开启一个服务端,由浏览器充当客户端,按照一定的路径去访问目标服务器所提供的一些静态资源。
注意:并不是实现一个完整的网站服务,而是在使用 web 框架,配合数据库之前,能够通过原生的模块演示一下响应和请求的一些处理原理。
const http = require('http');
const url = require('url');
const fs = require('fs');
const path = require('path');
const mime = require('mime');

const server = http.createServer((req, res)=>{
    console.log('请求进来了');
    let {pathname, query} = url.parse(req.url)
    // 1、路径处理
    pathname = decodeURIComponent(pathname)
    let absPath = path.join(__dirname, pathname)
    // 2、目标资源状态处理
    fs.stat(absPath, (err, statObj)=>{
        if(err){
            res.statusCode = 404
            res.end('Not Found')
            return
        }
        if(statObj.isFile()){ // 说明是文件,直接读取,回写
            fs.readFile(absPath, (err, data)=>{
                res.setHeader('Content-Type', mime.getType(absPath) + '; charset=utf-8')
                res.end(data)
            })
        } else { // 说明是目录
            fs.readFile(path.join(absPath, 'index.html'), (err, data)=>{
                res.setHeader('Content-Type', mime.getType(absPath) + '; charset=utf-8')
                res.end(data)
            })
        }
    })
    // res.setHeader('Content-Type', 'text/html; charset=utf-8')
    // res.end('静态服务')
})

server.listen(1234, ()=>{
    console.log('服务端启动了...');
})
lgserver 命令行配置
利用一些 node 内置的核心模块,配合着一些第三方工具包,实现自己的命令行工具,使可以调用相应的命令,在指定的目录下来启动一个 web 服务,接着就可以使用浏览器来访问当前目录下的所有静态资源。
这里参照一个已经存在的 server 工具的使用。
创建结构:
![]()
为了便于看语法,www 先加上.js
再运行 npm init -y 生成 package.json 文件,修改 bin 里边的指令路径为 bin/www.js
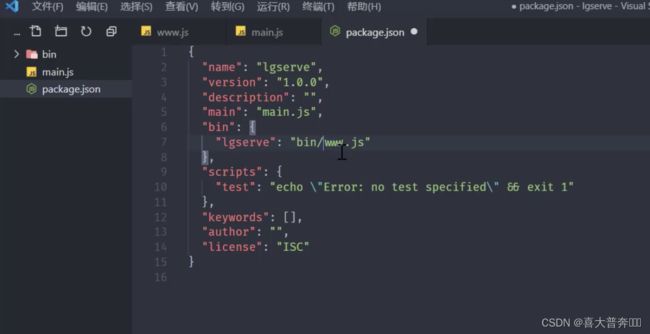
在 www.js 里写上说明行的东西 #! /usr/bin/env node
再随便输出个东西:console.log(‘执行了’)
然后再将这个包 link 到全局,npm link 即可
直接运行 lgserve
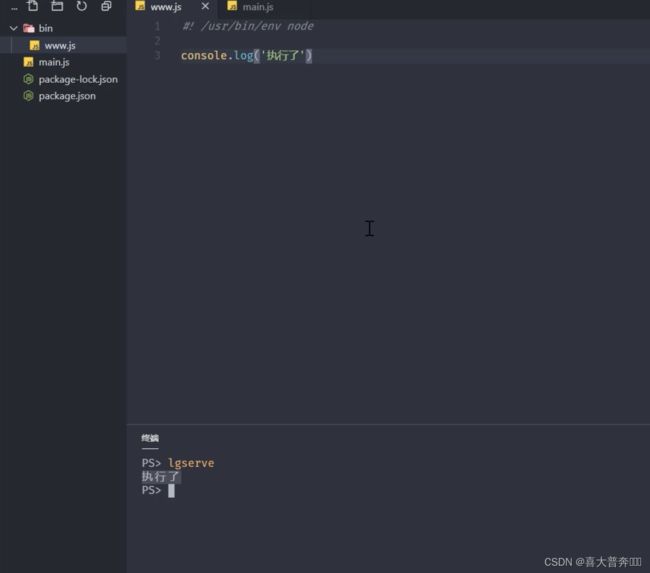
OK, 全局的命令 lgserve 就生成了
利用第三方工具包: npm install commander,注意:这里当前是
"commander": "^6.0.0" 版本
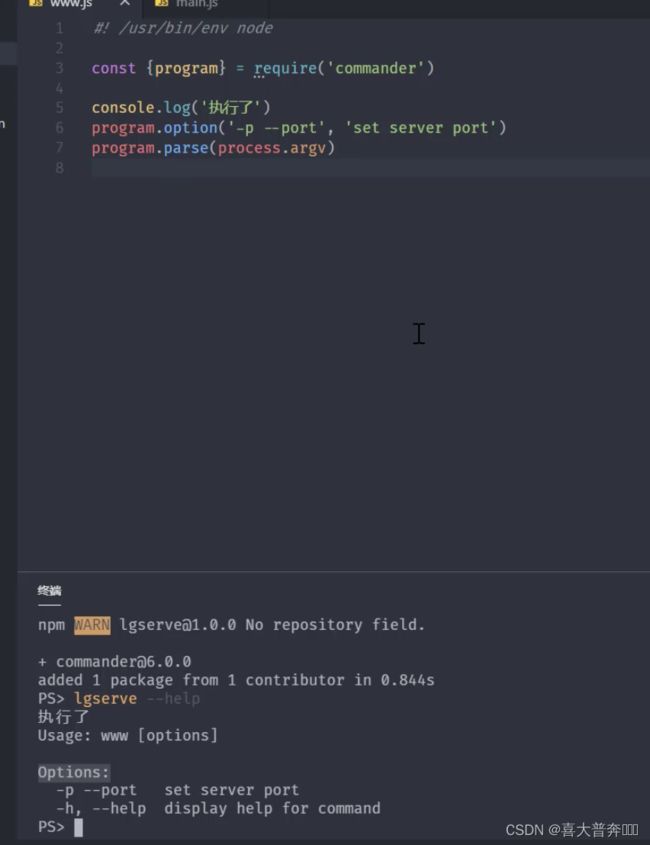
#! /usr/bin/env node
const {program} = require('commander');
// program.option('-p --port', 'set server port')
// 配置信息
let options = {
'-p --port ' : {
'description': 'init server port',
'example': 'myloserver -p 3306',
},
'-d --directory ' : {
'description': 'init server directory',
'example': 'myloserver -d c:',
},
}
function formatConfig(configs, callback){
Object.entries(configs).forEach(([key, val])=>{
callback(key, val)
})
}
formatConfig(options, (cmd, val)=>{
program.option(cmd, val.description)
})
program.parse(process.argv)
添加上示例和修改当前 Usage name:
program.on('--help', ()=>{
    console.log('examples: ');
    formatConfig(options, (cmd, val)=>{
        console.log(val.example)
    })
})

program.name('mylgserver')
添加上版本号:注意,版本号在 package.json 里边
const version = require('../package.json').version;
program.version(version)
let cmdConfig = program.parse(process.argv)
console.log(cmdConfig);
lgserver 启动 web 服务
这里的主要逻辑都放在 main.js 里在www.js 里直接引入就行,也可以直接放在 www.js 里,比较臃肿就不便于维护了
const Server = require('../main.js');
new Server(cmdConfig).start()
// main.js
const http = require('http');
class Server{
    constructor(config){
        this.config = config
    }
    start(){
        console.log('服务端已经运行了');
    }
}

module.exports = Server
const http = require('http');

function mergeConfig(config){
    return {
        port: 1234,
        directory: process.cwd(),
        ...config
    }
}

class Server{
    constructor(config){
        this.config = mergeConfig(config)
        console.log(this.config);
    }
    start(){
        console.log('服务端已经运行了');
    }
}

module.exports = Server
运行不加参数 lgserve

加上参数:lgserve -p 3307 -d c:
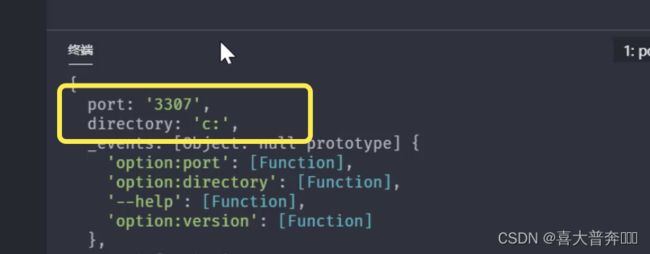
启动一个服务:
	start(){
        let server = http.createServer(this.serveHandle.bind(this))
        server.listen(this.config.port, ()=>{
            console.log('服务端已经启动了......')
        })
    }
    serveHandle(req, res){
        console.log('有请求进来了');
    }
lgserve 处理文件资源
const http = require('http');
const url = require('url');
const path = require('path');
const fs = require('fs').promises;
const { createReadStream } = require('fs');
const mime = require('mime');

function mergeConfig(config) {
    return {
        port: 1234,
        directory: process.cwd(),
        ...config
    }
}

class Server {
    constructor(config) {
        this.config = mergeConfig(config)
    }
    start() {
        let server = http.createServer(this.serveHandle.bind(this))
        server.listen(this.config.port, () => {
            console.log('服务端已经启动了......')
        })
    }
    async serveHandle(req, res) {
        let { pathname, query } = url.parse(req.url)
        pathname = decodeURIComponent(pathname)
        let absPath = path.join(this.config.directory, pathname)
        console.log(absPath);
        try {
            let statObj = await fs.stat(absPath)
            if (statObj.isFile()) { // 是个文件
                this.fileHandle(req, res, absPath)
            } else { // 是个文件夹
                this.fileHandle(req, res, absPath + '/www.js')
            }
        } catch (error) {
            this.errorHandle(req, res, error)
        }

    }
    fileHandle(req, res, absPath) {
        res.statusCode = 200
        res.setHeader('Content-Type', mime.getType(absPath) + '; charset=utf-8')
        createReadStream(absPath).pipe(res)
    }
    errorHandle(req, res, error) {
        // console.log(error);
        res.statusCode = 404
        res.setHeader('Content-Type', 'text/html; charset=utf-8')
        res.end('Not Found')
    }
}

module.exports = Server
lgserve 处理目录资源
已经存在的 serve 工具的操作是如果我们访问的是一个目录,它就会把它下边的所有资源名称展示出来,放在浏览器所对应的界面当中进行显示,这里也这样操作。
# 使用了 ejs 模板引擎
npm install ejs
const http = require('http');
const url = require('url');
const path = require('path');
const fs = require('fs').promises;
const { createReadStream } = require('fs');
const mime = require('mime');
const ejs = require('ejs');
const { promisify } = require('util')

function mergeConfig(config) {
    return {
        port: 1234,
        directory: process.cwd(),
        ...config
    }
}

class Server {
    constructor(config) {
        this.config = mergeConfig(config)
    }
    start() {
        let server = http.createServer(this.serveHandle.bind(this))
        server.listen(this.config.port, () => {
            console.log('服务端已经启动了......')
        })
    }
    async serveHandle(req, res) {
        console.log('请求进来了')
        console.log(req.url)
        let { pathname, query } = url.parse(req.url)
        pathname = decodeURIComponent(pathname)
        let absPath = path.join(this.config.directory, pathname)
        console.log(absPath);
        try {
            let statObj = await fs.stat(absPath)
            if (statObj.isFile()) { // 是个文件
                this.fileHandle(req, res, absPath)
            } else { // 是个文件夹
                let dirs = await fs.readdir(absPath)
                console.log(dirs);
                // promisify
                let renderFile = promisify(ejs.renderFile)
                let ret = await renderFile(path.resolve(__dirname, 'template.html'), {arr: dirs})
                res.end(ret)
            }
        } catch (error) {
            this.errorHandle(req, res, error)
        }

    }
    fileHandle(req, res, absPath) {
        res.statusCode = 200
        res.setHeader('Content-Type', mime.getType(absPath) + '; charset=utf-8')
        createReadStream(absPath).pipe(res)
    }
    errorHandle(req, res, error) {
        // console.log(error);
        res.statusCode = 404
        res.setHeader('Content-Type', 'text/html; charset=utf-8')
        res.end('Not Found')
    }
}

module.exports = Server
DOCTYPE html>
<html lang="en">
<head>
    <meta charset="UTF-8">
    <meta http-equiv="X-UA-Compatible" content="IE=edge">
    <meta name="viewport" content="width=device-width, initial-scale=1.0">
    <title>Documenttitle>
head>
<body>
    <ul>
        <% for(let i=0; i< arr.length; i++) { %>

            <li><a href="#"><%=arr[i]%>a>li>
        <% } %>
    ul>
body>
html>
lgserve 模板数据渲染
const http = require('http');
const url = require('url');
const path = require('path');
const fs = require('fs').promises;
const { createReadStream } = require('fs');
const mime = require('mime');
const ejs = require('ejs');
const { promisify } = require('util')

function mergeConfig(config) {
    return {
        port: 1234,
        directory: process.cwd(),
        ...config
    }
}

class Server {
    constructor(config) {
        this.config = mergeConfig(config)
    }
    start() {
        let server = http.createServer(this.serveHandle.bind(this))
        server.listen(this.config.port, () => {
            console.log('服务端已经启动了......')
        })
    }
    async serveHandle(req, res) {
        console.log('请求进来了')
        console.log(req.url)
        let { pathname, query } = url.parse(req.url)
        pathname = decodeURIComponent(pathname)
        let absPath = path.join(this.config.directory, pathname)
        console.log(absPath);
        try {
            let statObj = await fs.stat(absPath)
            if (statObj.isFile()) { // 是个文件
                this.fileHandle(req, res, absPath)
            } else { // 是个文件夹
                let dirs = await fs.readdir(absPath)

                dirs = dirs.map((item) => {
                    return {
                        path: path.join(pathname, item),
                        dirs: item
                    }
                })
                // promisify
                let renderFile = promisify(ejs.renderFile)
                let parentpath = path.dirname(pathname)
                let ret = await renderFile(path.resolve(__dirname, 'template.html'), {
                    arr: dirs,
                    parent: pathname == '/' ? false : true,
                    parentpath: parentpath,
                    title: path.basename(absPath)
                })
                res.end(ret)
            }
        } catch (error) {
            this.errorHandle(req, res, error)
        }
    }
    fileHandle(req, res, absPath) {
        res.statusCode = 200
        res.setHeader('Content-Type', mime.getType(absPath) + '; charset=utf-8')
        createReadStream(absPath).pipe(res)
    }
    errorHandle(req, res, error) {
        // console.log(error);
        res.statusCode = 404
        res.setHeader('Content-Type', 'text/html; charset=utf-8')
        res.end('Not Found')
    }
}

module.exports = Server
DOCTYPE html>
<html lang="en">
<head>
    <meta charset="UTF-8">
    <meta http-equiv="X-UA-Compatible" content="IE=edge">
    <meta name="viewport" content="width=device-width, initial-scale=1.0">
    <title>Documenttitle>
    <style>
        * {
            list-style: none;
        }
    style>
head>
<body>
    <h3>IndexOf <%=title%>h3>
    <ul>
        <% if(parent){ %>
        <li><a href="<%= parentpath %>">上一层a>li>
        <% } %>
        <% for(let i=0; i< arr.length; i++) { %>

            <li><a href="<%= arr[i].path %>"><%= arr[i].dirs %>a>li>
        <% } %>
    ul>
body>
html>

