【Spring Boot】Spring Boot经典面试题分享
文章目录
- 1. SpringBoot 简介
- 2. SpringBoot 的优缺点
- 3. SpringBoot 固定版本
- 4. SpringBoot 的使用方式
- 5. SpringBoot 自动配置原理
- 6. @PropertySource
- 7. @ImportResource
- 8. springboot 的 profile 加载
- 9. SpringBoot 激活指定 profile 的几种方式
- 10. SpringBoot 项目内部配置文件加载顺序
- 11. SpringBoot 外部配置文件加载顺序
- 12. Springboot 日志关系
- 13. SpringBoot 热部署
- 14. SpringBoot 的监控
- 15. SpringBoot 整合 redis
1. SpringBoot 简介
SpringBoot 是简化 Spring 应用开发的一个框架。他整合了 Spring 的技术栈,提供各种标准化的默认配置。使得我们可以快速开发 Spring 项目,免掉 xml 配置的麻烦。降低 Spring 项目的成本。
2. SpringBoot 的优缺点
使编码配置部署都变得很简单。
重点是自动装配、面试官经常问。
缺点可能就是自动注入的 bean ,有可能会冲突。
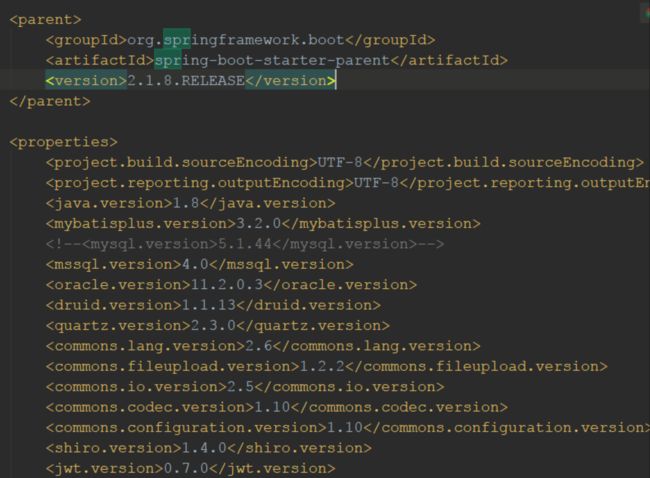
3. SpringBoot 固定版本
通过 dependcy 来固定,因为可能当前项目已经有父项目。
4. SpringBoot 的使用方式
maven 中父项目导入 SpringBoot 的启动器。然后编写一个主程序打上 SpringBootApplication 注解。通过 run 方法就可以启动。
5. SpringBoot 自动配置原理
底层源码解析是:
首先启动类上面有一个 SpringBootApplication 注解,点进去之后,又 EnableAutoConfiguration 注解。然后再进去,发现有个 @Import 注解,其导入的是 EnableAutoConfigurationImportSelector 类。这个类,他是集成了一个抽象的 AutoConfigutationimportSelector 。再往上就是接口 ImportSelector 。
然后如果实现了接口的 selectImport 接口就会将其中的返回的数组全部加载到 Spring 容器中。其中实现的最主要的地方是 getCandidateConfigurations 方法。那个方法内部实现就是回去读取 meta-inf 下的 spring.factories 。所以主要在那里面配置的类就都会被自动加载。
6. @PropertySource
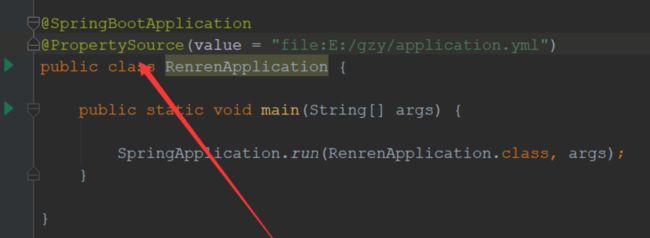
加载指定的配置文件。如果不声明的话,将从主配置文件加载。这样做的好处是灵活处理加载配置文件、主要是针对springboot打成JAR包之后不能编辑的问题、加入外部配置文件灵活处理。
7. @ImportResource
@ImportResource注解用于导入Spring的配置文件,让配置文件里面的内容生效;(就是以前写的springmvc.xml、applicationContext.xml)
导入 Spring 的配置文件,让配置文件里面的内容生效;这种方式比如一个类没有使用 @Componet 注解注册进容器,则使用自动装配 autowired 找不到。引入文件后,即可找到。
Spring Boot 里面没有 Spring 的配置文件,我们自己编写的配置文件,也不能自动识别;
想让 Spring 的配置文件生效,加载进来; @ImportResource 标注在一个配置类上
package com.demo.firstspringboot;

import org.springframework.boot.SpringApplication;
import org.springframework.boot.autoconfigure.SpringBootApplication;
import org.springframework.context.annotation.ImportResource;
import org.springframework.web.bind.annotation.RequestMapping;
import org.springframework.web.bind.annotation.RestController;

@ImportResource(locations = "classpath:applicationContext.xml")
@SpringBootApplication
@RestController
public class FirstSpringbootApplication {

    public static void main(String[] args) {
        SpringApplication.run(FirstSpringbootApplication.class, args);
    }
}
8. springboot 的 profile 加载
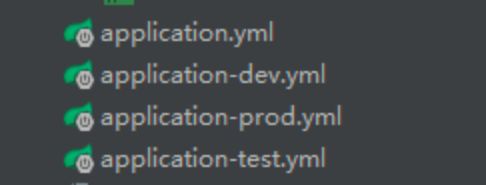
在配置文件的时候,我们可以建立多个。数据库各种环境经常用到、用 - 进行结尾。通过主配置文件,配置 profiles 的 active 就可以指定加载文件。
在同一个文件中, yml 文件支持文档块的写法,为 — 。
9. SpringBoot 激活指定 profile 的几种方式
直接在配置文件中通过 active 指定
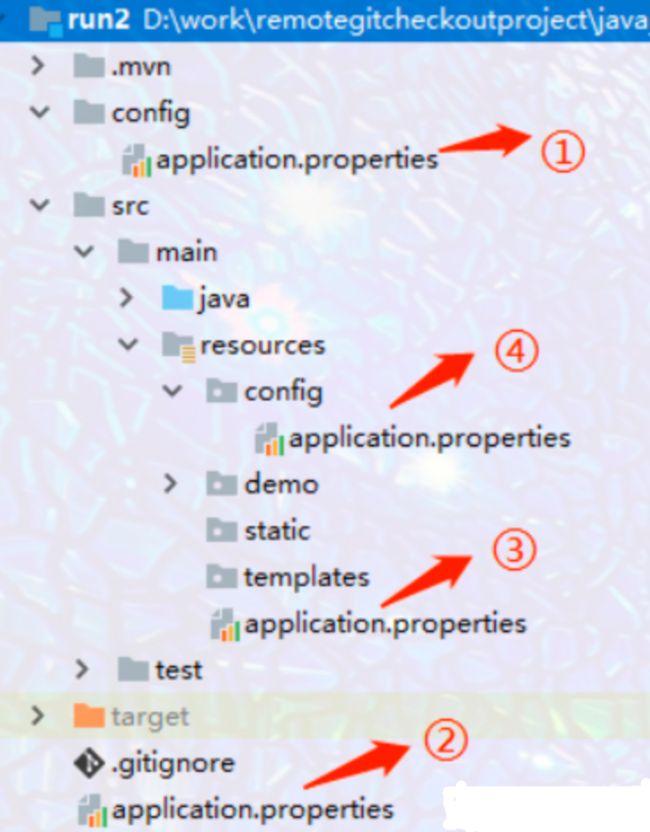
10. SpringBoot 项目内部配置文件加载顺序
顺序如下;
优先级由高到底,高优先级的配置会覆盖低优先级的配置;
SpringBoot 会从这四个位置全部加载主配置文件; ** 互补配置 ** ;
我们还可以通过 spring.config.location 来改变默认的配置文件位置
项目打包好以后,我们可以使用命令行参数的形式,启动项目的时候来指定配置文件的新位置;指定配置文件和默认加载的这些配置文件共同起作用形成互补配置;
11. SpringBoot 外部配置文件加载顺序
这个挺多的,我们就几个重要的。
高优先级的会覆盖低优先级的。
命令行上的参数配置是优先级最高的。
jar 包外的带 profile 的配置文件。
jar 包内的带 profile 的配置文件。
jar 包外的不带 profile 的配置文件。
jar 包内的不带 profile 的配置文件。
12. Springboot 日志关系
SpringBoot 默认使用的 slf4j+logback 。引入 logging-starter 就可以使用。能自动适配其他日志。只需要将日志里面的 commons-logging 移除。就会自动引入其他日志。
使用 LoggerFactory 可以获得 logger 。通过 logger 就可以记录日志。
日志的一些配置
logging.level.com.atguigu=trace 指定打印级别
logging.file=G:/springboot.log 指定日志生成路径
logging.path=/spring/log 指定日志生成相对路径
logging.pattern.console=%d{yyyy-MM-dd} [%thread] %-5level %logger{50} - %msg%n 指定控制台输出格式
logging.pattern.file=%d{yyyy-MM-dd} === [%thread] === %-5level === %logger{50} ==== 指定文件中日志输出格式
13. SpringBoot 热部署
一般使用 springboot-dev-tool 。通过 ctrl+f9 进行热部署。开启 idea 的自动编译。
14. SpringBoot 的监控
引入 actuatro 的监控器。配置文件需要配置安全关闭。management.security.enabled=false 。可以配置 endpoint 的 shutdown 的 enable 开启,就可以直接关闭了。
15. SpringBoot 整合 redis
使用RedisTemplate提供的方法来操作Redis
添加启动器
       <dependency>
           <groupId>org.springframework.bootgroupId>
           <artifactId>spring-boot-starter-data-redisartifactId>
       dependency>
配置连接信息
spring:
    redis:
      host: 127.0.0.1
      port: 6379
      password: 123456
      jedis:
        pool:
          max-active: 8
          max-wait: -1
          max-idle: 500
          min-idle: 0
      lettuce:
        shutdown-timeout: 0
代码测试打印:
@RunWith(SpringRunner.class)
@SpringBootTest
public class Test_1{
    @Autowired
    private RedisTemplate<String,String>redisTemplate;

    @Test
    public void set(){
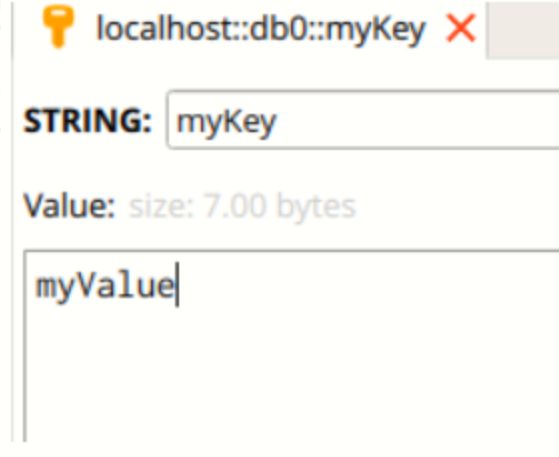
        redisTemplate.opsForValue().set("myKey","myValue");
        System.out.println(redisTemplate.opsForValue().get("myKey"));
