使用Axios发起POST请求提交文件
通过Axios发起POST请求向后端提交文件
FormData——传入文件类型参数
const formData = new FormData()
formData.append('key', value)
下面是Axios的post操作
Axios({
    headers: {
        'Content-Type':'application/json'
    },
    method: 'post',
    url:`后端url`,
    data: formData,
    onUploadProgress: ({total, loaded}) => {
        files.onProgress({percent: Math.round((loaded/total)*100).toFixed(2)}, files)
    }
}).then(res => {
    if(res && res.status === 200){
        // 响应成功的回调
        message.success(fileName + '上传成功')
    }else{
        // 响应失败
    }
})
或者直接简单点,只需要URL与参数即可
Axios.post(`URL`, formData).then(res => {
    if(res && res.status === 200){
        // 成功时的回调
    }else{
        // 失败时的回调
    }
})
延伸:以下是axios的所有配置参数
axios({
   // `url` 是用于请求的服务器 URL
   url: '/user',

   // `method` 是创建请求时使用的方法
   method: 'get', // 默认是 get

   // `baseURL` 将自动加在 `url` 前面,除非 `url` 是一个绝对 URL。
   // 它可以通过设置一个 `baseURL` 便于为 axios 实例的方法传递相对 URL
    baseURL: 'https://some-domain.com/api/',

  // `transformRequest` 允许在向服务器发送前,修改请求数据
  // 只能用在 'PUT', 'POST' 和 'PATCH' 这几个请求方法
  // 后面数组中的函数必须返回一个字符串,或 ArrayBuffer,或 Stream
  transformRequest: [function (data) {
        // 对 data 进行任意转换处理

        return data;
   }],

  // `transformResponse` 在传递给 then/catch 前,允许修改响应数据
  transformResponse: [function (data) {
      // 对 data 进行任意转换处理

       return data;
   }],

  // `headers` 是即将被发送的自定义请求头
  headers: { 'X-Requested-With': 'XMLHttpRequest' },

  // `params` 是即将与请求一起发送的 URL 参数
  // 必须是一个无格式对象(plain object)或 URLSearchParams 对象
   params: {
      ID: 12345
    },

  // `paramsSerializer` 是一个负责 `params` 序列化的函数
  // (e.g. https://www.npmjs.com/package/qs, http://api.jquery.com/jquery.param/)
  paramsSerializer: function (params) {
       return Qs.stringify(params, { arrayFormat: 'brackets' })
  },

  // `data` 是作为请求主体被发送的数据
  // 只适用于这些请求方法 'PUT', 'POST', 和 'PATCH'
 // 在没有设置 `transformRequest` 时,必须是以下类型之一:
  // - string, plain object, ArrayBuffer, ArrayBufferView, URLSearchParams
  // - 浏览器专属:FormData, File, Blob
  // - Node 专属: Stream
   data: {
      firstName: 'Fred'
  },

 // `timeout` 指定请求超时的毫秒数(0 表示无超时时间)
 // 如果请求话费了超过 `timeout` 的时间,请求将被中断
 timeout: 1000,

 // `withCredentials` 表示跨域请求时是否需要使用凭证
  withCredentials: false, // 默认的

 // `adapter` 允许自定义处理请求,以使测试更轻松
 // 返回一个 promise 并应用一个有效的响应 (查阅 [response docs](#response-api)).
 adapter: function (config) {
      /* ... */
  },

 // `auth` 表示应该使用 HTTP 基础验证,并提供凭据
 // 这将设置一个 `Authorization` 头,覆写掉现有的任意使用 `headers` 设置的自
定义 `Authorization`头
 auth: {
   username: 'janedoe',
   password: 's00pers3cret'
 },

// `responseType` 表示服务器响应的数据类型,
可以是 'arraybuffer', 'blob', 'document', 'json', 'text', 'stream'
 responseType: 'json', // 默认的

// `xsrfCookieName` 是用作 xsrf token 的值的cookie的名称
 xsrfCookieName: 'XSRF-TOKEN', // default

 // `xsrfHeaderName` 是承载 xsrf token 的值的 HTTP 头的名称
 xsrfHeaderName: 'X-XSRF-TOKEN', // 默认的

 // `onUploadProgress` 允许为上传处理进度事件
 onUploadProgress: function (progressEvent) {
     // 对原生进度事件的处理
 },

// `onDownloadProgress` 允许为下载处理进度事件
  onDownloadProgress: function (progressEvent) {
       // 对原生进度事件的处理
  },

  // `maxContentLength` 定义允许的响应内容的最大尺寸
 maxContentLength: 2000,

 // `validateStatus` 定义对于给定的HTTP 响应状态码是 resolve 或
 reject  promise 。如果 `validateStatus` 返回 `true`
 (或者设置为 `null` 或 `undefined`),promise 将被 resolve; 否则,promise 将被 rejecte
 validateStatus: function (status) {
     return status >= 200 && status < 300; // 默认的
 },

// `maxRedirects` 定义在 node.js 中 follow 的最大重定向数目
 // 如果设置为0,将不会 follow 任何重定向
maxRedirects: 5, // 默认的

// `httpAgent` 和 `httpsAgent` 分别在 node.js 中用于定义在执行 http 和
 https 时使用的自定义代理。允许像这样配置选项:
 // `keepAlive` 默认没有启用
 httpAgent: new http.Agent({ keepAlive: true }),
 httpsAgent: new https.Agent({ keepAlive: true }),

// 'proxy' 定义代理服务器的主机名称和端口
// `auth` 表示 HTTP 基础验证应当用于连接代理,并提供凭据
// 这将会设置一个 `Proxy-Authorization` 头,覆写掉已有的通过使用 `header`
设置的自定义 `Proxy-Authorization` 头。
proxy: {
   host: '127.0.0.1',
   port: 9000,
   auth: : {
       username: 'mikeymike',
        password: 'rapunz3l'
    }
},
// `cancelToken` 指定用于取消请求的 cancel token
 // (查看后面的 Cancellation 这节了解更多)
 cancelToken: new CancelToken(function (cancel) {
     })
})
React中fetch和axios的简单使用
fetch的使用
废话不多说,我们先看看文档(看不懂也无所谓的OAO!!)
文档:whatwg-fetch - npm
1.安装 cd到你创建react项目的目录,在终端输入:
npm install whatwg-fetch --save
2. npm start
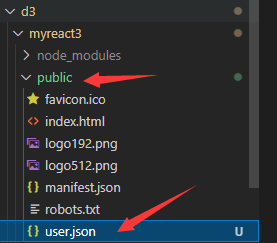
3.在public下面创建一个叫做 user.json 的文件,代码如下:
[
    {
        "stuNo":"007",
        "stuName":"double",
        "stuSex":0,
        "salary":100000
    },
    {
        "stuNo":"008",
        "stuName":"liu",
        "stuSex":0,
        "salary":200000
    },
    {
        "stuNo":"009",
        "stuName":"li",
        "stuSex":1,
        "salary":100000
    }
]
4.创建一个名为 UserManage.js 的组件,代码如下:
因为咱们src里面的App.js最终编译到 public 里面的 index.html,所以路径才这样写!
import React, { Component } from 'react';
import "whatwg-fetch"

class UserManage extends Component {
    componentDidMount(){
        fetch("/user.json").then((response)=>{
            return response.json()
        }).then((res)=>{
            console.log(res)
        }).catch((err)=>{
            console.log(err)
        })

    }

    render() {
        return (

                用户管理

        );
    }
}

export default UserManage;
第一个 then 是把response返回来的数据转换为json格式,第二个 then 里面的数据才是我们需要的内容。
4.查看控制台
这就是咱们得到的res。
那么,我们怎么在react中发起一个简单的axios请求呢?
Axios的使用
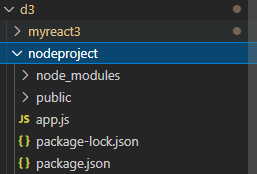
1.先搭建一个node。不会搭建?没关系,手把手教学。先创建一个叫 nodeproject的文件夹。
再创建一个叫 package.json的文件,再创建一个叫 app.js的文件。
以下是package.json的代码:
{
  "name": "nodejsproject",
  "version": "1.0.0",
  "description": "",
  "main": "app.js",
  "scripts": {
    "test": "echo \"Error: no test specified\" && exit 1"
  },
  "author": "",
  "license": "ISC",
  "dependencies": {
    "body-parser": "^1.19.0",
    "express": "^4.17.1",
    "morgan": "^1.10.0",
    "mysql": "^2.18.1"
  },
  "devDependencies": {
    "serve-favicon": "^2.5.0"
  }
}
以下是app.js的代码:
const myexpress = require('express');
const path = require("path");
const logger = require('morgan');
const favicon = require('serve-favicon');
const bodyParser = require('body-parser');
const app = myexpress();


// 跨域
app.all("*",function(req,res,next){
    res.header("Access-Control-Allow-Origin","*");
    res.header("Access-Control-Allow-Headers", "X-Requested-With,X_Requested_With,Content-Type");
    next();
})


// 定义日志和输出级别
app.use(logger('dev'));

// 必须设置在静态资源文件目录的前面,否则看不到日志的输出
app.use(myexpress.static(path.join(__dirname,"public"),{index:"login.html"}));

// 定义icon图标
// app.use(favicon(__dirname + '/public/favicon.ico'));


// 定义数据解析器 这个要放在post的前面
app.use(bodyParser.json());
app.use(bodyParser.urlencoded({ extended: false }));


app.post("/studentDetail",function(req,res){
    res.send(
        {student:
            [
                {
                    "stuNo":"007",
                    "stuName":"double",
                    "stuSex":0,
                    "salary":100000
                },
                {
                    "stuNo":"008",
                    "stuName":"liu",
                    "stuSex":0,
                    "salary":200000
                },
                {
                    "stuNo":"009",
                    "stuName":"li",
                    "stuSex":1,
                    "salary":100000
                }
            ]
        }
    )
})


app.listen(7777,function(){
    console.log("服务已启动");
})
(笔者已经把post请求写好了)
然后在控制台运行命令:
npm i
就可以把package.json里的工具下载下来。再启动node,搞定~
3.在发送axios请求前,我们再试试用fetch发送请求。
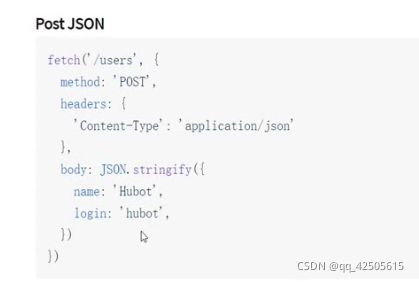
看文档找到了写法~
咱们也照葫芦画瓢,UserManage.js的代码为:
import React, { Component } from 'react';
import "whatwg-fetch"

class UserManage extends Component {
    componentDidMount(){
        fetch("http://localhost:7777/studentDetail",
        {
            method:'POST',
            headers:{
                'Content-Type':'application/json'
            },
            body:JSON.stringify({
                name:'Hubot',
                login:'hubot',
            })
        }).then((response)=>{
            return response.json()
        }).then((res)=>{
            console.log(res)
        }).catch((err)=>{
            console.log(err)
        })

    }

    render() {
        return (

                用户管理

        );
    }
}

export default UserManage;
4.运行就看到效果啦~成功~
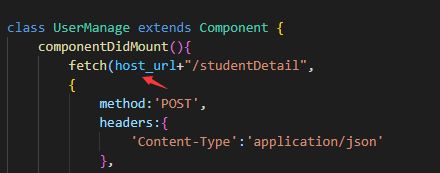
可能有朋友觉得每次写域名都写一大串,太麻烦,干脆我们把它提取出来。
在src目录下我们创建一个叫 config.js 的文件。
代码如下:
export const host_url = "http://localhost:7777"
然后回到 UserManage.js文件中,我们引入它:
import {host_url} from './config'
就只需要改一下下面的内容,效果是一样的~
5.好了~正式进入到axios的学习,有了前面的铺垫,现在特别简单。我们先下载axios。
npm i axios
下好后引入:
import Axios from 'axios'
UserManage.js的代码如下:
import React, { Component } from 'react';
import {host_url} from './config'
import "whatwg-fetch"
import Axios from 'axios'

class UserManage extends Component {
    componentDidMount(){

        Axios.post(host_url+"/studentDetail").then((res)=>{
            console.log(res.data.student)
        }).catch((err)=>{
            console.log(err)
        })
    }

    render() {
        return (

                用户管理

        );
    }
}

export default UserManage;
也是一样的能访问到数据,好了,写完了,撒花~
总结
以上为个人经验,希望能给大家一个参考,也希望大家多多支持脚本之家。


