Java小白学习指南【day49】---Spring进阶
文章目录
- 一、依赖注入
-
- 1、构造参数的注入(注意要提供有参构造)
- 2、外部bean与内部bean注入
- 3、普通属性的注入
- 4、其他属性的注入
- 5、Properties的注入
- 二、Spring的AOP
-
- 1、AOP的概述
- 2、Spring实现AOP的方式
- 3、XML实现AOP(代理模式)
-
- ①、添加aop命名空间
- ②、创建service与service实现类
- ③、准备事物对象
- ④、AOP配置
- ⑤、功能测试
- 4、注解实现AOP
-
- ①、配置文件
- ②、创建事务管理器
- ③、使用XML配置方法中的service与service实现类,进行测试
- 三、代理模式
-
- 1、静态代理
- 2、动态代理
- 四、创建Bean的方式
-
- 1、实例化公共的无参构造方式
- 2、使用FactoryBean
- 3、工厂类方式----静态方法
- 4、工厂类方式----动态方法
一、依赖注入
首先在idea创建普通的Maven项目,在pom.xml中进行导包
<project xmlns="http://maven.apache.org/POM/4.0.0"
         xmlns:xsi="http://www.w3.org/2001/XMLSchema-instance"
         xsi:schemaLocation="http://maven.apache.org/POM/4.0.0 http://maven.apache.org/xsd/maven-4.0.0.xsd">
    <modelVersion>4.0.0modelVersion>

    <groupId>cn.itsourcegroupId>
    <artifactId>day57_springartifactId>
    <version>1.0-SNAPSHOTversion>
    <dependencies>
        <dependency>
            <groupId>org.springframeworkgroupId>
            <artifactId>spring-coreartifactId>
            <version>4.2.5.RELEASEversion>
        dependency>
        <dependency>
            <groupId>org.springframeworkgroupId>
            <artifactId>spring-contextartifactId>
            <version>4.2.5.RELEASEversion>
        dependency>
        <dependency>
            <groupId>org.springframeworkgroupId>
            <artifactId>spring-aopartifactId>
            <version>4.2.5.RELEASEversion>
        dependency>
        <dependency>
            <groupId>org.springframeworkgroupId>
            <artifactId>spring-testartifactId>
            <version>4.2.5.RELEASEversion>
        dependency>

        <dependency>
            <groupId>org.aspectjgroupId>
            <artifactId>aspectjweaverartifactId>
            <version>1.8.8version>
        dependency>

        <dependency>
            <groupId>junitgroupId>
            <artifactId>junitartifactId>
            <version>4.12version>
        dependency>
    dependencies>

    <build>
        <resources>
            <resource>
                <directory>src/main/javadirectory>
                <includes>
                    <include>**/*.xmlinclude>
                includes>
            resource>
            <resource>
                <directory>src/test/javadirectory>
                <includes>
                    <include>**/*.xmlinclude>
                includes>
            resource>
        resources>
    build>

project>
1、构造参数的注入(注意要提供有参构造)
创建一个实体类
public class Mybean {
    private Long id;
    private String name;
    ......
}
在SpringTest-Context.xml(测试时候方便,使用了@ContextConfiguration不写路径,会默认扫描同包下的:类名-Context.xml)
	<bean id="Mybean" class="cn.itsource._01di.domain.Mybean">

        <constructor-arg type="java.lang.Long" value="22" />
        <constructor-arg type="java.lang.String" value="22"/>
    bean>

	<bean id="Mybean" class="cn.itsource._01di.domain.Mybean">

        <constructor-arg index="0" value="66" />
        <constructor-arg index="1" value="二狗"/>
    bean>


    <bean id="MyBean" class="cn.itsource._01di.domain.Mybean">
        <constructor-arg name="id" value="1" />
        <constructor-arg name="name" value="张三娃" />
    bean>
2、外部bean与内部bean注入
在domain加入引用类型
	/*引用属性*/
    private YouBean youBean;
外部bean注入
    <bean id="YouBean" class="cn.itsource._01di.domain.YouBean" />
    <bean id="Mybean" class="cn.itsource._01di.domain.Mybean">
        <constructor-arg index="0" value="666" />
        <constructor-arg index="1" value="二狗"/>
        <constructor-arg index="2" ref="YouBean"/>
    bean>
内部bean注入
	<bean id="Mybean" class="cn.itsource._01di.domain.Mybean">
        <constructor-arg index="0" value="666" />
        <constructor-arg index="1" value="二狗"/>
        <constructor-arg >
            <bean class="cn.itsource._01di.domain.YouBean" />
        constructor-arg>
    bean>
3、普通属性的注入
创建一个实体类
public class TestBean {
    // 简单属性
    private Boolean sex;
    private BigDecimal salary;
    // 对象属性
    private List<String> list;
    private Set<String> set;
    private List<OtherBean> otherBeanList;
    private Set<OtherBean> otherBeanSet;
    private String[] arrays;
    //下面这个是重点
    private Properties props1;
    .......
}
    <bean id="TestBean" class="cn.itsource._01di.domain.TestBean">
        <property name="sex" value="true"/>
        <property name="salary" value="6666"/>
        <property name="list" >
            <list>
                <value>nihaovalue>
                <value>666value>
                <value>嘿嘿嘿value>
            list>
        property>
    bean>
4、其他属性的注入
    <bean id="otherBean" class="cn.itsource._01di.domain.OtherBean"/>
    <bean id="testBean" class="cn.itsource._01di.domain.TestBean">
        <property name="otherBeanSet">
            <set>

                <bean class="cn.itsource._01di.domain.OtherBean" />
                <bean class="cn.itsource._01di.domain.OtherBean" />

                <ref bean="otherBean" />
                <ref bean="otherBean" />
            set>
        property>
    bean>
数组的注入
	<bean id="testBean" class="cn.itsource._01di.domain.TestBean">

        <property name="arrays">
            <array>
                <value>xxxvalue>
                <value>yyyvalue>
                <value>zzzvalue>
            array>
        property>

	<property name="arrays" value="A,B,C" />
    bean>
5、Properties的注入
    <bean id="testBean" class="cn.itsource._01di.domain.TestBean">
        <property name="props1">
            <props>
                <prop key="driver">org.Jpa.dialect.HSQLDialectprop>
                <prop key="url">com.mysql.jdbc.Driver prop>
            props>
        property>
    bean>
二、Spring的AOP
1、AOP的概述
AOP即Aspect Oriented Program,面向切面编程,是面向对象编程(OOP)的一种增强模式,可以将项目中与业务无关的,却为业务模块所共同调用的非核心代码封装成(比如事务管理、日志管理、权限控制等等)一个个切面,然后在运行的时候通过动态代理的方式织入到核心业务功能中。
2、Spring实现AOP的方式
要想实现AOP的配置,要满足三点,配置的三要素:
- 何时:在哪里执行,在代码之前、之后
- 何地:在哪个方法执行
- 做什么:要完成什么样的功能扩展
3、XML实现AOP(代理模式)
①、添加aop命名空间
SpringTest-Context.xml
xmlns:aop="http://www.springframework.org/schema/aop"
http://www.springframework.org/schema/aop http://www.springframework.org/schema/aop/spring-aop.xsd
②、创建service与service实现类
DepartmentServiceImpl
public class DepartmentServiceImpl implements IDeprtmentService {
    @Override
    public void save() {
        System.out.println("DepartmentServiceImpl  save.....");
    }
    @Override
    public void delete() {
        System.out.println("DepartmentServiceImpl  delete.....");
    }
}
UserServiceImpl
public class UserServiceImpl implements IUserService {
    @Override
    public void save() {
        System.out.println("UserServiceImpl  save.....");
        /*int i=1/0; 测试回滚使用*/
    }

    @Override
    public void delete() {
        System.out.println("UserServiceImpl  delete.....");
    }
}
③、准备事物对象
public class TxManager {
    //开启方法
    public void begin(){
        System.out.println("开启事务....");
    }
    //提交方法
    public void commit(){
        System.out.println("提交事务....");
    }
    //回滚方法
    public void rollback(){
        System.out.println("回滚事务....");
    }
    //关闭方法
    public void close(){
        System.out.println("关闭事务....");
    }
    //环绕方法
    public void around(ProceedingJoinPoint joinPoint){//环绕时需要执行service中的方法
        try {
            begin();
            joinPoint.proceed();
            commit();
        } catch (Throwable e) {//环绕时执行service中的方法需要将异常抛掷最大
            e.printStackTrace();
            rollback();
        } finally {
            close();
        }
    }
}
④、AOP配置
    <bean id="userServiceImpl" class="cn.itsource._02aopXml.service.impl.UserServiceImpl"/>
    <bean id="departServicImpl" class="cn.itsource._02aopXml.service.impl.DepartmentServiceImpl"/>

    <bean id="TxManage" class="cn.itsource._02aopXml.TxManager"/>

    <aop:config>

        <aop:pointcut id="pointcut" expression="execution(* cn.itsource._02aopXml.service.I*Service.*(..))"/>

        <aop:aspect ref="TxManage">


            <aop:around method="around" pointcut-ref="pointcut"/>
        aop:aspect>
    aop:config>
上述注释的部分,使用了环绕通知后,就不需要上述四个通知!
⑤、功能测试
@RunWith(SpringJUnit4ClassRunner.class)
@ContextConfiguration//不写路径,会默认扫描同包下的:类名-Context.xml
public class SpringTest {
    @Autowired
    private IUserService userService;
    @Autowired
    private IDepartmentService departmentService;
    @Test
    public void testSpringTest(){
        userService.save();
        userService.delete();
        departmentService.save();
        departmentService.delete();
    }
}
4、注解实现AOP
①、配置文件
需要在SpringTest-Context.xml进行配置AOP与Context
 	xmlns:aop="http://www.springframework.org/schema/aop"
    xmlns:context="http://www.springframework.org/schema/context"

	http://www.springframework.org/schema/aop http://www.springframework.org/schema/aop/spring-aop.xsd">
    http://www.springframework.org/schema/context http://www.springframework.org/schema/context/spring-context.xsd">


    <context:component-scan base-package="cn.itsource._03aopanno">context:component-scan>

    <aop:aspectj-autoproxy>aop:aspectj-autoproxy>
②、创建事务管理器
在注解方式中,对事物管理器需要使用@Component与@Aspect尤其是后面的,同时还是按照三要素进行配置,依旧需要切面、切点。
@Component//声明为一个spring的bean
@Aspect//AOP的类注解----->配置切面
public class TxManager {
    //声明切点
    @Pointcut("execution(* cn.itsource._03aopanno.service.I*Service.*(..))")
    public void txPoint(){}

    @Before("txPoint()")
    public void begin(){
        System.out.println("开启事务....");
    }

    @AfterReturning("txPoint()")
    public void commit(){
        System.out.println("提交事务....");
    }

    @AfterThrowing(value = "txPoint()",throwing = "e")//这里要将异常参数配置一致
    public void rollback(Throwable e){
        System.out.println(e.getMessage());
        System.out.println("回滚事务....");
    }

    @After("txPoint()")
    public void close(){
        System.out.println("关闭事务....");
    }
}
一般不使用上述这种配置方式,而使用环绕通知
@Component//声明为一个spring的bean
@Aspect//AOP的类注解----->配置切面
public class TxManager {
    //声明切点
    @Pointcut("execution(* cn.itsource._03aopanno.service.I*Service.*(..))")
    public void txPoint(){}

    public void begin(){
        System.out.println("开启事务....");
    }

    public void commit(){
        System.out.println("提交事务....");
    }

    public void rollback(Throwable e){
        System.out.println(e.getMessage());
        System.out.println("回滚事务....");
    }

    public void close(){
        System.out.println("关闭事务....");
    }
    //环绕方法
    @Around("txPoint()")
    public void around(ProceedingJoinPoint joinPoint){//环绕时需要执行service中的方法
        try {
            begin();
            joinPoint.proceed();
            commit();
        } catch (Throwable e) {//环绕时执行service中的方法需要将异常抛掷最大
            e.printStackTrace();
            rollback(e);
        } finally {
            close();
        }
    }
}
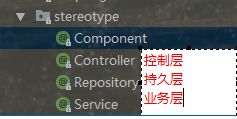
这里的@Component, 这个注解和@Component、@Controller和我们最常见的@Service注解是一个作用,都可以将一个类声明为一个Spring的Bean。它们的区别到不在于具体的语义上,更多的是在于注解的定位上。
-
@Repository注解,对应的是持久层即Dao层(Mapper层),其作用是直接和数据库交互,通常来说一个方法对应一条具体的Sql语句
-
@Service注解,对应的是服务层即Service层,直接调用Dao层的某个方法了
-
@Controller注解,对应的是控制层即MVC设计模式中的控制层,其作用是接收用户请求,根据请求调用不同的Service取数据,并根据需求对数据进行组合、包装返回给前端
-
@Component注解,这个更多对应的是一个组件的概念,如果一个Bean不知道属于拿个层,可以使用@Component注解标注
③、使用XML配置方法中的service与service实现类,进行测试
三、代理模式
是一种编程的思想(方式),帮我们实现一个外层的封装,除了能够实现我们想要的业务,还能做功能的扩展。
1、静态代理
基本不用
2、动态代理
①、JDK
代理的类有接口,用在被接口修饰的类上(例如service)
②、CGLIB
代理的类没有接口就使用这个(直接使用实现类)
这里springAOP使用的就是动态代理的模式,底层自动帮我们实现动态代理;如果有接口就使用JDK方式,如果没有就使用CGLIB。
简单的来说上面的注解方式我们就在使用代理模式
这里如果我们在test中注入的是实现类,呢么程序运行后会报错bean创建错误
因为我们使用AOP将UserServiceImpl代理了,所有不能注入实现类了,是通过
四、创建Bean的方式
1、实例化公共的无参构造方式
最常用的
<bean id="testBean" class="cn.itsource._01di.domain.TestBean" />
2、使用FactoryBean
spring在集成其他框架的时候,其他框架一般情况下不会直接提供创建对象的方式,在spring中就需要通过FactoryBean的方式来解决创建bean的问题。
<bean id="car" class="cn.itsource._04bean.CarFactoryBean" />
创建FactoryBean实体类
/*泛型:表明当前类是用来操作car类的*/
public class CarFactoryBean implements FactoryBean<Car>{
    /*创建需要的类对象*/
    @Override
    public Car getObject() throws Exception {
        return new Car();
    }
    /*确定返回值类型*/
    @Override
    public Class<?> getObjectType() {
        return Car.class;
    }

    @Override
    public boolean isSingleton() {
        return false;
    }
}
3、工厂类方式----静态方法
创建实体类car,再创建一个CarFactory
public class CarFactory {
    public static Car creatCar(){
        return new Car();
    }
}
在配置SpringTest-Context.xml
<bean id="car" class="cn.itsource._04bean.CarFactory" factory-method="creatCar"/>
4、工厂类方式----动态方法
CarFactory需要将static去掉,变为动态
    <bean id="carFactory" class="cn.itsource._04bean.CarFactory"/>
    <bean id="car" factory-bean="carFactory" factory-method="creatCar"/>
