MDN扫盲篇之CSS
MDN扫盲篇之CSS
-
-
- CSS是如何工作的
- 当浏览器遇到无法解析的css代码会发生什么
- CSS动画优点
- CSS动画事件监听器
- 检测浏览器是否支持css动画
- rgba
- 角度单位
- basic-shape基础图形
-
- clip-path
- 图形动画
- shape-outside
- 非常规图片的文字环绕效果
- blend-mode
- color颜色表达方法
-
- currentColor
- hsl和hsla
- css功能符号
- CSS 基本数据类型
- 用户自定义字符串标识符规则
- gradient渐变色
- CSS盒模型
- flex-box
-
- gap
- text-transform
- 文本布局和方向
-
- writing-mode
- text-orientation
-
CSS是如何工作的
- 浏览器载入HTML文件(比如从网络上获取)。
- 将HTML文件转化成一个DOM(Document Object Model),DOM是文件在计算机内存中的表现形式。
- 接下来,浏览器会拉取该HTML相关的大部分资源,比如嵌入到页面的图片、视频和CSS样式。JavaScript则会稍后进行处理
- 浏览器拉取到CSS之后会进行解析,根据选择器的不同类型(比如element、class、id等等)把他们分到不同的“桶”中。浏览器基于它找到的不同的选择器,将不同的规则(基于选择器的规则,如元素选择器、类选择器、id选择器等)应用在对应的DOM的节点中,并添加节点依赖的样式(这个中间步骤称为
渲染树)。 - 上述的规则应用于渲染树之后,渲染树会依照应该出现的结构进行布局。
- 网页展示在屏幕上(这一步被称为
着色)。
当浏览器遇到无法解析的css代码会发生什么
当你写的属性或值发生了拼写错误或者是一些让当前版本的浏览器不能识别的(比如不兼容的新特性),
那么浏览器对该属性什么也不会做,
而是会跳过该属性,继续解析下一个css样式。
举个例子:
DOCTYPE html>
<html lang="en">
<head>
    <meta charset="UTF-8">
    <meta http-equiv="X-UA-Compatible" content="IE=edge">
    <meta name="viewport" content="width=device-width, initial-scale=1.0">
    <title>Documenttitle>
    <style>
        .box {
            width: 200px;
            height: 200px;
            haha: 'ok'; // 错误的属性 错误的值
            background-color: pink;
        }
        .box1 {
            width: 100px;
            height: 100px;
            background-color: 'lalala'; // 错误的值
            color: #333;
        }
    style>
head>
<body>
    <div class="box">div>
    <div class="box1">box1div>
body>
html>
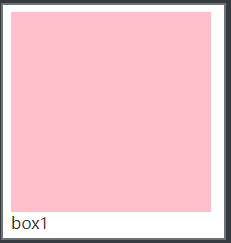
可以看到,属性haha和值ok被划掉了,然后跳过它去实现了background-color属性。
CSS动画优点
- 能够非常容易地创建简单动画,你甚至不需要了解JavaScript就能创建动画。
- 动画运行效果良好,甚至在低性能的系统上。渲染引擎会使用跳帧或者其他技术以保证动画表现尽可能的流畅。而使用JavaScript实现的动画通常表现不佳(除非经过很好的设计)。
- 让浏览器控制动画序列,允许浏览器优化性能和效果,如降低位于隐藏选项卡中的动画更新频率。
CSS动画事件监听器
animationstart:动画开始时执行监听函数
animationend: 动画结束时执行监听函数
animationiteration: 动画重新播放时执行监听函数
示例:
DOCTYPE html>
<html lang="en">
<head>
    <meta charset="UTF-8">
    <meta http-equiv="X-UA-Compatible" content="IE=edge">
    <meta name="viewport" content="width=device-width, initial-scale=1.0">
    <title>Documenttitle>
    <style>
        @keyframes move-rig {
            0% {margin-left: 0;}
            100% {margin-left: 200px;}
        }
        .box {
            width: 100px;
            height: 100px;
            background-color: pink;
            animation: move-rig 2s 3; // 动画播放一次为2s 重复播放3次
        }
    style>
head>
<body>
    <div class="box">div>
    <script>
        var box = document.querySelector('.box')
        box.addEventListener('animationstart', function() {
            console.log('动画开始啦~', Date.now())
        })
        box.addEventListener('animationend', function () {
            console.log('动画结束啦~', Date.now())
        })
        box.addEventListener('animationiteration', function () {
            console.log('动画重新播放啦~')
        })
    script>
body>
html>
打开控制台,可以看到输出情况:

动画开始和动画结束分别执行一次,动画重新播放了2次,所以打印了2次。
但是要注意哦,动画重复3次播放的事件并不是完整的6s哦,是约等于6s。
检测浏览器是否支持css动画
示例:
DOCTYPE html>
<html lang="en">
<head>
    <meta charset="UTF-8">
    <meta http-equiv="X-UA-Compatible" content="IE=edge">
    <meta name="viewport" content="width=device-width, initial-scale=1.0">
    <title>Documenttitle>
    <style>
        @keyframes move-rig {
            0% {margin-left: 0;}
            100% {margin-left: 200px;}
        }
        .box {
            width: 100px;
            height: 100px;
            background-color: pink;
            animation: move-rig 2s 3;
        }
    style>
    <script>
        // 检测CSS动画的支持性
        var animation = false,
            animationstring = 'animation',
            keyframeprefix = '',
            domPrefixes = 'Webkit Moz O ms Khtml'.split(' '),
            pfx = '',
            elm = document.createElement('div');

        if (elm.style.animationName !== undefined) { animation = true; }

        if (animation === false) {
            for (var i = 0; i < domPrefixes.length; i++) {
                if (elm.style[domPrefixes[i] + 'AnimationName'] !== undefined) {
                    pfx = domPrefixes[i];
                    animationstring = pfx + 'Animation';
                    keyframeprefix = '-' + pfx.toLowerCase() + '-';
                    animation = true;
                    break;
                }
            }
        }
        // animation = true 表示支持
        // animation = false 表示不支持
        console.log('animation: ', animation)
    script>
head>
<body>
    <div class="box">div>
body>
html>
animation显示为true,说明该浏览器支持css动画。
rgba
两种表达方式
rgba(255,192,203, .2)rgba(255 192 203 / 20%)
两者写法有区别,但是表达的意思是相同的,
角度单位
deg: 度。圆的弧度是360deg。

grad: 百分度。一个完整的圆是400grad。半圈就是200grad,相当于180deg

rad: 弧度。一个完整的圆是2π弧度。1rad就相当于180/π deg。

turn: 圈。一个完整的圆就是1turn。 1turn = 360deg
basic-shape基础图形
基础图形被插入到一个css盒子中,这个盒子会被当作一个二位坐标系。
盒子的左上角顶点就是坐标原点,水平向右的方向就是X轴的正方向,
垂直向下的方向就是Y轴的正方向。绘制基础图形就是按照这个标准来绘制的。
这里涉及两个属性:
- clip-path
- shape-outside
clip-path
通过图形函数,把图形插入到css盒子中。
涉及到的部分图形函数如下:
- inset()
- circle()
- ellipse()
- polygon()
- path()
inset
语法:
inset(top right bottom left round border-radius)
其中,top right bottom left分别对应插入的长方形四条边距离被插入盒子的四条边的距离。
用法和margin的上右下左一样。
inset(10px) 表示距离上右下左四条边的距离都是10px
inset(10px 20px)表示距离上下两条边的距离是10px,距离左右两条边的距离都是20px
以此类推
round border-radius表示插入的长方形的圆角尺寸。

不写就表示没有圆角,都是直角。
示例:
插入一个长方形
DOCTYPE html>
<html lang="en">
<head>
    <meta charset="UTF-8">
    <meta http-equiv="X-UA-Compatible" content="IE=edge">
    <meta name="viewport" content="width=device-width, initial-scale=1.0">
    <title>Documenttitle>
    <style>
        .box {
            width: 200px;
            height: 200px;
            border: 1px solid rgba(191,191,191, .5);
        }

        .box1 {
            width: 100%;
            height: 100%;
            background-color: pink;
            clip-path: inset(10px 10px 10px 10px round 6px);
            /*也可以简写为:*/
            /*clip-path: inset(10px round 6px)*/
        }
    style>
head>
<body>
    <div class="box">
        <div class="box1">div>
    div>
body>
html>
这意味着,插入的图形是显示出来的效果,而box1的实际大小仍然是100% 100%的宽高。
下面的图形属性也一样,就不单独说明了。
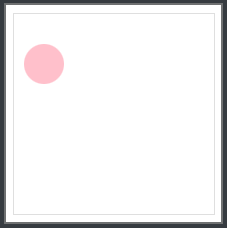
circle
插入一个圆形
语法:
circle(r at x y)
r 表示圆的半径尺寸
x 表示圆心的x坐标
y 表示圆心的y坐标

x y可以省略,表示圆心位于盒子的正中心
示例:
DOCTYPE html>
<html lang="en">
<head>
    <meta charset="UTF-8">
    <meta http-equiv="X-UA-Compatible" content="IE=edge">
    <meta name="viewport" content="width=device-width, initial-scale=1.0">
    <title>Documenttitle>
    <style>
        .box {
            width: 200px;
            height: 200px;
            border: 1px solid rgba(191,191,191, .5);
        }

        .box1 {
            width: 100%;
            height: 100%;
            background-color: pink;
            clip-path: circle(20px at 30px 50px);
        }
    style>
head>
<body>
    <div class="box">
        <div class="box1">div>
    div>
body>
html>
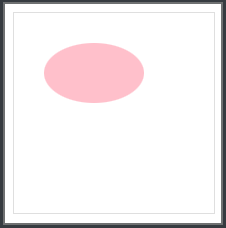
ellipse
插入一个椭圆形
语法:
ellipse(rx ry at x y)
rx 表示水平方向的半径
ry 表示垂直方向的半径
x  表示圆心的x坐标
y  表示圆心的y坐标

x y可以省略,表示圆心位于盒子的正中心
示例:
DOCTYPE html>
<html lang="en">
<head>
    <meta charset="UTF-8">
    <meta http-equiv="X-UA-Compatible" content="IE=edge">
    <meta name="viewport" content="width=device-width, initial-scale=1.0">
    <title>Documenttitle>
    <style>
        .box {
            width: 200px;
            height: 200px;
            border: 1px solid rgba(191,191,191, .5);
        }

        .box1 {
            width: 100%;
            height: 100%;
            background-color: pink;
            clip-path: ellipse(50px 30px at 80px 60px);
        }
    style>
head>
<body>
    <div class="box">
        <div class="box1">div>
    div>
body>
html>
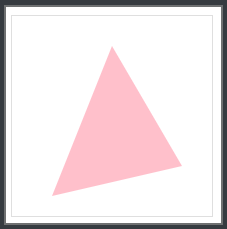
polygon
插入一个多边形(边数>=3)
语法:
polygon(x1 y1, x2 y2, x3 y3, ...)
x1, x2, x3 ... 表示多边形每个拐点的x坐标
y1, y2, y3 ... 表示多边形每个拐点的y坐标

注意:这些点都是按照顺时针方向绘制的
示例:
DOCTYPE html>
<html lang="en">
<head>
    <meta charset="UTF-8">
    <meta http-equiv="X-UA-Compatible" content="IE=edge">
    <meta name="viewport" content="width=device-width, initial-scale=1.0">
    <title>Documenttitle>
    <style>
        .box {
            width: 200px;
            height: 200px;
            border: 1px solid rgba(191,191,191, .5);
        }

        .box1 {
            width: 100%;
            height: 100%;
            background-color: pink;
            clip-path: polygon(100px 30px, 170px 150px, 40px 180px);
        }
    style>
head>
<body>
    <div class="box">
        <div class="box1">div>
    div>
body>
html>
path
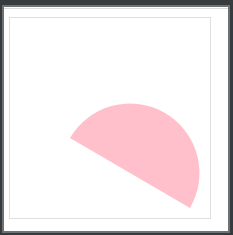
按照一定的路径来绘制更复杂的图形。路径是一个字符串,遵循SVG路径标准。
这个路径和SVG路径方法一致,可以参考SVG Path
示例:
DOCTYPE html>
<html lang="en">
<head>
    <meta charset="UTF-8">
    <meta http-equiv="X-UA-Compatible" content="IE=edge">
    <meta name="viewport" content="width=device-width, initial-scale=1.0">
    <title>Documenttitle>
    <style>
        .box {
            width: 200px;
            height: 200px;
            border: 1px solid rgba(191,191,191, .5);
        }

        .box1 {
            width: 100%;
            height: 100%;
            background-color: pink;
            clip-path: path('M 60,120 A 60,60 0, 0, 1 180, 190 z');
        }
    style>
head>
<body>
    <div class="box">
        <div class="box1">div>
    div>
body>
html>
图形动画
展示一个丰富的图形动画:
DOCTYPE html>
<html lang="en">
<head>
    <meta charset="UTF-8">
    <meta http-equiv="X-UA-Compatible" content="IE=edge">
    <meta name="viewport" content="width=device-width, initial-scale=1.0">
    <title>Documenttitle>
    <style>
        @keyframes poly {
            from {
                clip-path: polygon(50% 0%, 60% 40%, 100% 50%, 60% 60%, 50% 100%, 40% 60%, 0% 50%, 40% 40%);
            }

            to {
                clip-path: polygon(50% 30%, 100% 0%, 70% 50%, 100% 100%, 50% 70%, 0% 100%, 30% 50%, 0% 0%);
            }
        }
        .box {
            width: 200px;
            height: 200px;
            border: 1px solid rgba(191,191,191, .5);
            background: repeating-linear-gradient(red, orange 50px);
            clip-path: polygon(50% 0%, 60% 40%, 100% 50%, 60% 60%, 50% 100%, 40% 60%, 0% 50%, 40% 40%);
            animation: 4s poly infinite alternate ease-in-out;
        }
    style>
head>
<body>
    <div class="box">div>
body>
html>
用浏览器打开,即可看到一个丰富的图形动画。
shape-outside
该属性需要和clip-path属性结合使用
使用分为三个步骤:
1.写一个浮动的盒子
2.用clip-path往浮动盒子里插入一个图形
3.用shape-outside规定该图形是一个可被包裹的封闭图形
举个例子:
DOCTYPE html>
<html lang="en">
<head>
    <meta charset="UTF-8">
    <meta http-equiv="X-UA-Compatible" content="IE=edge">
    <meta name="viewport" content="width=device-width, initial-scale=1.0">
    <title>Documenttitle>
    <style>
        .main {
            width: 500px;
        }

        .left {
            float: left;
            width: 40%;
            height: 12ex;
            background-color: lightgray;
            shape-outside: polygon(0 0, 70px 40px, 25px 80px);
            clip-path: polygon(0 0, 70px 40px, 25px 80px);
        }
    style>
head>
<body>
    <div class="main">
        <div class="left">div>
        <p>
            Sometimes a web page's text content appears to be
            funneling your attention towards a spot on the page
            to drive you to follow a particular link. Sometimes
            you don't notice.
        p>
    div>
body>
html>
效果解释:
1.先在main盒子中定义了一个left浮动盒子
2.用clip-path在left盒子中插入了一个三角形
3.shape-outside把这个三角形定义为一个可被包裹的图形
4.最终显示为文字包裹了这个三角形的效果
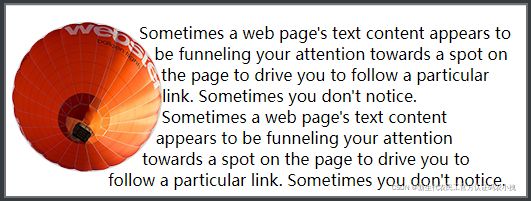
非常规图片的文字环绕效果
当图片是一个规则的长方形时,完成图片的文字环绕效果是非常轻松的。
但是当被环绕的图片是圆形或者其他非长方形的图片时,原有的方式已经不能轻松做到了。
这时候可以用shape-outside和clip-path属性配合完成。
示例:
DOCTYPE html>
<html lang="en">
<head>
    <meta charset="UTF-8">
    <meta http-equiv="X-UA-Compatible" content="IE=edge">
    <meta name="viewport" content="width=device-width, initial-scale=1.0">
    <title>Documenttitle>
    <style>
        .main {
            width: 500px;
        }

        .left {
            float: left;
            width: 150px;
            height: 150px;
            background-color: lightgray;
            shape-outside: circle(50%);
            clip-path: circle(50%);
        }
    style>
head>
<body>
    <div class="main">
        <img src="https://interactive-examples.mdn.mozilla.net/media/examples/round-balloon.png" alt="" class="left">
        <p>
            Sometimes a web page's text content appears to be
            funneling your attention towards a spot on the page
            to drive you to follow a particular link. Sometimes
            you don't notice.<br>
            Sometimes a web page's text content appears to be
            funneling your attention towards a spot on the page
            to drive you to follow a particular link. Sometimes
            you don't notice.
        p>
    div>
body>
html>
blend-mode
当若干个带有背景色的盒子重叠时,如何显示重叠区域的背景色,
就是blend-mode做的事情。
查看mode属性
如果中文页面无法显示,就切换到英文页面。
color颜色表达方法
- 关键字。 比如pink , black , transparent , currentColor
- rgb , rgba
- 十六进制符号,比如 #fff , #000, #f5f6f7
- hsl , hsla
currentColor
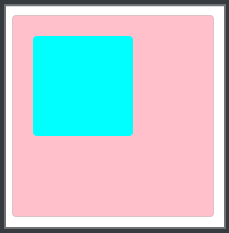
用于继承父盒子的color属性
示例:
DOCTYPE html>
<html lang="en">
<head>
    <meta charset="UTF-8">
    <meta http-equiv="X-UA-Compatible" content="IE=edge">
    <meta name="viewport" content="width=device-width, initial-scale=1.0">
    <title>Documenttitle>
    <style>
        .box {
            width: 200px;
            height: 200px;
            border: 1px solid rgba(191,191,191, .5);
            border-radius: 4px;
            color: aqua;
            background-color: pink;
        }

        .box1 {
            width: 100px;
            height: 100px;
            background-color: currentColor; /*继承自父盒子的color属性*/
            border-radius: 4px;
            margin: 20px;
        }
    style>
head>
<body>
    <div class="box">
        <div class="box1">div>
    div>
body>
html>
hsl和hsla
两者都表示色相-饱和度-亮度(Hue-saturation-lightness)模式。
类似于rgb和rgba的关系,hsl和hsla前三个参数分别表示色相-饱和度-亮度。
参数介绍:
h:表示色相,就是颜色,只不过这个颜色是用单个值来表示的

整个颜色用圆形来表示的话,每个度数都对应一个颜色。

比如red = 0deg = 360deg

green = 120deg

blue = 240deg
s和l都用百分比表示

s 的100%就是完全饱和,偏向于原色,而0%就是完全不饱和,偏向于灰色

l 的100%就是亮度最大,偏向于白色,而0%就是没有亮度,偏向于黑色。
相较于rgb和rgba,hsl和hsla更能直观的表达颜色。
hsl颜色对照表
https://drafts.csswg.org/css-color-3/#hsl-color
示例:
DOCTYPE html>
<html lang="en">
<head>
    <meta charset="UTF-8">
    <meta http-equiv="X-UA-Compatible" content="IE=edge">
    <meta name="viewport" content="width=device-width, initial-scale=1.0">
    <title>Documenttitle>
    <style>
        .box {
            width: 200px;
            height: 200px;
            border: 1px solid rgba(191,191,191, .5);
            border-radius: 4px;
            background-color: hsl(240, 25%, 54%);
        }
    style>
head>
<body>
    <div class="box">
        <div class="box1">div>
    div>
body>
html>
css功能符号
就是带小括号的一些方法,不算陌生,很多都是常用的,
比如translate() , url() , linear-gradient() , calc()等等。
还有很多功能符号,但是目前大多数是在实验阶段,浏览器不一定支持,
比如abs() , rem()等
感兴趣可以查看功能符号表:https://developer.mozilla.org/zh-CN/docs/Web/CSS/CSS_Functions
CSS 基本数据类型
没想到吧,css也有自己的基本数据类型,用<和>包裹起来表示。
类型有几十个,远远超过js的类型。
可以查看官网https://developer.mozilla.org/zh-CN/docs/Web/CSS/CSS_Types
了解基本数据类型,对于翻看文档,有相当大的帮助。
用户自定义字符串标识符规则
规则符号区分大小写,不能有歧义,且不能使用css已有的属性或关键字。
可以用以下字符组成:
- 字母(A - Z , a - z)
- 十进制数字(0 - 9)
- 连字符( - )
- 下划线( _ )
- 转义字符( \ )
- Unicode编码
示例:
DOCTYPE html>
<html lang="en">
<head>
    <meta charset="UTF-8">
    <meta http-equiv="X-UA-Compatible" content="IE=edge">
    <meta name="viewport" content="width=device-width, initial-scale=1.0">
    <title>Documenttitle>
    <style>
        .box {
            --color: pink;
            width: 200px;
            height: 200px;
            background-color: var(--color);
        }
    style>
head>
<body>
    <div class="box">div>
body>
html>
gradient渐变色
/*线性渐变*/

/*颜色值沿着一条隐式的直线逐渐过渡*/

linear-gradient()

/*径向渐变*/

/*颜色值由一个中心点(原点)向外扩散并逐渐过渡到其他颜色值*/

radial-gradient()

/*重复渐变*/

/*重复多次渐变图案直到足够填满指定元素*/

repeating-linear-gradient()
CSS盒模型
通过示例,轻松搞清楚盒模型。
先来看标准盒模型,即box-sizing: content-box;
写上这样一个示例:
DOCTYPE html>
<html lang="en">
<head>
    <meta charset="UTF-8">
    <meta http-equiv="X-UA-Compatible" content="IE=edge">
    <meta name="viewport" content="width=device-width, initial-scale=1.0">
    <title>Documenttitle>
    <style>
        .box {
            width: 200px;
            height: 200px;
            border-radius: 4px;
            border: 5px solid rgba(51,51,51, .1);
            margin: 20px;
            padding: 15px;
        }
    style>
head>
<body>
    <div class="box">div>
body>
html>
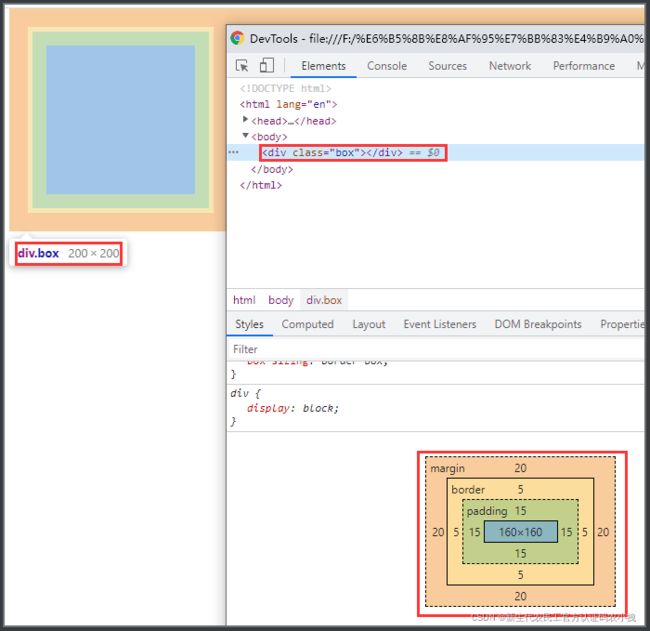
打开控制台,选择element选项,拉到最下面的位置,就可以看到这个盒子的模型了:

此时,
box的内容区域的宽高就是样式中的width和height

box的区域的宽/高 = 内容区域的宽/高 + 内边距宽/高 + 边框宽/高
改变padding和border的尺寸,会明显改变box区域的尺寸。
此时,给上面的代码加上一句代码,即
.box {
    width: 200px;
    height: 200px;
    border-radius: 4px;
    border: 5px solid rgba(51,51,51, .1);
    margin: 20px;
    padding: 15px;
    box-sizing: border-box;
}
box-sizing: border-box;让标准盒模型变成了怪异盒模型,也是IE盒模型。
可以看到,
盒子的总区域变成了200px * 200px,
padding区域把内容区域压缩了。内容区域变成了160px * 160px
此时的盒模型区域就表现为:
box的区域的宽/高 = 内容区域的宽/高 + 内边距宽/高 + 边框宽/高 。这个公式同样适用。

但是意思却完全变了。

box区域的宽高就是width和height。这是固定值了。

内容区域的宽高不受控制了,而是随着内边距和边框区域的变化而变化。

增加内边距和边框,内容区域就会被压缩;减少内边距和边框,内容区域就会往外扩张。
IE盒模型是常用的一种形式,因为设置了width和height之后,
盒子的宽高就不会因为设置了padding而发生变化了。
这在开发过程中,可以实现不错的效果。
flex-box
gap
以前用flex的时候,都是用margin来控制各个子盒子之间的间隔。
后来grid布局中用了gap属性后,flex也引入了该属性。
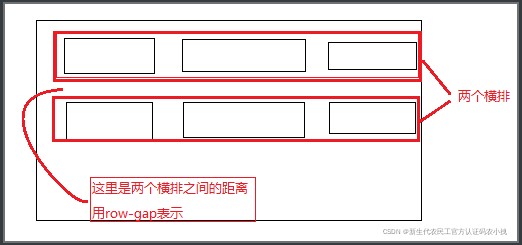
gap属性有两个值:
- row-gap 指的是每一排之间的间隔距离
- column-gap 指的是每一列之间的间隔距离
两个属性还可以合并在一起写:
gap: row-gap column-gap;
示例:
DOCTYPE html>
<html lang="en">
<head>
    <meta charset="UTF-8">
    <meta http-equiv="X-UA-Compatible" content="IE=edge">
    <meta name="viewport" content="width=device-width, initial-scale=1.0">
    <title>Documenttitle>
    <style>
        ul {
            margin: 0;
            padding: 0;
            width: 300px;
            display: flex;
            flex-wrap: wrap;
            /* row-gap: 10px; */
            /* column-gap: 20px; */
            gap: 10px 20px; /*合并在一起写*/
        }

        ul li {
            list-style-type: none;
            width: 80px;
            height: 60px;
            background-color: chartreuse;
        }
    style>
head>
<body>
    <div class="box">
        <ul>
            <li>1li>
            <li>2li>
            <li>3li>
            <li>4li>
            <li>5li>
        ul>
    div>
body>
html>
text-transform
用于单词的大小写转换。
有5个值:
none: 防止任何转型。uppercase: 将所有文本转为大写。lowercase: 将所有文本转为小写。capitalize: 转换所有单词让其首字母大写。full-width: 将所有字形转换成全角,即固定宽度的正方形,类似于等宽字体,允许拉丁字符和亚洲语言字形(如中文,日文,韩文)对齐。
示例:
DOCTYPE html>
<html lang="en">
<head>
    <meta charset="UTF-8">
    <meta http-equiv="X-UA-Compatible" content="IE=edge">
    <meta name="viewport" content="width=device-width, initial-scale=1.0">
    <title>Documenttitle>
    <style>
        .box {
            /* text-transform: capitalize; */
            text-transform: uppercase;
        }
    style>
head>
<body>
    <div class="box">
        hello world ~
    d>
body>
html>
全部转换为大写字母了。
文本布局和方向
这里会涉及到两个属性:
- writing-mode
- text-orientation
writing-mode
该性定义了文本水平或垂直排布以及在块级元素中文本的行进方向。
有如下可用的值:
text-orientation
该属性设定行中字符的方向。但是它只在writing-mode的值为vertical-rl
或vertical-lr这种纵向排列时有效。
所以该属性一定是要配合writing-mode属性,才能起作用。
以下就以vertical-rl情况下对text-orientation的值进行示例:
该属性还有个别名sideways-right,当遇到兼容性问题时,可以试试用这个。
代码示例:
DOCTYPE html>
<html lang="en">
<head>
    <meta charset="UTF-8">
    <meta http-equiv="X-UA-Compatible" content="IE=edge">
    <meta name="viewport" content="width=device-width, initial-scale=1.0">
    <title>Documenttitle>
    <style>
        .box {
            width: 200px;
            height: 400px;
            writing-mode: vertical-rl;
            text-orientation: sideways;
        }
    style>
head>
<body>
    <div class="box">
        1在小型大写字母和普通文本选项之间切换。2开启或关闭字体间距选项。3控制给定的自定义字体的替代字形的使用。4控制大写字母替代字形的使用。5控制文本中使用的连写和上下文形式。abcdefg
    d>
body>
html>
