Jetpack新组件?小部件的春天来了
/ 今日科技快讯 /
12月29日,距冬奥会倒计时40天,中国移动北京公司(北京移动)举行了冬奥保障大屏点亮仪式。据介绍,北京移动的保障大屏实现了基础网络(无线、传输、核心网)、新业务(互联网电视、5G toB),以及哑资源(井盖)的全覆盖,做到了网络全方位无死角监控保障。
/ 作者简介 /
本篇文章转自Zhujiang的博客,文章主要分享了他对Jetpack组件Glance内容的探索分析,相信会对大家有所帮助!
原文地址:
https://juejin.cn/post/7042468014251311112
/ Glance??? /
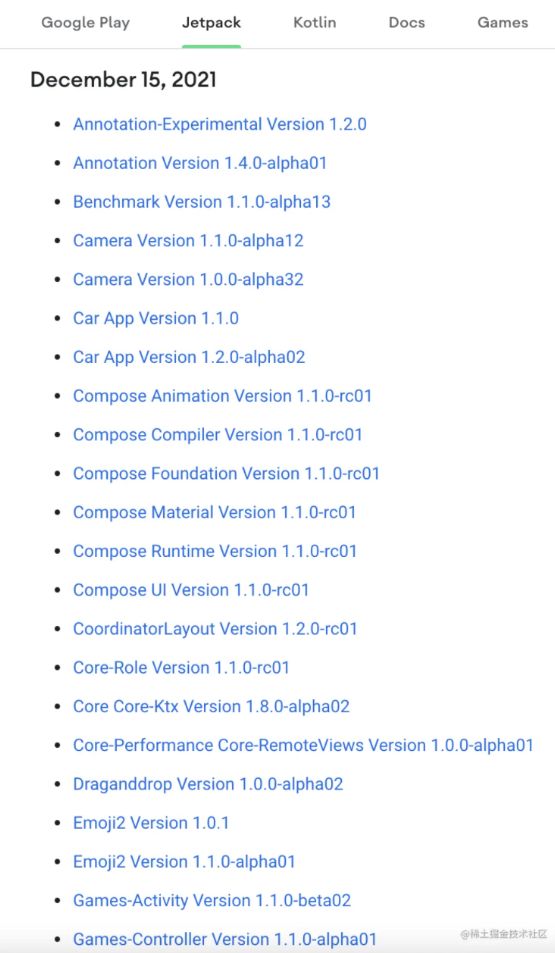
今天像往常一样进去 Google 的官方文档查看最新的依赖更新,发现昨天 Google 更新了一批依赖:
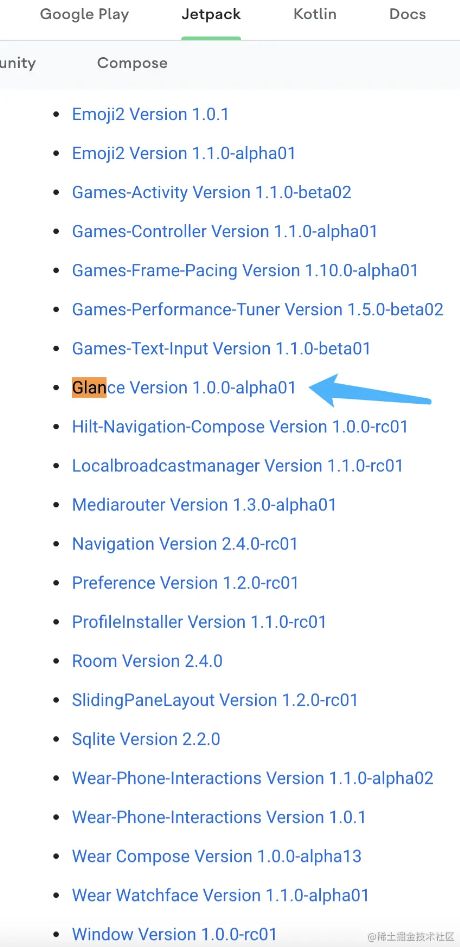
看着没啥不正常的,都是一些依赖的更新迭代,但当我往下继续滑动的时候。。。。
发现了我上面箭头标注的这个库,还是非常新鲜的,版本才 1.0.0,而且还是第一个 alpha 版本,这是个新东西啊,名字很眼熟啊!我记得郭霖大神曾经写过一个库也叫 Glance :
我还以为是郭神的库被官方给收录了,结果进去一看不是。。。
看到这个库的简介的时候给我高兴坏了,大致意思是:可以使用 Compose 风格的API为小部件构建布局。
前几天我写过一篇文章:别羡慕苹果的小部件了,安卓也有!
来介绍 Android S 中小部件的一些更新还有一些小部件的疑难杂症。小部件的问题其中有一点就是只能使用 RemotesView 来编写布局,现在看到这个库感觉问题被解决了!!!
于是乎马上打开之前写的天气应用,来试验一下!本文中的代码地址:
https://github.com/zhujiang521/PlayWeather
/ 开始撸码 /
添加依赖
使用一个库的第一步肯定是添加依赖,来看看Glance的依赖吧:
dependencies {
    implementation "androidx.glance:glance:1.0.0-alpha01"
}

android {
   buildFeatures {
       compose true
   }

   composeOptions {
       kotlinCompilerExtensionVersion = "1.1.0-rc01"
   }

   kotlinOptions {
       jvmTarget = "1.8"
   }
}
依赖添加很简单,如果你的项目中有 Compose 的话,只需要添加下 dependencies 中的内容即可,下面的应该都配置过,反之都添加下就行。
创建小部件
大家都知道,小部件其实就是一个 BroadcastReceiver ,所以咱们需要在清单文件中配置下:
上面代码都很熟悉,其中 enable 的配置项为:glance_appwidget_available,这是 Glance 库中的,无需自己添加。
需要注意的是:Glance 只支持 SDK 23 以上的应用,也就是 Android 6.0 (Marshmallow),所以 glance_appwidget_available 只是配置了下在 SDK 23 以下的版本中禁用。
下面来写下上面提到的资源 first_glance_widget_info :
只简单设置了几个配置:最小宽高、预览图像、宽高默认所占格数。
AppWidgetProvider
大家都知道之前小部件写的时候都需要继承自 AppWidgetProvider ,但如果使用 Glance 的话就不能继承 AppWidgetProvider 了,而需要继承 GlanceAppWidgetReceiver ,What ???这是个什么东西,咱们来看看 GlanceAppWidgetReceiver 的源码吧:
abstract class GlanceAppWidgetReceiver : AppWidgetProvider() {

    private companion object {
        private const val TAG = "GlanceAppWidgetReceiver"
    }

    /**
     * GlanceAppWidget的实例,用于生成应用程序Widget并将其发送到AppWidgetManager
     */
    abstract val glanceAppWidget: GlanceAppWidget

    // 更新小部件
    @CallSuper
    override fun onUpdate(
        context: Context,
        appWidgetManager: AppWidgetManager,
        appWidgetIds: IntArray
    ) {
        goAsync {
            updateManager(context)
            appWidgetIds.map { async { glanceAppWidget.update(context, appWidgetManager, it) } }
                .awaitAll()
        }
    }

    // 布局发生改变的时候刷新小部件
    @CallSuper
    override fun onAppWidgetOptionsChanged(
        context: Context,
        appWidgetManager: AppWidgetManager,
        appWidgetId: Int,
        newOptions: Bundle
    ) {
        goAsync {
            updateManager(context)
            glanceAppWidget.resize(context, appWidgetManager, appWidgetId, newOptions)
        }
    }

    @CallSuper
    override fun onDeleted(context: Context, appWidgetIds: IntArray) {
        goAsync {
            updateManager(context)
            appWidgetIds.forEach { glanceAppWidget.deleted(context, it) }
        }
    }

    // 更新小部件
    private fun CoroutineScope.updateManager(context: Context) {
        launch {
            runAndLogExceptions {
                GlanceAppWidgetManager(context)
                    .updateReceiver(this@GlanceAppWidgetReceiver, glanceAppWidget)
            }
        }
    }

    override fun onReceive(context: Context, intent: Intent) {
        runAndLogExceptions {
            if (intent.action == Intent.ACTION_LOCALE_CHANGED) {
                val appWidgetManager = AppWidgetManager.getInstance(context)
                val componentName =
                    ComponentName(context.packageName, checkNotNull(javaClass.canonicalName))
                onUpdate(
                    context,
                    appWidgetManager,
                    appWidgetManager.getAppWidgetIds(componentName)
                )
                return
            }
            super.onReceive(context, intent)
        }
    }
}
上面 GlanceAppWidgetReceiver 的代码经过删减。可以看到 GlanceAppWidgetReceiver 是一个抽象类,有一个实例 glanceAppWidget 需要子类来构建,它的类型为:GlanceAppWidget ,GlanceAppWidget 也是一个抽象类,由于类中代码过多,暂时不做详细解释,本篇文章主要讲使用。
使用 Glance 编写布局
那就来看看使用吧:
class FirstGlanceWidgetReceiver : GlanceAppWidgetReceiver() {

    override val glanceAppWidget: GlanceAppWidget = FirstGlanceWidget()

}
使用很简单,创建一个类继承 GlanceAppWidgetReceiver 并实例化 glanceAppWidget 即可。
下面来看看如何初始化 GlanceAppWidget 吧:
class FirstGlanceWidget : GlanceAppWidget() {
    @Composable
    override fun Content() {
        Column(modifier = GlanceModifier
                .fillMaxSize()
                .background(day = Color.Red, night = Color.Blue)
                .cornerRadius(10.dp)
                .padding(8.dp)
        ) {
            Text(
                text = "First Glance widget",
                modifier = GlanceModifier.fillMaxWidth(),
                style = TextStyle(fontWeight = FontWeight.Bold),
            )
        }
    }
}
来来来,开始找不同了!大家看看上面 Glance 中的 Compose 写法有啥不一样?
没错!Modifier 不一样了,现在 Modifier 变成了 GlanceModifier ,其实不止是 Modifier 变了,大家来看下别的依赖:
import androidx.compose.runtime.Composable
import androidx.compose.ui.graphics.Color
import androidx.compose.ui.unit.dp
import androidx.glance.Button
import androidx.glance.GlanceModifier
import androidx.glance.Image
import androidx.glance.ImageProvider
import androidx.glance.action.actionStartActivity
import androidx.glance.appwidget.GlanceAppWidget
import androidx.glance.appwidget.background
import androidx.glance.appwidget.cornerRadius
import androidx.glance.appwidget.lazy.LazyColumn
import androidx.glance.layout.*
import androidx.glance.text.FontWeight
import androidx.glance.text.Text
import androidx.glance.text.TextStyle
写的时候我都懵逼了。。。什么情况,这是相当于 Glance 重写了下 Compose 中的布局。
还记得之前文章中提到过,小部件中只能画一些简单的布局,我原本以为 Glance 会改变这一状况,没想到。。。。
Glance 中的可组合项
和之前的小部件其实差别不大,只能支持下面几种可组合项:Box、Row、Column、Text、Button、LazyColumn、Image、Spacer。
那就来都使用下吧:
@Composable
override fun Content() {
    Column(
        modifier = GlanceModifier
            .fillMaxSize()
            .background(day = Color.Red, night = Color.Blue)
            .cornerRadius(10.dp)
            .padding(8.dp)
    ) {
        Text(
            text = "First Glance widget",
            modifier = GlanceModifier.fillMaxWidth(),
            style = TextStyle(fontWeight = FontWeight.Bold),
        )

        Spacer(modifier = GlanceModifier.height(5.dp))
        Row {
            LazyColumn(modifier = GlanceModifier.width(150.dp)) {
                items(4) {
                    Text(text = "哈哈哈")
                }
            }
            Image(
                provider = ImageProvider(R.mipmap.back_100d),
                modifier = GlanceModifier.height(50.dp),
                contentDescription = ""
            )
        }

        Row {
            Text(text = "横着1")

            Text(text = "横着2 ", modifier = GlanceModifier.padding(10.dp))
        }

        Button(text = "Glance按钮", onClick = actionStartActivity(MainActivity::class.java))
    }
}
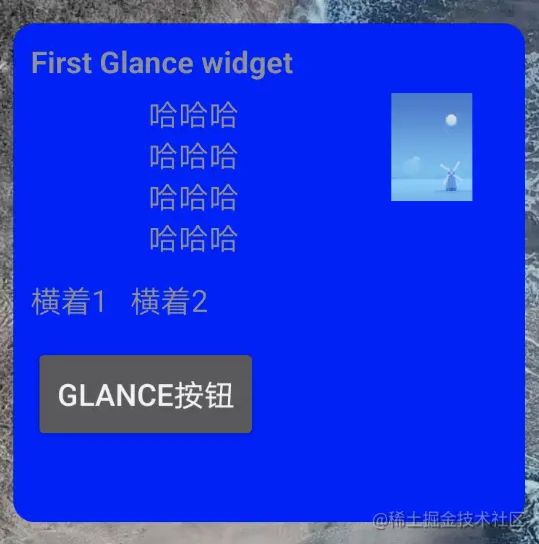
这基本把上面支持的几种可组合项给都写了一遍。到这里小部件就基本写好了,来运行看下效果吧:
基本上是预期的效果。来简单说下吧,上面说过,Glance 把用到的可组合项全部重写了一遍,大部分和之前使用方法一致,但还是有些不同的。
Image
Image 虽然看着和之前挺像,但确实不太一样了,咱们先来看下之前 Compose 中的 Image :
@Composable
fun Image(
    painter: Painter,
    contentDescription: String?,
    modifier: Modifier = Modifier,
    alignment: Alignment = Alignment.Center,
    contentScale: ContentScale = ContentScale.Fit,
    alpha: Float = DefaultAlpha,
    colorFilter: ColorFilter? = null
)
上面是之前 Compose 中的 Image 可组合项的方法定义,图片资源就是 Painter,之前如果加载图片的话需要这样写:
Image(
        modifier = modifier,
        painter = BitmapPainter(bitmap),
        contentDescription = "",
        contentScale = contentScale
    )

Image(
       modifier = modifier,
       painter = painterResource(资源id),
       contentDescription = "",
       contentScale = contentScale
    )
但是再来看下 Glance 中的 Image:
@Composable
public fun Image(
    provider: ImageProvider,
    contentDescription: String?,
    modifier: GlanceModifier = GlanceModifier,
    contentScale: ContentScale = ContentScale.Fit
)
发现了吗?有两项不一样,加载图片资源由之前的 Painter 变为了现在的 ImageProvider ,从上面也能看出 ImageProvider 的用法,再来看下吧:
// 图片资源加载
public fun ImageProvider(@DrawableRes resId: Int): ImageProvider =
    AndroidResourceImageProvider(resId)

// bitmap加载
public fun ImageProvider(bitmap: Bitmap): ImageProvider = BitmapImageProvider(bitmap)

// Icon加载
@RequiresApi(Build.VERSION_CODES.M)
public fun ImageProvider(icon: Icon): ImageProvider = IconImageProvider(icon)
可以看到,ImageProvider 有三个重载方法可以进行实例化,基本满足了加载 Image 的需求。
Button
上面的代码中可以看到 Button 也和之前的不太一样,来看下之前的 Button 吧:
@Composable
fun Button(
    onClick: () -> Unit,
    modifier: Modifier = Modifier,
    enabled: Boolean = true,
    interactionSource: MutableInteractionSource = remember { MutableInteractionSource() },
    elevation: ButtonElevation? = ButtonDefaults.elevation(),
    shape: Shape = MaterialTheme.shapes.small,
    border: BorderStroke? = null,
    colors: ButtonColors = ButtonDefaults.buttonColors(),
    contentPadding: PaddingValues = ButtonDefaults.ContentPadding,
    content: @Composable RowScope.() -> Unit
)
这是 Compose 中的 Button ,大家都很熟悉,再来看下 Glance 中的 Button 吧:
@Composable
fun Button(
    text: String,
    onClick: Action,
    modifier: GlanceModifier = GlanceModifier,
    enabled: Boolean = true,
    style: TextStyle? = null,
    maxLines: Int = Int.MAX_VALUE,
)
又到了找不同的时间了,这两个 Button 有啥不同?
没错,onClick 不一样,之前的是点击回调事件,而现在的是 Action,这又是一个比较多的内容了,咱们在下面说。
/ 为啥要使用 Glance /
我在使用这个库的时候一直在考虑这个问题,我为啥要使用这个库呢?为了多导入一些包?为了写法更加复杂一些?为了项目之后更难维护(考虑别人共同维护)?
更方便的 Action
以前咱们使用小部件的时候都少不了一个东西:PendingIntent ,但是现在在 Glance 中不需要了,改为了更为方便的 Action 。
Action 启动 Activity
先来看看使用 Action 启动 Activity 吧:
// 包名启动
public fun actionStartActivity(
    componentName: ComponentName,
    parameters: ActionParameters = actionParametersOf()
): Action = StartActivityComponentAction(componentName, parameters)

// 类名启动
public fun  actionStartActivity(
    activity: Class,
    parameters: ActionParameters = actionParametersOf()
): Action = StartActivityClassAction(activity, parameters)

// 内联函数,调用actionStartActivity
public inline fun  actionStartActivity(
    parameters: ActionParameters = actionParametersOf()
): Action = actionStartActivity(T::class.java, parameters)
可以看到,有几种写的方法,来看看调用方法吧:
Button(text = "Glance按钮", onClick = actionStartActivity(ComponentName("包名","包名+类名")))
Button(text = "Glance按钮", onClick = actionStartActivity())
Button(text = "Glance按钮", onClick = actionStartActivity(MainActivity::class.java))
Action 执行回调任务
先来看看源码吧:
public fun  actionRunCallback(
    callbackClass: Class,
    parameters: ActionParameters = actionParametersOf()
): Action = RunCallbackAction(callbackClass, parameters)

public inline fun  actionRunCallback(
    parameters: ActionParameters = actionParametersOf()
): Action = actionRunCallback(T::class.java, parameters)
代码很简单,来看下如何使用吧。
首先需要创建一个类,并实现 ActionCallback :
class ActionCallbacks:ActionCallback{
    override suspend fun onRun(context: Context, glanceId: GlanceId, parameters: ActionParameters) {
        // 执行需要的操作
    }
}
然后就可以进行正常调用了:
Button(text = "Glance按钮", onClick = actionRunCallback())
Button(text = "Glance按钮", onClick = actionRunCallback(ActionCallbacks::class.java))
Action 启动 Service
同样先来看看源码吧:
public fun actionStartService(intent: Intent, isForegroundService: Boolean = false): Action =
    StartServiceIntentAction(intent, isForegroundService)

public fun actionStartService(
    componentName: ComponentName,
    isForegroundService: Boolean = false
): Action = StartServiceComponentAction(componentName, isForegroundService)

public fun  actionStartService(
    service: Class,
    isForegroundService: Boolean = false
): Action =
    StartServiceClassAction(service, isForegroundService)

public inline fun  actionStartService(
    isForegroundService: Boolean = false
): Action = actionStartService(T::class.java, isForegroundService)
看到方法就知道使用方法了,首先也需要创建一个 Service :
class TestService : Service() {
    override fun onBind(intent: Intent?): IBinder? {
        TODO("Not yet implemented")
    }
}
接下来看如何使用吧:
// Service
Button(text = "Glance按钮", onClick = actionStartService())
Button(text = "Glance按钮", onClick = actionStartService(TestService::class.java))
Action 启动广播
public fun actionStartBroadcastReceiver(
    action: String,
    componentName: ComponentName? = null
): Action = StartBroadcastReceiverActionAction(action, componentName)

public fun actionStartBroadcastReceiver(intent: Intent): Action =
    StartBroadcastReceiverIntentAction(intent)

public fun actionStartBroadcastReceiver(componentName: ComponentName): Action =
    StartBroadcastReceiverComponentAction(componentName)

public fun  actionStartBroadcastReceiver(receiver: Class): Action = StartBroadcastReceiverClassAction(receiver)

public inline fun  actionStartBroadcastReceiver(): Action = actionStartBroadcastReceiver(T::class.java)
在小部件中启动广播一般都是发送给自己,所以这里就不重新创建一个广播了,直接来看如何使用吧:
// 广播
Button(text = "Glance按钮", onClick = actionStartBroadcastReceiver())
Button(text = "Glance按钮", onClick = actionStartBroadcastReceiver(FirstGlanceWidgetReceiver::class.java))
ActionParameters
其实 ActionParameters 在上面出现过很多回, ActionParameters 的作用就是为 Action 提供参数。来看下源码吧:
public class Key (public val name: String) {
    public infix fun to(value: T): Pair = Pair(this, value)
}

public fun actionParametersOf(vararg pairs: ActionParameters.Pair): ActionParameters =
    mutableActionParametersOf(*pairs)
来看下使用吧:
val test = ActionParameters.Key("test")
val testInt = ActionParameters.Key("test")
actionParametersOf(test to "测试", testInt to 123)
是不是很简单,获取的时候也很简单:
override suspend fun onRun(context: Context, glanceId: GlanceId, parameters: ActionParameters) {
    // 执行需要的操作
    val testString = requireNotNull(parameters[test])
    val testInt = requireNotNull(parameters[testInt])
}
更方便的 LocalXXX
使用过 Compose 的童鞋都知道 Compose 中的 LocalContext 非常方便,随处可以使用 LocalContext ,在 Glance 中也同样可以使用,不过也要注意包的导入问题,还可以使用更多的 LocalXXX ,来看下源码吧:
// 生成的概览视图的大小。概览视图至少有那么多空间可以显示
public val LocalSize = staticCompositionLocalOf { error("No default size") }

// Context
public val LocalContext = staticCompositionLocalOf { error("No default context") }

// 局部视图状态,在表面实现中定义。用于查看特定状态数据的可定制存储。
public val LocalState =
    staticCompositionLocalOf { null }

// glance的id
public val LocalGlanceId = staticCompositionLocalOf { error("No default glance id") }
大概的意思都写在了注释中,大家可以随意使用。
更简单的布局适配
Glance 中使用 SizeMode 来适配布局,来看下 SizeMode 源码吧:
public sealed interface SizeMode {
    // 提供单一的用户界面
    public object Single : SizeMode {
        public override fun toString(): String = "SizeMode.Single"
    }

    // 为 App Widget 可能显示的每种尺寸提供一个 UI。尺寸列表由选项包提供
    public object Exact : SizeMode {
        public override fun toString(): String = "SizeMode.Exact"
    }

    // 为一组固定大小提供 UI
    public class Responsive(val sizes: Set) : SizeMode
}
可以看到 SizeMode 是一个接口,一共有三个类实现了 SizeMode 接口,含义都写在了注释中。下面来看下使用方法吧:
when (val localSizeMode = this.sizeMode) {
    is SizeMode.Single -> {
        // 单一的用户界面
    }
    is SizeMode.Exact -> {
        // 可能显示的每种尺寸
    }
    is SizeMode.Responsive -> {
        // 为一组固定大小提供 UI
    }
其实 SizeMode 在 GlanceAppWidget 源码中已经做了使用,大家如果想看详细使用方法可以去查看 GlanceAppWidget 的源码。
/ 精致的结尾 /
今天所讲的 Glance 其实也是基于 Compose 的,由此可见,Google 现在对 Compose 发力非常足。
推荐阅读:
我的新书,《第一行代码 第3版》已出版!
在微软工作365天,还你一个我眼中更加真实的微软
Jetpack全家桶中最受欢迎的一定是它
欢迎关注我的公众号
学习技术或投稿
![]()
长按上图,识别图中二维码即可关注


