作者:狂乱的贵公子
来源:https://www.cnblogs.com/cjsblog/p/10548022.html
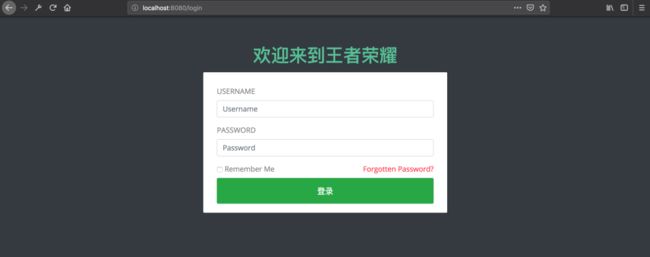
技术这东西吧,看别人写的好像很简单似的,到自己去写的时候就各种问题,“一看就会,一做就错”。网上关于实现SSO的文章一大堆,但是当你真的照着写的时候就会发现根本不是那么回事儿,简直让人抓狂,尤其是对于我这样的菜鸟。几经曲折,终于搞定了,决定记录下来,以便后续查看。先来看一下效果
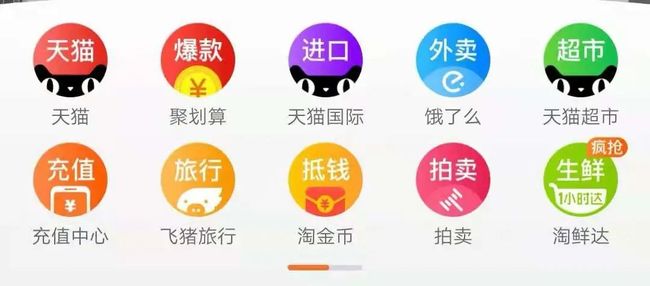
最常见的例子是,我们打开淘宝APP,首页就会有天猫、聚划算等服务的链接,当你点击以后就直接跳过去了,并没有让你再登录一次
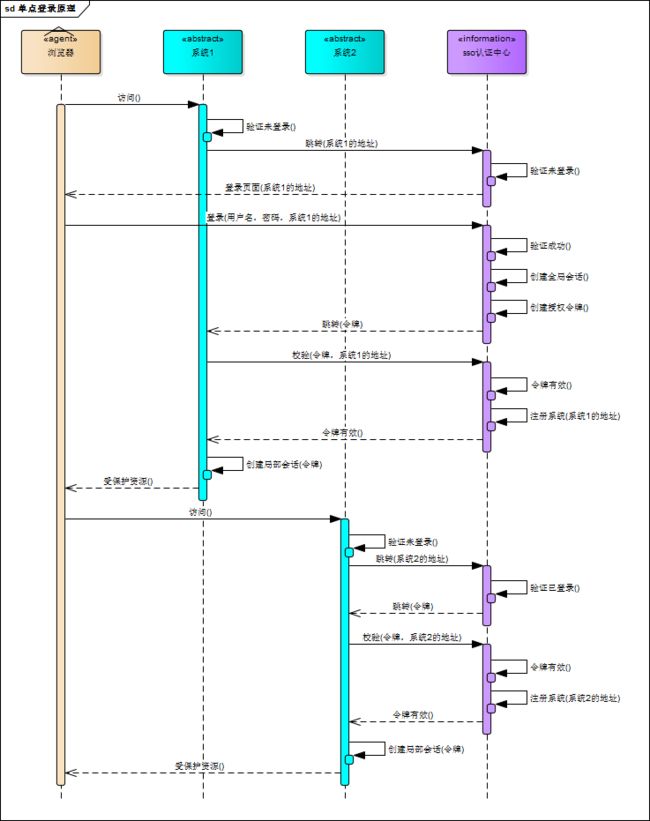
下面这个图是我再网上找的,我觉得画得比较明白:
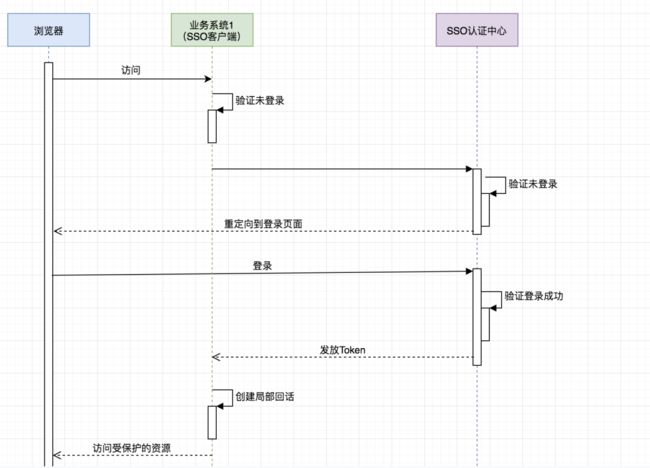
可惜有点儿不清晰,于是我又画了个简版的:
重要的是理解:
SSO服务端和SSO客户端直接是通过授权以后发放Token的形式来访问受保护的资源
相对于浏览器来说,业务系统是服务端,相对于SSO服务端来说,业务系统是客户端
浏览器和业务系统之间通过会话正常访问
不是每次浏览器请求都要去SSO服务端去验证,只要浏览器和它所访问的服务端的会话有效它就可以正常访问
推荐以下几篇博客
《OAuth 2.0》
《Spring Security对OAuth2的支持》
接下来,只讲跟本例相关的一些配置,不讲原理,不讲为什么
众所周知,在OAuth2在有授权服务器、资源服务器、客户端这样几个角色,当我们用它来实现SSO的时候是不需要资源服务器这个角色的,有授权服务器和客户端就够了。
授权服务器当然是用来做认证的,客户端就是各个应用系统,我们只需要登录成功后拿到用户信息以及用户所拥有的权限即可
之前我一直认为把那些需要权限控制的资源放到资源服务器里保护起来就可以实现权限控制,其实是我想错了,权限控制还得通过Spring Security或者自定义拦截器来做
在本例中,一定要分清楚这几个的作用
首先,SSO是一种思想,或者说是一种解决方案,是抽象的,我们要做的就是按照它的这种思想去实现它
其次,OAuth2是用来允许用户授权第三方应用访问他在另一个服务器上的资源的一种协议,它不是用来做单点登录的,但我们可以利用它来实现单点登录。在本例实现SSO的过程中,受保护的资源就是用户的信息(包括,用户的基本信息,以及用户所具有的权限),而我们想要访问这这一资源就需要用户登录并授权,OAuth2服务端负责令牌的发放等操作,这令牌的生成我们采用JWT,也就是说JWT是用来承载用户的Access_Token的
最后,Spring Security是用于安全访问的,这里我们我们用来做访问权限控制
4.0.0
org.springframework.boot
spring-boot-starter-parent
2.1.3.RELEASE
com.cjs.sso
oauth2-sso-auth-server
0.0.1-SNAPSHOT
oauth2-sso-auth-server
1.8
org.springframework.boot
spring-boot-starter-data-jpa
org.springframework.boot
spring-boot-starter-data-redis
org.springframework.boot
spring-boot-starter-security
org.springframework.security.oauth.boot
spring-security-oauth2-autoconfigure
2.1.3.RELEASE
org.springframework.boot
spring-boot-starter-thymeleaf
org.springframework.boot
spring-boot-starter-web
org.springframework.session
spring-session-data-redis
mysql
mysql-connector-java
runtime
org.projectlombok
lombok
true
org.springframework.boot
spring-boot-starter-test
test
org.springframework.security
spring-security-test
test
org.apache.commons
commons-lang3
3.8.1
com.alibaba
fastjson
1.2.56
org.springframework.boot
spring-boot-maven-plugin
这里面最重要的依赖是:spring-security-oauth2-autoconfigure
spring:
datasource:
url: jdbc:mysql://localhost:3306/permission
username: root
password: 123456
driver-class-name: com.mysql.jdbc.Driver
jpa:
show-sql: true
session:
store-type: redis
redis:
host: 127.0.0.1
password: 123456
port: 6379
server:
port: 8080
package com.cjs.sso.config;
import org.springframework.beans.factory.annotation.Autowired;
import org.springframework.context.annotation.Bean;
import org.springframework.context.annotation.Configuration;
import org.springframework.context.annotation.Primary;
import org.springframework.security.core.token.DefaultToken;
import org.springframework.security.oauth2.config.annotation.configurers.ClientDetailsServiceConfigurer;
import org.springframework.security.oauth2.config.annotation.web.configuration.AuthorizationServerConfigurerAdapter;
import org.springframework.security.oauth2.config.annotation.web.configuration.EnableAuthorizationServer;
import org.springframework.security.oauth2.config.annotation.web.configurers.AuthorizationServerEndpointsConfigurer;
import org.springframework.security.oauth2.config.annotation.web.configurers.AuthorizationServerSecurityConfigurer;
import org.springframework.security.oauth2.provider.token.DefaultTokenServices;
import org.springframework.security.oauth2.provider.token.TokenStore;
import org.springframework.security.oauth2.provider.token.store.JwtAccessTokenConverter;
import org.springframework.security.oauth2.provider.token.store.JwtTokenStore;
import javax.sql.DataSource;
/**
* @author ChengJianSheng
* @date 2019-02-11
*/
@Configuration
@EnableAuthorizationServer
public class AuthorizationServerConfig extends AuthorizationServerConfigurerAdapter {
@Autowired
private DataSource dataSource;
@Override
public void configure(AuthorizationServerSecurityConfigurer security) throws Exception {
security.allowFormAuthenticationForClients();
security.tokenKeyAccess("isAuthenticated()");
}
@Override
public void configure(ClientDetailsServiceConfigurer clients) throws Exception {
clients.jdbc(dataSource);
}
@Override
public void configure(AuthorizationServerEndpointsConfigurer endpoints) throws Exception {
endpoints.accessTokenConverter(jwtAccessTokenConverter());
endpoints.tokenStore(jwtTokenStore());
// endpoints.tokenServices(defaultTokenServices());
}
/*@Primary
@Bean
public DefaultTokenServices defaultTokenServices() {
DefaultTokenServices defaultTokenServices = new DefaultTokenServices();
defaultTokenServices.setTokenStore(jwtTokenStore());
defaultTokenServices.setSupportRefreshToken(true);
return defaultTokenServices;
}*/
@Bean
public JwtTokenStore jwtTokenStore() {
return new JwtTokenStore(jwtAccessTokenConverter());
}
@Bean
public JwtAccessTokenConverter jwtAccessTokenConverter() {
JwtAccessTokenConverter jwtAccessTokenConverter = new JwtAccessTokenConverter();
jwtAccessTokenConverter.setSigningKey("cjs"); // Sets the JWT signing key
return jwtAccessTokenConverter;
}
}
说明:
别忘了**@EnableAuthorizationServer**
Token存储采用的是JWT
客户端以及登录用户这些配置存储在数据库,为了减少数据库的查询次数,可以从数据库读出来以后再放到内存中
package com.cjs.sso.config;
import com.cjs.sso.service.MyUserDetailsService;
import org.springframework.beans.factory.annotation.Autowired;
import org.springframework.context.annotation.Bean;
import org.springframework.context.annotation.Configuration;
import org.springframework.security.config.annotation.authentication.builders.AuthenticationManagerBuilder;
import org.springframework.security.config.annotation.web.builders.HttpSecurity;
import org.springframework.security.config.annotation.web.builders.WebSecurity;
import org.springframework.security.config.annotation.web.configuration.EnableWebSecurity;
import org.springframework.security.config.annotation.web.configuration.WebSecurityConfigurerAdapter;
import org.springframework.security.crypto.bcrypt.BCryptPasswordEncoder;
import org.springframework.security.crypto.password.PasswordEncoder;
/**
* @author ChengJianSheng
* @date 2019-02-11
*/
@Configuration
@EnableWebSecurity
public class WebSecurityConfig extends WebSecurityConfigurerAdapter {
@Autowired
private MyUserDetailsService userDetailsService;
@Override
protected void configure(AuthenticationManagerBuilder auth) throws Exception {
auth.userDetailsService(userDetailsService).passwordEncoder(passwordEncoder());
}
@Override
public void configure(WebSecurity web) throws Exception {
web.ignoring().antMatchers("/assets/**", "/css/**", "/images/**");
}
@Override
protected void configure(HttpSecurity http) throws Exception {
http.formLogin()
.loginPage("/login")
.and()
.authorizeRequests()
.antMatchers("/login").permitAll()
.anyRequest()
.authenticated()
.and().csrf().disable().cors();
}
@Bean
public PasswordEncoder passwordEncoder() {
return new BCryptPasswordEncoder();
}
}
package com.cjs.sso.controller;
import org.springframework.stereotype.Controller;
import org.springframework.web.bind.annotation.GetMapping;
/**
* @author ChengJianSheng
* @date 2019-02-12
*/
@Controller
public class LoginController {
@GetMapping("/login")
public String login() {
return "login";
}
@GetMapping("/")
public String index() {
return "index";
}
}
自定义登录页面的时候,只需要准备一个登录页面,然后写个Controller令其可以访问到即可,登录页面表单提交的时候method一定要是post,最重要的时候action要跟访问登录页面的url一样
千万记住了,访问登录页面的时候是GET请求,表单提交的时候是POST请求,其它的就不用管了
Ela Admin - HTML5 Admin Template
欢迎来到王者荣耀
登录账户
package com.cjs.sso.domain;
import lombok.Data;
import org.springframework.security.core.GrantedAuthority;
import org.springframework.security.core.userdetails.User;
import java.util.Collection;
/**
* 大部分时候直接用User即可不必扩展
* @author ChengJianSheng
* @date 2019-02-11
*/
@Data
public class MyUser extends User {
private Integer departmentId; // 举个例子,部门ID
private String mobile; // 举个例子,假设我们想增加一个字段,这里我们增加一个mobile表示手机号
public MyUser(String username, String password, Collection extends GrantedAuthority> authorities) {
super(username, password, authorities);
}
public MyUser(String username, String password, boolean enabled, boolean accountNonExpired, boolean credentialsNonExpired, boolean accountNonLocked, Collection extends GrantedAuthority> authorities) {
super(username, password, enabled, accountNonExpired, credentialsNonExpired, accountNonLocked, authorities);
}
}
加载登录账户
package com.cjs.sso.service;
import com.alibaba.fastjson.JSON;
import com.cjs.sso.domain.MyUser;
import com.cjs.sso.entity.SysPermission;
import com.cjs.sso.entity.SysUser;
import lombok.extern.slf4j.Slf4j;
import org.springframework.beans.factory.annotation.Autowired;
import org.springframework.security.core.authority.SimpleGrantedAuthority;
import org.springframework.security.core.userdetails.UserDetails;
import org.springframework.security.core.userdetails.UserDetailsService;
import org.springframework.security.core.userdetails.UsernameNotFoundException;
import org.springframework.security.crypto.password.PasswordEncoder;
import org.springframework.stereotype.Service;
import org.springframework.util.CollectionUtils;
import java.util.ArrayList;
import java.util.List;
/**
* @author ChengJianSheng
* @date 2019-02-11
*/
@Slf4j
@Service
public class MyUserDetailsService implements UserDetailsService {
@Autowired
private PasswordEncoder passwordEncoder;
@Autowired
private UserService userService;
@Autowired
private PermissionService permissionService;
@Override
public UserDetails loadUserByUsername(String username) throws UsernameNotFoundException {
SysUser sysUser = userService.getByUsername(username);
if (null == sysUser) {
log.warn("用户{}不存在", username);
throw new UsernameNotFoundException(username);
}
List permissionList = permissionService.findByUserId(sysUser.getId());
List authorityList = new ArrayList<>();
if (!CollectionUtils.isEmpty(permissionList)) {
for (SysPermission sysPermission : permissionList) {
authorityList.add(new SimpleGrantedAuthority(sysPermission.getCode()));
}
}
MyUser myUser = new MyUser(sysUser.getUsername(), passwordEncoder.encode(sysUser.getPassword()), authorityList);
log.info("登录成功!用户: {}", JSON.toJSONString(myUser));
return myUser;
}
}
当我们看到这个界面的时候,表示认证服务器配置完成
4.0.0
org.springframework.boot
spring-boot-starter-parent
2.1.3.RELEASE
com.cjs.sso
oauth2-sso-client-member
0.0.1-SNAPSHOT
oauth2-sso-client-member
Demo project for Spring Boot
1.8
org.springframework.boot
spring-boot-starter-data-jpa
org.springframework.boot
spring-boot-starter-oauth2-client
org.springframework.boot
spring-boot-starter-security
org.springframework.security.oauth.boot
spring-security-oauth2-autoconfigure
2.1.3.RELEASE
org.springframework.boot
spring-boot-starter-thymeleaf
org.thymeleaf.extras
thymeleaf-extras-springsecurity5
3.0.4.RELEASE
org.springframework.boot
spring-boot-starter-web
com.h2database
h2
runtime
org.projectlombok
lombok
true
org.springframework.boot
spring-boot-starter-test
test
org.springframework.security
spring-security-test
test
org.springframework.boot
spring-boot-maven-plugin
server:
port: 8082
servlet:
context-path: /memberSystem
security:
oauth2:
client:
client-id: UserManagement
client-secret: user123
access-token-uri: http://localhost:8080/oauth/token
user-authorization-uri: http://localhost:8080/oauth/authorize
resource:
jwt:
key-uri: http://localhost:8080/oauth/token_key
img
这里context-path不要设成/,不然重定向获取code的时候回被拦截
package com.cjs.example.config;
import com.cjs.example.util.EnvironmentUtils;
import org.springframework.beans.factory.annotation.Autowired;
import org.springframework.boot.autoconfigure.security.oauth2.client.EnableOAuth2Sso;
import org.springframework.context.annotation.Configuration;
import org.springframework.security.config.annotation.web.builders.HttpSecurity;
import org.springframework.security.config.annotation.web.builders.WebSecurity;
import org.springframework.security.config.annotation.web.configuration.WebSecurityConfigurerAdapter;
/**
* @author ChengJianSheng
* @date 2019-03-03
*/
@EnableOAuth2Sso
@Configuration
public class WebSecurityConfig extends WebSecurityConfigurerAdapter {
@Autowired
private EnvironmentUtils environmentUtils;
@Override
public void configure(WebSecurity web) throws Exception {
web.ignoring().antMatchers("/bootstrap/**");
}
@Override
protected void configure(HttpSecurity http) throws Exception {
if ("local".equals(environmentUtils.getActiveProfile())) {
http.authorizeRequests().anyRequest().permitAll();
}else {
http.logout().logoutSuccessUrl("http://localhost:8080/logout")
.and()
.authorizeRequests()
.anyRequest().authenticated()
.and()
.csrf().disable();
}
}
}
说明:
最重要的注解是@EnableOAuth2Sso
权限控制这里采用Spring Security方法级别的访问控制,结合Thymeleaf可以很容易做权限控制
顺便多提一句,如果是前后端分离的话,前端需求加载用户的权限,然后判断应该显示那些按钮那些菜单
package com.cjs.example.controller;
import org.springframework.security.access.prepost.PreAuthorize;
import org.springframework.security.core.Authentication;
import org.springframework.stereotype.Controller;
import org.springframework.web.bind.annotation.GetMapping;
import org.springframework.web.bind.annotation.PostMapping;
import org.springframework.web.bind.annotation.RequestMapping;
import org.springframework.web.bind.annotation.ResponseBody;
import java.security.Principal;
/**
* @author ChengJianSheng
* @date 2019-03-03
*/
@Controller
@RequestMapping("/member")
public class MemberController {
@GetMapping("/list")
public String list() {
return "member/list";
}
@GetMapping("/info")
@ResponseBody
public Principal info(Principal principal) {
return principal;
}
@GetMapping("/me")
@ResponseBody
public Authentication me(Authentication authentication) {
return authentication;
}
@PreAuthorize("hasAuthority('member:save')")
@ResponseBody
@PostMapping("/add")
public String add() {
return "add";
}
@PreAuthorize("hasAuthority('member:detail')")
@ResponseBody
@GetMapping("/detail")
public String detail() {
return "detail";
}
}
server:
port: 8083
servlet:
context-path: /orderSystem
security:
oauth2:
client:
client-id: OrderManagement
client-secret: order123
access-token-uri: http://localhost:8080/oauth/token
user-authorization-uri: http://localhost:8080/oauth/authorize
resource:
jwt:
key-uri: http://localhost:8080/oauth/token_key
退出就是清空用于与SSO客户端建立的所有的会话,简单的来说就是使所有端点的Session失效,如果想做得更好的话可以令Token失效,但是由于我们用的JWT,故而撤销Token就不是那么容易,关于这一点,在官网上也有提到:
本例中采用的方式是在退出的时候先退出业务服务器,成功以后再回调认证服务器,但是这样有一个问题,就是需要主动依次调用各个业务服务器的logout
附上源码:https://github.com/chengjiansheng/cjs-oauth2-sso-demo.git
https://www.cnblogs.com/cjsblog/p/9174797.html
https://www.cnblogs.com/cjsblog/p/9184173.html
https://www.cnblogs.com/cjsblog/p/9230990.html
https://www.cnblogs.com/cjsblog/p/9277677.html
https://blog.csdn.net/fooelliot/article/details/83617941
http://blog.leapoahead.com/2015/09/07/user-authentication-with-jwt/
https://www.cnblogs.com/lihaoyang/p/8581077.html
https://www.cnblogs.com/charlypage/p/9383420.html
http://www.360doc.com/content/18/0306/17/16915_734789216.shtml
https://blog.csdn.net/chenjianandiyi/article/details/78604376
https://www.baeldung.com/spring-security-oauth-jwt
https://www.baeldung.com/spring-security-oauth-revoke-tokens
https://www.reinforce.cn/t/630.html
https://projects.spring.io/spring-security-oauth/docs/oauth2.html
https://docs.spring.io/spring-security-oauth2-boot/docs/2.1.3.RELEASE/reference/htmlsingle/
https://docs.spring.io/spring-security-oauth2-boot/docs/2.1.3.RELEASE/
https://docs.spring.io/spring-security-oauth2-boot/docs/
https://docs.spring.io/spring-boot/docs/2.1.3.RELEASE/
https://docs.spring.io/spring-boot/docs/
https://docs.spring.io/spring-framework/docs/
https://docs.spring.io/spring-framework/docs/5.1.4.RELEASE/
https://spring.io/guides/tutorials/spring-boot-oauth2/
https://docs.spring.io/spring-security/site/docs/current/reference/htmlsingle/#core-services-password-encoding
https://spring.io/projects/spring-cloud-security
https://cloud.spring.io/spring-cloud-security/single/spring-cloud-security.html
https://docs.spring.io/spring-session/docs/current/reference/html5/guides/java-security.html
https://docs.spring.io/spring-session/docs/current/reference/html5/guides/boot-redis.html#boot-spring-configuration
Springboot启动扩展点超详细总结,再也不怕面试官问了
List去除重复数据的五种方式,学到了...
SpringBoot操作ES进行各种高级查询(必须收藏)
10w行级别数据的Excel导入优化记录
再见,HttpClient!再见,Okhttp!
使用Docker部署SpringBoot+Vue系统
快试试Java8中的StringJoiner吧,真香!
点击阅读全文前往微服务电商教程