手把手带你入门机器学习2——线性回归代码实现
上一篇文章《手把手带你入门机器学习1——线性回归》讲述了线性回归的概念,以及如何使用梯度下降算法实现线性回归。本文延续上一篇的内容,根据《Machine Learning》课程中的练习1的内容,使用python来实现线性回归的过程。
1.可视化数据集
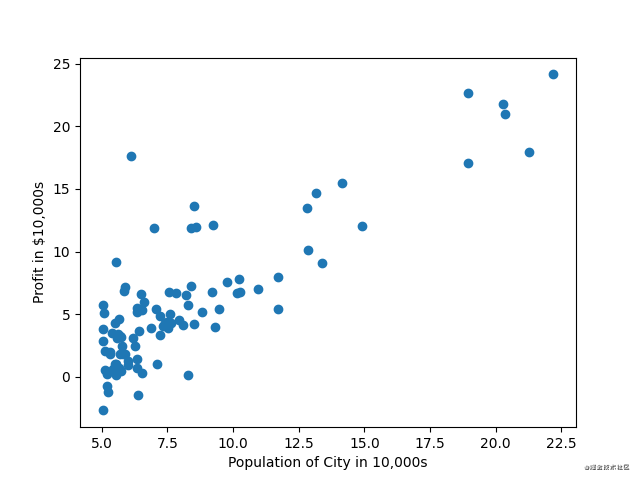
这里为了方便演示与计算,选择了只有1个特征值的数据集。这个数据集的第一列描述了一个城市的人口数量,设置为特征值X,第二列代表了这个城市快餐车的收益,设置为标签y。
csv_reader = csv.reader(open('ex1data1.txt', 'r'))
X = []
y = []
for line in csv_reader:
    X.append(float(line[0]))
    y.append(float(line[1]))
X = np.array(X)
y = np.array(y)
plt.scatter(X, y)
plt.ylabel('Profit in $10,000s')
plt.xlabel('Population of City in 10,000s')
plt.show()
通过上面的代码,将ex1data1.txt中数据,保存到X和y中。我们使用散点图的方式可视化数据,得到如下图像。通过该图,可以大致看出城市人口与收益之间的关系,是一种近似线性的关系。
2.实现损失函数
这里我们可以用上一篇文章中提到的公式来表示这种关系,这里的 x 0 x_0 x0为常量1,添加一个 x 0 x_0 x0是为了方便编程计算:
H = θ 0 x 0 + θ 1 x 1 H=\theta_0x_0+\theta_1x_1 H=θ0x0+θ1x1 (1)
为了计算出 θ 0 \theta_0 θ0和 θ 1 \theta_1 θ1的值,我们首先需要建立损失函数,公式是之前提到过的,如下:
J = 1 2 m ∑ i = 1 m ( H − y ( i ) ) 2 J=\frac{1}{2m} \sum_{i=1}^m(H-y^{(i)})^2 J=2m1∑i=1m(H−y(i))2 (2)
代码实现如下
def computeCost(X, y, theta):
    #获取样本数量
    m = y.shape[0]
    J = 0
    #遍历所有样本,计算H-y的值,然后累计相加。
    for i in range(m):
        h = np.matmul(X[i,:], theta)
        J = J + (h - y[i])**2
    #根据公式,最后计算出J。
    J = J / 2 / m
    return J
完成计算损失函数的代码后,可以使用下列代码验证损失函数程序是否正确。
theta = np.zeros([2,1])
X = np.hstack([np.ones([X.shape[0],1]), X[:,np.newaxis]])

J = computeCost(X, y, theta)
#使用两个0作为theta的值,计算出损失值。
print('With theta = [0 ; 0]\nCost computed = %f' % (J,));
#预期的损失值,如果一直说明损失函数正确。
print('Expected cost value (approx) 32.07\n');


J = computeCost(X, y, np.array([[-1], [2]]))
#使用-1和2作为theta的值,计算出损失值。
print('\nWith theta = [-1 ; 2]\nCost computed = %f' % (J,));
#预期的损失值,如果一直说明损失函数正确。
print('Expected cost value (approx) 54.24\n');
3.实现梯度下降
下面是本篇文章核心的内容,使用python实现梯度下降算法。根据之前的内容,已知更新 θ \theta θ的方法如下:
reapeat{
θ j : = θ j − α ∂ ∂ θ j J ( θ 0 , θ 1 , . . . , θ n ) \theta_j := \theta_j - \alpha\frac{\partial}{\partial\theta_j}J(\theta_0,\theta_1,...,\theta_n) θj:=θj−α∂θj∂J(θ0,θ1,...,θn) (4)
}
上述公式中,损失函数J对 θ j \theta_j θj求偏导,我们已知损失函数J,所以可以对上述公式进一步展开:
reapeat{
θ j : = θ j − α 1 m ∑ i = 1 m ( h ( x i ) − y i ) x j i \theta_j := \theta_j - \alpha\frac{1}{m}\sum_{i=1}^m(h(x^i)-y^i)x_j^i θj:=θj−αm1∑i=1m(h(xi)−yi)xji (4)
}
这样我们的迭代算法就很清晰了,上面公式中除了 θ \theta θ以外,都是可以获取的,实现的代码如下:
def gradientDescent(X, y, theta, alpha, num_iters):
    m = y.shape[0]
    n = theta.shape[0]
    #根据num_iters参数,迭代对应的次数。
    for iter in range(num_iters):
        k = np.zeros([m, 1])
        p = np.zeros([n, 1])
        #根据公式计算求和符号里的部分
        for i in range(m):
            X_tmp = np.expand_dims(X[i,:],0)
            k[i] = np.matmul(X_tmp, theta) - y[i]
            p = p + k[i] * np.transpose(X_tmp,[1,0])
            pass
        p = p / m
        #迭代更新theta参数
        theta = theta - alpha * p
        pass
    #迭代结束后,返回梯度下降得到的参数。
    return theta
在主程序里调用梯度下降算法函数,学习率设置为0.01,迭代次数为1500。
alpha = 0.01
iterations = 1500
theta = gradientDescent(X, y, theta, alpha, iterations)


print('Theta found by gradient descent:');
print(theta[0], theta[1]);
print('Expected theta values (approx)');
print(' -3.6303\n  1.1664');

plt.scatter(X[:,1], y)
plt.plot(X[:,1], np.matmul(X, theta),'r')
plt.ylabel('Profit in $10,000s')
plt.xlabel('Population of City in 10,000s')
plt.show()
4.验证线性回归结果
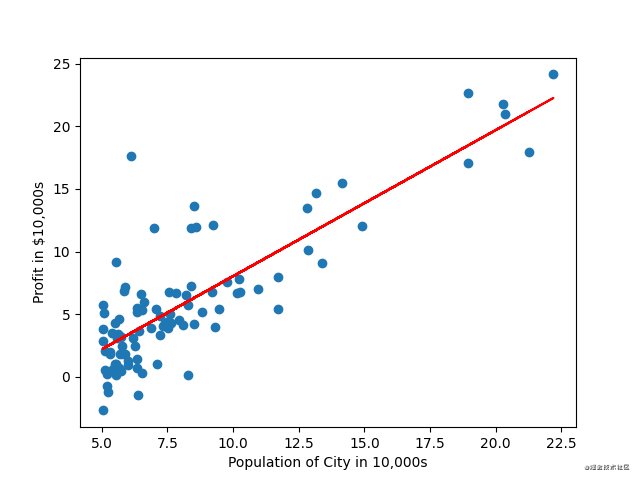
经过1500次迭代,我们会得到 θ 0 = − 3.6303 \theta_0=-3.6303 θ0=−3.6303和 θ 1 = 1.1664 \theta_1=1.1664 θ1=1.1664。那么之前的公式(1)就可以写做:
H = − 3.6303 + 1.1664 x 1 H=-3.6303+1.1664x_1 H=−3.6303+1.1664x1 (5)
这个公式代表了一条直线,我们将这条直线和所有的样本可视化,如下图。
从上图中可以看到,这条直线是可以大致表示出人口数量与快餐车收益之间的关系的。那么,我们就可以用这条直线根据人口数量大致预测出未来收益。
5.可视化损失函数
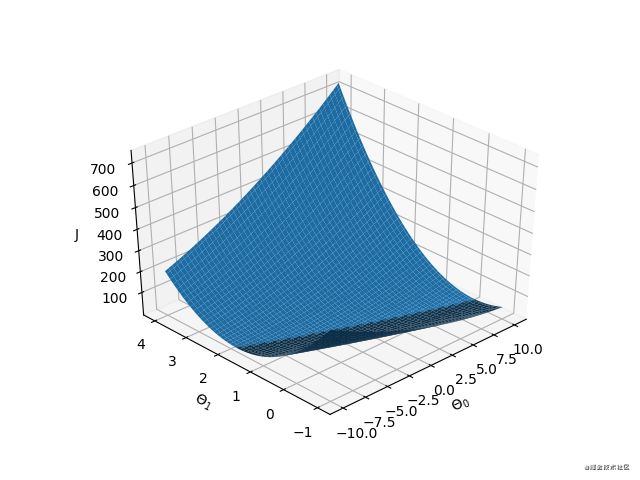
为了更好的理解损失函数,我们可以将 θ 0 \theta_0 θ0、 θ 1 \theta_1 θ1和 J J J之间的关系可视化,代码如下:
theta0_vals = np.linspace(-10, 10, 100)
theta1_vals = np.linspace(-1, 4, 100)

J_vals = np.zeros([100, 100])
for i in range(100):
    for j in range(100):
        t = np.array([theta0_vals[i], theta1_vals[j]])
        t = t[:,np.newaxis]
        J_vals[i, j] = computeCost(X, y, t)
        pass

fig = plt.figure()
ax = fig.gca(projection='3d')

X, Y = np.meshgrid(theta0_vals, theta1_vals)
J_vals = np.transpose(J_vals, [1, 0])
surf = ax.plot_surface(X, Y, J_vals)

plt.show()
因为有两个变量,所以这是一个3维坐标系,水平面的两个坐标轴分别代表着变量 θ 0 \theta_0 θ0和 θ 1 \theta_1 θ1,垂直坐标轴代表着J的值。在这个图中,曲面的最低点对应的 θ 0 \theta_0 θ0和 θ 1 \theta_1 θ1值就是我们需要求的,因为这个位置的J值最小。我们可以通过等高线图进一步验证。
绘制等高线图代码如下:
plt.contour(X, Y, J_vals, np.logspace(-2, 3, 20))
plt.scatter(theta[0], theta[1])
plt.show()
在上述代码中,我们也将之前计算出的 θ \theta θ值在图中用蓝色圆点标出,通过等高线图可以看出,该蓝色点确实在该曲面的最低点。
以上就是使用python实现线性回归的全过程,完整代码地址如下:
https://github.com/txyugood/Machine_Learning
如果大家觉得本文有帮助,欢迎大家点赞、关注和收藏,也欢迎关注我的公众号:人工智能研习社,大家的支持是我继续创作下去的动力,谢谢大家!


