关于 ML-Agents 的超级大坑 “CUDA error: no kernel image is available for execution on the device”
在经过痛苦的环境搭建工作之后,表面上一切是那么的和谐自然,就等着我去启动训练功能来爽一下了。结果,无情的 Bug 再次糊脸。
以下记录了问题的发生和解决过程。
环境的搭建可以浏览:Unity 对接 ML-Agents 初探
在完成环境搭建工作后,可以根据 Unity 官方文档使用附带的 Demo 进行初步的功能熟悉。
官方文档在此
一、问题的发生
本次要运行的就是 3D Balance Ball

除了直接运行 Unity 工程查看效果外,还可以通过打开之前创建好的 ml-agents 环境来进行训练操作,而本次的坑就是在启动训练时遇到的。
打开 Anaconda Prompt,之后激活 ml-agents 环境,cd 到 Release 20 的解压文件目录,输入以下命令:
mlagents-learn config/ppo/3DBall.yaml --run-id=first3DBallRun
其中 config/ppo/3DBall.yaml 是官方提供的默认训练配置文件的路径。

config/ppo 文件夹包含了所有的示例环境的训练配置文件,也包括 3DBall。
--run-id= 用来定义该训练课程的唯一名称,此处命名为 first3DBallRun。
也可以在后面加上 --force 命令,表示强制执行,使用后会覆盖上一次的数据,如果没有写 --force 并且有同名文件夹存在,就会出现无法执行的情况。
mlagents-learn config/ppo/3DBall.yaml --run-id=first3DBallRun --force
执行命令后,正常情况下,在控制台会出现以下画面:
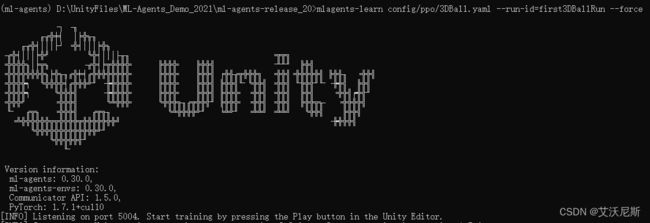
在末尾,会提示用户启动 Unity 的工程
[INFO] Listening on port 5004. Start training by pressing the Play button in the Unity Editor.
之后,点击 Unity 项目中对应场景的 Play 按键,正常情况下应该会出现类似官方文档中的显示:
INFO:mlagents_envs:
'Ball3DAcademy' started successfully!
Unity Academy name: Ball3DAcademy

INFO:mlagents_envs:Connected new brain:
Unity brain name: 3DBallLearning
        Number of Visual Observations (per agent): 0
        Vector Observation space size (per agent): 8
        Number of stacked Vector Observation: 1
INFO:mlagents_envs:Hyperparameters for the PPO Trainer of brain 3DBallLearning:
        batch_size:          64
        beta:                0.001
        buffer_size:         12000
        epsilon:             0.2
        gamma:               0.995
        hidden_units:        128
        lambd:               0.99
        learning_rate:       0.0003
        max_steps:           5.0e4
        normalize:           True
        num_epoch:           3
        num_layers:          2
        time_horizon:        1000
        sequence_length:     64
        summary_freq:        1000
        use_recurrent:       False
        memory_size:         256
        use_curiosity:       False
        curiosity_strength:  0.01
        curiosity_enc_size:  128
        output_path: ./results/first3DBallRun/3DBallLearning
INFO:mlagents.trainers: first3DBallRun: 3DBallLearning: Step: 1000. Mean Reward: 1.242. Std of Reward: 0.746. Training.
INFO:mlagents.trainers: first3DBallRun: 3DBallLearning: Step: 2000. Mean Reward: 1.319. Std of Reward: 0.693. Training.
INFO:mlagents.trainers: first3DBallRun: 3DBallLearning: Step: 3000. Mean Reward: 1.804. Std of Reward: 1.056. Training.
INFO:mlagents.trainers: first3DBallRun: 3DBallLearning: Step: 4000. Mean Reward: 2.151. Std of Reward: 1.432. Training.
INFO:mlagents.trainers: first3DBallRun: 3DBallLearning: Step: 5000. Mean Reward: 3.175. Std of Reward: 2.250. Training.
INFO:mlagents.trainers: first3DBallRun: 3DBallLearning: Step: 6000. Mean Reward: 4.898. Std of Reward: 4.019. Training.
INFO:mlagents.trainers: first3DBallRun: 3DBallLearning: Step: 7000. Mean Reward: 6.716. Std of Reward: 5.125. Training.
INFO:mlagents.trainers: first3DBallRun: 3DBallLearning: Step: 8000. Mean Reward: 12.124. Std of Reward: 11.929. Training.
INFO:mlagents.trainers: first3DBallRun: 3DBallLearning: Step: 9000. Mean Reward: 18.151. Std of Reward: 16.871. Training.
INFO:mlagents.trainers: first3DBallRun: 3DBallLearning: Step: 10000. Mean Reward: 27.284. Std of Reward: 28.667. Training.
此时就意味着进入了训练环节。
然而我遇到的问题是 Unity 立刻退出了执行,而控制台输出了如下信息。
[WARNING] Trainer has no policies, not saving anything.
Traceback (most recent call last):
  File "C:\anaconda\Anaconda3\envs\ml-agents\lib\runpy.py", line 197, in _run_module_as_main
    return _run_code(code, main_globals, None,
  File "C:\anaconda\Anaconda3\envs\ml-agents\lib\runpy.py", line 87, in _run_code
    exec(code, run_globals)
  File "C:\anaconda\Anaconda3\envs\ml-agents\Scripts\mlagents-learn.exe\__main__.py", line 7, in <module>
  File "C:\anaconda\Anaconda3\envs\ml-agents\lib\site-packages\mlagents\trainers\learn.py", line 264, in main
    run_cli(parse_command_line())
  File "C:\anaconda\Anaconda3\envs\ml-agents\lib\site-packages\mlagents\trainers\learn.py", line 260, in run_cli
    run_training(run_seed, options, num_areas)
  File "C:\anaconda\Anaconda3\envs\ml-agents\lib\site-packages\mlagents\trainers\learn.py", line 136, in run_training
    tc.start_learning(env_manager)
  File "C:\anaconda\Anaconda3\envs\ml-agents\lib\site-packages\mlagents_envs\timers.py", line 305, in wrapped
    return func(*args, **kwargs)
  File "C:\anaconda\Anaconda3\envs\ml-agents\lib\site-packages\mlagents\trainers\trainer_controller.py", line 172, in start_learning
    self._reset_env(env_manager)
  File "C:\anaconda\Anaconda3\envs\ml-agents\lib\site-packages\mlagents_envs\timers.py", line 305, in wrapped
    return func(*args, **kwargs)
  File "C:\anaconda\Anaconda3\envs\ml-agents\lib\site-packages\mlagents\trainers\trainer_controller.py", line 107, in _reset_env
    self._register_new_behaviors(env_manager, env_manager.first_step_infos)
  File "C:\anaconda\Anaconda3\envs\ml-agents\lib\site-packages\mlagents\trainers\trainer_controller.py", line 267, in _register_new_behaviors
    self._create_trainers_and_managers(env_manager, new_behavior_ids)
  File "C:\anaconda\Anaconda3\envs\ml-agents\lib\site-packages\mlagents\trainers\trainer_controller.py", line 165, in _create_trainers_and_managers
    self._create_trainer_and_manager(env_manager, behavior_id)
  File "C:\anaconda\Anaconda3\envs\ml-agents\lib\site-packages\mlagents\trainers\trainer_controller.py", line 137, in _create_trainer_and_manager
    policy = trainer.create_policy(
  File "C:\anaconda\Anaconda3\envs\ml-agents\lib\site-packages\mlagents\trainers\ppo\trainer.py", line 194, in create_policy
    policy = TorchPolicy(
  File "C:\anaconda\Anaconda3\envs\ml-agents\lib\site-packages\mlagents\trainers\policy\torch_policy.py", line 41, in __init__
    GlobalSteps()
  File "C:\anaconda\Anaconda3\envs\ml-agents\lib\site-packages\mlagents\trainers\torch_entities\networks.py", line 748, in __init__
    torch.Tensor([0]).to(torch.int64), requires_grad=False
RuntimeError: CUDA error: no kernel image is available for execution on the device
其中比较重要的一句信息是:
RuntimeError: CUDA error: no kernel image is available for execution on the device
之后就是一顿好查。大致得到了两种说法:
1. PyTorch 版本与 CUDA 版本不兼容。
2. 显卡的算力太低,不支持高版本的 CUDA。
当时心中感觉一万匹草泥马奔腾而过。什么是 CUDA???
显卡算力低确实是可能存在的问题,因为目前开发用的显卡型号是 NVIDIA GeForce GT 730,是一款比较低端的显卡。
CUDA(Compute Unified Device Architecture),是显卡厂商 NVIDIA 推出的运算平台。 CUDA™ 是一种由NVIDIA推出的通用并行计算架构,该架构使 GPU 能够解决复杂的计算问题。 它包含了 CUDA 指令集架构(ISA)以及 GPU 内部的并行计算引擎。 开发人员可以使用 C 语言来为 CUDA™ 架构编写程序,所编写出的程序可以在支持 CUDA™ 的处理器上以超高性能运行。CUDA3.0 已经开始支持 C++ 和 FORTRAN。
直接给我看懵了,感觉已然超出了业务范畴。
二、排除 PyTorch 版本与 CUDA 版本不兼容的情况
首先我怀疑了是否是由于 PyTorch 和 CUDA 版本不匹配导致报错,于是查询到了检验的方式,同时也查到了版本对应表格。
# 激活 ml-agents 环境,因为 PyTorch 是安装在该环境下的
(base) C:\Users\Administrator>activate ml-agents
# 进入 python 环境
(ml-agents) C:\Users\Administrator>python
Python 3.9.16 (main, Jan 11 2023, 16:16:36) [MSC v.1916 64 bit (AMD64)] on win32
Type "help", "copyright", "credits" or "license" for more information.
# 引入 PyTorch 开发包
>>> import torch
# 打印 PyTorch 的版本号
>>> torch.__version__
'1.7.1+cu110'
# 打印 CUDA 版本
>>> torch.version.cuda
'11.0'
# 显示当前 CUDA 版本是否可用
>>> torch.cuda.is_available()
True
# 顺便打印了一下 gpu 的名字
>>> torch.cuda.get_device_name(0)
'NVIDIA GeForce GT 730'
去到 PyTorch 官网可以找到不同版本 PyTorch 和 CUDA 的关系。

当然了,首页的这张图虽然比较直观,但是只显示了最新版本的对应。
在该地址中,可以查找到过去的版本的对应关系,而我们之前按照 Unity 文档安装的是 1.7.1 版本

更加直观的比对图,可以参考这篇文章。
很显然,当前的安装的 PyTorch 和 CUDA 版本是可以对应上的。
三、关于 CUDA 和显卡驱动的匹配验证
那就是显卡的问题了呗!
不过也不能轻易下判断,因为:
第一,换显卡很贵。。。
第二,网上也有一些其他的关于这个报错的说法,所以还是需要进一步核实。
由于查到一篇文章说 CUDA 大致指的就是 NVIDIA CUDA Toolkit 软件开发包。
PS:但是经过所有查询后,CUDA 和 CUDA Toolkit 是两个不同的概念,不能单纯的画等号。
CUDA (Compute Unified Device Architecture):直译过来就是 “统一计算架构”,是 NVIDIA 公司推出的,目标是使 GPU 在除了之前专精的图像处理任务之外,也能利用其强大的并行计算能力做一些通用计算。CUDA 目前支持多种语言(C++、JAVA、Python 等),并且较新的 NVIDIA GPU 上也基本都可以运行,可使用范围还是比较广的。
CUDA Toolkit:CUDA 的开发工具,包括以下几个部分: Compiler(编译器),Tools,Libraries,CUDA Samples,CUDA Driver(如果只是在 gpu 上跑深度学习代码的话,可以单独下载 CUDA driver)。
于是,当前的假定就是看下 CUDA 和显卡的对应信息,于是我去了 CUDA 官网,在这里可以看到有一些对应表,是显示的 CUDA Toolkit 和显卡驱动的对应。

基于此表,我就判断问题的原因可能是由于显卡驱动和 CUDA 版本不匹配导致的(因为一开始真是看懵了,以为这个算力和 CUDA 的问题就是指的显卡驱动和 CUDA Toolkit 版本的兼容问题,然而最后发现并不是一回事)。
查看板卡驱动的两个方法:
1.通过 NVIDIA 控制面板查看
- 同时按下
Win + Q的组合键,呼唤出搜索栏,搜索 “控制面板” - 点击打开
NVIDIA 控制面板


可以看到,当前的驱动版本是 472.12
之后,点击 “帮助”->“系统信息”,选择 “组件” 页签,就可以看到当前电脑支持的 CUDA

2.通过 cmd 控制台查看
通过 cmd 使用命令可以查看驱动版本和其他详细信息
C:\Users\Administrator>nvidia-smi
如果无效的话,说明没有配置路径信息。
NVIDIA 的驱动默认路径是在:C:\Program Files\NVIDIA Corporation\NVSMI,将该路径添加到系统的环境变量中的 Path 中,重新启动 cmd 就可以使用命令了。


可以看到,驱动版本是 472.12,CUDA 版本为 11.4

经过比对,大致也能排除掉显卡驱动和 CUDA 不匹配的问题了。
四、关于 ML-Agents 官方文档上更新内容的确认
这时就真是满脑袋问号了。。。于是再次一顿好查,直到我无意中看了下 Release 20 版的变动信息。

心中又是一万匹草泥马喷腾而过,合着官方文档里也有错。。。
于是再次打开 ml-agents 环境,执行命令卸载当前的 PyTorch
pip3 uninstall torch
之后执行以下命令:
conda install pytorch==1.8.0 torchvision==0.9.0 torchaudio==0.8.0 cudatoolkit=11.1 -c pytorch -c conda-forge
-c conda-forge 是指明在库 conda-forge 中下载 cudatoolkit 11.1 这个包。
结束安装后验证是否成功

之后测试了以下,结果依然是报相同的错误,我裂开了。
五、问题的解决:显卡算力和 CUDA 的匹配性
想了下,那也许就是显卡本身不支持的问题了,又是一顿好查,在一篇文章中发现从 PyTorch 1.3 开始,不再支持 GPU 的算力在 3.5 及以下的显卡。
于是以此为线索,查询了 ai 开发过程中对于显卡算力的需求。
得出的结论就是:
1. PyTorch 和 CUDA 有对应关系。
2. CUDA 对显卡的算力也有对应关系。
3. 不同版本的 PyTorch 对显卡算力也有要求。
这里面有一点不满足都会出现问题。
算力 (Compute Capability):
The compute capability of a device is represented by a version number, also sometimes called its “SM version”. This version number identifies the features supported by the GPU hardware and is used by applications at runtime to determine which hardware features and/or instructions are available on the present GPU.
The compute capability comprises a major revision number X and a minor revision number Y and is denoted by X.Y.
Devices with the same major revision number are of the same core architecture. The major revision number is 9 for devices based on the NVIDIA Hopper GPU architecture, 8 for devices based on the NVIDIA Ampere GPU architecture, 7 for devices based on the Volta architecture, 6 for devices based on the Pascal architecture, 5 for devices based on the Maxwell architecture, and 3 for devices based on the Kepler architecture.
The minor revision number corresponds to an incremental improvement to the core architecture, possibly including new features.
Turing is the architecture for devices of compute capability 7.5, and is an incremental update based on the Volta architecture.
CUDA-Enabled GPUs lists of all CUDA-enabled devices along with their compute capability. Compute Capabilities gives the technical specifications of each compute capability.Note
The compute capability version of a particular GPU should not be confused with the CUDA version (for example, CUDA 7.5, CUDA 8, CUDA 9), which is the version of the CUDA software platform. The CUDA platform is used by application developers to create applications that run on many generations of GPU architectures, including future GPU architectures yet to be invented. While new versions of the CUDA platform often add native support for a new GPU architecture by supporting the compute capability version of that architecture, new versions of the CUDA platform typically also include software features that are independent of hardware generation.
The Tesla and Fermi architectures are no longer supported starting with CUDA 7.0 and CUDA 9.0, respectively.
大致译文:
设备的计算能力由版本号表示,有时也被称为“SM版本”。这个版本号标识了GPU硬件支持的特性,并被应用程序在运行时用来确定当前GPU上哪些硬件特性和/或指令可用。
计算能力包括一个大版本号X和一个小版本号Y,用X.Y表示。
具有相同主版本号的设备具有相同的核心架构。主要版本号为 :
8 用于基于 NVIDIA Ampere GPU 架构的设备,
7 用于基于 Volta 架构的设备,
6 用于基于 Pascal 架构的设备,
5 用于基于 Maxwell 架构的设备,
3 用于基于 Kepler 架构的设备,
2 用于基于 Fermi 架构的设备,
1 用于基于 Tesla 架构的设备。
次要修订号对应于对核心架构的增量改进,可能包括新功能。
巴拉巴拉一大堆,大致就是说这个 “算力” 并不单纯指的是计算能力,还有些其他意义。
具体的 CUDA 和算力的对应表,可以直接查看 WIKI,或者查看这篇博客进行对照,同时里面还有不同型号显卡的算力值标注。

此图为 WIKI 中的一张截图。
我用的电脑是 CUDA 11.4,虽然看图中是可以支持 3.5 算力的显卡(NVIDIA GeForce GT 730),但在实际运行 ai 算法时就会报错。
之后,我用家中的电脑尝试了布置环境,结果一次通过,家里的显卡是 1080 Ti 的,这让我对这次的问题是出在显卡算力上面的更加确定了一些。不过在家里我直接按照 ML-Agents 文档中下载的 PyTorch 1.7.1 也可以正常运行,这样我多少有些摸不到头脑。
然后,在公司找到了一台 NVIDIA GeForce GTX 1070 显卡的笔记本,尝试安装。为了防止出一些其他幺蛾子,就预先进行了格式化操作。结果还是一装就是一整天,中间出了一些其他问题,不过最后也算是跑通了,也就是说本次的问题就是出在了显卡算力不够这一点上。
至此,问题解决了。
PS:在笔记本上安装时遇到的问题 [WinError 1455]页面文件太小,无法完成操作。
问题的起因:在笔记本电脑中,由于 C 盘是固态硬盘比较小,所以我将 ANACONDA 安装到了机械硬盘的 D 盘,但是电脑在默认情况下不会给 C 盘以外的磁盘分配那么多虚拟内存,以上问题是由于没有足够的虚拟内存导致的。
解决方法:
首先,通过 Win + Q 的组合键,打开控制面板界面。之后打开系统。

选择高级系统设置,打开系统属性页面。
在高级页签中点击设置按钮,进入性能选项页面。

在性能选项页面中选择高级页签,之后点击程序选项,并点击更改按钮。
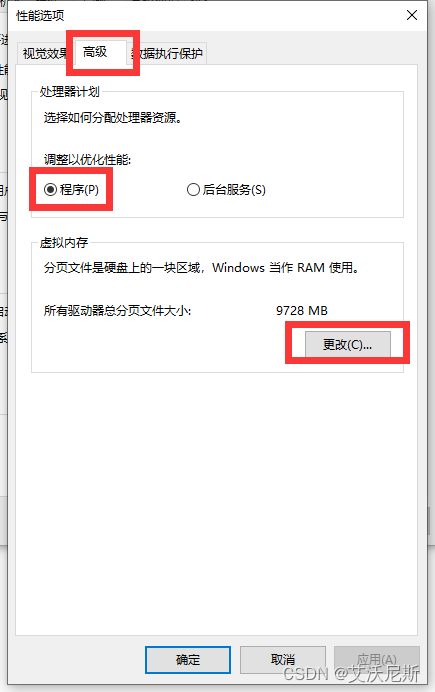
默认页面样式如下:
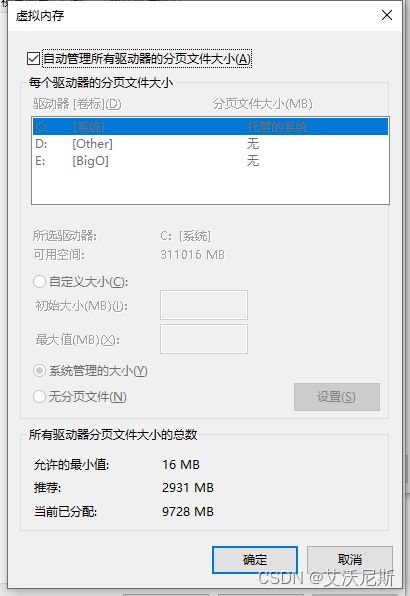

首先取消顶部的勾选,然后点击要分配虚拟内存的驱动器,点击自定义大小后分配合适的虚拟内存(10G 的话就填 10240),之后点击设置按钮,最后点击确认键退出页面并重启电脑。
在一番操作之后,问题报错解决了。