【教你搭建服务器系列】(2)搭建服务器环境,安装JDK、MySQL、Redis、Tomcat、Nginx
我白嫖过的一些云厂商:
| 云厂商 | 学生优惠 | 新人优惠 |
|---|---|---|
| 腾讯云 | 学生特惠,1核2G5M宽带,仅需9元/1个月 | 星星海SA2云服务器,1核2G首年99元(我目前用的) |
| 新客户无门槛代金券,价值高达2860元代金券 | ||
| 云产品限时秒杀,爆款1核2G云服务器,首年99元 | ||
| 阿里云 | 精选云服务器1核2G 新人仅需87元/年 | |
| 百度云 | 1核2G 学生身份 9 元/1个月 | |
| 华为云 | 精选云服务器2折起 | |
| 七牛云 | 对象存储服务每月10GB免费空间 (用做云存储) | |
| 青云 | https://www.qingcloud.com |
以上是答主我从学生时代到打工人薅过最便宜的云服务器,建议大家有学生身份或者新用户身份的都去试试。
在配置服务器环境的时候,需要下载很多东西,比如你要安装jdk,你可以使用yum命令;也可以使用ftp工具把预先下载的.gz 压缩包上传到服务器,然后解压安装。
1、配置jdk
有两种安装方法,我使用的是第二种安装方式。
-
yum安装
查看可用版本:
yum -y list java
[root@VM-8-8-centos software]# yum -y list java*
Loaded plugins: fastestmirror, langpacks
Determining fastest mirrors
Available Packages
java-1.6.0-openjdk.x86_64                                                   1:1.6.0.41-1.13.13.1.el7_3                                   os
java-1.6.0-openjdk-demo.x86_64                                              1:1.6.0.41-1.13.13.1.el7_3                                   os
java-1.6.0-openjdk-devel.x86_64                                             1:1.6.0.41-1.13.13.1.el7_3                                   os
java-1.6.0-openjdk-javadoc.x86_64                                           1:1.6.0.41-1.13.13.1.el7_3                                   os
java-1.6.0-openjdk-src.x86_64                                               1:1.6.0.41-1.13.13.1.el7_3                                   os
java-1.7.0-openjdk.x86_64                                                   1:1.7.0.261-2.6.22.2.el7_8                                   updates
java-1.7.0-openjdk-accessibility.x86_64                                     1:1.7.0.261-2.6.22.2.el7_8                                   updates
java-1.7.0-openjdk-demo.x86_64                                              1:1.7.0.261-2.6.22.2.el7_8                                   updates
java-1.7.0-openjdk-devel.x86_64                                             1:1.7.0.261-2.6.22.2.el7_8                                   updates
java-1.7.0-openjdk-headless.x86_64                                          1:1.7.0.261-2.6.22.2.el7_8                                   updates
java-1.7.0-openjdk-javadoc.noarch                                           1:1.7.0.261-2.6.22.2.el7_8                                   updates
选择你要的版本:
yum install -y java-1.6.0-openjdk.x86_64
然后就可以了。
默认给安装到 usr/lib/jvm/ , 而且帮你把环境变量配好了,你输入 java -version 就可以了,这种方法也同样适合安装其他环境。
-
解压包安装
1、上传并解压
使用ftp工具把jdk上传到服务器,然后解压。
我选择jdk8,注意是.gz的,这是Linux识别的压缩包后缀。
下载地址是:https://www.oracle.com/java/technologies/javase/javase-jdk8-downloads.html
解压到 我自己新建的指定目录 /var/www/web/jdk/
tar -zxvf jdk-8u261-linux-x64.tar.gz -C /var/www/web/jdk/
然后记住你的安装路径。用pwd命令查看当前目录 我本地是 /var/www/web/jdk/jdk1.8.0_261
[root@VM-8-8-centos ~]# cd /var/www/web/jdk/jdk1.8.0_261/
[root@VM-8-8-centos jdk1.8.0_261]# ll
total 25668
drwxr-xr-x 2 10143 10143     4096 Jun 18 14:55 bin
-r--r--r-- 1 10143 10143     3244 Jun 18 14:55 COPYRIGHT
drwxr-xr-x 3 10143 10143     4096 Jun 18 14:55 include
-rw-r--r-- 1 10143 10143  5219010 Jun 18 12:03 javafx-src.zip
-rw-r--r-- 1 10143 10143      195 Jun 18 14:55 jmc.txt
drwxr-xr-x 6 10143 10143     4096 Jun 18 14:55 jre
drwxr-xr-x 4 10143 10143     4096 Jun 18 14:55 legal
drwxr-xr-x 4 10143 10143     4096 Jun 18 14:55 lib
-r--r--r-- 1 10143 10143       44 Jun 18 14:55 LICENSE
drwxr-xr-x 4 10143 10143     4096 Jun 18 14:55 man
-r--r--r-- 1 10143 10143      159 Jun 18 14:55 README.html
-rw-r--r-- 1 10143 10143      424 Jun 18 14:55 release
-rw-r--r-- 1 10143 10143 21005583 Jun 18 14:55 src.zip
-rw-r--r-- 1 10143 10143      190 Jun 18 12:03 THIRDPARTYLICENSEREADME-JAVAFX.txt
-r--r--r-- 1 10143 10143      190 Jun 18 14:55 THIRDPARTYLICENSEREADME.txt
[root@VM-8-8-centos jdk1.8.0_261]# pwd
/var/www/web/jdk/jdk1.8.0_261
2、配置环境变量:
vim /etc/profile
按一下按Insert或者I键,表示 进入编辑模式。
末尾追加添加三行,JAVA_HOME是你的jdk安装路径(可以右键粘贴) :
export JAVA_HOME=/var/www/web/jdk/jdk1.8.0_261
export CLASSPATH=$:CLASSPATH:$JAVA_HOME/lib/
export PATH=$PATH:$JAVA_HOME/bin
修改完成再按一下 Esc 键 ,输入 :wq ,表示保存并关闭 。
3、生效环境变量
source /etc/profile
4、完成
输入 java -version ,出现版本号,安装成功。
[root@VM-8-8-centos ~]# java -version
java version "1.8.0_261"
Java(TM) SE Runtime Environment (build 1.8.0_261-b12)
Java HotSpot(TM) 64-Bit Server VM (build 25.261-b12, mixed mode)
2、配置tomcat
tomcat下载地址:https://tomcat.apache.org/download-80.cgi
我这里用的是tomcat8.0,把tomcat上传到服务器,然后解压:
tar -zxvf apache-tomcat-8.0.53.tar.gz -C /var/www/web
我这里不配置环境变量,直接到tomcat的bin目录启动:
[root@VM-8-8-centos bin]# cd /var/www/web/apache-tomcat-8.0.53/bin
[root@VM-8-8-centos bin]# ./startup.sh
Using CATALINA_BASE:   /var/www/web/apache-tomcat-8.0.53
Using CATALINA_HOME:   /var/www/web/apache-tomcat-8.0.53
Using CATALINA_TMPDIR: /var/www/web/apache-tomcat-8.0.53/temp
Using JRE_HOME:        /var/www/web/jdk/jdk1.8.0_261
Using CLASSPATH:       /var/www/web/apache-tomcat-8.0.53/bin/bootstrap.jar:/var/www/web/apache-tomcat-8.0.53/bin/tomcat-juli.jar
Tomcat started.
因为我在腾讯云的后台的防火墙已经事先开放了8080端口。
然后通过 ip:8080 就能访问了。
如果你不是腾讯云的服务器,不能访问,那么就需要配置防火墙,开放8080端口;或者修改tomcat的端口,这种一般都是自己的本地虚拟机才会出现,市面上的云服务器都可以在控制台配置。
如果你是centos7,可以这样做:
[root@VM-8-8-centos bin]# firewall -cmd --list-ports
-bash: firewall: command not found
未安置防火墙,需要安装
yum install firewalld systemd -y
启动防火墙
systemctl start firewalld.service
开放80端口
firewall-cmd --zone=public --add-port=80/tcp --permanent
重启防火墙:
systemctl reload firewalld
查看防火墙状态(关闭后显示not running,开启后显示running)
systemctl status firewalld
3、MySQL
MySQL的话,一般是很少和项目的服务器在同一个服务器,都是单独购买云MySQL。
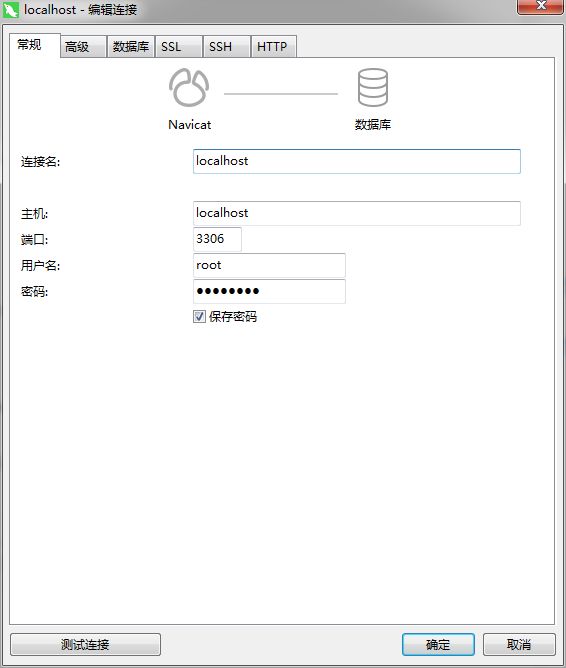
我们使用Navicat连接本地数据库的时候,通过 localhost 输入账户密码就能连接了,如果你是服务器的MySQL,那么把locahost换成你服务器的IP就可以了。
1、上传MySQL安装包并解压
安装到 /usr/local/
tar -zxvf mysql-5.6.33-linux-glibc2.5-x86_64.tar.gz -C /usr/local/
然后改一下名字:
cd /usr/local/
mv mysql-5.6.33-linux-glibc2.5-x86_64 mysql5.6
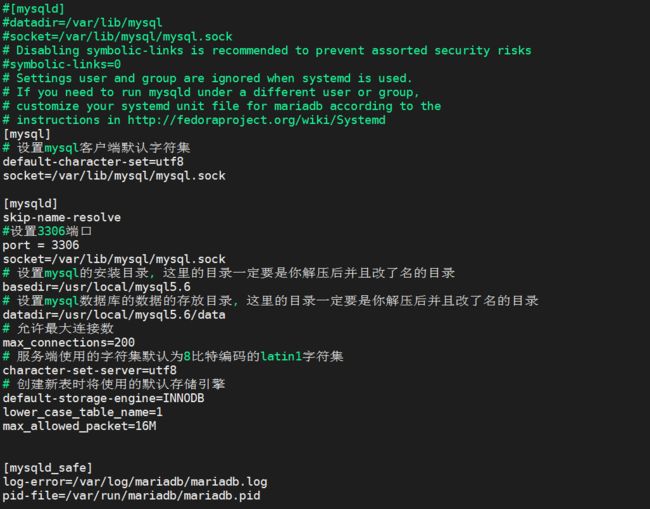
2、修改my.cnf配置文件
如果etc/my.cnf文件不存在,则新建一个
vi /etc/my.cnf
怕敲错,可以先使用FTP工具下载到本地修改,再上传到服务器。将以下内容添加到my.cnf:
[mysql]
# 设置mysql客户端默认字符集
default-character-set=utf8
socket=/var/lib/mysql/mysql.sock

[mysqld]
skip-name-resolve
#设置3306端口
port = 3306
socket=/var/lib/mysql/mysql.sock
# 设置mysql的安装目录, 这里的目录一定要是你解压后并且改了名的目录
basedir=/usr/local/mysql5.6
# 设置mysql数据库的数据的存放目录, 这里的目录一定要是你解压后并且改了名的目录
datadir=/usr/local/mysql5.6/data
# 允许最大连接数
max_connections=200
# 服务端使用的字符集默认为8比特编码的latin1字符集
character-set-server=utf8
# 创建新表时将使用的默认存储引擎
default-storage-engine=INNODB
lower_case_table_name=1
max_allowed_packet=16M
3、添加用户组
新建一个mysql的用户组,并新建一个mysql的用户,赋予操作mysql目录(本目录)的权限
[root@VM-8-8-centos local]# cd /usr/local/mysql5.6/
[root@VM-8-8-centos mysql5.6]# groupadd mysql
[root@VM-8-8-centos mysql5.6]# useradd -g mysql mysql
[root@VM-8-8-centos mysql5.6]# chown -R mysql:mysql ./
4、安装MySQL
还是在mysql的安装目录下操作
--basedir=/usr/local/mysql5.6/ 这个是你的安装目录
datadir=/usr/local/mysql5.6/data/ 这个是你的数据存储目录
这两个已经在上一步的my.cnf文件配置了,要一致。
./scripts/mysql_install_db --user=mysql --basedir=/usr/local/mysql5.6/ --datadir=/usr/local/mysql5.6/data/
5、配置一下全局变量以及权限
[root@VM-8-8-centos mysql5.6]# chown -R mysql:mysql data
[root@VM-8-8-centos mysql5.6]# chown 777 /etc/my.cnf
[root@VM-8-8-centos mysql5.6]# cp ./support-files/mysql.server /etc/rc.d/init.d/mysqld
[root@VM-8-8-centos mysql5.6]# chmod +x /etc/rc.d/init.d/mysqld
[root@VM-8-8-centos mysql5.6]# chkconfig --add mysqld
[root@VM-8-8-centos mysql5.6]# chkconfig --list mysqld

Note: This output shows SysV services only and does not include native
      systemd services. SysV configuration data might be overridden by native
      systemd configuration.

      If you want to list systemd services use 'systemctl list-unit-files'.
      To see services enabled on particular target use
      'systemctl list-dependencies [target]'.

mysqld          0:off   1:off   2:on    3:on    4:on    5:on    6:off
6、启动mysql
service mysqld start
坑1:
发现报错了, 找不到文件 /var/log/mariadb/mariadb.log,那就新建一个:
[root@VM-8-8-centos mysql5.6]# service mysqld start
Starting MySQL.touch: cannot touch '/var/log/mariadb/mariadb.log': No such file or directory
chmod: cannot access '/var/log/mariadb/mariadb.log': No such file or directory
touch: cannot touch '/var/log/mariadb/mariadb.log': No such file or directory
chown: cannot access '/var/log/mariadb/mariadb.log': No such file or directory
/usr/local/mysql5.6/bin/mysqld_safe: line 129: /var/log/mariadb/mariadb.log: No such file or directory
/usr/local/mysql5.6/bin/mysqld_safe: line 166: /var/log/mariadb/mariadb.log: No such file or directory
touch: cannot touch '/var/log/mariadb/mariadb.log': No such file or directory
chown: cannot access '/var/log/mariadb/mariadb.log': No such file or directory
chmod: cannot access '/var/log/mariadb/mariadb.log': No such file or directory
/usr/local/mysql5.6/bin/mysqld_safe: line 129: /var/log/mariadb/mariadb.log: No such file or directory
 ERROR! The server quit without updating PID file (/usr/local/mysql5.6/data/VM-8-8-centos.pid).
解决:
[root@VM-8-8-centos mysql5.6]# mkdir /var/log/mariadb/
[root@VM-8-8-centos mysql5.6]# vim /var/log/mariadb/mariadb.log
[root@VM-8-8-centos mysql5.6]# service mysqld start
Starting MySQL. SUCCESS!
7、配置PATH
vi ~/.bash_profile
在文件最后面加入以下内容,并使用:wq保存
export PATH=$PATH:/usr/local/mysql5.6/bin
刷新PATH
source ~/.bash_profile
8、登录mysql
这时mysql没有密码, 当出现Enter password:时直接回车
mysql -uroot -p
[root@VM-8-8-centos mysql5.6]# mysql -uroot -p
Enter password:
Welcome to the MySQL monitor.  Commands end with ; or \g.
Your MySQL connection id is 1
Server version: 5.6.33 MySQL Community Server (GPL)

Copyright (c) 2000, 2016, Oracle and/or its affiliates. All rights reserved.

Oracle is a registered trademark of Oracle Corporation and/or its
affiliates. Other names may be trademarks of their respective
owners.

Type 'help;' or '\h' for help. Type '\c' to clear the current input statement.

mysql>
9、修改密码并允许远程访问
修改root用户密码:
mysql>  use mysql;
mysql> update user set password=password('HaCpassword') where user='root' and host='localhost';
mysql> flush privileges;
新建一个用户:
mysql> create user HaC identified by 'HaCpassword';
允许远程连接:
%表示所有ip,表示允许所有IP下,一个名HaC的用户使用HaCpassword登录。
mysql>grant all privileges on *.* to 'HaC'@'%' identified by 'HaCpassword' with grant option;
mysql>flush privileges;
重启MySQL。
[root@VM-8-8-centos mysql5.6]# service mysqld restart
Shutting down MySQL.. SUCCESS!
Starting MySQL. SUCCESS!
10、远程连接MySQL
我选择使用Navicat作为可视化工具,输入IP、端口、用户密码
注意,这个也需要开发防火墙的3306端口。
4、Nginx
后面的文章在部署项目的时候,我会使用Nginx,建议都安装。
Nginx下载地址:https://nginx.org/en/download.html
1、gcc 安装
Nginx 是 C语言 开发,安装 Nginx 需要先将官网下载的源码进行编译,编译依赖 gcc 环境,如果没有 gcc 环境,则需要安装:
yum install gcc-c++
我这里显示已经是最新了:
[root@VM-8-8-centos ~]# yum install gcc-c++
Loaded plugins: fastestmirror, langpacks
Loading mirror speeds from cached hostfile
Package gcc-c++-4.8.5-39.el7.x86_64 already installed and latest version
Nothing to do
2、 PCRE pcre-devel 安装
PCRE(Perl Compatible Regular Expressions) 是一个Perl库,包括 perl 兼容的正则表达式库。nginx 的 http 模块使用 pcre 来解析正则表达式,所以需要在 linux 上安装 pcre 库,pcre-devel 是使用 pcre 开发的一个二次开发库。
nginx也需要此库。命令:
yum install -y pcre pcre-devel
3、zlib 安装
zlib 库提供了很多种压缩和解压缩的方式, nginx 使用 zlib 对 http 包的内容进行 gzip ,所以需要在 Centos 上安装 zlib 库。
yum install -y zlib zlib-devel
4、OpenSSL 安装
OpenSSL 是一个强大的安全套接字层密码库,囊括主要的密码算法、常用的密钥和证书封装管理功能及 SSL 协议,并提供丰富的应用程序供测试或其它目的使用。
nginx 不仅支持 http 协议,还支持 https(即在ssl协议上传输http),所以需要在 Centos 安装 OpenSSL 库。
yum install -y openssl openssl-devel
5、Nginx解压
tar -zxvf nginx-1.15.2.tar.gz -C /var/www/web
6、编译Nginx
进入Nginx安装目录,输入 ./configure,表示使用Nginx的默认配置,开启ssl
[root@VM-8-8-centos software]# cd /var/www/web/nginx-1.15.2/
[root@VM-8-8-centos nginx-1.15.2]# ./configure --prefix=/usr/local/nginx --with-http_stub_status_module --with-http_ssl_module
然后输入:
make
编译成功再输入:
make install
7、启动Nginx
Nginx的默认配置,是指向 /usr/local/nginx/sbin/这个目录的,配置文件是 这里 /usr/local/nginx/conf
Nginx常用命令:(需要在安装目录执行,我的是 /usr/local/nginx/sbin/ )
./nginx  # 启动
./nginx -s stop #停止
./nginx -s reload #重启
启动,成功找到Nginx的进程。
[root@VM-8-8-centos nginx-1.15.2]# cd /usr/local/nginx/sbin/
[root@VM-8-8-centos sbin]# ./nginx
[root@VM-8-8-centos sbin]# ps -aux|grep nginx
root     11505  0.0  0.0  20556   616 ?        Ss   18:00   0:00 nginx: master process ./nginx
nobody   11506  0.0  0.0  23092  1384 ?        S    18:00   0:00 nginx: worker process
root     11545  0.0  0.0 112712   960 pts/4    R+   18:00   0:00 grep --color=auto nginx
然后浏览器输入IP,出现Welcome to Nginx 就表示成功了。
为了方便使用,我们把Nginx添加到全局变量:
[root@VM-8-8-centos sbin]# ln -s /usr/local/nginx/sbin/nginx /usr/local/bin/
添加完毕,我们在任何一个目录就可以使用Nginx命令了。
这里要记住的是你的nginx.conf 目录:/usr/local/nginx/conf/
5、Redis
下载地址:https://redis.io/download
1、解压
[root@VM-8-8-centos redis-5.0.8]# tar -zxvf redis-5.0.8.tar.gz -C /var/www/web
2、进入Redis安装目录,编译,安装
[root@VM-8-8-centos redis-5.0.8]# cd /var/www/web/redis-5.0.8/
[root@VM-8-8-centos redis-5.0.8]# make
make表示编译, 编译完成之后,可以看到解压文件redis-5.0.8 中会有对应的src、conf等文件夹。
[root@VM-8-8-centos redis-5.0.8]# cd src
[root@VM-8-8-centos src]# make install
make install表示安装。
ps:你也可以指定安装 make install PREFIX=/usr/local/redis,或者不指定,install 后把redis命令文件移动一下。
3、配置
- 让Redis后台运行
修改redis.config文件,将daemonize no 改成 daemonize yes。
[root@VM-8-8-centos redis-5.0.8]# cd /var/www/web/redis-5.0.8
[root@VM-8-8-centos redis-5.0.8]# vi redis.conf
- 设置 远程访问:
修改redis.config文件,将 bind 127.0.0.1 这段在前面 加 # 注释 。
- 将redis加入到开机启动
vi /etc/rc.d/rc.local
添加一行:
/usr/local/redis/bin/redis-server /var/www/web/redis-5.0.8/redis.conf
意思就是开机调用这段开启redis的命令 ,/usr/local/redis/bin/redis-server 是启动redis的命令,/var/www/web/redis-5.0.8/redis.conf 表示使用的redis配置。
- 设置redis密码
修改密码需要先启动redis。
然后输入: redis-cli
redis-cli # 连接redis

config get requirepass  #查看是否有密码

config set requirepass **** # 设置你的密码
我本地操作过程:
[root@VM-8-8-centos ~]# cd /var/www/web/redis-5.0.8/src
[root@VM-8-8-centos src]# ./redis-server /var/www/web/redis-5.0.8/redis.conf
6569:C 14 Oct 2020 10:12:50.429 # oO0OoO0OoO0Oo Redis is starting oO0OoO0OoO0Oo
6569:C 14 Oct 2020 10:12:50.429 # Redis version=5.0.8, bits=64, commit=00000000, modified=0, pid=6569, just started
6569:C 14 Oct 2020 10:12:50.429 # Configuration loaded
[root@VM-8-8-centos src]# ps -aux|grep redis
root      6570  0.0  0.4 153900  7688 ?        Ssl  10:12   0:00 ./redis-server *:6379
root      6584  0.0  0.0 112712   960 pts/0    R+   10:13   0:00 grep --color=auto redis
[root@VM-8-8-centos src]# ./redis-cli
127.0.0.1:6379>
127.0.0.1:6379>
127.0.0.1:6379>
127.0.0.1:6379> config get requirepass
1) "requirepass"
2) ""
127.0.0.1:6379> config set requirepass redis
OK
然后重启一下,就能生效了。
[root@VM-8-8-centos src]# cd /var/www/web/redis-5.0.8/src/
[root@VM-8-8-centos src]# ./redis-server /var/www/web/redis-5.0.8/redis.conf
6859:C 14 Oct 2020 10:17:02.227 # oO0OoO0OoO0Oo Redis is starting oO0OoO0OoO0Oo
6859:C 14 Oct 2020 10:17:02.227 # Redis version=5.0.8, bits=64, commit=00000000, modified=0, pid=6859, just started
6859:C 14 Oct 2020 10:17:02.227 # Configuration loaded
4、Redis自带客户端连接工具:
Redis提供了 redis-cli 工具可以连接你的Redis服务
redis-cli -h 你的Redis服务IP -p 6379 -a **** # (****为你设置的密码))
5、开放 6379 端口
需要在腾讯云后台开放。如果你服务器有防火墙,还需要再开放:
firewall-cmd --zone=public --add-port=6379/tcp --permanent
重启防火墙以使配置即时生效:
systemctl restart firewalld
6、客户端连接
我在本地Windows想要连接我的服务器,可以这样做:
我这里选择使用Redis-desktop-manager 进行连接。
6、Node
Node下载地址:https://nodejs.org/zh-cn/download/
1、解压
下载的是 .xz文件结尾的,解压:
tar -xvf node-v12.19.0-linux-x64.tar.xz -C /var/www/web
2、添加环境变量
vi ~/.bash_profile
末尾 加入以下三行,NODE_HOME 是你的 Node安装路径:
export NODE_HOME=/var/www/web/node-v12.19.0-linux-x64
export PATH=$PATH:$NODE_HOME/bin
export NODE_PATH=$NODE_HOME/lib/node_modules
生效:
source ~/.bash_profile
3、测试
输入
node -v
npm -v
如下表示 安装成功:
[root@VM-8-8-centos software]# node -v
v12.19.0
[root@VM-8-8-centos software]# npm -v
6.14.8
当你觉得npm慢的时候,可以安装cnpm
npm install cnpm -g --registry=https://registry.npm.taobao.org
然后就使用 cnpm 命令了
7、git
官方推荐使用yum安装
1、安装
yum -y install git
2、测试
git --version
以上就是开发常用的环境搭建过程了,如果你还需要搭建MQ、python、nodejs等等环境,也是差不多一样的流程,可以尝试自己搭建。


