Prometheus + Thanos 集群版部署
部署单节点的prometheus很简单,但如果我们存储的数据量比较大且要保证数据的高可用,那单节点就不能满足需求,而Thanos 可以帮我们简化分布式 Prometheus 的部署与管理,并提供了一些的高级特性:全局视图,长期存储,高可用
部署的机器和上面部署的组件如下:
| 主机名 | 部署组件 |
| monitor1 | prometheus、Query、Sidecar、Store Gateway |
| monitor2 | prometheus、Sidecar、Store Gateway |
| monitor3 | prometheus、Sidecar、Store Gateway |
1.prometheus部署
安装包下载地址:Download | Prometheus
我这边之前下载的是这个安装包:prometheus-2.31.1.linux-amd64.tar.gz
下载好后,上传到monitor1的/soft目录下
cd /soft
tar xvf prometheus-2.31.1.linux-amd64.tar.gz
cd prometheus-2.31.1.linux-amd64
vi prometheus.yml
prometheus.yml配置如下:
# my global config
global:
scrape_interval: 15s # Set the scrape interval to every 15 seconds. Default is every 1 minute.
evaluation_interval: 15s # Evaluate rules every 15 seconds. The default is every 1 minute.
# scrape_timeout is set to the global default (10s).
external_labels:
region: cn-hangzhou
monitor: infrastructure
replica: 1# Alertmanager configuration
alerting:
alertmanagers:
- static_configs:
- targets:
# - alertmanager:9093
# Load rules once and periodically evaluate them according to the global 'evaluation_interval'.
rule_files:
# - "first_rules.yml"
# - "second_rules.yml"# A scrape configuration containing exactly one endpoint to scrape:
# Here it's Prometheus itself.
scrape_configs:
# The job name is added as a label `job=` to any timeseries scraped from this config.
- job_name: 'prometheus'# metrics_path defaults to '/metrics'
# scheme defaults to 'http'.static_configs:
- targets: ['localhost:9090']
这边我没启用prometheus自带的告警组件,所以不需要做太多修改,只改了global的相关配置,增加了external_labels用来区分不同节点prometheus,region就是标识一下机器所在区域,replica标识节点id,monitor2、monitor3部署的话可以分配设置为2和3
这边启动我专门配置了一个启动脚本start.sh
#!/bin/bash
nohup /soft/prometheus-2.31.1.linux-amd64/prometheus --config.file=prometheus.yml --web.enable-admin-api --web.enable-lifecycle --storage.tsdb.path=/data/prometheus/data --enable-feature=remote-write-receiver --storage.tsdb.min-block-duration=2h --storage.tsdb.max-block-duration=2h --storage.tsdb.retention.time=2h --storage.tsdb.wal-compression --query.lookback-delta=2m >/dev/null &
我这边设置了本地数据存储目录为:/data/prometheus/data,以及最长保存时间2h
chmod +x start.sh
mkdir -p /data/prometheus/data
./start.sh
浏览器打开9090可打开ui界面验证
其它节点部署基本一致,唯一需要修改的就是yml文件里面的external_labels,这里就不多加叙述
2.Thanos部署
2.1 thanos架构
官方架构图如下:
可以看到,其实thanos主要包含下面几个组件:
- thanos Query:将来自下游组件提供的数据进行聚合最终返回给查询数据的 client (如 grafana)。
- Thanos Sidecar: 连接 Prometheus,将其数据提供给 Thanos Query 查询,并且/或者将其上传到对象存储,以供长期存储。
- Thanos Store Gateway: 将对象存储的数据暴露给 Thanos Query 去查询。
- Thanos Ruler: 对监控数据进行评估和告警,还可以计算出新的监控数据,将这些新数据提供给 Thanos Query 查询并且/或者上传到对象存储,以供长期存储。
- Thanos Compact: 将对象存储中的数据进行压缩和降低采样率,加速大时间区间监控数据查询的速度。
此文档主要部署:thanos Query + Thanos Sidecar + Thanos Store Gateway
2.2 thanos部署
安装包下载:https://github.com/thanos-io/thanos/releases/download/v0.21.1/thanos-0.21.1.linux-amd64.tar.gz
这边只讲一下monitor1机器上的组件部署,因为其他两个机器相关组件部署都一样。主要包括Query、Sidecar、Store Gateway3个组件,另外这边选择了oss作为持久化存储,所以建议先创建好oss bucket。
2.2.1 部署sidecar
下载好的thanos-0.21.1.linux-amd64.tar.gz压缩包上传到monitor1的/soft目录
tar xvf thanos-0.21.1.linux-amd64.tar.gz -C /usr/local/
cd /usr/local/
ln -s thanos-0.21.1.linux-amd64/ thanos
cd thanos
新增aliyun-oss.yaml文件
type: ALIYUNOSS
config:
endpoint: "XXXXXX"
bucket: "XXXXX"
access_key_id: "XXX"
access_key_secret: "XXX"
这边根据oss实际情况填写
配置系统服务
vi /etc/systemd/system/thanos-sidecar.service[Unit]
Description=Thanos Sidecar
After=network-online.target[Service]
Restart=on-failure
# --prometheus.url 配置对应的prometheus 地址
# --tsdb.path 配置对应的prometheus 数据目录
ExecStart=/usr/local/thanos/thanos sidecar --prometheus.url=http://localhost:9090 --tsdb.path=/data/prometheus/data --objstore.config-file=/usr/local/thanos/aliyun-oss.yaml --grpc-address=0.0.0.0:19090 --http-address=0.0.0.0:19091[Install]
WantedBy=multi-user.target
启动系统服务
#启动sidecar服务
systemctl daemon-reload && systemctl enable thanos-sidecar && systemctl start thanos-sidecar
#查看服务状态
systemctl status thanos-sidecar
2.2.3 部署Store Gateway
配置系统服务
vi /etc/systemd/system/thanos-store-gateway.service[Unit]
Description=Thanos Store Gateway
After=network-online.target[Service]
Restart=on-failure
ExecStart=/usr/local/thanos/thanos store --data-dir=/data/thanos/data --objstore.config-file=/usr/local/thanos/aliyun-oss.yaml --http-address=0.0.0.0:10902 --grpc-address=0.0.0.0:10901[Install]
WantedBy=multi-user.target
启动系统服务
#启动系统服务
systemctl daemon-reload && systemctl enable thanos-store-gateway && systemctl start thanos-store-gateway
#查看服务状态
systemctl status thanos-store-gateway
2.2.4 部署Query
配置系统服务
vi /etc/systemd/system/thanos-query.service[Unit]
Description=Thanos Query
After=network-online.target[Service]
Restart=on-failure
# --query.replica-label "replica" --query.replica-label "region" --> 加上后,thanos query 查询同一节点的数据时,会自动去重
ExecStart=/usr/local/thanos/thanos query --http-address=0.0.0.0:19192 --grpc-address 0.0.0.0:19092 --store=monitor1:19090 --store=monitor1:10901 --store=monitor2:19090 --store=monitor2:10901 --store=monitor3:19090 --store=monitor3:10901 --query.replica-label "replica" --query.replica-label "region"[Install]
WantedBy=multi-user.target
这边query配置里面需要配置3个部署节点的sidecar和gateway 的grpc地址
启动系统服务
#启动系统服务
systemctl daemon-reload && systemctl enable thanos-query && systemctl start thanos-query
#查看服务状态
systemctl status thanos-query
3. 部署成功
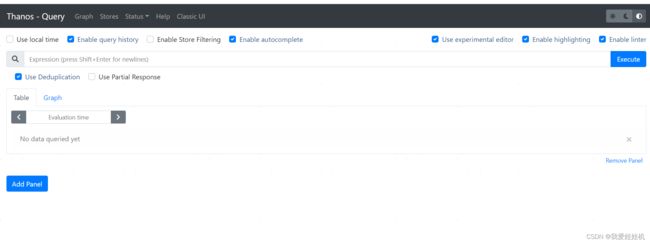
浏览器打开:http://monitor1:19192,出现如下界面
查看store
4.题外话
写文章首先是为了记录自己的部署过程,怕自己后面忘记;其次也是看看能不能在相关问题上帮助到大家,后面会继续更新一些组件级别的监控 ,比如flink、kafka、hbase、zk等;如果感兴趣的话,可以点点关注,谢谢大家
参考文章:使用 Thanos 实现 Prometheus 高可用和监控数据持久化 - 简书


