从微服务各组件入门微服务架构
微服务架构
四大组件:Nacos Ribbon OpenFeign Gateway
微服务八大金刚
nacos【name server】:注册中心,解决服务的注册与发现
Ribbon:客户端负载均衡器,解决微服务集群负载均衡问题
Openfeign:声明式HTTP客户端,解决微服务之间的远程调用问题
Sentinel:微服务流量防卫兵,以流量为入口,保护微服务,防止服务雪崩
gateway:微服务网关,服务集群的入口,路由转发以及负载均衡(全局认证,流控)
nacos【config】:配置中线,微服务配置文件的中心化管理,同时配置信息的动态刷新
sleuth:链路追踪
分布式事务
一、微服务架构
1.0:单体架构
所有的模块(功能)都集中在一个服务进程,对外提供服务。
不适用于互联网项目(访问量大、业务复杂),只适合传统项目(政府、学校、外包)
优化:搭建集群

单体架构优缺点

1.1:微服务架构


1.2:微服务架构的优势与缺点
优点

缺点

1.3:SpringCloud与微服务关系

注册中心动态感知服务上下线,记录列表
openfeign实现远程调用 ribbon实现负载均衡 senta组件实现分布式事务

1.4:SpringBoot与SpringCloud的关系

二:服务注册与发现
2.0:相关概念
分布式是不同服务做不同的事,而集群是多个服务实例做同一件事。有集群就要考虑负载均衡。

2.1:什么是服务注册与发现


2.2:注册中心对比
nacos:是阿里开源的,经过了阿里实践的
erueka:netflix公司的,现在不维护了,不开源了
zookeeper:更多应用于dubbo,大数据环境中安装kafka


三:nacos简介与架构
3.1:架构与功能

nacos功能

3.2:安装与配置

默认为集群,改为单机
![]()
3.3:nacos工作原理


四:微服务入门案例
4.1:boot与cloud版本

使用版本有对应关系


4.2:SpringCloud-alibaba

一代与二代五个方面的区别
注册中心;负载均衡器;服务降级熔断与限流;网关;配置中心。

4.3:版本确定

4.4:创建父工程
- 添加微服务基础依赖(3个)
- application properties
- 启动类加注解
- 暴露接口
服务消费者
- 同上3步
- 远程调用服务提供者的微服务
关键代码: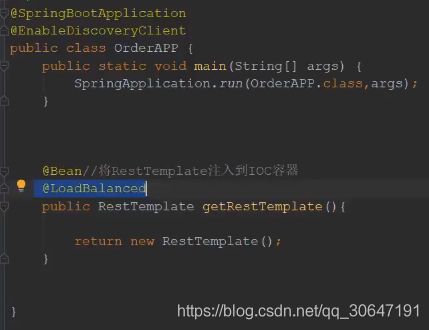
保存订单接口
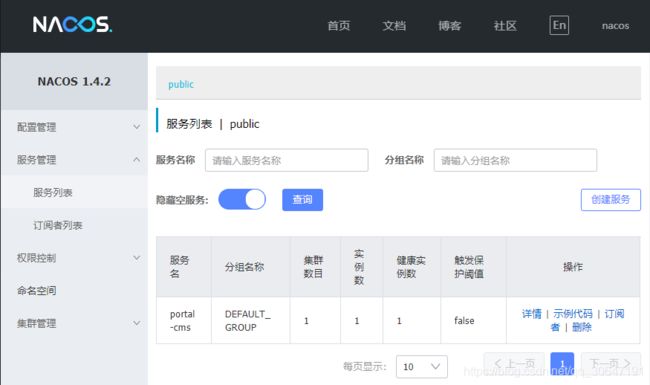
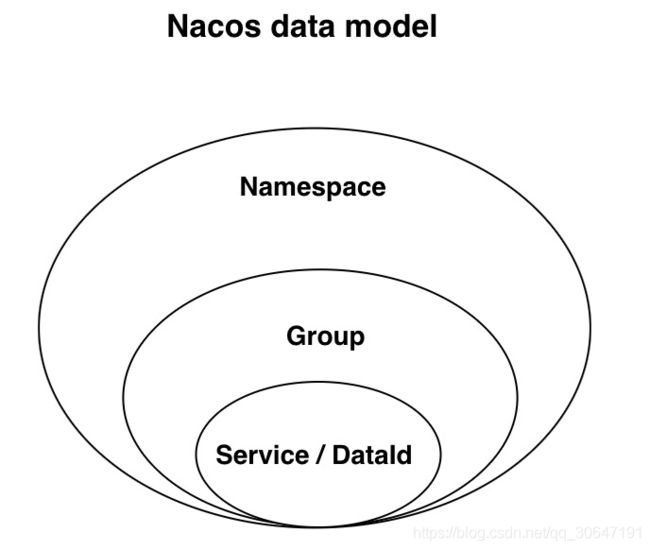
nacos领域模型
nacos领域模型:分类管理服务,同时实现服务的相互隔离。不同的namespace,服务之间不能相互访问;相同namespace,但不同的group,服务之间不能相互访问。
nacos数据模型key由三元组唯一确定,namespace默认的命名空间是public,默认的分组是DEFAULT_GROUP。
服务领域模型

配置领域模型
围绕配置,主要有两个关联的实体,一个是配置变更历史,一个是服务标签(用于打标分类,方便索引),由 ID 关联。

将服务注册到指定的namespace(public)和group(DEFAULT_GROUP)下
spring.cloud.nacos.discovery.namespace={自己命名的空间名}
#spring.cloud.nacos.discovery.group=DEFAULT_GROUP
报错: No instance available for {服务名}
启动微服务集群
server.port=${port:8000}
#获取port,若有值使用port值,若没有值使用8000
-Dport=8002
-Dport=8001
启动两个实例
默认就是轮询负载均衡

actuator 端点监控
#management.endpoints.web.exposure.include=*
#暴露所有的端点监控
五:RestTemplate
实现服务间远程调用
5.1:什么是RestTemplate

API简介
5.2:ForObject


5.3:ForEntity


六:负载均衡器Ribbon
Nacos:负责服务的注册与发现,动态感知服务的上线和下线
Ribbon:负责从服务列表中选取其中一个服务实例地址【负载均衡】,服务实例地址再交给resttemplate发送http请求
Ribbon:客户端的负载均衡器
6.1:Ribbon简介
![]()
客户端的服务器:Ribbon

服务端的服务器:Nginx就是典型的服务端负载均衡

Ribbon与Nginx负载均衡之间 的关系
Ribbon本地负载均衡
原理:在调用接口的时候、会在eureka注册中心上获取注册信息服务列表,获取到之后,缓存在jvm本地,使用本地实现rpc远程技术进行调用,即是客户端实现负载均衡
Nginx服务器负载均衡
客户端所有请求都会交给nginx,然后由nginx实现转发请求,即负载均衡是由服务端实现
应用场景:ribbon本地负载均衡适合微服务rpc远程调用,比如:dubbo,springcloud
nginx服务负载均衡适合于针对服务器端,比如:tomcat、jetty
6.2:Ribbon在项目中怎么使用


6.3:Ribbon的工作流程

6.4:Ribbon源码追踪


第四步:从实力列表中根据负载均衡策略获取一个实例
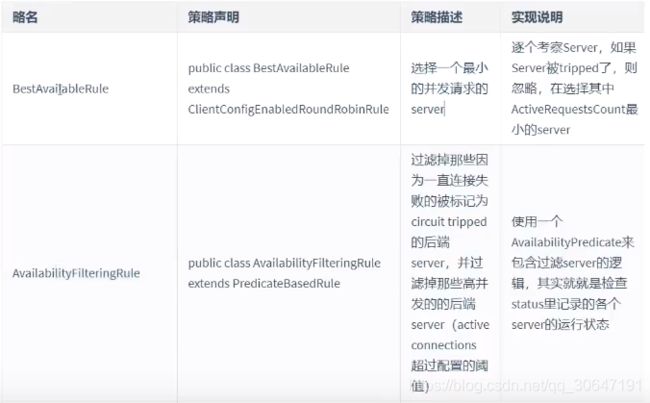

6.5:切换Ribbon负载均衡策略


6.6:解释为什么nacos关掉还能继续访问
nacos-client开启定时器,定期更新服务列表

七:nacos集群搭建
7.1:nacos集群架构

7.2:nacos集群搭建

八:Spring Cloud OpenFeign
声明式http客户端

8.1: 应用
示例:index首页微服务远程调用接口cms内容微服务
-
index新建service和impl和controller 以及新建api模块


-
jar包依赖:index依赖entity和api‘;api依赖openfeign 【注】openfeign包含ribbon,不必额外导入

-
index模块bootstrap配置 nacos配置中心配置

-
引导类注解 启动类引入openfeign注解 【注】openfeign basePackets属性配置

-
api微服务提供者暴露接口 portal-api中进行接口声明CmsClient【注】接口声明所有形参前要添加@RequestParam(“形参名”) 或者是 @PathVariable @RequestBody
-
使用时声明接口

-
调用处直接调 serviceimpl中实现远程调用 接口声明+调用

8.2: Ribbon和OpenFeign相关配置
#ribbon默认是(false)懒加载,懒加载第一次调用效率低  true:开启Ribbon的饥饿加载模式
ribbon:
  eager-load:
    enabled: true
    clients:  #指定需要饥饿加载的微服务
      - portal-goods
      - portal-cms
#openfeign配置某个微服务调用超时时间,单位毫秒
feign:
  client:
    config:
      portal-goods:
        read-timeout: 5
        connect-timeout: 5
      default:
        connect-timeout: 5000
        read-timeout: 10000
# default context 连接超时时间 :5000
# default context 读取超时时间 :10000
九:Nacos配置中心
9.1:为什么使用配置中心
中心化管理微服务的配置文件
分布式系统,配置文件存在问题

9.2:主流配置中心对比


9.3:配置管理领域模型

9.4:配置中心入门使用
1.创建namespace
2.创建文件(dataid) 新建配置名称DataId规范:{微服务名称}-{环境}.yml
3.微服务集成nacos配置中心,拉取配置文件

4.微服务添加配置文件bootstrap.properties

检索文件公式
![]()
5.启动微服务,验证是否生效
9.5:多环境切换
以端口为例,演示多环境切换
下面sit测试环境改为pro即改为生产环境下的

9.6:nacos配置动态刷新
@RefreshScope //整个控制器 只要从配置中心获取的数据都支持动态刷新
9.7:动态刷新连接池大小

localhost:8080/druid/index.html 进入Druid监控台

9.8:nacos共享配置
common.yml
spring:
  datasource:
    druid:
      driver-class-name: com.mysql.jdbc.Drive
      username: root
      password: 123456
      url: jdbc:mysql://42.192.69.94:33306/mall?userUnicode=true&characterEncoding=utf8
      max-active: 4 #设置数据库连接池最大连接数
  cloud:
    nacos:
        discovery:
            ip: 127.0.0.1
            namespace: pro
            group: DEFAULT_GROUP
            sever-addr: localhost:8848
    sentinel:
        transport:
            port: 8719
            dashboard: 127.0.0.1:8888
        eager: true
qiniu:
  url: http://www.baidu.com
指定共享配置文件

动态刷新共享文件需要指定

9.9:配置文件版本管理

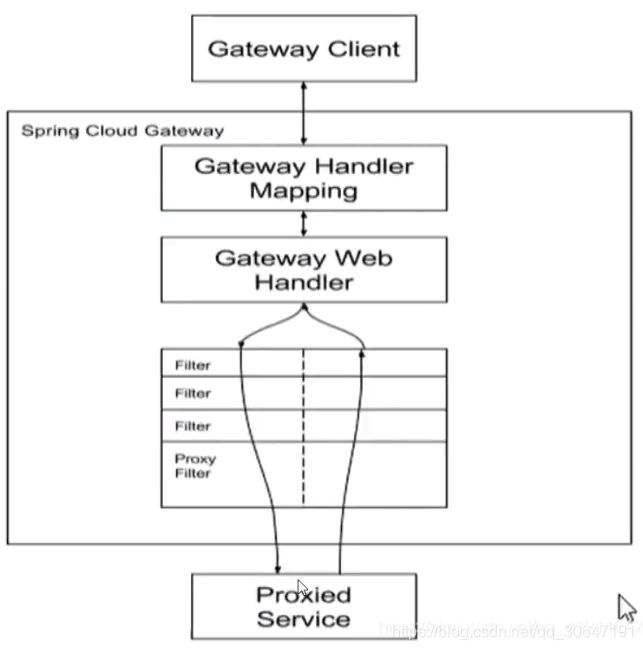
10:Gateway
10.1:Gateway简介
为什么使用网关
所有的终端只需知道网关的地址,且网关本身也是一个微服务,可以很好解决统一入口问题。
网关搭建集群,前端通过nginx转发请求给网关,网关转发请求给微服务。

什么是springcloud-gateway
微服务横切面即共性的东西可以在网关中做


springcloud-gateway特点

gateway核心概念


gateway工作流程

搭建网关
- pom依赖
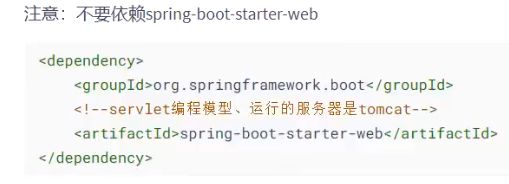
<dependencies>

    <dependency>
        <groupId>org.springframework.cloudgroupId>
        <artifactId>spring-cloud-starter-gatewayartifactId>
    dependency>

    <dependency>
        <groupId>org.springframework.bootgroupId>
        <artifactId>spring-boot-starter-actuatorartifactId>
    dependency>
    <dependency>
        <groupId>com.alibaba.cloudgroupId>
        <artifactId>spring-cloud-starter-alibaba-nacos-discoveryartifactId>
    dependency>

    <dependency>
        <groupId>org.springframework.cloudgroupId>
        <artifactId>spring-cloud-starter-alibaba-nacos-configartifactId>
        <version>0.9.0.RELEASEversion>
    dependency>

dependencies>
- 基本配置
配置文件采用yml
spring:
  application:
    name: portal-geteway
  cloud:
    gateway:
      routes:
         gateway:
      		routes: #配置路由 转发到微服务
        	  - id: portal-index #id是路由的唯一标识,不能重复
          		uri: lb://portal-index #指定路由转发目的服务器
          		predicates:  #谓词
            	  - Path=/index/** # /**匹配所有请求,转发到uri
server:
  port: 8040
- 引导类
@SpringBootApplication
@EnableDiscoveryClient
public class GatewayApp {
    public static void main(String[] args) {
        SpringApplication.run(GatewayApp.class,args);
    }
}
10.2:路由配置
静态路由 :uri: http://localhost:8080 #指定路由转发目的地址
动态路由 :uri: lb://portal-index #指定路由转发目的服务器
spring:
  cloud:
    gateway:
      routes:
         gateway:
      		routes: #配置路由 转发到微服务
        	  - id: portal-index #id是路由的唯一标识,不能重复
          		uri: lb://portal-index #指定路由转发目的服务器
          		predicates:  #谓词
            	  - Path=/index/** # /**匹配所有请求,转发到uri
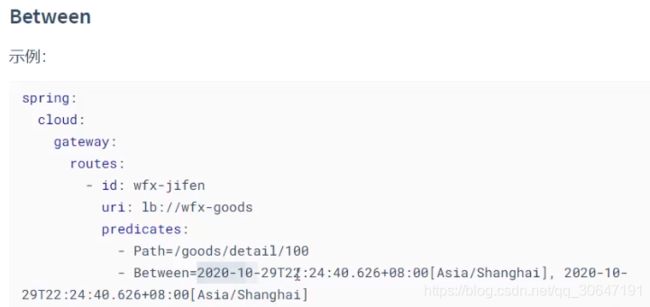
10.3:谓词工程详解
匹配命中转发

谓词工厂:路径Path

谓词工厂:时间Date
时间格式 :ZoneDataTime
after可以应用于秒杀的场景


谓词工厂:Cookie

谓词工厂:Header
支持写正则表达式

其他谓词工厂


自定义谓词工厂


10.4:过滤器
内置过滤器

使用内置过滤器


自定义过滤器


全局过滤器

全局认证功能实现
法一:全局过滤器不用配置 直接@Component放在ioc容器即可
order数字越小越先执行

法二:@Bean (组件放入IOC容器中)

10.5:gateway整合sentinel
整合步骤
BlockException异常处理
10.6 gateway跨域
由于gateway使用的额是webflux,而不是springmvc,所以需要先关闭springmvc的cors,再从gateway的filter里面设置cors就行了。
