VUE 3——2:深入组件
在前面简单介绍了什么是组件化以及父子组件之间的简单数据交互,并举了一些小,这里就更详细地讲解一下。
文章目录
- 一,组件注册
-
- (一)组件命名
- (二)全局注册
- (三)局部注册
- 二,Props
-
- (一)Prop 值的类型与命名
- (二)使用 Prop 向子组件传值
- (三)单向数据流
- (四)Prop 校验
- 三,透传 Attribute
-
- (一)Attribute 继承
- (二)禁用 Attribute 继承
- (三)多个根节点上的 Attribute 继承
- 四,组件事件
-
- (一)事件名
- (二)父组件监听子组件事件
- (三)使用 v-model 的参数
- (四)处理 v-model 修饰符
- 五,插槽
-
- (一)插槽的内容
- (二)在插槽中插值
- (三)备用内容
- (四)具名插槽
- (五)作用域插槽
-
- 1,使用 slot prop 扩展子组件数据的作用域
- 2,独占默认插槽的缩写语法
- 3,解构 slot prop
- (六)动态插槽名
- 六,Provide 与 Inject
-
- (一)实现长距离的 props
- (二)处理 Provide 与 Inject 的响应性
- (三)更细节的补充
- 七,动态组件 & 异步组件
-
- (一)在动态组件上使用 keep-alive
- (二)异步组件
一,组件注册
(一)组件命名
给变量名是一件说大不大说小不小的事,为了强调编码的统一性,出现了一些接受度比较高的编码规范。
Vue 官方认为,为了避免与一般的 HTML 元素产生冲突,需要在创建并使用组件之前,必须先给组件一个符合 Vue 规范的组件名。
由于我们这里还没接触到工程化的 Vue 项目,所以就说说最基础的命名规范.
使用 kebab-case 格式:
- 全部小写
- 包含连字符
<person-info></person-info>
<posts-info></posts-info>

    app.component('person-info', {
		...
    });

    app.component('posts-info', {
		...
    })
使用 PascalCase 格式:
<my-component-name> </my-component-name>
或
<MyComponentName> </MyComponentName>
都可以

	app.component('MyComponentName', {
		...
	})
对于组件命名,官方推荐使用 PascalCase 方式。
更多命名规范,请参考 Style Guide。
(二)全局注册
到目前为止,我们的组就都是通过 app.component 的方式——全局注册——来创建组件的:
Vue.createApp({...}).component('my-component-name', {
  // ... 选项 ...
})
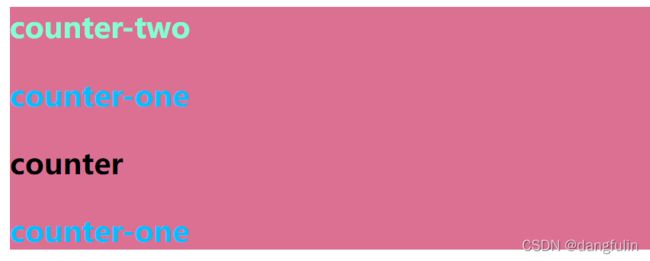
全局注册的组件可以用在任何新创建的组件实例的模板中:
<div id="app" style="background-color:palevioletred">
<counter-two>counter-two>
<h3>counterh3>
<counter-one>counter-one>
div>
<script>
// 1,创建根组件
const Root = {
data() {
return {
count: 0
}
},
// 可以在根组件中使用全局组件
// template: `
// counter-one
`
});
// 3,注册一个名为 counter-two 的全局组件
app.component('counter-two', {
template: `
counter-two
尽管全局注册的子组件的使用位置非常灵活,但当这种子组件不再使用时,却仍存在于代码中,它会一直挂载在根组件上,这明显是在浪费网络资源和内存资源,同时也浪费文件资源打包时间。
而且全局组件就和全局变量一样,如果到处都在用,则会增加代码的复杂性,从而时的代码难以维护。
(三)局部注册
相比之下,局部注册的组件需要在使用它的父组件中显式导入,并且只能在该父组件中使用。它的优点是使组件之间的依赖关系更加明确,并且对 tree-shaking 更加友好。
局部组件可以通过普通的 JavaScript 对象来定义:
	const ComponentA = {
	  /* ... */
	}
	const ComponentB = {
	  /* ... */
	}
	const ComponentC = {
	  /* ... */
	}
然后在 components property 中使用局部组件:
	// 在应用中使用
	const app = Vue.createApp({
	  components: {
	    'component-a': ComponentA,
	    'component-b': ComponentB
	  }
	})

	// 在一个子组件中使用一个局部组件
	const ComponentB = {
	  components: {
	    'component-a': ComponentA
	  }
	  // ...
	}
举个例子:
<div id="app" style="background-color:palevioletred">
<counter-two>counter-two>
<counter-one>counter-one>
div>
<script>
// 1,创建根组件
const Root = {
data() {
return {
count: 0
}
},
}
// 2,创建应用
const app = Vue.createApp(Root)
// 3,注册一个名为 counter-one 的全局组件
app.component('counter-one', {
template: `
counter-one
`
});
// 3,创建一个普通对象
const CounterThree = {
template: `
counter-three
`,
}
// 3,创建一个普通对象
const CounterFour = {
components: { // 注册一个局部组件
'component-three': CounterThree
},
// 在一个组件中使用一个局部组件
template: `
counter-three
counter-two
二,Props
(一)Prop 值的类型与命名
目前为止,我们只看到了以字符串数组形式列出的 prop:
	props: ['name']
	props: ['name','title']
还可以以对象的形式为组件的 props 标注类型:
props: {
  title: String,
  likes: Number,
  isPublished: Boolean,
  commentIds: Array,
  name: Object,
  callback: Function,
  contactsPromise: Promise // 或任何其他构造函数
}
对象形式的 props 声明还提供了许多额外的功能,后面再说。
因为 HTML 元素中的 attribute 名是大小写不敏感的,所以浏览器会把所有大写字符解释为小写字符。这意味着当你使用 DOM 模板时,camelCase (驼峰命名法) 的 prop 名需要使用其等价的 kebab-case (短横线分隔命名) 命名:
<blog-post post-title="hello!">blog-post>
<script>
const app = Vue.createApp({})
app.component('blog-post', {
// 在 JavaScript 中使用 camelCase
props: ['postTitle'],
template: '{{ postTitle }}
'
})
script>
(二)使用 Prop 向子组件传值
除了像之前那样给 prop 传入一个静态的字符类型的值:
    <person-info name="xiaolu2333"></person-info>
    <post-info title="My journey with Vue"></post-info>
还能通过 v-bind 指令动态传入值:
    <posts-info v-for="post in posts"
                :title="post.title"
                :content="post.content"
                :style="styleObject"
    >posts-info>
可以传递多种类型的值,但具体操作起来会有所不同:
1,传入一个数字
<blog-post :likes="42">blog-post>


<blog-post :likes="post.likes">blog-post>
2,传入一个布尔值
<blog-post is-published>blog-post>


<blog-post :is-published="false">blog-post>


<blog-post :is-published="post.isPublished">blog-post>
3,传入一个数组
<blog-post :comment-ids="[234, 266, 273]">blog-post>


<blog-post :comment-ids="post.commentIds">blog-post>
4,传入一个对象
<blog-post
  :author="{
    name: 'Veronica',
    company: 'Veridian Dynamics'
  }"
>blog-post>


<blog-post :author="post.author">blog-post>
5,传入一个对象的所有 property
如果想要将一个对象的所有 property 都作为 prop 传入,可以使用不带参数的 v-bind:
对于给定对象:
post: {
  id: 1,
  title: 'My Journey with Vue'
}

<blog-post v-bind="post">blog-post>
等价于:
<blog-post v-bind:id="post.id" v-bind:title="post.title">blog-post>
举个例子:向子组件传递文章数据并渲染:
DOCTYPE html>
<html>
<head>
<meta charset="utf-8">
<script src="https://unpkg.com/vue@next">script>
head>
<body>
<div id="app">
<div class="demo" :style="themeSettings">
<button
v-for="tab in tabObj.tabs"
:key="tab"
:class="['tab-button', { active: tabObj.currentTab === tab }]"
@click="tabObj.currentTab = tab"
>
{{ tab }}
button>
<keep-alive>
<component :is="currentTabComponent" class="tab">component>
keep-alive>
div>
<div :style="themeSettings">
<user-info :userinfo="userInfo">user-info>
<theme-switcher @switch-theme="switchTheme">切换主题theme-switcher>
<search-post v-model="searchText">search-post>
<posts-list v-for="post in publishedPostsList"
:key="post.id"
:id="post.id"
:author="post.author"
:title="post.title"
:only-fans="post.onlyFans"
:likes="post.likes"
:tags="post.tags"
>
posts-list>
div>
div>
<script>
const Root = {
data() {
return {
tabObj: {
currentTab: "Home",
tabs: ["Home", "Posts", "Archive"],
},
userInfo: {
username: 'xiaolu2333',
grade: 12,
},
postsList: [
{
id: 1, // 文章id,数值类型
author: 'xiaolu2333', // 文章作者,字符串类型
title: 'My journey with Vue', // 文章标题,字符串类型
status: 1, // 文章状态,数值类型,0表示草稿,1表示已发布
onlyFans: false, // 是否仅限粉丝查看,布尔类型
likes: 101, // 点赞数,数值类型
tags: ['vue', 'vue.js', 'vue3'], // 文章标签,数组类型
content: 'Vue is awesome!', // 文章内容,字符串类型
comments: [ // 评论列表,json
{
id: 1, // 评论id,数值类型
username: 'xiaolu2333', // 评论者用户名,字符串类型
content: 'good!' // 评论内容,字符串类型
},
{
id: 2,
username: 'xiaolu2333',
content: 'nice!'
}
]
},
{
id: 2,
author: 'xiaolu2333',
title: 'My journey with JavaScript',
status: 1,
onlyFans: true,
likes: 96,
tags: ['javascript', 'js'],
content: 'JavaScript is awesome!',
comments: [
{
id: 1,
username: 'xiaolu2333',
content: 'good!'
},
{
id: 2,
username: 'xiaolu2333',
content: 'nice!'
}
]
},
{
id: 3,
author: 'xiaolu2333',
title: 'My journey with HTML',
status: 1,
onlyFans: false,
likes: 97,
tags: ['html', 'html5'],
content: 'HTML is awesome!',
comments: [
{
id: 1,
username: 'xiaolu2333',
content: 'good!'
},
{
id: 2,
username: 'xiaolu2333',
content: 'nice!'
}
]
},
{
id: 4,
author: 'xiaolu666',
title: 'My journey with CSS',
status: 1,
onlyFans: true,
likes: 199,
tags: ['css', 'css3'],
content: 'CSS is awesome!',
comments: [
{
id: 1,
username: 'xiaolu2333',
content: 'good!'
},
{
id: 2,
username: 'xiaolu2333',
content: 'nice!'
}
]
},
{
id: 5,
author: 'xiaolu666',
title: 'My journey with Node.js',
status: 0,
onlyFans: true,
likes: 121,
tags: ['node', 'node.js'],
content: 'Node.js is awesome!',
comments: [
{
id: 1,
username: 'xiaolu2333',
content: 'good!'
},
{
id: 2,
username: 'xiaolu2333',
content: 'nice!'
}
]
},
{
id: 6,
author: 'xiaolu666',
title: 'My journey with spring boot',
status: 1,
onlyFans: true,
likes: 89,
tags: ['spring', 'spring boot'],
content: 'Spring boot is awesome!',
comments: [
{
id: 1,
username: 'xiaolu2333',
content: 'good!'
},
{
id: 2,
username: 'xiaolu2333',
content: 'nice!'
}
]
}
],
themeSettings: {
color: 'green',
background: 'white'
},
searchText: ""
}
},
methods: {
switchTheme(clickCounter) {
console.log(clickCounter);
this.themeSettings.color = '#' + Math.floor(Math.random() * 0xffffff).toString(16).padEnd(6, '0');
this.themeSettings.background = '#' + Math.floor(Math.random() * 0xffffff).toString(16).padEnd(6, '0');
},
},
watch: {
searchText(newVal, oldVal) {
let searchResult = [];
if (newVal !== "") {
for (let i = 0; i < this.postsList.length; i++) {
if (this.postsList[i].title.toLowerCase().includes(newVal.toLowerCase())) {
searchResult.push(this.postsList[i]);
}
}
console.log(searchResult);
}
}
},
computed: {
// 根据tabObj.tabs的值,动态计算出当前tab对应的组件名
currentTabComponent() {
return 'Tab' + this.tabObj.currentTab
},
// 过滤出所有已发布的文章
publishedPostsList() {
let publishedPosts = [];
for (let i = 0; i < this.postsList.length; i++) {
if (this.postsList[i].status === 1) {
publishedPosts.push(this.postsList[i]);
}
}
return publishedPosts;
},
}
}
const app = Vue.createApp(Root)
app.component('TabHome', {
template: `Home page`
})
app.component('TabPosts', {
template: `Posts page`
})
app.component('TabArchive', {
template: `Archive page`
})
app.component('user-info', {
props: ['userinfo'],
template: `
用户名:{{ userinfo.username }} 等级:{{ userinfo.grade }}
`
})
app.component('theme-switcher', {
emits: ['switch-theme'],
data() {
return {
clickCounter: 0
}
},
template: `
`
})
app.component('search-post', {
props: ['modelValue'],
emits: ['update:modelValue'],
template: `
`
})
app.component('posts-list', {
props: {
id: Number, // 文章id,指定类型为Number
author: String, // 文章作者,指定类型为String
title: String, // 文章标题,指定类型为String
onlyFans: Boolean, // 是否仅限粉丝查看,指定类型为Boolean
likes: Number, // 点赞数,指定类型为Number
tags: Array, // 标签,指定类型为Array
},
data() {
return {
likeCounter: this.likes, // 不能修改 props 里的值,所以这里用 data 里的值来保存其快照
highQuality: false,
}
},
methods: {
// 点赞数加一
likePost() {
this.likeCounter++; // 修改 data 里的快照,而不是 props 里的值
}
},
watch: {
// 监听 likeCounter 的变化,符合条件时修改 props 里的值
likeCounter() {
if (this.likeCounter >= 100) {
this.highQuality = true;
}
}
},
computed: {
isOnlyFans() {
return this.onlyFans;
},
isHighQuality() {
return this.highQuality;
}
},
created() { // 使用生命周期钩子,在初始化各个property后执行
// 如果点赞数大于等于100,就将 highQuality 设为 true
if (this.likes >= 100) { // 使用this访问props内容
this.highQuality = true;
}
},
template: `
{{ title }}
`
})
const vm = app.mount('#app')
script>
body>
html>
简单列举一下用到的基本的东西:
- 创建 Vue 应用
- 插值
- data,methods,watch,computed
- 生命周期钩子。
- v-if,v-for,v-on,v-model
- 绑定 style
- 绑定事件
- 创建子组件
- 通过 props 向子组件传值
- 通过 $emit 监听子组件事件
- 动态组件
(三)单向数据流
所有的 props 都使得其父子之间形成了一个单向下行绑定:父级数据的更新会通过 props 实时向下流动到子组件中,但是反过来则不行。也就是说,props 是只读的。
有两种常见的试图变更 props 的情形:
- 这个 prop 用来向子组件传递一个初始值;子组件将其作为一个本地的数据来使用。在这种情况下,子组件最好定义一个本地的
dataproperty 并将这个 prop 作为其初始值:
	props: ['initialCounter'],
	data() {
	  return {
	    counter: this.initialCounter
	  }
	}
- 这个 prop 以一种原始的值传入,后续需要进行各种转换。在这种情况下,子组件最好定义一个本地的
computedproperty 来计算这个 prop:
	props: ['size'],
	computed: {
	  normalizedSize() {
	    return this.size.trim().toLowerCase()
	  }
	}
在 JavaScript 中对象和数组是通过引用传入的,所以对于一个数组或对象类型的 prop 来说,在子组件中改变这个对象或数组本身将会影响到父组件的状态,且 Vue 无法为此向你发出警告。作为一个通用规则,应该避免修改任何 prop,包括对象和数组,因为这种做法无视了单向数据绑定,且极有可能会导致不可追溯的错误。
在上面的文章列表组件中,我们严格地遵守了这两条规定!
但如果确实需要在子组件中变更 prop,则子组件应该抛出一个事件来通知父组件作出变更,具体做法后面来说。
就像上面的点击事件一样:父组件通过 props 传递数据给子组件,并通过 $emit 监听子组件中的点击事件 ,点赞数量的变化操作由父组件实现,数据又通过 prop 传递给子组件。
(四)Prop 校验
为了能对传入 props 的数据进行类型验证,除了显式地指定值的类型外,还能进一步提供一个带有验证要求的对象:
export default {
  props: {
    // 基础类型检查
    //(给出 `null` 和 `undefined` 值则会跳过任何类型检查)
    propA: Number,
    // 多种可能的类型
    propB: [String, Number],
    // 必传,且为 String 类型
    propC: {
      type: String,
      required: true
    },
    // Number 类型的默认值
    propD: {
      type: Number,
      default: 100
    },
    // 对象类型的默认值
    propE: {
      type: Object,
      // 对象或者数组应当用工厂函数返回。
      // 工厂函数会收到组件所接收的原始 props
      // 作为参数
      default(rawProps) {
        return { message: 'hello' }
      }
    },
    // 自定义类型校验函数
    propF: {
      validator(value) {
        // The value must match one of these strings
        return ['success', 'warning', 'danger'].includes(value)
      }
    },
    // 函数类型的默认值
    propG: {
      type: Function,
      // 不像对象或数组的默认,这不是一个工厂函数。这会是一个用来作为默认值的函数
      default() {
        return 'Default function'
      }
    }
  }
}
一些补充细节:
- 所有 prop 默认都是可选的,除非声明了 required: true。
- 除 Boolean 外的未传递的可选 prop 将会有一个默认值 undefined。
- Boolean 类型的未传递 prop 将被转换为 false。这可以通过为它设置 default 来更改——例如:设置为 default: undefined 将与非布尔类型的 prop 的行为保持一致。
- 如果声明了 default 值,那么在 prop 的值被解析为 undefined 时,无论 prop 是未被传递还是显式指明的 undefined,都会改为 default 值。
当 prop 验证失败的时候,Vue 将会产生一个控制台的警告。
type 可以是下列原生构造函数中的一个:
- String
- Number
- Boolean
- Array
- Object
- Date
- Function
- Symbol
type 也可以是自定义的类或构造函数,Vue 将会通过 instanceof 来检查类型是否匹配:
class Person {
  constructor(firstName, lastName) {
    this.firstName = firstName
    this.lastName = lastName
  }
}

props: {
  author: Person
}
prop 会在一个组件实例创建之前就被验证,所以实例的 property (如 data、computed 等) 在 default 或 validator 函数中是不可用的。
三,透传 Attribute
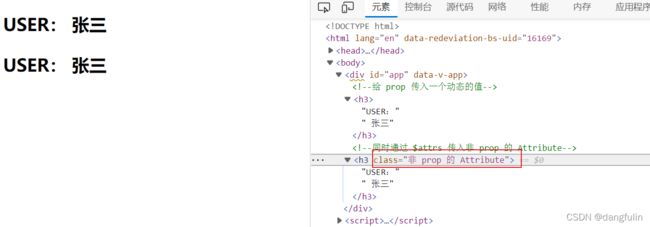
“透传 attribute”指的是传递给一个组件,却没有被该组件声明为 props 或 emits 的 attribute 或者 v-on 事件监听器。常见的示例包括 class、style、id 等 attribute。
比如父组件向子组件传递 Attribute:
<div id="app">
<person-info :info="info">USER:person-info>
<person-info :info="info" class="非 prop 的 Attribute">USER:person-info>
div>
<script>
const Root = {
data() {
return {
info: {
name: '张三',
age: 18,
}
}
}
}
const app = Vue.createApp(Root)
app.component('person-info', {
props: ['info'],
template: `
`
});
const vm = app.mount('#app')
script>
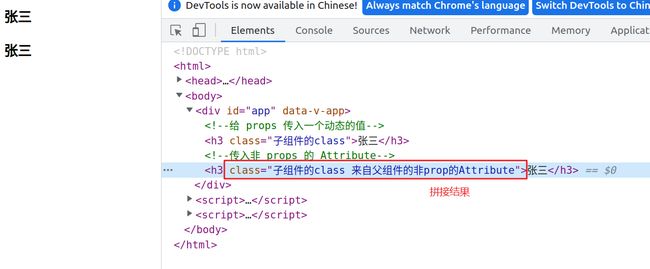
效果就是,子组件默认直接就获得并使用了这个来自父组件的 Attribute:
(一)Attribute 继承
子组件这种对传入自父组件的 Attribute 的继承能力,具体表现为将传入的 Attribute 的值拼接在其根元素的同名 Attribute 的值后面:
<div id="app">

    <person-info :info="info">person-info>

    <person-info :info="info" class=" 来自父组件的非prop的Attribute">person-info>
div>

<script>
    const Root = {
        data() {
            return {
                info: {
                    name: '张三',
                    age: 18,
                }
            }
        }
    }

    const app = Vue.createApp(Root)

    app.component('person-info', {
        props: ['info'],
        template: `

          {{ info.name }}
          `
    });
    const vm = app.mount('#app')
script>
同样的规则也适用于事件监听器,例如 @click 将作为 $attrs.onClick 进行传递。
<div class="app">
<p>选择职业技能等级与职业时长:p>
<date-level @change="showChange">date-level>
<date-duration @change="showChange">date-duration>
<p>你选择了 {{ info.level }} {{ info.duration }}p>
div>
<script>
const Root = {
data() {
return {
info: {
name: '张三',
age: 18,
level: '初级',
duration: '1年'
}
}
},
methods: {
showChange(event) {
if (event.target.className === 'level') {
this.info.level = event.target.value
} else if (event.target.className === 'duration') {
this.info.duration = event.target.value
}
console.log(event.target.value) // 将打印所选选项的值
}
}
}
const app = Vue.createApp(Root)
app.component('date-level', {
template: `
`
})
app.component('date-duration', {
template: `
`
})
const vm = app.mount('.app')
script>
change 事件监听器将从父组件传递到子组件,它将在原生 的 change 事件上触发,因此我们不需要显式地从 子组件再抛出事件。
效果如下:

子组件可以通过 $attrs property 访问这些 Attribute:
(二)禁用 Attribute 继承
如果你不希望组件的根元素继承 attribute,可以在组件的选项中设置 inheritAttrs: false,然后在除组件的根元素以外的元素上使用 v-bind="$attrs":
	app.component('date-picker', {
	  inheritAttrs: false,
	  template: `


	  `
	})
(三)多个根节点上的 Attribute 继承
与只有单个根节点的组件不同,具有多个根节点的组件不具有自动 attribute fallthrough 行为。如果未显式绑定 $attrs,将发出运行时警告。
<custom-layout id="custom-layout" @click="changeValue">custom-layout>
<script>
...
// 这将发出警告
app.component('custom-layout', {
template: `
...
...
`
})
// 没有警告,$attrs 被传递到 元素
app.component('custom-layout', {
template: `
...
...
`
})
...
script>
四,组件事件
(一)事件名
与组件名和 prop 名一样,事件名提供了自动的大小写转换。如果在子组件中触发一个以 camelCase (驼峰式命名) 命名的事件,则需要在父组件中添加一个 kebab-case (短横线分隔命名) 的监听器。
<my-component @my-event="doSomething">my-component>

<script>
	...
	this.$emit('myEvent')
	...
script>
(二)父组件监听子组件事件
可以像前面我们做过的那样用 $emit('event-name', value) 的形式抛出事件的同时抛出一个值:
<posts-info v-for="post in posts"
:title="post.title"
:style="styleObject"
从子组件捕获事件,并获得值
@minish-text="postFontSize -= $event"
@enlarge-text="postFontSize += $event"
>posts-info>
<script>
app.component('posts-info', {
props: ['title', 'content'],
template: `
{{ title }}
——{{ content }}
`
})
script>
还可以在子组件中的 emits property 上定义可能抛出的事件名:
- 官方也建议所有会被抛出的事件都放到这里,以便更好地记录组件应该如何工作。
	app.component('custom-form', {
	  emits: ['inFocus', 'submit']
	})
甚至还能为抛出的事件创建验证:
	app.component('custom-form', {
	  emits: {
	    // 没有验证
	    click: null,

	    // 验证 submit 事件
	    submit: ({ email, password }) => {
	      if (email && password) {
	        return true
	      } else {
	        console.warn('Invalid submit event payload!')
	        return false
	      }
	    }
	  },
	  methods: {
	    submitForm(email, password) {
	      this.$emit('submit', { email, password })
	    }
	  }
	})
(三)使用 v-model 的参数
前面讲过,自定义事件也可以用于创建支持 v-model 的自定义输入组件,只不过有比较多的限制:
<div id="app">
<custom-input v-model="searchText">custom-input>
div>
<script>
// 1,创建根组件
const Root = {
...
}
// 2,创建应用
const app = Vue.createApp(Root)
// 在组件上使用 v-model 自定义输入框
app.component('custom-input', {
props: ['modelValue'],
emits: ['update:modelValue'],
template: `
`
})
// 4,挂载应用实例到 DOM,创建根组件实例
const vm = app.mount('#app')
script>
- 将子组件中
valueattribute 绑定到一个名叫modelValue的propsProperty上。 - 将子组件中的 input 事件通过
emitsProperty 自定义的update:modelValue事件抛出。
但我们实际上是能够将这个 modelValue 关联的 prop 作为 v-model 的参数绑定到父组件中具体的 data Property:
<div id="app">
    <my-component v-model:title="bookTitle">my-component>
div>

<script>
    // 1,创建根组件
    const Root = {
        data() {
            return {
                bookTitle: 'Vue3'
            }
        }
    }

    // 2,创建应用
    const app = Vue.createApp(Root)

    // 3,在组件上使用 v-model 自定义输入框
    app.component('my-component', {
        props: {
            title: String
        },
        emits: ['update:title'],
        template: `

          {{ title }}
        `
    })

    // 4,挂载应用实例到 DOM,创建根组件实例
    const vm = app.mount('#app')
script>
进一步,可以在单个组件实例上创建多个 v-model 绑定:
<div id="app">
<user-name
v-model:first-name="userInfo.firstName"
v-model:last-name="userInfo.lastName"
>user-name>
div>
<script>
// 1,创建根组件
const Root = {
data() {
return {
userInfo: {
firstName: '',
lastName: ''
}
}
}
}
// 2,创建应用
const app = Vue.createApp(Root)
// 3,在组件上使用 v-model 自定义输入框
app.component('user-name', {
props: {
firstName: String,
lastName: String
},
emits: ['update:firstName', 'update:lastName'],
template: `
`
})
// 4,挂载应用实例到 DOM,创建根组件实例
const vm = app.mount('#app')
script>
(四)处理 v-model 修饰符
除了使用内置修饰符——.trim、.number 和 .lazy 之外,还能使用自定义修饰符来扩展对输入的处理。
首先,添加到组件 v-model 的修饰符会通过 modelModifiers prop 提供给组件。
<div id="app">
    <my-component v-model.capitalize="myText">my-component>
    {{ myText }}
div>

<script>
    // 1,创建根组件
    const Root = {
        data() {
            return {
                myText: ''
            }
        }
    }

    // 2,创建应用
    const app = Vue.createApp(Root)

    // 3,在组件上使用 v-model 自定义输入框
    app.component('my-component', {
        props: {
            modelValue: String,
            modelModifiers: {
                default: () => ({})
            }
        },
        emits: ['update:modelValue'],
        methods: {
            // 本质就是在输入框上绑定了一个事件,实现对出入的处理
            emitValue(e) {
                let value = e.target.value
                // 将输入的首字母转换为大写
                if (this.modelModifiers.capitalize) {
                    value = value.charAt(0).toUpperCase() + value.slice(1)
                }
                this.$emit('update:modelValue', value)
            }
        },
        template: `

          将输入的首字母转换为大写:
        `
    })

    // 4,挂载应用实例到 DOM,创建根组件实例
    const vm = app.mount('#app')
script>
五,插槽
插槽就是一种内容分发机制,就像我们前面讲到的那样:
<div id="app">
    <todo-button>add todotodo-button>
div>

<script>
    // 1,创建根组件
    const Root = {
        data() {
            return {
                username: ''
            }
        }
    }

    // 2,创建应用
    const app = Vue.createApp(Root)

    // 3,
    app.component('todo-button', {
        template: `


        `
    })

    // 4,挂载应用实例到 DOM,创建根组件实例
    const vm = app.mount('#app')
script>
渲染结果就是 “add todo” 会替换
(一)插槽的内容
插槽除了能包含文本字符串之外,还可以包含任何模板代码,包括 HTML:
    <todo-button>
        Add todo
        <i class="fas fa-plus" style="color: red"> into this listi>
    todo-button>
或包含其他组件:
	<todo-button>

	  <font-awesome-icon name="plus">font-awesome-icon>
	  Add todo
	todo-button>
(二)在插槽中插值
插槽可以访问父组件范围的数据,因为数据是在父组件中定义的:
<div id="app">
    list: {{ item }}
    <br>
    <todo-button>
        # 可以访问父组件的 data prop.<br>
        Inserts "fourth" into the list after {{ item[item.length - 1] }}<br>
    todo-button>
    <br>
    list: {{ item }}
div>

<script>
    const Root = {
        data() {
            return {
                username: 'xiaolu2333',
                item: ['first', 'second', 'third']
            }
        }
    }

    const app = Vue.createApp(Root)

    app.component('todo-button', {
        template: `


        `
    })

    const vm = app.mount('#app')
script>
(三)备用内容
有时为一个插槽指定备用 (或者说是默认的) 内容是很有用的,它只会在没有向插槽提供内容时被渲染:
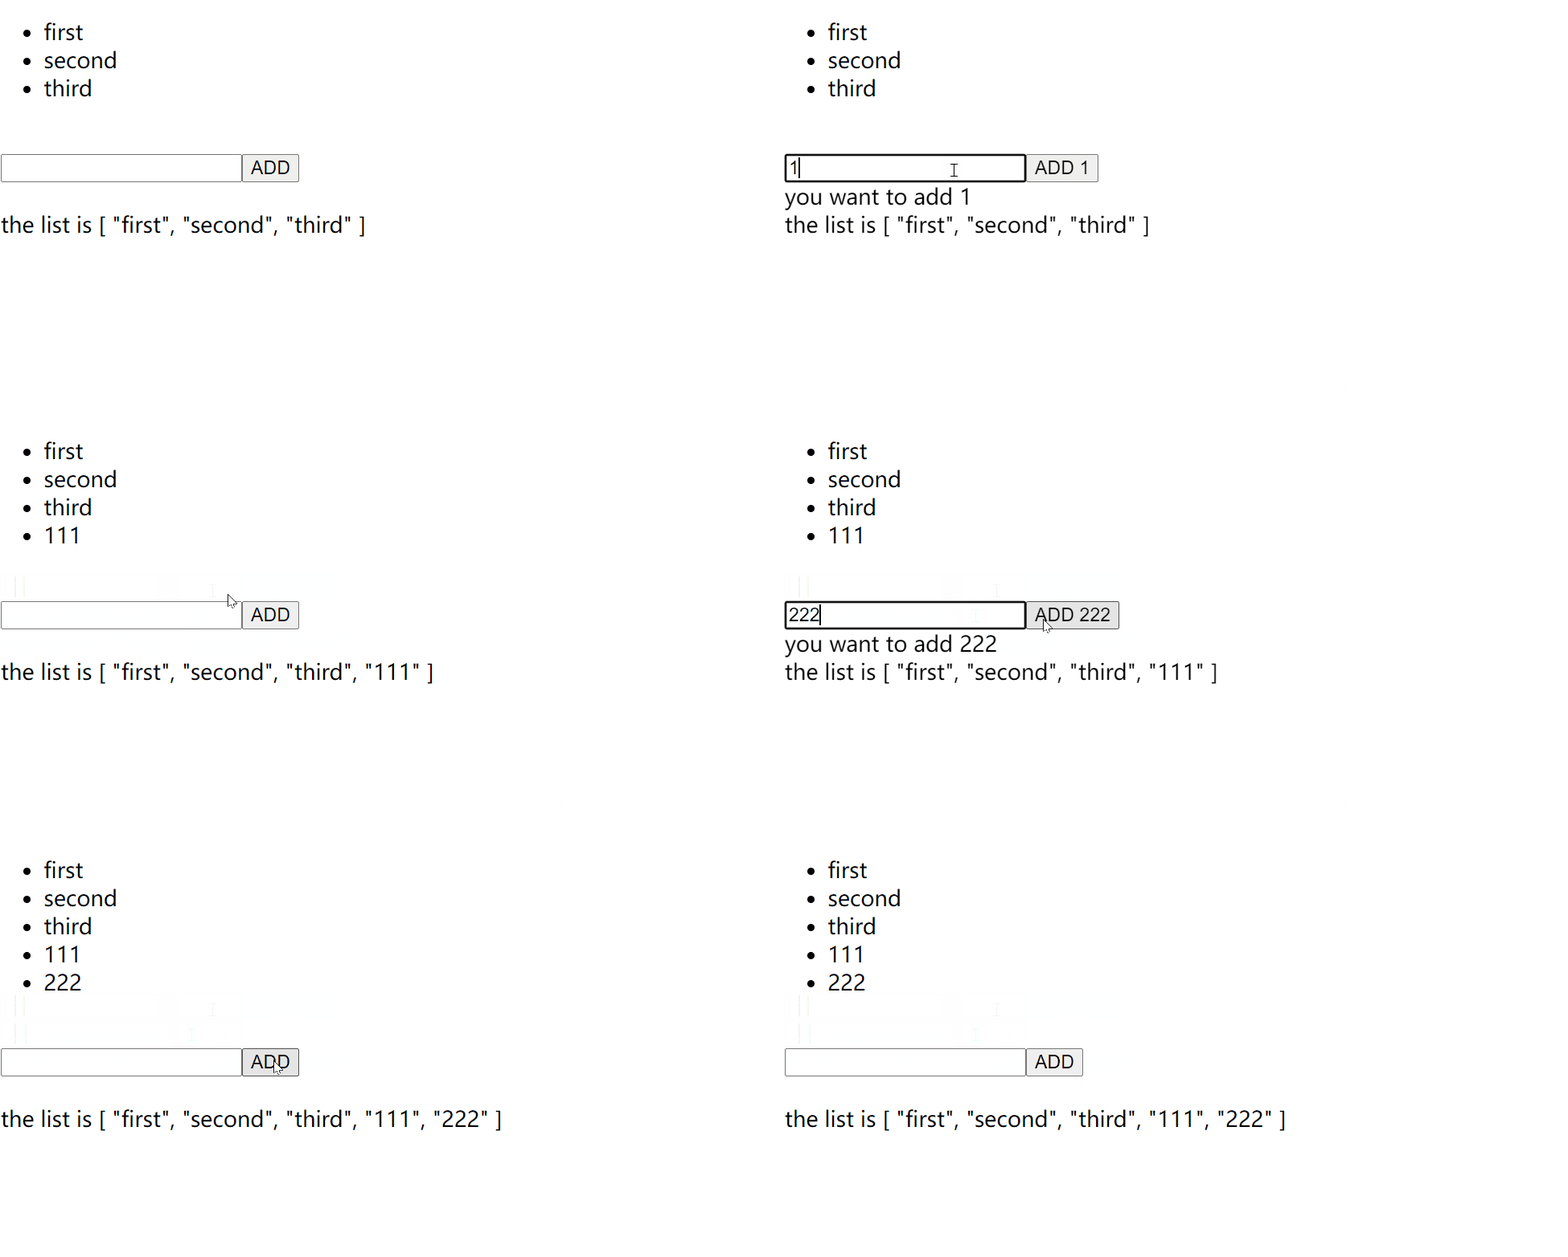
举个例子:一个不完整的待办事项功能。
<div id="app">
<show-todo-list :todolist="todolist">show-todo-list>
<br>
没有向插槽中传入内容,将使用备用内容
<add-todo v-model="todo" @add="addTodo($event)">add-todo>
<span v-show="todo">you want to add {{ todo }}span>
<br>
the list is {{ todolist }}
div>
<script>
const Root = {
data() {
return {
username: 'xiaolu2333',
todolist: ['first', 'second', 'third'],
todo: '',
}
},
methods: {
addTodo(todo) {
this.todolist.push(todo)
this.todo = ''
}
}
}
const app = Vue.createApp(Root)
app.component('show-todo-list', {
props: ['todolist'],
emits: ['delete'],
template: `
- {{ item }}
`
})
app.component('add-todo', {
props: ['modelValue'],
emits: ['update:modelValue'],
methods: {
addClick(event, val) {
if (val) {
this.$emit(event, val)
}
}
},
template: `
`
})
const vm = app.mount('#app')
script>
这里稍微分析一下代码:
1,注册了一个全局子组件用于展示列表内容。我们在父组件中将数组整个传入到子组件,在子组件中分行渲染。
2,又注册了一个全局子组件用于将输入框中的内容添加到数组中。处理输入的过程和前面例子一样。子组件的按钮点击事件触发后,会先在本地调用事件处理函数以验证非空输入,然后抛出给父组件,再在父组件中触发事件处理函数,将输入值添加到数组。
之所以说“不完整”,显然是因为没有删除功能,这涉及到组件通信的其它知识,后面来说。
(四)具名插槽
有时我们需要多个插槽,可通过name attribute 来进行唯一标识:
	    app.component('base-layout', {
	        template: `


	        `
	    });
使用时,需要在父组件中先使用多个 元素来适应多个插槽,然后在各个 元素上使用 v-slot 指令的参数的形式提供插槽名称以实现 元素与插槽的匹配:
<div id="app">
    <base-layout>
        <template v-slot:header>
            <h1>Here might be a page titleh1>
        template>

        <template v-slot:default>
            <p>A paragraph for the main content.p>
            <p>And another one.p>
        template>

        <template v-slot:footer>
            <p>Here's some contact infop>
        template>
    base-layout>
div>
- 一般情况下,
v-slot只能添加在上。
跟 v-on 和 v-bind 一样,v-slot 也有缩写:把参数之前的所有内容 (v-slot:) 替换为字符 #:
- 该缩写只在其有参数的时候才可用
<div id="app">
    <base-layout>
        <template #header>
            <h1>Here might be a page titleh1>
        template>

        <template #default>
            <p>A paragraph for the main content.p>
            <p>And another one.p>
        template>

        <template #footer>
            <p>Here's some contact infop>
        template>
    base-layout>
div>
- 如果希望使用缩写的话,你必须始终以明确的插槽名取而代之。
(五)作用域插槽
在刚刚我们说过,因为作用域的关系,在父组件向子组件中的插槽插值时,是无法使用子组件中的数据的。
但有时让插槽内容能够访问子组件中才有的数据是很有用的。
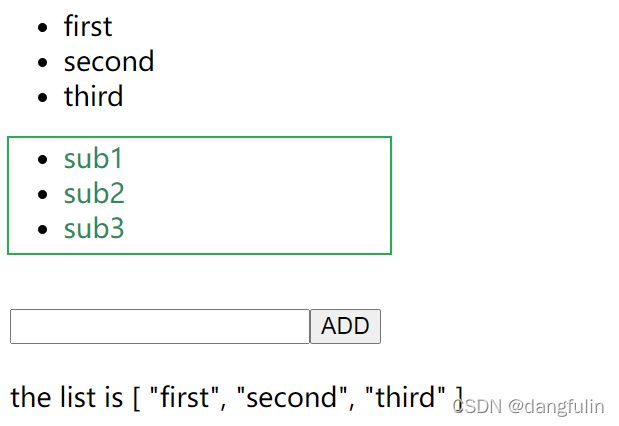
例如,针对前面展示列表内容的子组件的模板,我们可能会想把 {{ item }} 替换为
但简单地替换显然是行不通的:
<div id="app">
    <show-todo-list :todolist="todolist">
    	<i class="fas fa-check">i>
    	<span class="green">{{ item }}span>show-todo-list>
    <br>
    <add-todo v-model="todo" @add="addTodo($event)">add-todo>
    <span v-show="todo">you want to add {{ todo }}span>
    <br>
    the list is {{ todolist }}
div>
1,使用 slot prop 扩展子组件数据的作用域
要使子组件中的数能在父级提供的插槽内容上可用,我们可以在子组件的模板中添加一个
template: `
-
`
还可以根据自己的需要将任意数量的 attribute 绑定到 slot 上:
template: `
-
`
绑定在 slot prop。现在,在父级作用域中,我们就可以使用带参数值的 v-slot ,来将通过slot prop 的名字抛出到父组件中的子组件的数据,匹配到子组件中指定的具名插槽上:
    <show-todo-list :todolist="todolist">
        <template v-slot:default="slotProps">
            <i class="fas fa-check">i>
            <span class="green" style="color: seagreen">{{ slotProps.item }}span>
        template>
    show-todo-list>
2,独占默认插槽的缩写语法
当被提供的内容只匹配到默认插槽时,组件的标签就可以被当作插槽的模板来使用。这样我们就可以把 v-slot 直接用在组件上:
缩写:
	<show-todo-list :todolist="todolist" v-slot:default="slotProps">
        <span class="green" style="color: seagreen">{{ slotProps.item }}span>
    show-todo-list>
或进一步缩写:
	<show-todo-list :todolist="todolist" v-slot="slotProps">
        <span class="green" style="color: seagreen">{{ slotProps.item }}span>
    show-todo-list>
对比未缩写:
	<show-todo-list :todolist="todolist">
        <template v-slot:default="slotProps">
            <span class="green" style="color: seagreen">{{ slotProps.item }}span>
        template>
    show-todo-list>
注意,default 插槽的缩写语法不能和具名插槽混用!因为它会导致作用域不明确。只要使用多个插槽,为所有的插槽使用完整的基于 的语法的优先级应该是最高的!
3,解构 slot prop
作用域插槽的内部工作原理,就是将你的插槽内容包含在一个传入单个参数的函数里:
function (slotProps) {
  // ... 插槽内容 ...
}
这意味着 v-slot 的值实际上可以是任何能够作为函数定义中的参数的 JavaScript 表达式。因此也就可以使用 ES2015 解构 来传入具体的 slot prop,如下:
	<show-todo-list :todolist="todolist" v-slot="{ item }">
        <span class="green" style="color: seagreen">{{ item }}span>
    show-todo-list>
这样可以使模板更简洁,尤其是在该插槽提供了多个slot prop 的时候。它同样开启了 prop 重命名等其它可能,例如将 item 重命名为 todo:
	<show-todo-list :todolist="todolist" v-slot="{ item: todo }">
        <span class="green" style="color: seagreen">{{ item }}span>
    show-todo-list>
甚至可以定义备用内容,用于slot prop 是 undefined 的情形:
	<show-todo-list :todolist="todolist" v-slot="{ item = 'Placeholder' }">
        <span class="green" style="color: seagreen">{{ item }}span>
    show-todo-list>
(六)动态插槽名
动态指令参数也可以用在 v-slot 指令上,以定义动态的插槽名:
	<show-todo-list :todolist="todolist">
        <template v-slot:[dynamicSlotName]>
            ...
        template>
    show-todo-list>
六,Provide 与 Inject
说到组件间通信方式,我们目前只知道:
- 父组件向子组件传递数据可使用
props。 - 子组件向父组件传递数据可使用
$emit。
但实际上,组件间的关系非常多样:父子关系、祖孙关系,兄弟关系等,因此就产生了多种组件间通信需求。
当然我们能使用 props 和 $emit 来逐层传递,但显然会让整个传递路径因包含额外的本不需要的东西而显得非常臃肿且复杂。
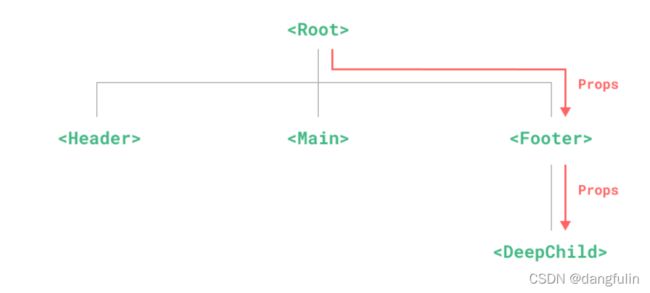
(一)实现长距离的 props
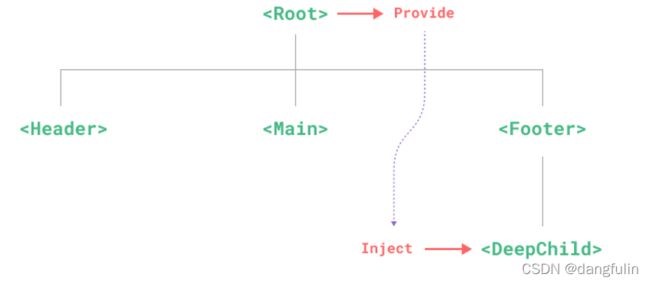
对于这种情况,我们可以使用一对 provide 和 inject来一步到位:
- 父组件用一个
provide选项来提供数据 - 子组件用一个
inject选项来开始使用这些数据。
<div id="app">
<todo-list>todo-list>
div>
<script>
const app = Vue.createApp({})
app.component('todo-list', {
data() {
return {
todos: ['Feed a cat', 'Buy tickets']
}
},
provide: {
currentUser: 'John Doe',
todoList: this.todos
},
template: `
todos is {{ todos }}
length of todos is {{ todos.length }}
——owner is {{ currentUser }}
`
})
app.mount('#app')
script>

需要注意的是,如果我们希望早 provide 中提供一些包含组件实例的东西,就需要将 provide 转换为返回对象的函数:
const app = Vue.createApp({})
app.component('todo-list', {
data() {
return {
todos: ['Feed a cat', 'Buy tickets'],
user: {
name: 'John',
age: 30
}
}
},
provide() {
return {
currentUser: this.user
}
},
template: `
todos is {{ todos }}
length of todos is {{ todos.length }}
官方建议使用第二种方式,这使我们能够更安全地继续开发该组件,而不必担心因可能更改/删除子组件所依赖的某些内容而使子组件功能出错。
(二)处理 Provide 与 Inject 的响应性
在上面的例子中,如果我们在祖先组件中更改了 todos 的列表,这个变化并不会反映在 inject 的 todoLength property 中。
因为默认情况下,provide/inject 绑定并不是响应式的。但我们可以通过传递一个 ref property 或 reactive 对象给 provide 来改变这种行为。
例如,如果我们想对祖先组件中的更改做出响应,我们需要为 provide 的 todoLength 使用一个通常用于 Composition API 组件的 computed 函数:
const app = Vue.createApp({})
app.component('todo-list', {
data() {
return {
todos: ['Feed a cat', 'Buy tickets'],
user: {
name: 'John',
age: 30
}
}
},
provide() {
return {
currentUser: this.user,
todoLength: Vue.computed(() => this.todos.length)
}
},
template: `
todos is {{ todos }}
——owner is {{ user }}
`,
created() {
console.log(`Injected property: ${this.todoLength.value}`) // > 注入的 property: 5
}
})
app.mount('#app')
(三)更细节的补充
除了在组件中 provide 数据外,我们还可以在应用级别 provide:
import { createApp } from 'vue'

const app = createApp({})

app.provide(/* key */ 'message', /* value */ 'hello!')
除了使用数组形式的 inject 外,还能对其中的使用别名:
  inject: {
    /* local key */ localMessage: {
      from: /* injection key */ 'message'
    }
  }
还能为 inject 的内容设置默认值:
  inject: {
    message: {
      from: 'message', // this is optional if using the same key for injection
      default: 'default value'
    },
    user: {
      // use a factory function for non-primitive values that are expensive
      // to create, or ones that should be unique per component instance.
      default: () => ({ name: 'John' })
    }
  }
Provide 与 Inject 主要用于一脉相承式的组件单项数据流,更多方式的通信实现,后面再说。
七,动态组件 & 异步组件
我们之前曾经在一个多标签的界面中使用 is attribute 来切换不同的组件:
<div id="app">
    <div id="dynamic-component">
        <button
                v-for="tab in tabs"
                :key="tab"
                :class="['tab-button', { active: currentTab === tab }]"
                @click="currentTab = tab"
        >
            {{ tab }}
        button>
        <component v-bind:is="currentTabComponent" class="tab">component>
    div>
div>

<script>
    const Root = {
        data() {
            return {
                currentTab: 'Home',
                tabs: ['Home', 'Posts', 'Archive']
            }
        },
        computed: {
            currentTabComponent() {
                return 'tab-' + this.currentTab.toLowerCase()
            }
        }
    }

    const app = Vue.createApp(Root)

    app.component('tab-home', {
        template: `Home component`
    })
    app.component('tab-posts', {
        template: `Posts component`
    })
    app.component('tab-archive', {
        template: `Archive component`
    })

    const vm = app.mount('#app')
script>
(一)在动态组件上使用 keep-alive
如果各个组件都有各自的状态,比如:
<div id="dynamic-component-demo" class="demo">
<button
v-for="tab in tabs"
:key="tab"
:class="['tab-button', { active: currentTab === tab }]"
@click="currentTab = tab"
>
{{ tab }}
button>
<component :is="currentTabComponent" class="tab">component>
div>
<script>
const app = Vue.createApp({
data() {
return {
currentTab: 'Home',
tabs: ['Home', 'Posts', 'Archive']
}
},
computed: {
currentTabComponent() {
return 'tab-' + this.currentTab.toLowerCase()
}
}
})
app.component('tab-home', {
template: `Home component`
})
app.component('tab-posts', {
data() {
return {
posts: [
{
id: 1,
title: 'Cat Ipsum',
content:
'Dont wait for the storm to pass, dance in the rain kick up litter decide to want nothing to do with my owner today demand to be let outside at once, and expect owner to wait for me as i think about it cat cat moo moo lick ears lick paws so make meme, make cute face but lick the other cats. Kitty poochy chase imaginary bugs, but stand in front of the computer screen. Sweet beast cat dog hate mouse eat string barf pillow no baths hate everything stare at guinea pigs. My left donut is missing, as is my right loved it, hated it, loved it, hated it scoot butt on the rug cat not kitten around
'
},
{
id: 2,
title: 'Hipster Ipsum',
content:
'Bushwick blue bottle scenester helvetica ugh, meh four loko. Put a bird on it lumbersexual franzen shabby chic, street art knausgaard trust fund shaman scenester live-edge mixtape taxidermy viral yuccie succulents. Keytar poke bicycle rights, crucifix street art neutra air plant PBR&B hoodie plaid venmo. Tilde swag art party fanny pack vinyl letterpress venmo jean shorts offal mumblecore. Vice blog gentrify mlkshk tattooed occupy snackwave, hoodie craft beer next level migas 8-bit chartreuse. Trust fund food truck drinking vinegar gochujang.
'
},
{
id: 3,
title: 'Cupcake Ipsum',
content:
'Icing dessert soufflé lollipop chocolate bar sweet tart cake chupa chups. Soufflé marzipan jelly beans croissant toffee marzipan cupcake icing fruitcake. Muffin cake pudding soufflé wafer jelly bear claw sesame snaps marshmallow. Marzipan soufflé croissant lemon drops gingerbread sugar plum lemon drops apple pie gummies. Sweet roll donut oat cake toffee cake. Liquorice candy macaroon toffee cookie marzipan.
'
}
],
selectedPost: null
}
},
template: `
{{ selectedPost.title }}
Click on a blog title to the left to view it.
`
})
app.component('tab-archive', {
template: `Archive component`
})
app.mount('#dynamic-component-demo')
script>
会发现,当在这些组件之间切换的时候,是无法保持这些组件的状态的,这是因为你每次切换新标签的时候,Vue 都创建了一个新的 currentTabComponent 实例。
而保持这些组件的状态却能避免反复渲染导致的性能问题,可以通过
    <keep-alive>
        <component :is="currentTabComponent" class="tab">component>
    keep-alive>
(二)异步组件
在大型应用程序中,我们可能需要将应用程序分成更小的块,并且仅在需要时从服务器加载组件。为了实现这一点,Vue 有一个 defineAsyncComponent 方法:
const { createApp, defineAsyncComponent } = Vue

const app = createApp({})

const AsyncComp = defineAsyncComponent(
  () =>
    new Promise((resolve, reject) => {
      resolve({
        template: 'I am async!'
      })
    })
)

app.component('async-example', AsyncComp)
此方法接受一个返回 Promise 的工厂函数。从服务器检索组件定义后,调用 Promise 的 resolve 回调。也可以调用 reject(reason)来表示加载失败。
更多的异步组件的内容,后面再讲。
组件作为组件化的核心,有更多的细节实现,由于我们还未介绍更多前置条件,所以这里的“深入组件”也就暂时到此为止,后续随着相关知识的介绍,再继续深入组件。
