实现android多页面跳转,获取数据操作
准备工具:安卓开发工具
实现页面效果:
1.第一页面:要求停留三秒跳转第二页面

2.第二页面,要求:获取输入的数据点击确定按钮跳转第三页面并数据传入第三页面
3.第三页面:要求:接收第二页面数据显示在文本框并吐司显示

打开android开发工具 在左上角找到File新建一个项目,找到New里的Android Application Project,在这里我项目的名称为Work
项目创建好之后开始写第一个页面的代码,打开第一个页面编辑:
在layout里找到activity_main.xml里编辑页面样式:
修改整个手机页面的布局,呈线性布局:LinearLayout,并修改页面的排列方式为垂直排列(android:orientation=“vertical”)
代码如下:
<LinearLayout xmlns:android="http://schemas.android.com/apk/res/android"
    xmlns:tools="http://schemas.android.com/tools"
    android:layout_width="match_parent"
    android:layout_height="match_parent"
    android:orientation="vertical" >

LinearLayout>
编辑页面里需要的控件,这里我们只需要让整个页面背景设置一张图片即可,这里我用系统自带的图片作为背景
在上一步的线性布局里加入android:background="@drawable/ic_launcher"即可
运行结果演示: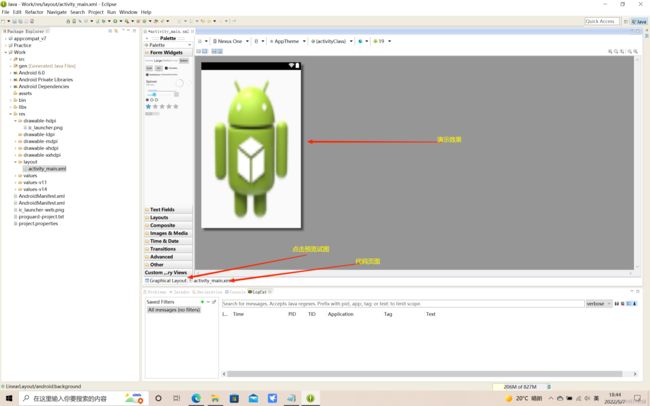
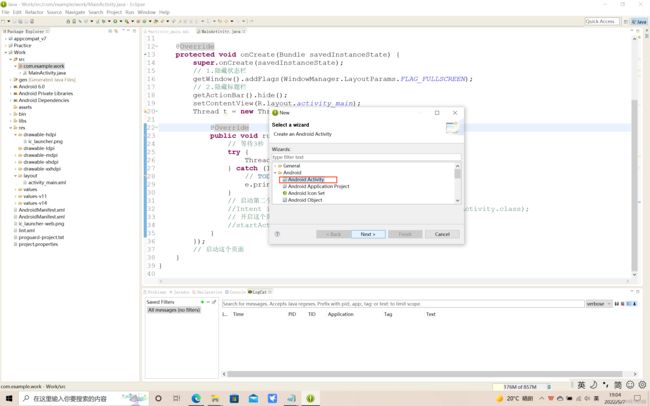
下一步要实现用户点击程序之后显示的第一个页面自动停留3秒钟,跳转到第二个页面,在做这些操作之前我们要准备要跳转的第二个页面,这时候在src文件下的com.example.work包创建第二个的页面,如下图:
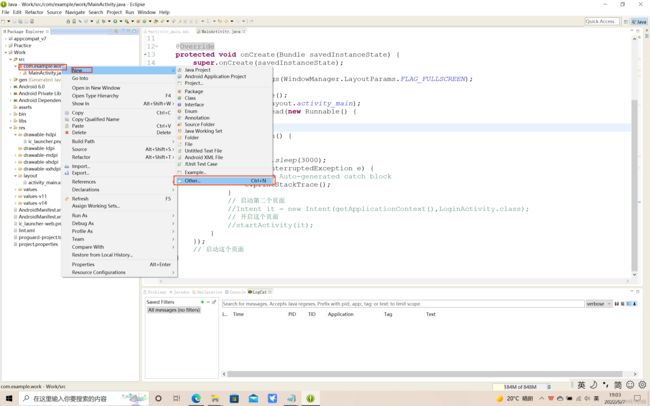

做完这些操作之后我们回到MainActivity.java文件里实现页面自动停留3秒钟,跳转到第二个页面的功能
代码如下:
package com.example.work;

import android.app.Activity;
import android.content.Intent;
import android.os.Bundle;
import android.view.Menu;
import android.view.MenuItem;
import android.view.WindowManager;

public class MainActivity extends Activity {

	@Override
	protected void onCreate(Bundle savedInstanceState) {
		super.onCreate(savedInstanceState);
		// 1.隐藏状态栏
		getWindow().addFlags(WindowManager.LayoutParams.FLAG_FULLSCREEN);
		// 2.隐藏标题栏
		getActionBar().hide();
		setContentView(R.layout.activity_main);
		//开启一个线程(等三秒之后自动执行)
		Thread t = new Thread(new Runnable() {

			@Override
			public void run() {
				// 等待3秒
				try {
					Thread.sleep(3000);
				} catch (InterruptedException e) {
					// TODO Auto-generated catch block
					e.printStackTrace();
				}
				// 启动第二个页面
				Intent it = new Intent(getApplicationContext(),
						LoginActivity.class);
				// 开启这个页面
				startActivity(it);
			}
		});
		// 启动这个页面
		t.start();
	}
}
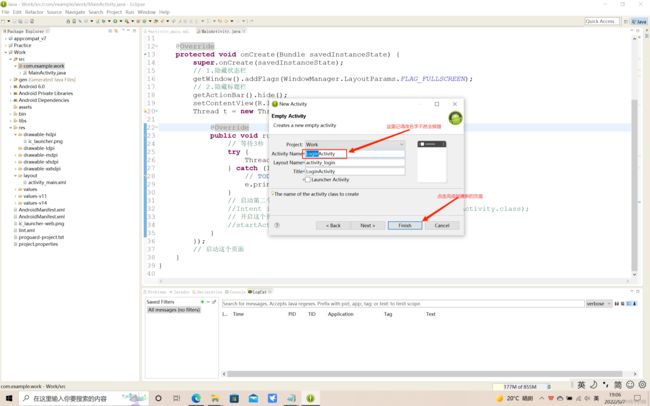
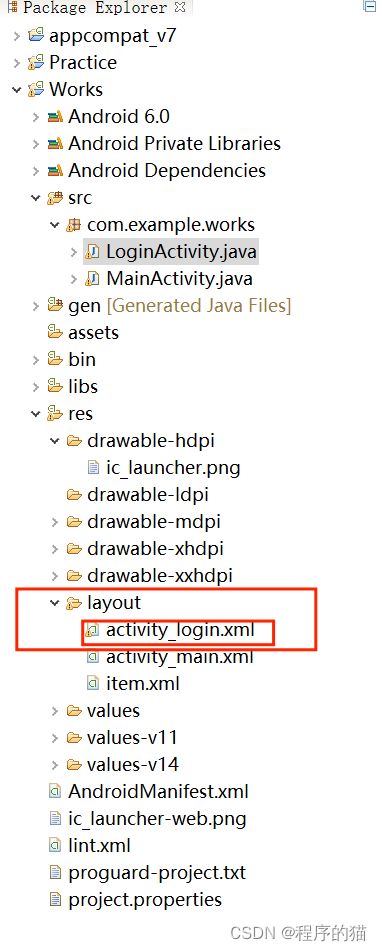
这个时候第一个页面的代码编辑已经结束了,现在开始写第二个页面的代码首先选中第二个页面的android代码页,首先我们在layout文件夹里找到刚才创建的第二个页面也就是activity_login.xml文件双击打开
在里面就可以编写我们页面的代码:
<LinearLayout xmlns:android="http://schemas.android.com/apk/res/android"
    xmlns:tools="http://schemas.android.com/tools"
    android:layout_width="match_parent"
    android:layout_height="match_parent"
    android:orientation="vertical"
    tools:context="${relativePackage}.${activityClass}" >


    <LinearLayout
        android:layout_width="match_parent"
        android:layout_height="50dp"
        android:background="#32373a"
        android:gravity="center" >


        <TextView
            android:layout_width="wrap_content"
            android:layout_height="20dp"
            android:text="用户注册"
            android:textColor="#ffffff" />
    LinearLayout>


    <LinearLayout
        android:layout_width="match_parent"
        android:layout_height="50dp" >


        <TextView
            android:layout_width="0dp"
            android:layout_height="match_parent"
            android:layout_weight="1"
            android:gravity="center_vertical|right"
            android:text="账号:" />


        <EditText
            android:id="@+id/et_username"
            android:layout_width="0dp"
            android:layout_height="match_parent"
            android:layout_weight="2"
            android:hint="请输入QQ号/手机号" />
    LinearLayout>


    <LinearLayout
        android:layout_width="match_parent"
        android:layout_height="50dp" >


        <TextView
            android:layout_width="0dp"
            android:layout_height="match_parent"
            android:layout_weight="1"
            android:gravity="center_vertical|right"
            android:text="密码:" />


        <EditText
            android:id="@+id/et_pwd"
            android:layout_width="0dp"
            android:layout_height="match_parent"
            android:layout_weight="2" />
    LinearLayout>


    <LinearLayout
        android:layout_width="match_parent"
        android:layout_height="50dp" >


        <TextView
            android:layout_width="0dp"
            android:layout_height="match_parent"
            android:layout_weight="1"
            android:gravity="center_vertical|right"
            android:text="班级:" />


        <Spinner
            android:id="@+id/sp_item"
            android:layout_width="0dp"
            android:layout_height="50dp"
            android:layout_weight="2" />
    LinearLayout>


    <LinearLayout
        android:layout_width="match_parent"
        android:layout_height="50dp" >


        <TextView
            android:layout_width="0dp"
            android:layout_height="match_parent"
            android:layout_weight="1"
            android:gravity="center_vertical|right"
            android:text="性别:" />


        <RadioGroup
            android:layout_width="0dp"
            android:layout_height="50dp"
            android:layout_weight="2"
            android:orientation="horizontal" >


            <RadioButton
                android:id="@+id/rb1"
                android:layout_width="wrap_content"
                android:layout_height="match_parent"
                android:text="男" />


            <RadioButton
                android:id="@+id/rb2"
                android:layout_width="wrap_content"
                android:layout_height="match_parent"
                android:text="女" />
        RadioGroup>

    LinearLayout>


    <LinearLayout
        android:layout_width="match_parent"
        android:layout_height="50dp" >


        <TextView
            android:layout_width="0dp"
            android:layout_height="match_parent"
            android:layout_weight="1"
            android:gravity="center_vertical|right"
            android:text="爱好:" />


        <LinearLayout
            android:layout_width="0dp"
            android:layout_height="50dp"
            android:layout_weight="2" >


            <CheckBox
                android:id="@+id/cb1"
                android:layout_width="wrap_content"
                android:layout_height="match_parent"
                android:text="上网" />


            <CheckBox
                android:id="@+id/cb2"
                android:layout_width="wrap_content"
                android:layout_height="match_parent"
                android:text="聊天" />


            <CheckBox
                android:id="@+id/cb3"
                android:layout_width="wrap_content"
                android:layout_height="match_parent"
                android:text="睡觉" />


            <CheckBox
                android:id="@+id/cb4"
                android:layout_width="wrap_content"
                android:layout_height="match_parent"
                android:text="看书" />
        LinearLayout>

    LinearLayout>


    <LinearLayout
        android:layout_width="match_parent"
        android:layout_height="40dp"
        android:gravity="center" >


        <Button
            android:id="@+id/btn_commit"
            android:layout_width="100dp"
            android:layout_height="match_parent"
            android:text="确定" />


        <Button
            android:id="@+id/btn2"
            android:layout_width="100dp"
            android:layout_height="match_parent"
            android:text="取消" />
    LinearLayout>

LinearLayout>
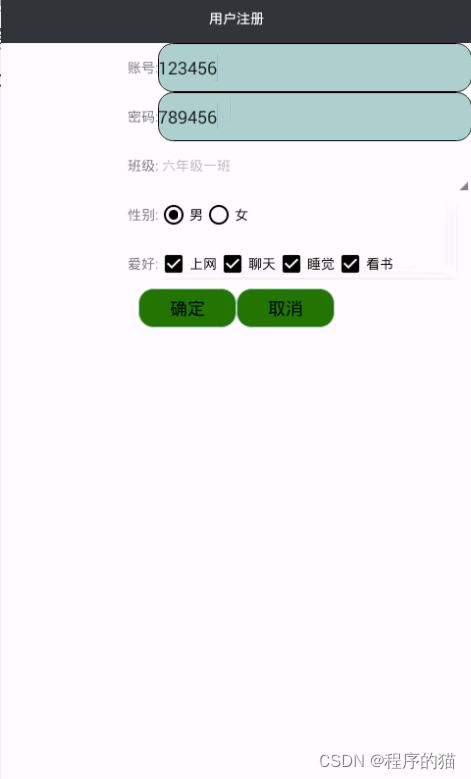
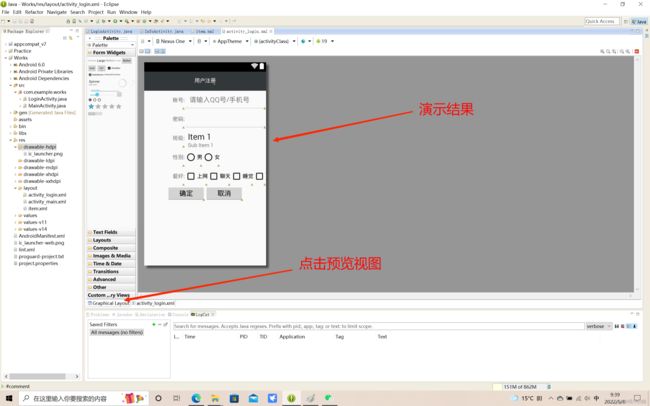
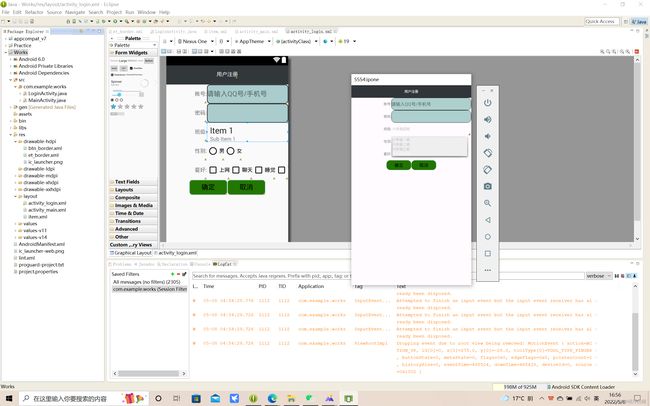
我们点击预览示图如下:
到这里我们的第二个页面的基础效果已经做好了,但是有点掉不美观,现在我想让输入框和按钮变得美观一点,应该怎么改呢?
首先我们需要找到res文件下的drawable-hdpi文件,选中鼠标右键
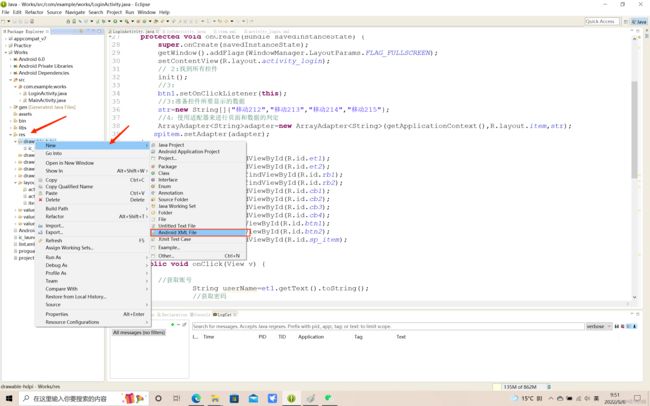
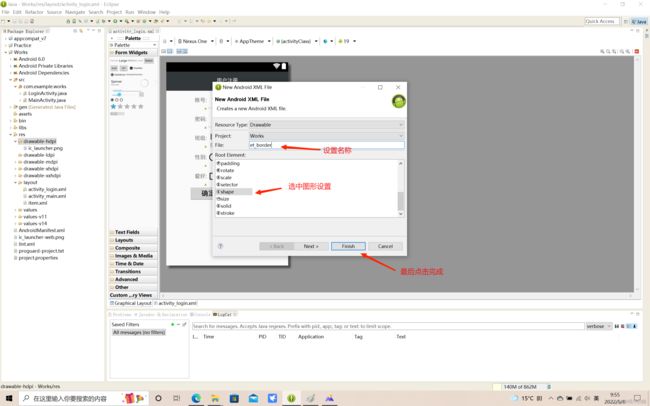
设置完成之后我们就可以在里面编写内容,在里面主要写关于输入框的样式,如一下代码
<shape xmlns:android="http://schemas.android.com/apk/res/android" >

    <corners android:radius="15dp"/>

    <solid android:color="#acc"/>

    <stroke android:width="1dp" android:color="#000000"/>

shape>
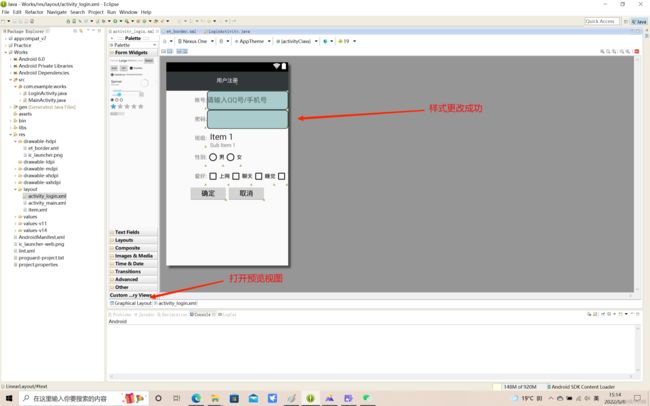
写完之后保存,我们要使用它,我们回到第二个页面的代码页面

现在我们回到预览视图看下效果
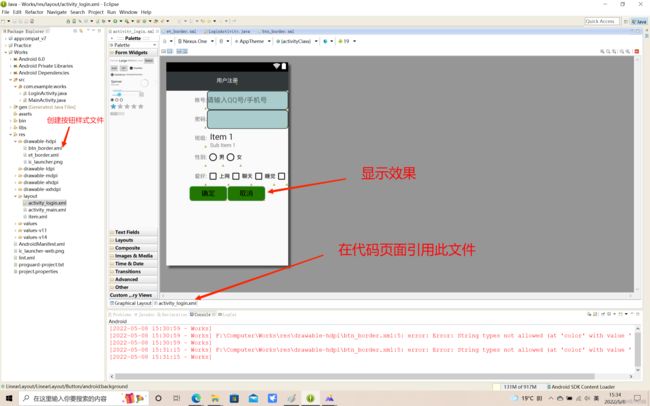
同理按钮的样式也是同样的设置,使颜色修改即可,代码如下
<shape xmlns:android="http://schemas.android.com/apk/res/android" >


    <corners android:radius="15dp" />

    <solid android:color="#227700" />

    <stroke
        android:width="1dp"
        android:color="#acc" />

shape>
效果如下:
最后我们要在下拉列表里添加数据,打开第二个页面对应的java文件:LoginActivity.java文件打开编辑,代码如下
package com.example.works;
import android.widget.Spinner;

public class LoginActivity extends Activity {
	// 定义有ID的各种控件
	Spinner spitem;
	String[] str = null;

	@Override
	protected void onCreate(Bundle savedInstanceState) {
		super.onCreate(savedInstanceState);
		getWindow().addFlags(WindowManager.LayoutParams.FLAG_FULLSCREEN);
		setContentView(R.layout.activity_login);
		// 准备下拉列表(spinner)控件所要显示的数据
		str = new String[] { "六年级一班", "六年级二班", "六年级三班", "六年级四班" };
		// 使用适配器来进行页面和数据的判定,参数解释:getApplicationContext():当前页面,R.layout.item:自定义样式文件, str:需要显示的数据
		ArrayAdapter<String> adapter = new ArrayAdapter<String>(getApplicationContext(), R.layout.item, str);
		//适配器和控件绑定
		spitem.setAdapter(adapter);
	}
}
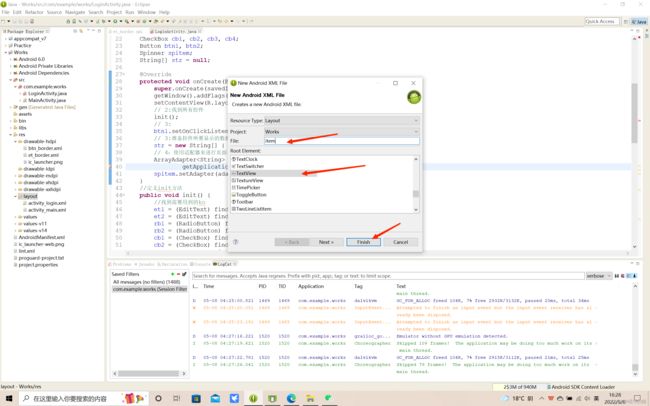
保存之后会报错,因为R.layout.item是自己为下拉列表创建的样式的文件,所以我们创建文件item文件

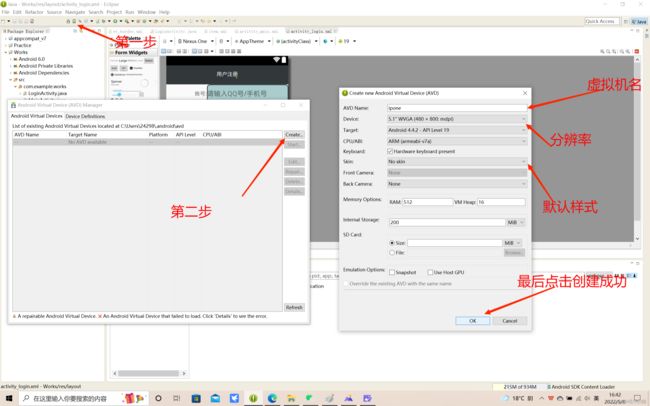
编写完成之后查看效果,因为预览时视图不会显示下拉列表的效果所以我们要启动虚拟机来查看效果,那么我们要创建虚拟机如以下图:
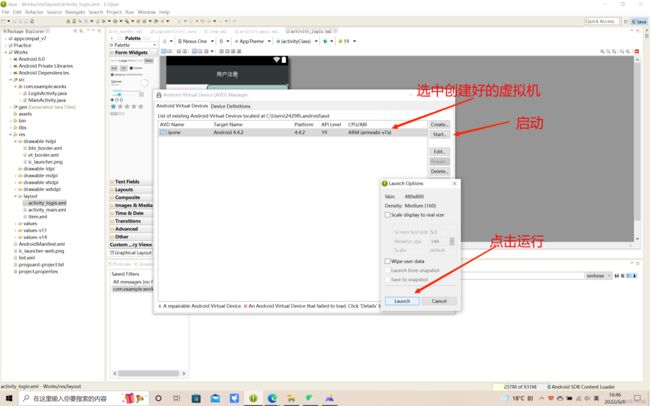
如果出现类似手机的页面出现说明虚拟机打开成功
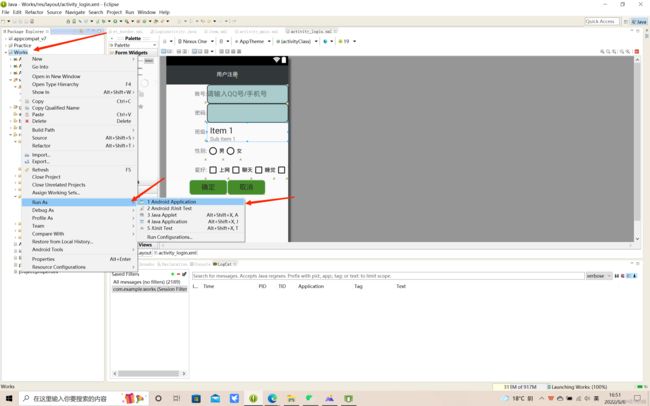
然后我们点击项目鼠标右击,鼠标移动到Run as,选中里面第一个即可运行,如图:
运行之后结果演示如下:
现在我们写第三个页面,目的是让第二个页面用户填写的数据放到第三个页面文本框上显示,如之前创造第二个页面一样在src文件下的com.example.work包创建第二个的页面:InfoActivity.java文件,打开第三个页面的android代码页面,并在文本框加上id,如图:

最后一步,我们要使第二页面输入的内容放到第三个页面上,首先要在第二个页面(LoginActivity.java)里写入功能,代码如下
package com.example.works;

import android.app.Activity;
import android.content.Intent;
import android.os.Bundle;
import android.view.Menu;
import android.view.MenuItem;
import android.view.View;
import android.view.View.OnClickListener;
import android.view.WindowManager;
import android.widget.ArrayAdapter;
import android.widget.Button;
import android.widget.CheckBox;
import android.widget.EditText;
import android.widget.RadioButton;
import android.widget.Spinner;
import android.widget.Toast;

public class LoginActivity extends Activity implements OnClickListener {
	// 定义有ID的各种控件
	EditText et_username, et_pwd;
	RadioButton rb1, rb2;
	CheckBox cb1, cb2, cb3, cb4;
	Button btn_commit;
	Spinner spitem;
	String[] str = null;

	@Override
	protected void onCreate(Bundle savedInstanceState) {
		super.onCreate(savedInstanceState);
		getWindow().addFlags(WindowManager.LayoutParams.FLAG_FULLSCREEN);
		setContentView(R.layout.activity_login);
		//找到所有控件
		init();
		// 给id为btn1的按钮添加点击事件
		btn1.setOnClickListener(this);
		// 准备控件所要显示的数据
		str = new String[] { "六年级一班", "六年级二班", "六年级三班", "六年级四班" };
		// 使用适配器来进行页面和数据的判定
		ArrayAdapter<String> adapter = new ArrayAdapter<String>(
				getApplicationContext(), R.layout.item, str);
		//控件与适配器的绑定
		spitem.setAdapter(adapter);
	}

	// 定义init方法
	public void init() {
		// 找到需要用到的控件
		et_username = (EditText) findViewById(R.id.et_username);
		et_pwd = (EditText) findViewById(R.id.et_pwd);
		rb1 = (RadioButton) findViewById(R.id.rb1);
		rb2 = (RadioButton) findViewById(R.id.rb2);
		cb1 = (CheckBox) findViewById(R.id.cb1);
		cb2 = (CheckBox) findViewById(R.id.cb2);
		cb3 = (CheckBox) findViewById(R.id.cb3);
		cb4 = (CheckBox) findViewById(R.id.cb4);
		btn_commit = (Button) findViewById(R.id.btn_commit);
		spitem = (Spinner) findViewById(R.id.sp_item);

	}

	public void onClick(View v) {

		// 获取账号
		String userName = et1.getText().toString();
		// 获取密码
		String pwd = et2.getText().toString();
		// 获取性别
		String sex = "";
		if (rb1.isChecked()) {
			sex = rb1.getText().toString();
		}
		if (rb2.isChecked()) {
			sex = rb2.getText().toString();
		}
		// 获取爱好多选框内容
		String fav = "";
		if (cb1.isChecked()) {
			fav += cb1.getText().toString();
		}
		if (cb2.isChecked()) {
			fav += cb2.getText().toString();
		}
		if (cb3.isChecked()) {
			fav += cb3.getText().toString();
		}
		if (cb4.isChecked()) {
			fav += cb4.getText().toString();
		}
		// 7:获取下拉列表选中的内容
		int i = spitem.getSelectedItemPosition();
		String spItem = str[i];
		// 8:传值跳转
		Intent it = new Intent(getApplicationContext(), InfoActivity.class);
		// 传递数据

		it.putExtra("userName", userName);
		it.putExtra("pwd", pwd);
		it.putExtra("sex", sex);
		it.putExtra("fav", fav);
		it.putExtra("spitem", spItem);
		startActivity(it);

	}
}
以上代码使第二页(LoginActivity)面输入内容后点击按钮的数据传入第三页面(InfoActivity)中,下一步就是要让第三页面接受数据并放在文本框里且吐司显示,代码如下:
package com.example.works;

import android.app.Activity;
import android.content.Intent;
import android.os.Bundle;
import android.view.Menu;
import android.view.MenuItem;
import android.widget.TextView;
import android.widget.Toast;

public class InfoActivity extends Activity {

	@Override
	protected void onCreate(Bundle savedInstanceState) {
		super.onCreate(savedInstanceState);
		setContentView(R.layout.activity_info);
		// 获取上一个页面传递过来的数据
				Intent it = getIntent();
				String userName = it.getStringExtra("userName");
				String pwd = it.getStringExtra("pwd");
				String sex = it.getStringExtra("sex");
				String fav = it.getStringExtra("fav");
				String spItem = it.getStringExtra("spitem");
				//将这些数据放在一起
				String str = "账号:  "+userName + "          密码:  " + pwd + "          性别:  " + sex + "          爱好:  " + fav+"          班级:  "+spItem;
				// 显示这些数据
				// 1:吐司显示
				Toast.makeText(getApplicationContext(), str, 1).show();
				// 2:文本框显示
				TextView tvShow = (TextView) findViewById(R.id.tv_show);
				tvShow.setText(str);

	}
}
保存,然后右键项目Run as运行虚拟机试试效果,以下视频为演示效果
android演示