@ansible(一键部署Lnmp架构及prometheus监控)
文章目录
-
-
- 一、LNMP架构(ansible)
-
- 1、LNMP简介
- 2、LNMP的组成
- 3、特点
- 4、优点
- 二、服务工具简述:
- 三、架构
-
- 1、架构网络配置
- 2、架构结构图
- 3、架构搭建流程图
- 四、架构部署(ansible)
-
- 1、ansible自动化运维
- 1、结构详解:
- 五、ansible的使用配置介绍
-
- 1.ansible安装
- **2.ansible文件说明**
- 3.主机清单hosts详解
- 4、ansible使用的架构
- 5、模块详解
- 六、架构流程介绍(ansible)
-
- 1、backup
- 2、nfs
- 3、数据库(mariadb)
- 4、web
- 5、prometheus
- 七、实现的状态
-
- 1、实现的服务(bbs)
-
一、LNMP架构(ansible)
1、LNMP简介
#LNMP代表的就是:Linux系统下Nginx+MySQL+PHP这种网站服务器架构。
  1)Linux是一类Unix计算机操作系统的统称,是目前最流行的免费操作系统。代表版本有:debian、centos、ubuntu、fedora、gentoo等。
  2)Nginx是一个高性能的HTTP和反向代理服务器,也是一个IMAP/POP3/SMTP代理服务器。
  3)Mysql是一个小型关系型数据库管理系统。
  4)PHP是一种在服务器端执行的嵌入HTML文档的脚本语言。


#注:这四种软件均为免费开源软件,组合到一起,成为一个免费、高效、扩展性强的网站服务系统。
2、LNMP的组成
LNMP是指一组通常一起使用来运行动态网站或者服务器的自由软件名称首字母缩写,L指Linux,N指Nginx,M一般指MySQL,也可以指MariaDB,P一般指PHP,也可以指Perl或Python
3、特点
   1)Nginx是一个小巧而高效的Linux下的Web服务器软件,是由 Igor Sysoev 为俄罗斯访问量第二的 Rambler 站点开发的,已经在一些俄罗斯的大型网站上运行多年,相当的稳定

  2)Nginx性能稳定、功能丰富、运维简单、处理静态文件速度快且消耗系统资源极少
4、优点
   1)作为 Web 服务器:相比 Apache,Nginx 使用更少的资源,支持更多的并发连接,体现更高的效率。
   2)作为负载均衡服务器:Nginx 既可以在内部直接支持Rails和PHP,也可以支持作为 HTTP代理服务器对外进行服务。Nginx 用C编写,不论是系统资源开销还是CPU使用效率都比Perlbal要好的多。
   3)作为邮件代理服务器:Nginx同时也是一个非常优秀的邮件代理服务器(最早开发这个产品的目的之一也是作为邮件代理服务器),Last/fm 描述了成功并且美妙的使用经验。
   4)Nginx 安装非常的简单,配置文件非常简洁(还能够支持perl语法)。Nginx支持平滑加载新的配置,还能够在不间断服务的情况下进行软件版本的升级。
二、服务工具简述:
#1》nginx主要实现功能:
       1、处理http的请求、构建响应报文等自身服务;

       2、配置让nginx支持PHP程序的响应(通过PHP模块或FPM);

       3、配置nginx具体处理php程序的方法,如通过反向代理将php程序交给fcgi处理。


#2》mariadb主要实现功能:
        1、提供PHP程序对数据的存储;

        2、提供PHP程序对数据的读取(通常情况下从性能的角度考虑,尽量实现数据库的读写分离)。


#3》php主要实现功能:
        1、提供nginx的访问接口,即CGI或Fast CGI(FPM);

        2、提供PHP程序的解释器;

        3、提供mairadb数据库的连接函数的基本环境。


#4》Ansible主要实现功能
        1.配置管理Configuration(cfengine,chef,puppet)

        2.部署发布 Deployment(Capistrano,Fabric)

        3.命令行批量执行 Ad-Host Task(func)

        4.多层次任务编排 Multi-Ter Orchestration(Juju,sort of)
三、架构
1、架构网络配置
| ip(外网) | ip(内网) | 角色 | 工具 |
|---|---|---|---|
| 192.168.15.41 | 172.16.1.41 | backup | rsync |
| 192.168.15.31 | 172.16.1.31 | nfs | nfs-utils、rpcbind |
| 192.168.15.51 | 172.16.1.51 | db | mariadb |
| 192.168.15.7 | 172.16.1.7 | web | nginx、PHP、nfs-utils |
| 192.168.15.5 | 172.16.1.5 | lb | nginx、keepalived |
| 192.1681.5.13 | 172.16.1.13 | m01 | ansible |
| 192.168.15.71 | 172.16.1.71 | prometheus | prometheus、grafana |
2、架构结构图
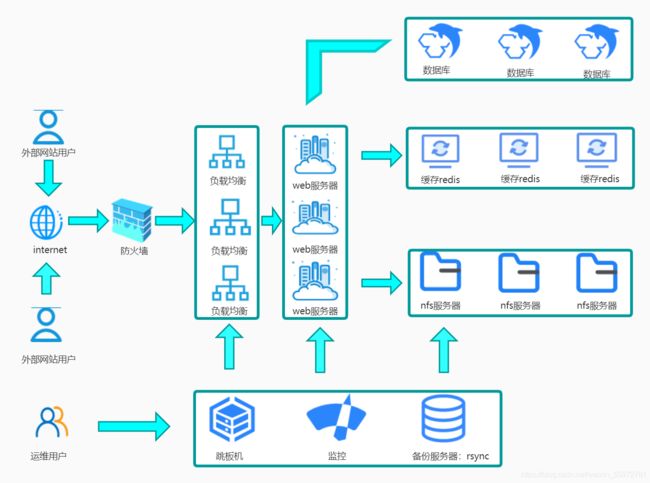
3、架构搭建流程图
#工作流程
    用户访问网站(动态页面) ---> 防火墙(firewalld) --->lb(负载均衡) --->nginx(fastcgi_pass) --FastCGI(接口)-->(php-fpm ---> wrapper) php (php解析器) --->redis(读取/缓存)  ---> mysql(读取或写入)

四、架构部署(ansible)
1、ansible自动化运维
1)#Ansible简介
   Ansible采用高度模块化,调用特定的模块,完成相应的任务,基于yaml来批量完成任务的模块化,支持playbook,基于python语言实现,主要是用paramiko、pyyaml和jinja2三个关键模块,部署简单,主从模式,支持自定义模块,幂等性:允许重复执行N次,没有变化时,只会执行第一次

Ansible的主要目标是简单和易用,无客户端,使用Openssh来进行数据传输


2)#Ansible特点
   部署简单,只需要在主控端部署Ansible环境,被控端无需作任何操作
默认使用SSH协议对设备进行管理
主从集中化管理
配置简单、功能强大、扩展性强
支持API及自定义模块、可以通过Python轻松扩展
通过Playbooks来定制强大的配置、状态管理
对云计算平台、大数据都有很好的支持

1、结构详解:
1)#Core Modules:
  核心模块,Ansible自带的模块。

2)#Custom Modules:
  自定义模块,如果核心模块不足以完成某种功能,可以自行添加自定义模块(支持现在主流的大部分编程语言,甚至于shell)

3)#Plugins:
   插件,支持使用插件的方式对ansible本身的功能进行扩展,模块是用来实现任务的,增强ansible平台自己的功能就需要使用插件(loggin插件记录日志,email插件发送邮件),其中最常用的是:连接插件(Connectionr Plugins)ansible基于连接插件连接到各个主机上,虽然默认情况下ansible使用ssh连接到各个主机上,但它还支持其它的连接方法。

4)#Host Inventory:
   主机群,主机清单,定义ansible管理的主机,还可以存放一下针对不同主机的变量,也可以写入主机的用户名和密码

5)#Playbooks:
    ansible的任务配置文件,将多个任务定义在剧中本,由ansible自动执行
五、ansible的使用配置介绍
1.ansible安装
Ansible原来不在默认的yum仓库中的,我们需要先下载epel-release镜像源才能够安装ansible,但是后来ansible被红帽1.5亿美元收购后,ansible镜像源就融合进了默认的yum仓库,所以我们直接ansible即可
yum install ansible
2.ansible文件说明
rpm -qi ansible             #查看ansible版本信息
rpm -qa ansible             #查看ansible包名称
rpm -ql ansible             #查看ansible安装目录
/etc/ansible                #ansible主目录
/etc/ansible/ansible.cfg    #ansible主配置文件
/etc/ansible/hosts          #ansible主机清单
/etc/ansible/roles          #ansible角色目录
/usr/bin/ansible            #ansible主程序目录
/usr/bin/ansible-connection #ansible连接工具
/usr/bin/ansible-console    #ansible控制台
/usr/bin/ansible-doc        #ansible文档工具
/usr/bin/ansible-galaxy     #ansible galaxy
/usr/bin/ansible-inventory  #ansible资产
/usr/bin/ansible-playbook   #ansible playbook剧本工具
/usr/bin/ansible-pull       #ansible pull是指在客户端组件基于ansible pull的方式从服务器上拉取文件
3.主机清单hosts详解
ansible_ssh_host=172.26.3.58                        #目标主机地址
ansible_ssh_port=22                                 #目标端口,默认为ansible.cfg中配置的端口
ansible_ssh_user=test                               #连接目标主机的用户
ansible_ssh_pass=123456                             #连接目标主机的用户密码
ansible_ssh_private_key_file=/root/.ssh/id_rsa      #连接目标主机的用户密钥,密钥和密码二选一即可
ansible_sudo_ssh=123456                             #sudo到ansible.cfg配置中指定用户的密码
ansible_python_interpreter=/bin/python2.7           #指定python解释器
4、ansible使用的架构
roles/
├── backup
│   ├── defaults
│   │   └── main.yml
│   ├── files
│   ├── handlers
│   │   ├── main.yml
│   │   └── restart.yaml
│   ├── meta
│   │   └── main.yml
│   ├── README.md
│   ├── tasks
│   │   ├── conf_file.yaml
│   │   ├── directory.yaml
│   │   ├── install.yaml
│   │   ├── main.yml
│   │   ├── passwd_file.yaml
│   │   ├── start.yaml
│   │   └── user_add.yaml
│   ├── templates
│   │   ├── rsyncd.conf.j2
│   │   └── rsync.passwd.j2
│   ├── tests
│   │   ├── inventory
│   │   └── test.yml
│   └── vars
│       └── main.yml
├── db
│   ├── defaults
│   │   └── main.yml
│   ├── files
│   ├── handlers
│   │   ├── main.yml
│   │   └── restart.yaml
│   ├── meta
│   │   └── main.yml
│   ├── README.md
│   ├── tasks
│   │   ├── database.yaml
│   │   ├── epel_install.yaml
│   │   ├── install.yaml
│   │   ├── main.yml
│   │   ├── start.yaml
│   │   └── user_add.yaml
│   ├── templates
│   ├── tests
│   │   ├── inventory
│   │   └── test.yml
│   └── vars
│       └── main.yml
├── lb01
│   ├── defaults
│   │   └── main.yml
│   ├── files
│   ├── handlers
│   │   └── main.yml
│   ├── meta
│   │   └── main.yml
│   ├── README.md
│   ├── tasks
│   │   ├── conf_file.yaml
│   │   ├── install.yaml
│   │   ├── main.yml
│   │   ├── start.yaml
│   │   └── user_add.yaml
│   ├── templates
│   │   ├── check_web.sh.j2
│   │   ├── hzl.conf.j2
│   │   ├── keepalived.conf.j2
│   │   └── nginx.conf.j2
│   ├── tests
│   │   ├── inventory
│   │   └── test.yml
│   └── vars
│       └── main.yml
├── lb02
│   ├── defaults
│   │   └── main.yml
│   ├── files
│   ├── handlers
│   │   └── main.yml
│   ├── meta
│   │   └── main.yml
│   ├── README.md
│   ├── tasks
│   │   ├── conf_file.yaml
│   │   ├── install.yaml
│   │   ├── main.yml
│   │   ├── start.yaml
│   │   └── user_add.yaml
│   ├── templates
│   │   ├── check_web.sh.j2
│   │   ├── hzl.conf.j2
│   │   ├── keepalived.conf.j2
│   │   └── nginx.conf.j2
│   ├── tests
│   │   ├── inventory
│   │   └── test.yml
│   └── vars
│       └── main.yml
├── nfs
│   ├── defaults
│   │   └── main.yml
│   ├── files
│   ├── handlers
│   │   ├── main.yml
│   │   └── restart.yaml
│   ├── meta
│   │   └── main.yml
│   ├── README.md
│   ├── tasks
│   │   ├── conf_file.yaml
│   │   ├── directry.yaml
│   │   ├── install.yaml
│   │   ├── main.yml
│   │   ├── sersync.yaml
│   │   ├── start.yaml
│   │   └── user_add.yaml
│   ├── templates
│   │   ├── confxml.xml.j2
│   │   ├── exrorts.j2
│   │   └── rsync.passwd.j2
│   ├── tests
│   │   ├── inventory
│   │   └── test.yml
│   └── vars
│       └── main.yml
├── prometheus
│   ├── defaults
│   │   └── main.yml
│   ├── files
│   │   ├── grafana-7.3.6-1.x86_64.rpm
│   │   ├── prometheus-2.27.1.linux-amd64.tar.gz
│   │   ├── prometheus.sh
│   │   └── prometheus.yml
│   ├── handlers
│   │   └── main.yml
│   ├── meta
│   │   └── main.yml
│   ├── README.md
│   ├── tasks
│   │   └── main.yml
│   ├── templates
│   ├── tests
│   │   ├── inventory
│   │   └── test.yml
│   └── vars
│       └── main.yml
├── prometheus_web
│   ├── defaults
│   │   └── main.yml
│   ├── files
│   │   ├── node_exporter-1.1.2.linux-amd64.tar.gz
│   │   └── node.sh
│   ├── handlers
│   │   └── main.yml
│   ├── meta
│   │   └── main.yml
│   ├── README.md
│   ├── tasks
│   │   └── main.yml
│   ├── templates
│   ├── tests
│   │   ├── inventory
│   │   └── test.yml
│   └── vars
│       └── main.yml
└── web
    ├── defaults
    │   └── main.yml
    ├── files
    ├── handlers
    │   ├── main.yml
    │   └── restart.yaml
    ├── meta
    │   └── main.yml
    ├── README.md
    ├── tasks
    │   ├── conf_file.yaml
    │   ├── install.yaml
    │   ├── main.yml
    │   ├── mount.yaml
    │   ├── remove_file.yaml
    │   ├── repo.yaml
    │   ├── start.yaml
    │   └── user_add.yaml
    ├── templates
    │   ├── nginx.conf.j2
    │   └── www.conf
    ├── tests
    │   ├── inventory
    │   └── test.yml
    └── vars
        └── main.yml

72 directories, 121 files
[root@m01 hzl]# tree roles/
roles/
├── backup
│   ├── defaults
│   │   └── main.yml
│   ├── files
│   ├── handlers
│   │   ├── main.yml
│   │   └── restart.yaml
│   ├── meta
│   │   └── main.yml
│   ├── README.md
│   ├── tasks
│   │   ├── conf_file.yaml
│   │   ├── directory.yaml
│   │   ├── install.yaml
│   │   ├── main.yml
│   │   ├── passwd_file.yaml
│   │   ├── start.yaml
│   │   └── user_add.yaml
│   ├── templates
│   │   ├── rsyncd.conf.j2
│   │   └── rsync.passwd.j2
│   ├── tests
│   │   ├── inventory
│   │   └── test.yml
│   └── vars
│       └── main.yml
├── db
│   ├── defaults
│   │   └── main.yml
│   ├── files
│   ├── handlers
│   │   ├── main.yml
│   │   └── restart.yaml
│   ├── meta
│   │   └── main.yml
│   ├── README.md
│   ├── tasks
│   │   ├── database.yaml
│   │   ├── epel_install.yaml
│   │   ├── install.yaml
│   │   ├── main.yml
│   │   ├── start.yaml
│   │   └── user_add.yaml
│   ├── templates
│   ├── tests
│   │   ├── inventory
│   │   └── test.yml
│   └── vars
│       └── main.yml
├── lb01
│   ├── defaults
│   │   └── main.yml
│   ├── files
│   ├── handlers
│   │   └── main.yml
│   ├── meta
│   │   └── main.yml
│   ├── README.md
│   ├── tasks
│   │   ├── conf_file.yaml
│   │   ├── install.yaml
│   │   ├── main.yml
│   │   ├── start.yaml
│   │   └── user_add.yaml
│   ├── templates
│   │   ├── check_web.sh.j2
│   │   ├── hzl.conf.j2
│   │   ├── keepalived.conf.j2
│   │   └── nginx.conf.j2
│   ├── tests
│   │   ├── inventory
│   │   └── test.yml
│   └── vars
│       └── main.yml
├── lb02
│   ├── defaults
│   │   └── main.yml
│   ├── files
│   ├── handlers
│   │   └── main.yml
│   ├── meta
│   │   └── main.yml
│   ├── README.md
│   ├── tasks
│   │   ├── conf_file.yaml
│   │   ├── install.yaml
│   │   ├── main.yml
│   │   ├── start.yaml
│   │   └── user_add.yaml
│   ├── templates
│   │   ├── check_web.sh.j2
│   │   ├── hzl.conf.j2
│   │   ├── keepalived.conf.j2
│   │   └── nginx.conf.j2
│   ├── tests
│   │   ├── inventory
│   │   └── test.yml
│   └── vars
│       └── main.yml
├── nfs
│   ├── defaults
│   │   └── main.yml
│   ├── files
│   ├── handlers
│   │   ├── main.yml
│   │   └── restart.yaml
│   ├── meta
│   │   └── main.yml
│   ├── README.md
│   ├── tasks
│   │   ├── conf_file.yaml
│   │   ├── directry.yaml
│   │   ├── install.yaml
│   │   ├── main.yml
│   │   ├── sersync.yaml
│   │   ├── start.yaml
│   │   └── user_add.yaml
│   ├── templates
│   │   ├── confxml.xml.j2
│   │   ├── exrorts.j2
│   │   └── rsync.passwd.j2
│   ├── tests
│   │   ├── inventory
│   │   └── test.yml
│   └── vars
│       └── main.yml
├── prometheus
│   ├── defaults
│   │   └── main.yml
│   ├── files
│   │   ├── grafana-7.3.6-1.x86_64.rpm
│   │   ├── prometheus-2.27.1.linux-amd64.tar.gz
│   │   ├── prometheus.sh
│   │   └── prometheus.yml
│   ├── handlers
│   │   └── main.yml
│   ├── meta
│   │   └── main.yml
│   ├── README.md
│   ├── tasks
│   │   └── main.yml
│   ├── templates
│   ├── tests
│   │   ├── inventory
│   │   └── test.yml
│   └── vars
│       └── main.yml
├── prometheus_web
│   ├── defaults
│   │   └── main.yml
│   ├── files
│   │   ├── node_exporter-1.1.2.linux-amd64.tar.gz
│   │   └── node.sh
│   ├── handlers
│   │   └── main.yml
│   ├── meta
│   │   └── main.yml
│   ├── README.md
│   ├── tasks
│   │   └── main.yml
│   ├── templates
│   ├── tests
│   │   ├── inventory
│   │   └── test.yml
│   └── vars
│       └── main.yml
└── web
    ├── defaults
    │   └── main.yml
    ├── files
    ├── handlers
    │   ├── main.yml
    │   └── restart.yaml
    ├── meta
    │   └── main.yml
    ├── README.md
    ├── tasks
    │   ├── conf_file.yaml
    │   ├── install.yaml
    │   ├── main.yml
    │   ├── mount.yaml
    │   ├── remove_file.yaml
    │   ├── repo.yaml
    │   ├── start.yaml
    │   └── user_add.yaml
    ├── templates
    │   ├── nginx.conf.j2
    │   └── www.conf
    ├── tests
    │   ├── inventory
    │   └── test.yml
    └── vars
        └── main.yml

72 directories, 121 files
5、模块详解
【模块介绍】
六、架构流程介绍(ansible)
1、backup
#使用工具:
 rsync :开源、高速的数据同步工具
#ansible使用rolse文件配置
tasks
├── conf_file.yaml
├── directory.yaml
├── install.yaml
├── main.yml
├── passwd_file.yaml
├── start.yaml
└── user_add.yaml

#主要文件(顺序自定义,怎么喜欢怎么来)
cat > main.yml <<EOF
- include: install.yaml
- include: user_add.yaml
- include: conf_file.yaml
- include: passwd_file.yaml
- include: directory.yaml
- include: start.yaml
EOF

#注意事项:
   1》rsync命令,使用rsync,如,data代表该目录和目录下内容,data/只是目录下的内容,不包含自身,rsync服务的默认端口号是873

   2》增量复制即将源和目标做对比,只复制多出来的或发生变化的文件。(可以用参数控制)

   3》客户端执行命令时用的是模块名(不用加中括号),对应的就是path的路径

   4》创建用户和目录并赋予权限

   5》创建密码文件路径、用户名必须和模块里的配置文件一致

   6》使用免密传输,创建密码文件时,文件权限一定要更改权限(600、700都行),rsync客户端文件(用户:密码),服务端密码文件(密码)
2、nfs
#使用工具
nfs :  文件共享服务器
#ansible使用rolse文件配置
tasks/
├── conf_file.yaml
├── directry.yaml
├── install.yaml
├── main.yml
├── sersync.yaml
├── start.yaml
└── user_add.yaml


#主要文件(顺序自定义,怎么喜欢怎么来)
cat > main.yml <<EOF
- include: install.yaml
- include: user_add.yaml
- include: conf_file.yaml
- include: directry.yaml
- include: start.yaml
- include: sersync.yaml
EOF

#nfs使用三步走战略:
   配置/etc/exports → 启动rpcbind(111) → 启动 NFS


#注意事项:
   1》配置 /etc/exports,设置权限参数的位置、主机名与小括号是连在一起
   2》文件的写入权限、需要满足:
      (1)使用者账号,亦即 UID 的相关身份
      (2)NFS 服务器允许有写入的权限
      (3)文件系统确实具有 w 的权限
   3》挂载问题
       在Client端使用:showmount -e IP或主机名,查看可挂载的目录,在Server端使用:重配置/etc/exports,用户或客户端身份权限不符
3、数据库(mariadb)
#使用工具
mariadb :  数据库(Database)是按照数据结构来组织、存储和管理数据的仓库

#ansible使用rolse文件配置
tasks/
├── database.yaml
├── epel_install.yaml
├── install.yaml
├── main.yml
├── mount.yaml
├── start.yaml
└── user_add.yaml

#主要文件(顺序自定义,怎么喜欢怎么来)
- include: epel_install.yaml
- include: install.yaml
- include: user_add.yaml
- include: start.yaml
- include: mount.yaml
- include: database.yaml

#注意事项:
  1》端口查看默认:3306
  2》设置数据库ROOT密码(注:如果不设置密码默认密码为空)
  3》授权某用户权限需要在root用户权限
  4》取消指定的权限,若想取消xxx用户的所有权限可以使用ALL选项:
    MariaDB [(none)]> REVOKE ALL  ON test.* FROM 'xxx'@'%';

  5》添加用户,设置权限
#创建用户命令
create user username@localhost identified by 'password';

#直接创建用户并授权的命令
grant all on *.* to username@localhost indentified by 'password';

#授予外网登陆权限
grant all privileges on *.* to username@'%' identified by 'password';

#授予权限并且可以授权
grant all privileges on *.* to username@'hostname' identified by 'password' with grant option;


6》#!!!注:flush privileges;    #刷新权限


7》彻底删除数据库
 yum remove mariadb       #卸载mariadb
 rm -f /etc/my.cnf        #配置文件删除
 rm -rf /var/lib/mysql/   #删除存放数据目录

    #注意,有可能mariadb要某些依赖才能卸载,要么安装完依赖再卸载
 强制卸载:  rpm -e mariadb-libs-5.5.60-1.el7_5.x86_64 --nodeps
4、web
#使用工具
nginx:   代理服务器,用于HTTP、HTTPS、SMTP、POP3和IMAP协议
php:     通用开源脚本语言,PHP是在服务器端执行的脚本语言,与C语言类似,是常用的网站编程语言

#ansible使用rolse文件配置
tasks/
├── conf_file.yaml
├── install.yaml
├── main.yml
├── mount.yaml
├── remove_file.yaml
├── repo.yaml
├── start.yaml
└── user_add.yaml


#主要文件(顺序自定义,怎么喜欢怎么来)
- include: repo.yaml
- include: install.yaml
- include: user_add.yaml
- include: mount.yaml
- include: conf_file.yaml
- include: start.yaml

#注意事项:
 1》nginx 当出现多个相同的server_name情况下,配置文件排序优先使用则会被调用,所以建议配置相同端口,不同域名,这样不会出现域名访问冲突(Nginx多Sever优先级)

 2》nginx  location匹配优先级

 3》php版本问题 (版本查看 php -v)

 4》显示中文乱码(将源文件修改为 UTF-8 格式)

 5》nginx与php的WEB常见问题一般的排查方法有:
    检查error_log,检查access_log,使用strace查看系统调用,tcpdump分析网络状况。而程序本身的问题,可能需要用到gdb(调试),web问题排障很复杂,找到正确的方向很重要,学会看log与系统状态。问题一定是有原因的,要找到root cause(真正的根本原因)

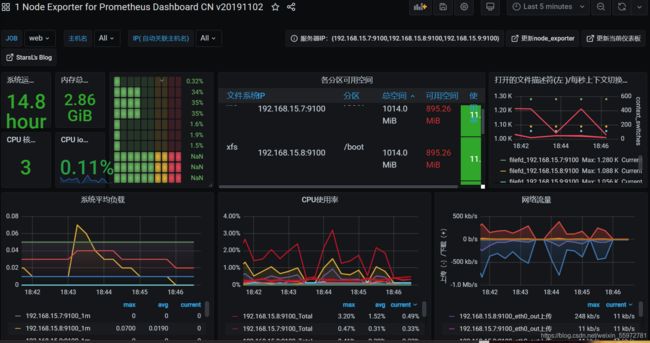
5、prometheus
监控就是实时的帮助我们来监控或者探测我们部署的服务是否正常运
  #使用工具
prometheus :
    Prometheus一套完整的开源监控接近方案,因为其诸多强大的特性以及生态的开放性,俨然已经成为了监控领域的事实标准并在全球范围内得到了广泛的部署应用
    Prometheus 是由 SoundCloud 开发的开源监控报警系统和时序列数据库,从字面上理解,Prometheus 由两个部分组成,一个是监控报警系统,另一个是自带的时序数据库(TSDB)
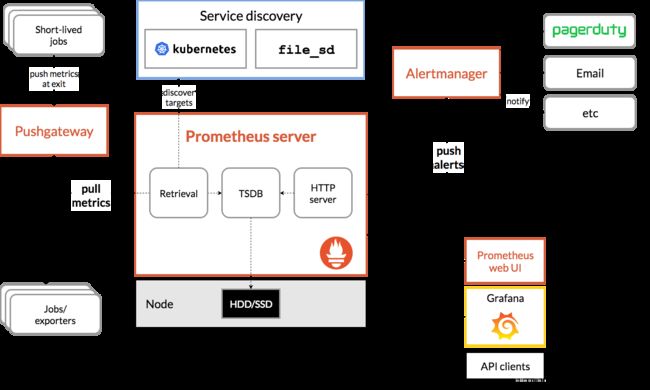
#Prometheus 的整体架构图:
   左侧是各种数据源,主要是各种符合 Prometheus 数据格式的 exporter,除此之外,为了支持推送数据的 Agent代理,你可以通过 Pushgateway组件,将Push转化为Pull。   (Prometheus甚至可以从其它的Prometheus获取数据)

   上侧是服务发现,Prometheus 支持监控对象的自动发现机制,从而可以动态获取监控对象。(虽然 Zabbix 和 Open-Falcon 也支持动态发现机制,但 Prometheus 的支持最完善)

  中间是核心:通过 Retrieval检索模块定时拉取数据,通过 Storage 存储模块保存数据

  右侧是告警和页面展现,页面查看除了 Prometheus 自带的 Web UI,还可以通过Grafana等组件查询 Prometheus 监控数据promql
#nasible实现prometheus
- name: ntpdate
  yum:
    name: ntpdate
    state: present

- name: ntpdate time
  shell: ntpdate ntp.aliyun.com

- name: unarchive prometheus
  unarchive:
    src: /hzl/hzl/prometheus-2.25.0.linux-amd64.tar.gz
    dest: /usr/local/

- name: create ln
  shell: ln -s /usr/local/prometheus-2.25.0.linux-amd64 /usr/local/prometheus

- name: create system
  template:
    src: prometheus.service
    dest: /etc/systemd/system

- name: ip
  template:
    src: prometheus.yml
    dest: /usr/local/prometheus

- name: daemon reload
  service:
    daemon_reload: yes

- name: scp  grafana
  copy:
    src: grafana-7.3.6-1.x86_64.rpm
    dest: /opt/

- name: install grafana
  yum:
    name: /opt/grafana-7.3.6-1.x86_64.rpm

- name: start prometheus
  service:
    name: prometheus
    state: started
    enabled: yes

- name: start grafana-server
  service:
    name: grafana-server
    state: started
    enabled: yes

#注意事项:
  1》端口占用
  2》配置文件修改
  3》时间统一

#url: https://mp-new.csdn.net/mp_download/manage/download/UpDetailed
七、实现的状态
1、实现的服务(bbs)

状态码ID号:web :: 12227 8919 12559 11207
database:: 10795


Grafana Dashboards - discover and share dashboards for Grafana. | Grafana Labs
仪表链接地址