Java IO总结
普通IO(Blocking IO)
(标题是IO,其实主要讲Input)
先来看一个最基本的IO示例,一般做需要读输入的算法题目都会用到Scanner
Scanner s=new Scanner(System.in);
while (s.hasNext()){
    int i=s.nextInt();
}
s.close();所以,我们一直用的这个System.in是什么?
什么是IO资源?
进入System类可以看到
public final static InputStream in = null;然后再看InputStream是什么?
public abstract class InputStream implements CloseableInputStream是一个抽象类,实现了Closeable接口
再来看Closeable接口
public interface Closeable extends AutoCloseable {
    public void close() throws IOException;
}
根据开发者的注释,可以知道Closeable表示一个被可以被关闭的数据源或目的地。
如果不关闭,就可能发生我们常见的内存泄露。
而其中唯一的close()方法即关闭对这个数据源(流)的持有
该方法有一段注释:
strongly advised to relinquish the underlying resources and to internally mark the Closeable as closed, prior to throwing the IOException
就是说关闭之后最好做一个“已关闭”的标记,做到幂等性,防止二次关闭时产生异常状况
注:幂等性即多次对一个资源的操作可以得到相同的结果。比如REST API中的GET, PUT, DELETE 动词都是幂等的。POST, PATCH是非幂等的。
另外,值得一提的是,存在一个close链。多个实现了Closeable接口(这里是InputStream的子类)的对象嵌套初始化后,只需调用最外层的close()即可逐层调用内部的close(),所以如果要自己写一个xxxInputStream,最好也对close()方法进行一个逐层调用。 方法如下:
    public void close() throws IOException {
        byte[] buffer;
        while ( (buffer = buf) != null) {
            if (bufUpdater.compareAndSet(this, buffer, null)) {
                InputStream input = in;
                in = null;
                if (input != null)
                    input.close();
                return;
            }
            // Else retry in case a new buf was CASed in fill()
        }
    }
    //这里用了CAS操作保证内存中没有未读入的缓冲,至于CAS本篇就不细说了
继续探究其父接口:
//@since 1.7
public interface AutoCloseable{
    void close() throws Exception;
}
可以看到是在jdk1.7才加入的这个接口,注释大意:
这个接口标记着可以进行try-with-resource
not required to be idempotent(幂等), but strongly encouraged
这里的try-with-resource是什么意思?写过myBatis的同学可能比较熟悉:
//MyBatis中,开启一个sqlSession
//MybatisConf是一个自建的工厂类
try (SqlSession session = MybatisConf.getSession()) {
    //...
}

//对普通IO进行try-with
try (BufferedInputStream bis=new BufferedInputStream(new FileInputStream("data/io.txt"))){
    //...
} catch (IOException e){
    e.printStackTrace();
}在try后的括号内取得一个实现了AutoCloseable接口的资源,在try的整个块中都可以使用,结束后会自动调用close()方法(python的with)
注意这里catch IOException并不是那一句初始化所产生的(初始化的时候只会有FileNotFoundException),
而是close()方法抛出的。
上面就是InputStream的根源,那么,我们最开始说的System.in是什么时候被初始化成哪一个类的呢
public final class System {
    private static native void registerNatives();
    static {
        registerNatives();
    }
    public final static InputStream in = null;
}在System整个类中并没有显式初始化in,但是可以看出,是通过静态块中调用native方法进行初始化的。
面向字节的IO
再来看看刚才提到的,另一种常用的读输入方式BufferedInputStream
BufferedInputStream bis=new BufferedInputStream(new FileInputStream("data/io.txt"))

BufferedInputStream bis=new BufferedInputStream(new FileInputStream(new File("data/io.txt")))效果都是一样的,传入字符串时,内部也会初始化一个File。
BufferedReader内含了两种初始化方法,都是需要传入InputStream的,在读文件时,一般会初始化一个FileInputStream,构造函数直接传入文件路径。
public BufferedInputStream(InputStream in) {}

public BufferedInputStream(InputStream in, int size) {}然后我们来看BufferedInputStream的父类FilterInputStream
/**
 * A FilterInputStream contains
 * some other input stream, which it uses as
 * its  basic source of data, possibly transforming
 * the data along the way or providing  additional
 * functionality. The class FilterInputStream
 * itself simply overrides all  methods of
 * InputStream with versions that
 * pass all requests to the contained  input
 * stream. Subclasses of FilterInputStream
 * may further override some of  these methods
 * and may also provide additional methods
 * and fields.
 *
 * @author  Jonathan Payne
 * @since   JDK1.0
 */
class FilterInputStream extends InputStream
注释大意:
此类只是简单地重写了InputStream类的方法,其子类可以进一步重写以提供其他功能。
具体有哪些子类?
不一一列举出来,比较有代表性的有:
- BufferedInputStream
- DataInputStream
- ZipInputStream
可以看出,他们都是对InputStream(或者说FilterInputStream)进行了扩展,实现特定的功能。
IO中的装饰器(Decorator)模式
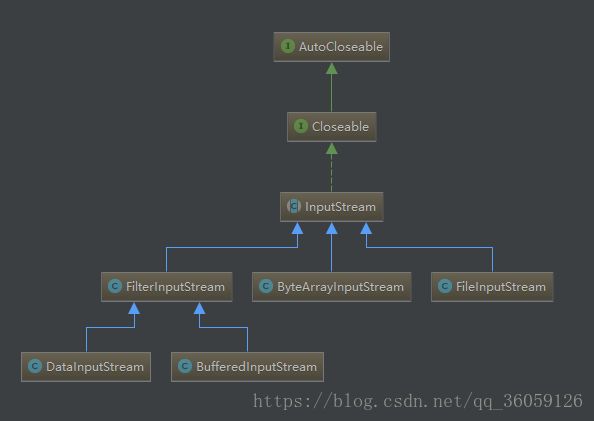
先上一个直观的Diagram:
这里BufferedInputStream继承了FilterInputStream,FilterInputStream继承InputStream
FileInputStream又继承了InputStream
之前可能无法理解什么叫Filter“简单重写”,现在可以具体看下
public
class FilterInputStream extends InputStream {

    protected volatile InputStream in;

    protected FilterInputStream(InputStream in) {
        this.in = in;
    }

    public int read() throws IOException {
        return in.read();
    }

    public int read(byte b[]) throws IOException {
        return read(b, 0, b.length);
    }

    public int read(byte b[], int off, int len) throws IOException {
        return in.read(b, off, len);
    }

    public void close() throws IOException {
        in.close();
    }

    public synchronized void mark(int readlimit) {
        in.mark(readlimit);
    }

    //省略了其他方法
}
我们发现,不仅是“简单重写”,还完全调用了传入的InputStream实例的方法
传入的InputStream实例即图中和FilterInputStream为兄弟节点的类,比如FileInputStream
这里就是装饰器模式的体现了。具体的read工作不由FilterInputStream的子类完成,而是对InputStream子类的read进行包装,完成更具体的工作,比如BufferedInputStream的缓冲,DataInputStream的读取Java数据类型。
而被包装的,实际的内核类,即FileInputStream,ByteArrayInputStream实现了实际的对文件、字节数据等的读取。
面向字符的IO
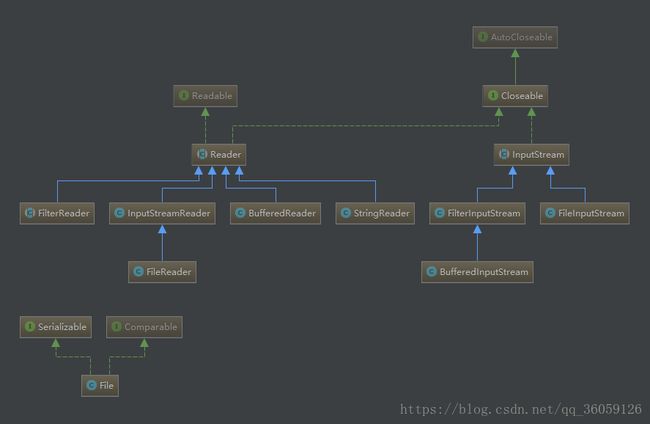
以实现Readable接口为首的的xxxReader类就是面向字符的Input,可以进行readLine()操作。
常用操作:
BufferedReader br=new BufferedReader(new InputStreamReader(new FileInputStream("data/a.txt")));- InputStreamReader
其构造方法,接受一个InputStream
    public InputStreamReader(InputStream in) {
        super(in);
        try {
            sd = StreamDecoder.forInputStreamReader(in, this, (String)null); // ## check lock object
        } catch (UnsupportedEncodingException e) {
            // The default encoding should always be available
            throw new Error(e);
        }
    }
可以看到内部是利用了InputStream。也就是说字符流IO(Reader)是以字节流IO(InputStream)为基础的。
最常用的Scanner
Scanner的便利是由于其可以包装InputStream或Readable,以及其他各种东西。
    private Scanner(Readable source, Pattern pattern) {
        assert source != null : "source should not be null";
        assert pattern != null : "pattern should not be null";
        this.source = source;
        delimPattern = pattern;//参数pattern就是分隔符
        buf = CharBuffer.allocate(BUFFER_SIZE);
        buf.limit(0);
        matcher = delimPattern.matcher(buf);
        matcher.useTransparentBounds(true);
        matcher.useAnchoringBounds(false);
        useLocale(Locale.getDefault(Locale.Category.FORMAT));
    }

    public Scanner(Readable source) {
        this(Objects.requireNonNull(source, "source"), WHITESPACE_PATTERN);
    }

    public Scanner(InputStream source) {
        this(new InputStreamReader(source), WHITESPACE_PATTERN);
    }

    public Scanner(InputStream source, String charsetName) {
        this(makeReadable(Objects.requireNonNull(source, "source"), toCharset(charsetName)),
             WHITESPACE_PATTERN);
    }
    public Scanner(File source) throws FileNotFoundException {
        //...
    }
    //还有其他构造函数,这里不贴出
关于输出流
输出流和输入流的组织方式很像,就不详细介绍了。
比如InputStream对应OutputStream,Reader对应Writer。
需要注意有PrintWriter和BufferedWriter两个Writer的子类;PrintStream和BufferedOutputStream两个FilterOutputStream的子类,使用稍有区别。这里贴出网上总结的区别 XD
PrintWriter的print、println方法可以接受任意类型的参数,而BufferedWriter的write方法只能接受字符、字符数组和字符串;
PrintWriter的println方法自动添加换行,BufferedWriter需要显示调用newLine方法;
PrintWriter的方法不会抛异常,若关心异常,需要调用checkError方法看是否有异常发生;
PrintWriter构造方法可指定参数,实现自动刷新缓存(autoflush);
PrintWriter的构造方法更广
PrintWriter提供println()方法可以写不同平台的换行符,而BufferedWriter可以任意设定缓冲大小
IO大概就是这么多,除了本篇的内容,还有其他需要注意的内细节,比如输出流的flush()等…
总结一下本篇内容:
- System.in的真面目
- InputStream -> Closeable -> AutoCloseable 的继承关系
- AutoCloseable 和 try-with-resource
- close链、幂等性
- FilterInputStream, BuffererInputStream, DataInputStream, FileInputStream 的关系和装饰器模式
- Readable, Reader及其子类
- Scanner
- 输出流
下节将会介绍Java的NIO(New IO)。

