k3s方案
什么是k3s
k3s 是一个轻量级的 Kubernetes 发行版,它针对边缘计算、物联网等场景进行了高度优化。专为无人值守、资源受限、远程位置或物联网设备内部的生产工作负载而设计。
k3s 有以下增强功能:
-
打包为单个二进制文件。
-
使用基于 sqlite3 的轻量级存储后端作为默认存储机制。同时支持使用 etcd3、MySQL 和 PostgreSQL 作为存储机制。
-
封装在简单的启动程序中,通过该启动程序处理很多复杂的 TLS 和选项。
-
默认情况下是安全的,对轻量级环境有合理的默认值。
-
添加了简单但功能强大的
batteries-included功能,例如:本地存储提供程序,服务负载均衡器,Helm controller 和 Traefik Ingress controller。 -
所有 Kubernetes control-plane 组件的操作都封装在单个二进制文件和进程中,使 k3s 具有自动化和管理包括证书分发在内的复杂集群操作的能力。
-
最大程度减轻了外部依赖性,k3s 仅需要 kernel 和 cgroup 挂载。 k3s 软件包需要的依赖项包括:
- containerd
- Flannel
- CoreDNS
- CNI
- 主机实用程序(iptables、socat 等)
- Ingress controller(Traefik)
- 嵌入式服务负载均衡器(service load balancer)
- 嵌入式网络策略控制器(network policy controller)
-
紧跟K8s发行版本
-
提供证书轮换策略
适用场景
k3s 适用于以下场景:
- 边缘计算-Edge
- 物联网-IoT
- CI
- Development
- ARM
- 嵌入 K8s
为什么用k3s
k3s 几乎可以胜任 k8s 的所有工作, 它只是一个更轻量级的版本。
支持使用 etcd3、MySQL 和 PostgreSQL 作为存储机制。
50MB左右二进制包,500MB左右内存消耗。
同时支持x86_64, Arm64, Amd64, Arm
支持容器内部署 如可以在k8s中部署k3s 方便后续二次开发和多租户管理
官方评价
k3s相对k8s的精简部分:
- 内置的storage驱动 内置Local Path Provider。
- k3s可执行文件包含了Kubernetes control-plane 组件,如 API server, controller-manager, 和 scheduler。
- 内置的cloud provider (公有云使用) 仍可通过手动安装的外部插件。它是 Kubernetes 中开放给云厂商的通用接口,便于 Kubernetes 自动管理和利用云服务商提供的资源,这些资源包括虚拟机资源、负载均衡服务、弹性公网 IP、存储服务等。
- 过时的API,k3s不包括任何默认禁用的Alpha功能或者过时的功能,原有的API组件目前仍运行于标准部署当中。
- 非核心的feature
- 将在工作节点上运行的kubelet、kubeproxy和flannel代理进程组合成一个进程。默认情况下,k3s 将以 flannel 作为 CNI 运行,使用 VXLAN 作为默认后端。
- 除了 etcd 之外,引入 SQLite 作为可选的数据存储:在k3s中添加了SQLite作为可选的数据存储,从而为etcd提供了一个轻量级的替代方案。该方案不仅占用了较少的内存,而且大幅简化了操作。
- 使用containerd代替Docker作为运行时的容器引擎:通过用containderd替换Docker,k3s能够显著减少运行时占用空间,删除libnetwork、swarm、Docker存储驱动程序和其他插件等功能。你可以使用Docker,只是说contained是默认选项。Containerd可以直接通过编译方式内置到k3s里,Docker则不能。Containerd占用资源小,Docker本身有额外的组件,那些组件k8s完全不需要。
| k8s | k3s | |
|---|---|---|
| 操作系统 | 大多数现代 Linux 系统 支持windows | 大多数现代 Linux 系统 不支持windows |
| 容器运行时支持docker | ☑️ | ☑️ |
| 容器运行时支持containerd | ☑️ | ☑️ 默认安装containerd |
| Ingress controller | ☑️ | ☑️ 默认安装traefik |
| 默认数据库存储 | etcd | SQLite 支持mysql和etcd |
| GPU | ☑️ | ☑️ |
| 网络 | 支持flannel canal calico 以及自定义CNI | 支持flannel canal calico 以及自定义CNI 默认安装flannel |
| 升级版本 | 繁琐 | 简单 替换二进制文件即可 |
k3s单节点架构
默认情况下,k3s 启动 master 节点也同时具有 worker 角色,是可调度的,因此可以在它们上启动工作
# 如果不需要master被调度可以通过安装时加入参数INSTALL_k3s_EXEC="--node-taint k3s-controlplane=true:NoExecute"
# 去除标签修改标签
# kubectl label node ubuntu node-role.kubernetes.io/master-
# kubectl label node ubuntu node-role.kubernetes.io/master=""
安装docker
# wget https://download.docker.com/linux/static/stable/x86_64/docker-20.10.2.tgz
cd /data1/k3s/airgap
tar -xvf docker-20.10.2.tgz
cp -f docker/* /usr/bin/

cat >/etc/systemd/system/docker.service <
安装apt依赖gcc Nvidia-docker2 cmake
cat <<-EOF > /etc/apt/sources.list
deb [trusted=yes] file:///var/ debs/
EOF

mkdir -p /var/debs
cp *.deb  /var/debs/
touch /var/debs/Packages.gz
cd /var/debs
apt-ftparchive packages /var/debs > /var/debs/Packages
apt-get update


# 这一步安装就没必要搞上面花里胡哨的
# apt install /var/debs/*deb -y
cp *.deb  /var/debs/
echo Y| apt install /var/debs/*.deb -y --no-install-recommends


# 安装完成配置default-runtime后重启
cat >  /etc/docker/daemon.json <
如需在线安装参考注释
# curl -L https://nvidia.github.io/nvidia-docker/gpgkey | sudo apt-key add - &&
distribution=$(. /etc/os-release;echo $ID$VERSION_ID) &&
# curl -s -L https://nvidia.github.io/nvidia-docker/$distribution/nvidia-docker.list | sudo tee /etc/apt/sources.list.d/nvidia-docker.list &&
# sudo apt-get update &&
# sudo apt-get install -y nvidia-docker2 &&

# 修改docker配置文件,以让其将nvidia的runtime设置为默认的runtime

cat >  /etc/docker/daemon.json <
安装NVIDIA GPU驱动安装
cd /data1/k3s/airgap
./nvidia_cuda/NVIDIA-Linux-x86_64-470.63.01.run  -silent --no-x-check --no-nouveau-check --install-libglvnd
[ $? -eq 0 ] && echo "nvidia驱动安装成功"||echo "nvidia驱动安装异常,请检查nvidia-smi命令是否可用!!!"


cat  >/etc/modprobe.d/blacklist-nouveau.conf </dev/null
modprobe  nvidia-drm 1>/dev/null

# 开启驱动持久模式
nvidia-smi -pm 1
导入所需镜像
cd /data1/k3s/airgap
for i in `ls |grep tar.gz`;do docker load < $i;done
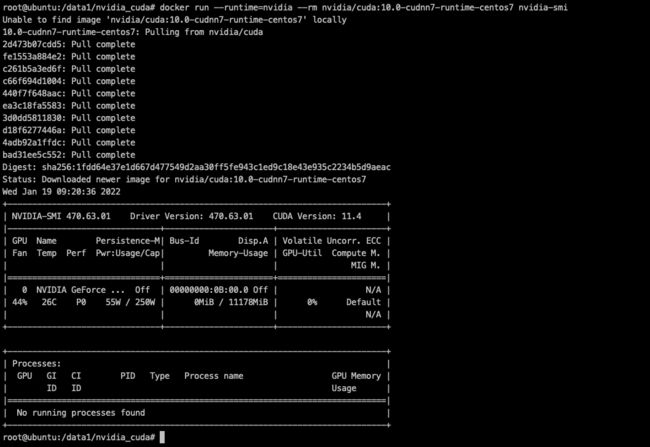
测试nvidia驱动
# docker run --runtime=nvidia --rm nvidia/cuda:10.0-cudnn7-runtime-centos7 nvidia-smi
安装k3s
考虑nginx配置应用到traefik,以及前端转发,暂时先不用traefik,采用原来的部署方式nginx + HostPort方式部署服务
选择参数安装
sudo mkdir -p /var/lib/rancher/k3s/agent/images/
sudo cp ./k3s-airgap-images-amd64.tar  /var/lib/rancher/k3s/agent/images/
# sudo cp ./k3s-airgap-images-arm64.tar  /var/lib/rancher/k3s/agent/images/
# 上面这两步可以通过docker load < k3s-airgap-images-amd64.tar 代替

# sudo chmod +x /usr/local/bin/k3s
# sudo chmod +x install.sh
sudo cp ./k3s /usr/local/bin/

# service-node-port-range默认是3000-32767
# export INSTALL_K3S_SKIP_DOWNLOAD="--datastore-endpoint=mysql://root:root@tcp(172.17.0.150:3306)/k3s --docker --kube-apiserver-arg service-node-port-range=1-65000 --no-deploy traefik --write-kubeconfig  ~/.kube/config --write-kubeconfig-mode 666"
# 启用docker代替containerd   默认会部署traefik
sudo INSTALL_K3S_SKIP_DOWNLOAD=true ./install.sh  --docker --no-deploy traefik  --no-deploy local-storage
查看k3s状态
alias kubectl='k3s kubectl'
# 查看flannel
ip -o -d link show flannel.1

k3s kubectl get nodes
k3s镜像版本
| Component | Version |
|---|---|
| Kubernetes | v1.18.20 |
| SQLite | 3.33.0 |
| Containerd | v1.3.10-k3s1 未安装 |
| Runc | v1.0.0-rc95 |
| Flannel | v0.11.0-k3s.2 |
| Metrics-server | v0.3.6 未安装 |
| Traefik | 1.7.19 未安装 |
| CoreDNS | v1.6.9 |
| Helm-controller | v0.8.3 未安装 |
| Local-path-provisioner | v0.0.11 未安装 |
测试
k3s kubectl run --image=nginx nginx-app --port=80
k3s kubectl get pods -A  -w
安装DaemonSet的nvidia-device-plugin插件(指定GPU个数)
nvidia-device-plugin.yml
# Copyright (c) 2019, NVIDIA CORPORATION.  All rights reserved.
#
# Licensed under the Apache License, Version 2.0 (the "License");
# you may not use this file except in compliance with the License.
# You may obtain a copy of the License at
#
#     http://www.apache.org/licenses/LICENSE-2.0
#
# Unless required by applicable law or agreed to in writing, software
# distributed under the License is distributed on an "AS IS" BASIS,
# WITHOUT WARRANTIES OR CONDITIONS OF ANY KIND, either express or implied.
# See the License for the specific language governing permissions and
# limitations under the License.

apiVersion: apps/v1
kind: DaemonSet
metadata:
  name: nvidia-device-plugin-daemonset
  namespace: kube-system
spec:
  selector:
    matchLabels:
      name: nvidia-device-plugin-ds
  updateStrategy:
    type: RollingUpdate
  template:
    metadata:
      # This annotation is deprecated. Kept here for backward compatibility
      # See https://kubernetes.io/docs/tasks/administer-cluster/guaranteed-scheduling-critical-addon-pods/
      annotations:
        scheduler.alpha.kubernetes.io/critical-pod: ""
      labels:
        name: nvidia-device-plugin-ds
    spec:
      tolerations:
      # This toleration is deprecated. Kept here for backward compatibility
      # See https://kubernetes.io/docs/tasks/administer-cluster/guaranteed-scheduling-critical-addon-pods/
      - key: CriticalAddonsOnly
        operator: Exists
      - key: nvidia.com/gpu
        operator: Exists
        effect: NoSchedule
      # Mark this pod as a critical add-on; when enabled, the critical add-on
      # scheduler reserves resources for critical add-on pods so that they can
      # be rescheduled after a failure.
      # See https://kubernetes.io/docs/tasks/administer-cluster/guaranteed-scheduling-critical-addon-pods/
      priorityClassName: "system-node-critical"
      containers:
      - image: nvcr.io/nvidia/k8s-device-plugin:v0.10.0
        name: nvidia-device-plugin-ctr
        args: ["--fail-on-init-error=false"]
        securityContext:
          allowPrivilegeEscalation: false
          capabilities:
            drop: ["ALL"]
        volumeMounts:
          - name: device-plugin
            mountPath: /var/lib/kubelet/device-plugins
      volumes:
        - name: device-plugin
          hostPath:
            path: /var/lib/kubelet/device-plugins
WARNING: if you don’t request GPUs when using the device plugin with NVIDIA images all the GPUs on the machine will be exposed inside your container.
kubectl apply -f nvidia-device-plugin.yml
通过如下指令检查node的gpu资源
k3s kubectl describe node ubuntu |grep nvidia
# 可能有几秒的延迟 如果看到的结果不理想可以通过命令查看日志
# kubectl logs -f nvidia-device-plugin-daemonset-xtllb -n kube-system
安装一个gpu的应用tensorflow测试
NodePort + SVC
tensorflow-gpu-deploy.yaml
apiVersion: apps/v1
kind: Deployment
metadata:
  name: tensorflow-gpu
spec:
  replicas: 1
  selector:
    matchLabels:
      name: tensorflow-gpu
  template:
    metadata:
      labels:
        name: tensorflow-gpu
    spec:
      containers:
        - name: tensorflow-gpu
          image: tensorflow/tensorflow:1.15.0-py3-jupyter
          imagePullPolicy: Always
          resources:
            limits:
            # 这个必带,否则不会使用GPU  后续需要获取GPU个数再分配GPU
              nvidia.com/gpu: 1
          ports:
          - containerPort: 8888
tensorflow-gpu-svc.yaml
apiVersion: v1
kind: Service
metadata:
  name: tensorflow-gpu
spec:
  ports:
  - port: 8888
    targetPort: 8888
    nodePort: 30888
    name: jupyter
  selector:
    name: tensorflow-gpu
  type: NodePort
kubectl apply -f tensorflow-gpu-deploy.yaml
kubectl apply -f tensorflow-gpu-svc.yaml
HostPort + HostPath
apiVersion: apps/v1
kind: Deployment
metadata:
  name: tensorflow-gpu
spec:
  replicas: 1
  selector:
    matchLabels:
      name: tensorflow-gpu
  template:
    metadata:
      labels:
        name: tensorflow-gpu
    spec:
      containers:
        - name: tensorflow-gpu
          image: tensorflow/tensorflow:1.15.0-py3-jupyter
          imagePullPolicy: Always
          volumeMounts:
          - name: hostpath-tensorflow
            mountPath: /data2
          resources:
            limits:
            # 这个必带,否则不会使用GPU  后续需要获取GPU个数再分配GPU
              nvidia.com/gpu: 1
          ports:
          - containerPort: 8888
            hostPort: 88
            name: tensorflow
            protocol: TCP
      volumes:
      - name: hostpath-tensorflow
        hostPath:
          path: /data2
登录tensorflow 地址为IP:30888 token通过pod的log获取
kubectl logs -f tensorflow-gpu-67769c9f4-7vhrc
登录之后创建简单的python3任务
from tensorflow.python.client import device_lib

def get_available_devices():
    local_device_protos = device_lib.list_local_devices()
    return [x.name for x in local_device_protos]

print(get_available_devices())
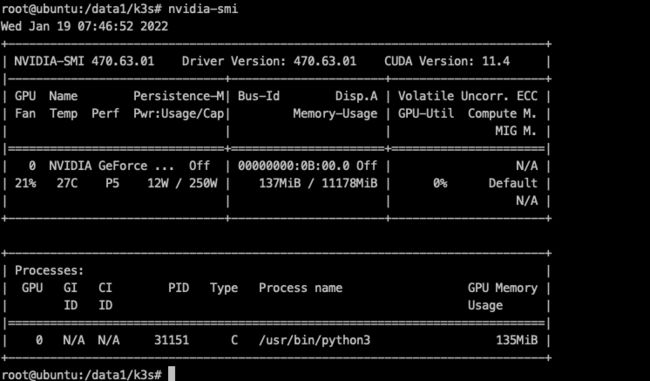
前后对比
通过查看节点上的gpu运行状态看到gpu是否被正常调用
安装VGPU插件
1 首选4paradigm/k8s-device-plugin
支持k3s 虚拟GPU
k8s支持虚拟化vGPU的显存及算力
2 k8s集群可以考虑阿里开源AliyunContainerService/gpushare-scheduler-extender
暂时不支持k3s,仅支持k8s
# 检查文件 自行判断是否需要更改daemon.json 并重启docker
cat >  /etc/docker/daemon.json <
显卡虚拟化DaemonSet插件
4pdosc-nvidia-device-plugin.yml
# Copyright (c) 2019, NVIDIA CORPORATION.  All rights reserved.
#
# Licensed under the Apache License, Version 2.0 (the "License");
# you may not use this file except in compliance with the License.
# You may obtain a copy of the License at
#
#     http://www.apache.org/licenses/LICENSE-2.0
#
# Unless required by applicable law or agreed to in writing, software
# distributed under the License is distributed on an "AS IS" BASIS,
# WITHOUT WARRANTIES OR CONDITIONS OF ANY KIND, either express or implied.
# See the License for the specific language governing permissions and
# limitations under the License.

apiVersion: apps/v1
kind: DaemonSet
metadata:
  name: nvidia-device-plugin-daemonset
  namespace: kube-system
spec:
  selector:
    matchLabels:
      name: nvidia-device-plugin-ds
  updateStrategy:
    type: RollingUpdate
  template:
    metadata:
      # This annotation is deprecated. Kept here for backward compatibility
      # See https://kubernetes.io/docs/tasks/administer-cluster/guaranteed-scheduling-critical-addon-pods/
      annotations:
        scheduler.alpha.kubernetes.io/critical-pod: ""
      labels:
        name: nvidia-device-plugin-ds
    spec:
      tolerations:
      # This toleration is deprecated. Kept here for backward compatibility
      # See https://kubernetes.io/docs/tasks/administer-cluster/guaranteed-scheduling-critical-addon-pods/
      - key: CriticalAddonsOnly
        operator: Exists
      - key: nvidia.com/gpu
        operator: Exists
        effect: NoSchedule
      # Mark this pod as a critical add-on; when enabled, the critical add-on
      # scheduler reserves resources for critical add-on pods so that they can
      # be rescheduled after a failure.
      # See https://kubernetes.io/docs/tasks/administer-cluster/guaranteed-scheduling-critical-addon-pods/
      priorityClassName: "system-node-critical"
      containers:
      - image: 4pdosc/k8s-device-plugin:latest
        # - image: m7-ieg-pico-test01:5000/k8s-device-plugin-test:v0.9.0-ubuntu20.04
        imagePullPolicy: Always
        name: nvidia-device-plugin-ctr
        args: ["--fail-on-init-error=false", "--device-split-count=3", "--device-memory-scaling=3", "--device-cores-scaling=3"]
        env:
        - name: PCIBUSFILE
          value: "/usr/local/vgpu/pciinfo.vgpu"
        securityContext:
          allowPrivilegeEscalation: false
          capabilities:
            drop: ["ALL"]
        volumeMounts:
          - name: device-plugin
            mountPath: /var/lib/kubelet/device-plugins
          - name: vgpu-dir
            mountPath: /usr/local/vgpu
      volumes:
        - name: device-plugin
          hostPath:
            path: /var/lib/kubelet/device-plugins
        - name: vgpu-dir
          hostPath:
            path: /usr/local/vgpu
在这个DaemonSet文件中, 你能发现
nvidia-device-plugin-ctr容器有一共4个vGPU的客制化参数:
fail-on-init-error:布尔类型, 预设值是true。当这个参数被设置为true时,如果装置插件在初始化过程遇到错误时程序会返回失败,当这个参数被设置为false时,遇到错误它会打印信息并且持续阻塞插件。持续阻塞插件能让装置插件即使部署在没有GPU的节点(也不应该有GPU)也不会抛出错误。这样你在部署装置插件在你的集群时就不需要考虑节点是否有GPU,不会遇到报错的问题。然而,这么做的缺点是如果GPU节点的装置插件因为一些原因执行失败,将不容易察觉。现在预设值为当初始化遇到错误时程序返回失败,这个做法应该被所有全新的部署采纳。device-split-count:整数类型,预设值是2。NVIDIA装置的分割数。对于一个总共包含N张NVIDIA GPU的Kubernetes集群,如果我们将device-split-count参数配置为K,这个Kubernetes集群将有K * N个可分配的vGPU资源。注意,我们不建议将NVIDIA 1080 ti/NVIDIA 2080 tidevice-split-count参数配置超过5,将NVIDIA T4配置超过7,将NVIDIA A100配置超过15。device-memory-scaling:浮点数类型,预设值是1。NVIDIA装置显存使用比例,可以大于1(启用虚拟显存,实验功能)。对于有M显存大小的NVIDIA GPU,如果我们配置device-memory-scaling参数为S,在部署了我们装置插件的Kubenetes集群中,这张GPU分出的vGPU将总共包含 S * M显存。每张vGPU的显存大小也受device-split-count参数影响。在先前的例子中,如果device-split-count参数配置为K,那每一张vGPU最后会取得 S * M / K 大小的显存。device-cores-scaling:浮点数类型,预设值与device-split-count数值相同。NVIDIA装置算力使用比例,可以大于1。如果device-cores-scaling参数配置为Sdevice-split-count参数配置为K,那每一张vGPU对应的一段时间内 sm 利用率平均上限为S / K。属于同一张物理GPU上的所有vGPU sm利用率总和不超过1。enable-legacy-preferred:布尔类型,预设值是false。对于不支持 PreferredAllocation 的kublet(<1.19)可以设置为true,更好的选择合适的device,开启时,本插件需要有对pod的读取权限,可参看 legacy-preferred-nvidia-device-plugin.yml。对于 kubelet >= 1.9 时,建议关闭。
用于测试的deployment文件
vgpu-deploy.yaml
注意: 如果你使用插件装置时,如果没有请求vGPU资源,那容器所在机器的所有vGPU都将暴露给容器。
apiVersion: apps/v1
kind: Deployment
metadata:
  name: tensorflow-gpu
spec:
  replicas: 1
  selector:
    matchLabels:
      name: tensorflow-gpu
  template:
    metadata:
      labels:
        name: tensorflow-gpu
    spec:
      containers:
        - name: ubuntu-container
          image: ubuntu:18.04
          command: ["bash", "-c", "sleep 86400"]
          resources:
            limits:
              nvidia.com/gpu: 1 # 请求1个vGPUs  默认一张卡只能拆为2个,如需要修改需要修改ds中device-split-count参数,device-split-count: 整数类型,预设值是2。NVIDIA装置的分割数。对于一个总共包含N张NVIDIA GPU的Kubernetes集群,如果我们将device-split-count参数配置为K,这个Kubernetes集群将有K * N个可分配的vGPU资源。注意,我们不建议将NVIDIA 1080 ti/NVIDIA 2080 ti device-split-count参数配置超过5,将NVIDIA T4配置超过7,将NVIDIA A100配置超过15。
        - name: tensorflow-gpu
          image: tensorflow/tensorflow:1.15.0-py3-jupyter
          imagePullPolicy: Always
          resources:
            limits:
              nvidia.com/gpu: 1 # 请求1个vGPUs
          ports:
          - containerPort: 8888

---
apiVersion: v1
kind: Service
metadata:
  name: tensorflow-gpu
spec:
  ports:
  - port: 8888
    targetPort: 8888
    nodePort: 30888
    name: jupyter
  selector:
    name: tensorflow-gpu
  type: NodePort
2个container都能看到nvidia-smi
这里可以考虑将每个vgpu的perf调到p12 最小性能
pwr需开启
设置daemonset参数如下
分配显存算力GPU为1/8
args: ["--fail-on-init-error=false", "--device-split-count=8", "--device-memory-scaling=1", "--device-cores-scaling=1"]
卸载k3s
/usr/local/bin/k3s-uninstall.sh
网络转发
Ingress controller
hostport + nginx
补充
更新镜像
# deployment更新会新起pod 因为端口和GPU资源等问题会无法启动新的pod  需要先把deploy的replicas缩容为0
kubectl scale deploy tensorflow-gpu --replicas=0
# 确认deployment对应pod剔除之后再应用新的yaml
kubectl get pods
kubectl apply -f tensorflow-gpu-deploy.yaml
k3s日志路径
/var/log/syslog
查看k3s服务状态
# 会根据系统是否支持systemctl创建对应服务
systemctl  status k3s
设置 Local Storage Provider
创建一个由 hostPath 支持的持久卷声明和一个使用它的 pod:
默认存储在/var/lib/rancher/k3s/storage/ 需要注意accessModes
pvc.yaml
apiVersion: v1
kind: PersistentVolumeClaim
metadata:
  name: local-path-pvc
  namespace: default
spec:
  accessModes:
    - ReadWriteOnce
  storageClassName: local-path
  resources:
    requests:
      storage: 2Gi
pod.yaml
apiVersion: v1
kind: Pod
metadata:
  name: volume-test
  namespace: default
spec:
  containers:
  - name: volume-test
    image: nginx:stable-alpine
    imagePullPolicy: IfNotPresent
    volumeMounts:
    - name: volv
      mountPath: /data
    ports:
    - containerPort: 80
  volumes:
  - name: volv
    persistentVolumeClaim:
      claimName: local-path-pvc
使用 crictl 清理未使用的镜像
k3s crictl rmi --prune
端口
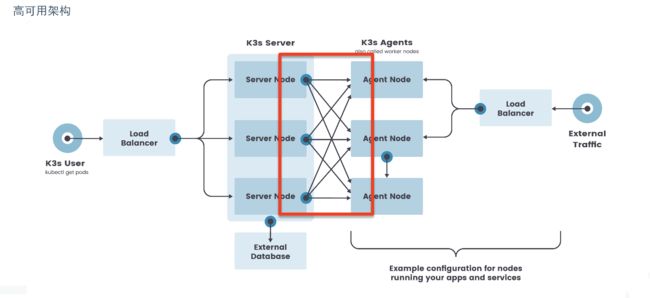
(拓展)k3s高可用
需要vip或弹性ip
使用mysql
docker run --name mysql5.7 --net host --restart=always -e MYSQL_ROOT_PASSWORD=root -d mysql:5.7--lower_case_table_names=1 #创建数据库
# "mysql://username:password@tcp(hostname:3306)/database-name"
export INSTALL_K3S_EXEC="--datastore-endpoint=mysql://root:root@tcp(172.17.0.150:3306)/k3s --docker --kube-apiserver-arg service-node-port-range=1-65000 --no-deploy traefik --write-kubeconfig  ~/.kube/config --write-kubeconfig-mode 666"
nginx配置
stream {
		upstream k3sList {
				server 172.17.0.151:6443;
				server 172.17.0.152:6443;
		}

		server {
				listen 6443;
				proxy_pass k3sList;
		}
}
rancherUI管理
docker run -d -v /data/docker/rancher-server/var/lib/rancher/:/var/lib/rancher/ --restart=unless-stopped --name rancher-server -p 9443:443 rancher/rancher:v2.3.10
docker配置优化
exec-opts": ["native.cgroupdriver=systemd"]
# Kubernetes 推荐使用 systemd 来代替 cgroupfs因为systemd是Kubernetes自带的cgroup管理器, 负责为每个进程分配cgroups, 但docker的cgroup driver默认是cgroupfs,这样就同时运行有两个cgroup控制管理器, 当资源有压力的情况时,有可能出现不稳定的情况
参考
https://www.cnblogs.com/breezey/p/11801122.html


