安卓Handler消息处理机制详解
消息处理机制可以算得上是每个安卓开发入行最先接触的机制之一。它为我们提供了一种线程间通信方式。本文就讲解Handler提供的各种用法以及其运行机理。
1.基本使用介绍
首先简单的demo展示Handler的基本使用,从使用入手进行讲解。
public class HandlerTest {
    private static final int MESSAGE_NO = 1;

    private static final int ONE_SECOND_WAIT = 1000;

    private Handler mHandler;

    private Handler mCallbackHandler;

    private Runnable mRunnable = new Runnable() {
        @Override
        public void run() {
            mHandler.post(new Runnable() {
                @Override
                public void run() {
                    // 1 最优先判断此Runnable的存在,且仅执行此callback
                    // doing something...
                }
            });
            // 建议使用obtain生成Message,obtain提供对象池化管理。
            Message msg = Message.obtain();
            msg.what = MESSAGE_NO;
            // sendMessage 方式发送消息
            mCallbackHandler.sendMessageDelayed(msg, ONE_SECOND_WAIT);
            // post方式发送消息
            // 内部会创建一个message并把此Runnable赋给message.callback
            mCallbackHandler.post(new Runnable() {
                @Override
                public void run() {
                    // 1 最优先判断此Runnable的存在,且仅执行此callback
                    // doing something...
                }
            });
        }
    };

    public HandlerTest() {
        // 创建Handler没有主动传入Looper,构造方法内部会自行获取当前线程的Looper。
        // 如果线程没有Looper,构造时会抛异常。
        mHandler = new Handler() {
            @Override
            public void handleMessage(@NonNull Message msg) {
                // doing something...
            }
        };
        // 构造传入 Handler.Callback
        mCallbackHandler = new Handler(new Handler.Callback() {
            @Override
            public boolean handleMessage(@NonNull Message msg) {
                // 2 如果没有 Message callback,执行本方法
                // return true: 仅执行本方法,阻断Handler的handleMessage执行
                // return false: 除执行本Callback的handleMessage外,还会执行Handler的handleMessage
                return false;
            }
        }) {
            @Override
            public void handleMessage(@NonNull Message msg) {
                // 3 如果1、2放行后才执行本方法
                // doing something...
            }
        };
    }
}
一、Handler消息执行的三种回调及其执行优先级:
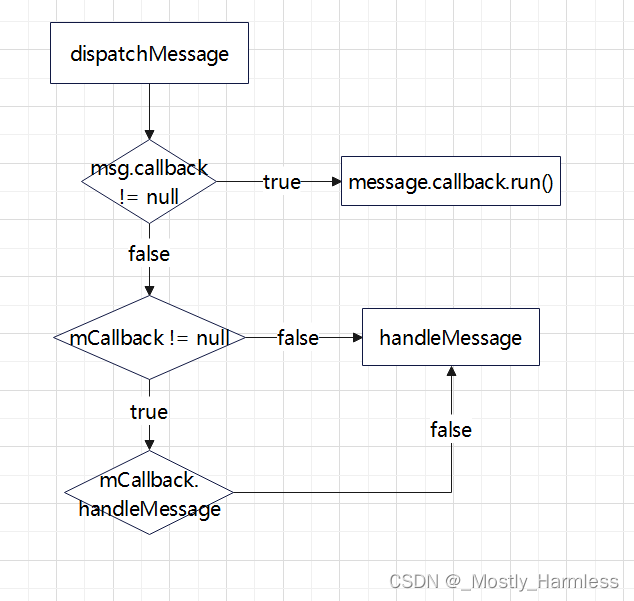
1 如果Message.callback存在,优先处理Message.callback且仅处理此callback
Message callback是什么?
实际就是Handler.post系列传入的Runnable
2 如果没有Message callback,则判断是否存在Handler.Callback,存在则优先执行Handler.Callback的handleMessage,且如果返回true表示拦截,不再执行Handler的handleMessage回调;
3 如果1、2都没有拦截,执行Handler的handleMessage回调。
总的来说,1 Message有callback,只执行callback;2 其次判断执行Handler.Callback的handleMessage,Handler.Callback.handleMessage回调返回true表示禁止Handler.handleMessage回调;3 如果1、2没有阻止,最后会执行Handler.handleMessage回调。
三种回调对于使用者来说如何使用:
- Message.callback: 使用者通过post方式发送消息传入的Runnable参数,就是Message的callback,对应1类的回调处理;
- Handler.Callback: Handler提供的Callback接口,Handler提供了两种构造方法接收Callback类型参数,就是Handler的mCallback。使用者通过带有Callback参数的两种构造创建Handler,即注册了此Callback;
- Handler的handleMessage回调: 在没有1Message.callback和没有2Handler.Callback或2的回调返回false不拦截的情况下,执行此回调,用户直接override此方法即可。
注:回调最终是通过Looper执行的,因此消息执行线程与Looper线程一致,使用者通过给Hanler传入指定Looper来确定消息执行在哪个线程。
二、消息发送
主要有两种发送消息方式:
1 sendMessage 方式
提供如下方式
public final boolean sendMessage(Message msg)
{
    return sendMessageDelayed(msg, 0);
}

public final boolean sendEmptyMessage(int what)
{
    return sendEmptyMessageDelayed(what, 0);
}

public final boolean sendEmptyMessageDelayed(int what, long delayMillis) {
    Message msg = Message.obtain();
    msg.what = what;
    return sendMessageDelayed(msg, delayMillis);
}

public final boolean sendEmptyMessageAtTime(int what, long uptimeMillis) {
    Message msg = Message.obtain();
    msg.what = what;
    return sendMessageAtTime(msg, uptimeMillis);
}

public final boolean sendMessageDelayed(Message msg, long delayMillis)
{
    if (delayMillis < 0) {
        delayMillis = 0;
    }
    return sendMessageAtTime(msg, SystemClock.uptimeMillis() + delayMillis);
}

public boolean sendMessageAtTime(Message msg, long uptimeMillis) {
    MessageQueue queue = mQueue;
    if (queue == null) {
        RuntimeException e = new RuntimeException(
                this + " sendMessageAtTime() called with no mQueue");
        Log.w("Looper", e.getMessage(), e);
        return false;
    }
    return enqueueMessage(queue, msg, uptimeMillis);
}

public final boolean sendMessageAtFrontOfQueue(Message msg) {
    MessageQueue queue = mQueue;
    if (queue == null) {
        RuntimeException e = new RuntimeException(
            this + " sendMessageAtTime() called with no mQueue");
        Log.w("Looper", e.getMessage(), e);
        return false;
    }
    return enqueueMessage(queue, msg, 0);
}
总言之就是组织Message和执行时间最终调用到sendMessageAtTime
public boolean sendMessageAtTime(Message msg, long uptimeMillis) {
    MessageQueue queue = mQueue;
    if (queue == null) {
        RuntimeException e = new RuntimeException(
                this + " sendMessageAtTime() called with no mQueue");
        Log.w("Looper", e.getMessage(), e);
        return false;
    }
    return enqueueMessage(queue, msg, uptimeMillis);
}
2 post 方式
提供如下方式
public final boolean post(Runnable r)
{
   return  sendMessageDelayed(getPostMessage(r), 0);
}

public final boolean postAtTime(Runnable r, long uptimeMillis)
{
    return sendMessageAtTime(getPostMessage(r), uptimeMillis);
}

public final boolean postAtTime(Runnable r, Object token, long uptimeMillis)
{
    return sendMessageAtTime(getPostMessage(r, token), uptimeMillis);
}

public final boolean postDelayed(Runnable r, long delayMillis)
{
    return sendMessageDelayed(getPostMessage(r), delayMillis);
}

public final boolean postAtFrontOfQueue(Runnable r)
{
    return sendMessageAtFrontOfQueue(getPostMessage(r));
}
post需要传入Runnable,post会自行创建Message,Runnable赋值为Message callback,就是前面讲的第一级优先处理的回调Message callback。
3 runWithScissors
一个特殊消息类型,阻塞式消息。
public final boolean runWithScissors(final Runnable r, long timeout) {
    if (r == null) {
        throw new IllegalArgumentException("runnable must not be null");
    }
    if (timeout < 0) {
        throw new IllegalArgumentException("timeout must be non-negative");
    }
    // 如果当前线程与handler创建Looper为同线程,则直接调用执行Runnable run方法
    if (Looper.myLooper() == mLooper) {
        r.run();
        return true;
    }
    // 如果当前线程与handler非相同线程,则创建BlockingRunnable postAndWait
    BlockingRunnable br = new BlockingRunnable(r);
    return br.postAndWait(this, timeout);
}

private static final class BlockingRunnable implements Runnable {
    private final Runnable mTask;
    private boolean mDone;

    public BlockingRunnable(Runnable task) {
        mTask = task;
    }

    @Override
    public void run() {
        // 4 自己就是post消息的callback,mTask既runWithScissors的Runnable
        try {
            mTask.run();
        } finally {
            synchronized (this) {
                // 5 执行完毕,标记mDone并唤醒等待
                mDone = true;
                notifyAll();
            }
        }
    }

    public boolean postAndWait(Handler handler, long timeout) {
        // 1 直接使用handler.post传入消息队列执行
        if (!handler.post(this)) {
            // 这里是消息队列退出post失败才会直接返回
            return false;
        }

        synchronized (this) {
            // 2 设置了超时时间,
            if (timeout > 0) {
                final long expirationTime = SystemClock.uptimeMillis() + timeout;
                // 3 mDone等待消息回调[3]执行完毕由5标记
                while (!mDone) {
                    long delay = expirationTime - SystemClock.uptimeMillis();
                    if (delay <= 0) {
                        // 超时直接跳出
                        return false; // timeout
                    }
                    try {
                        // 设置了超时时间,由[5]唤醒或者超时唤醒
                        wait(delay);
                    } catch (InterruptedException ex) {
                    }
                }
            } else {
                // 没有设置超时时间,一直等待[5]唤醒
                while (!mDone) {
                    try {
                        // 一直等待,由[5]唤醒
                        wait();
                    } catch (InterruptedException ex) {
                    }
                }
            }
        }
        return true;
    }
}
该消息与前面两个消息不同,前面两个消息不会阻塞当前线程,该消息会阻塞当前线程。
参数Runnable与post的Runnable参数作用相同,参数timeout超时时间。
运行机制:
首先判断当前Looper与Handler的Looper相同,说明当前线程就是Handler线程,直接调用Runnable.run,并没有利用消息机制,当然是阻塞的;
如果当前线程与Handler不是同一线程,则创建BlockingRunnable并postAndWait;这里的实际就是:
- 使用当前handler post本BlockingRunnable消息;
- 然后创建循环并wait等待,在run执行完毕后会mDone = true标记完成并notifyAll唤醒wait,唤醒后再次循环判断到mDone true则跳出循环,阻塞结束。如果设置了timeout,则发生超时仍未完成run并notifyAll,也会超时直接跳出阻塞。
总之,runWithScissors的作用就是post消息到handler线程执行,并阻塞当前线程直到消息处理结束,如果设置有超时直接,则最多阻塞到超时。
三、获取Message消息对象
Message类提供了一套obtain方法,满足使用者多种Message生成方式的需要。最主要的一点,obtain提供了Message对象池化管理。
public static Message obtain() {
    synchronized (sPoolSync) {
        if (sPool != null) {
            Message m = sPool;
            sPool = m.next;
            m.next = null;
            m.flags = 0; // clear in-use flag
            sPoolSize--;
            return m;
        }
    }
    return new Message();
}
obtain就是把sPool池链表头部从链表断开取出返回给调用者,原头部next作为新头部,如果池子空则直接new对象
void recycleUnchecked() {
    // Mark the message as in use while it remains in the recycled object pool.
    // Clear out all other details.
    flags = FLAG_IN_USE;
    what = 0;
    arg1 = 0;
    arg2 = 0;
    obj = null;
    replyTo = null;
    sendingUid = -1;
    when = 0;
    target = null;
    callback = null;
    data = null;

    synchronized (sPoolSync) {
        if (sPoolSize < MAX_POOL_SIZE) {
            next = sPool;
            sPool = this;
            sPoolSize++;
        }
    }
}
recycleUnchecked:重置待回收message数据,把待回收message next指向池子链表头部,把头指针设置为当前待回收message作为新的头部。
从代码不难看出,Message对象池子是一个链表结构,从表头存取元素。使用者通过obtain获取实例对象,回收动作在消息处理后会自动回收,不需要使用者处理。
四、Asynchronous消息
异步消息的效果:就是在打下同步屏障后会只处理异步消息,普通消息只能等到去除屏障后才会被执行,否则即使looper空转等待,也不会执行普通消息。
使用方式:
生成异步消息:1 Handler提供了响应的几种构造接收boolean参数,传入true表示此Handler为异步消息专用,使用它发送消息时默认给消息打上异步标记msg.setAsynchronous(true); 2 使用Message的setAsynchronous给单个消息打上异步标记,使消息成为异步消息。
打上同步屏障:相当于打开异步消息处理开关,通过MessageQueue的postSyncBarrier(long when),它实际是post了一个特殊的Message,在when时间后生效,此后消息队列就只处理Asynchronous标记的消息而跳过同步消息,直到调用removeSyncBarrier关闭。
具体实现原理会在接下来的原理介绍中穿插讲解。
2.原理介绍
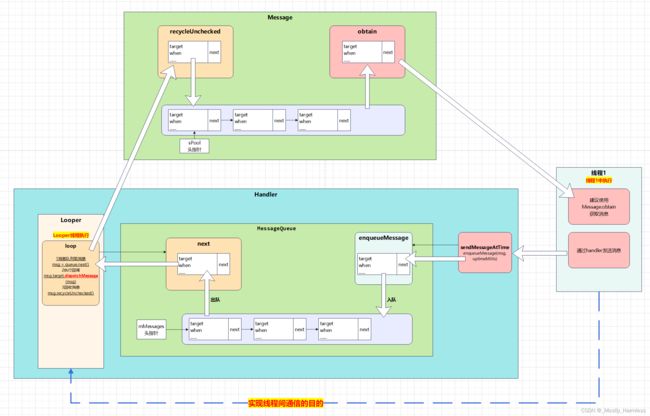
简单概述其原理就是通过Handler对象发送消息,handler通过MessageQueue把消息根据执行时间when插入链表,等待Looper从loop轮询中唤醒(根据消息时间唤醒的)取消息链表中的最早的消息(特例:异步消息),根据dispatchMessage策略安排回调,如图:
一、enqueueMessage 入队:
boolean enqueueMessage(Message msg, long when) {
    if (msg.target == null) {
        throw new IllegalArgumentException("Message must have a target.");
    }
    // message不能重复入队列,在消息入队、消息执行的处理中都有标记消息为InUse的动作,
    // 直到消息被执行完毕回收时会把状态重置。
    if (msg.isInUse()) {
        throw new IllegalStateException(msg + " This message is already in use.");
    }

    synchronized (this) {
        if (mQuitting) {
            IllegalStateException e = new IllegalStateException(
                    msg.target + " sending message to a Handler on a dead thread");
            Log.w(TAG, e.getMessage(), e);
            msg.recycle();
            return false;
        }

        msg.markInUse();
        msg.when = when;
        Message p = mMessages;
        boolean needWake;
        // 判断:当前链表为空||当前要插入的消息when==0要立即执行||when<头节点when表示有更早的消息进来
        // 从这里可以看出,链表是按照时间由早到晚的从头节点向后排的。
        if (p == null || when == 0 || when < p.when) {
            // New head, wake up the event queue if blocked.
            // 把当前消息插在头部并设置为头结点
            msg.next = p;
            mMessages = msg;
            // 有更早要执行的消息进来,需要唤醒Looper更新
            needWake = mBlocked;
        } else {
            // 这里标记needWake的意图是:当前头部是屏障消息(表示异步开关打开),
            // 待插入元素就是异步消息且是比现有最早异步消息还早,需要唤醒Looper更新。
            // (p.target == null表示p消息是异步消息的屏障消息,屏障消息的特点就是没有target,
            // 因为正常消息必须有target,否则在enqueueMessage开始时就会抛异常,
            // 而屏障消息是通过提供的特定接口生成的直接插入链表没有target检查)
            needWake = mBlocked && p.target == null && msg.isAsynchronous();
            Message prev;
            // 使用p指针指示待插入元素应该next指向的位置,prev是待插入元素的前置元素,
            // 即 prev->msg->prev
            // 循环遍历链表,直到找到比待插入的when还要大的元素就是目标
            for (;;) {
                prev = p;
                p = p.next;
                // 由于链表从小到大排列,因此找到第一个比待插入元素when还要大的元素就是其后继
                if (p == null || when < p.when) {
                    break;
                }
                // 遍历到这里,当前p指针指向的这个元素比带插入元素早且也是异步消息,
                // 说明待插入元素不是更早的异步消息,因此就不需要唤醒Looper更新了。
                if (needWake && p.isAsynchronous()) {
                    needWake = false;
                }
            }
			// 插入msg到指定位置:prev->msg->prev
            msg.next = p;
            prev.next = msg;
        }

        if (needWake) {
            nativeWake(mPtr);
        }
    }
    return true;
}
enqueueMessage前面有讲过,是发送消息时调用过来的,发送消息实际就是把消息按规则入队的动作。这里我们看一下enqueueMessage:
它的存储容器的是一个单项链表结构,链表根据message.when的大小按照从小到大的顺序储存消息,消息入队过程就是一个从头部插入链表的过程。
- 判断当前链表为空 || 待插入元素when==0 || when比头部元素小时,说明当前插入元素是 首个消息 || 需要立即执行的消息 || 当前最早的消息,需要把他插入头部并唤醒Looper让Looper安排处理
- 如果1的条件不成立,说明需要插入到链表中,代码中采取的方式是使用prev(前驱)p(后继)两个指针遍历链表,由于链表是从小到大排列的,因此遍历出现第一个比带插入元素大的消息就是后继,此时p指向第一个大的位置prev指向p的前驱,prev->msg->p即可插入。
- 关于唤醒:当消息插入头部时,说明是新的最早的消息,需要唤醒Looper更新操作;当头部是同步屏障时说明当前要处理的是异步消息,传入的消息是最早的异步消息时才需要唤醒。
二、Looper取消息进行处理:
public static void loop() {
    final Looper me = myLooper();
    if (me == null) {
        throw new RuntimeException("No Looper; Looper.prepare() wasn't called on this thread.");
    }
    final MessageQueue queue = me.mQueue;

    // Make sure the identity of this thread is that of the local process,
    // and keep track of what that identity token actually is.
    Binder.clearCallingIdentity();
    final long ident = Binder.clearCallingIdentity();

    for (;;) {
        // 1 从MessageQueue取出待处理消息,如果没有需要当前立即处理的消息这里会阻塞等待
        Message msg = queue.next(); // might block
        // 运行中的MessageQueue只会返回message或阻塞等待不会返回null,除非是消息队列退出才会return null
        if (msg == null) {
            return;
        }

        // 这里是提供监测消息处理耗时的维护日志,使用者通过setMessageLogging使用
        final Printer logging = me.mLogging;
        if (logging != null) {
            logging.println(">>>>> Dispatching to " + msg.target + " " +
                    msg.callback + ": " + msg.what);
        }

        // 使用者通过setSlowDispatchThresholdMs设置阈值,耗时超过阈值才会
        final long slowDispatchThresholdMs = me.mSlowDispatchThresholdMs;
        // 使用者通过setTraceTag设置打开systrace
        final long traceTag = me.mTraceTag;
        if (traceTag != 0 && Trace.isTagEnabled(traceTag)) {
            Trace.traceBegin(traceTag, msg.target.getTraceName(msg));
        }
        final long start = (slowDispatchThresholdMs == 0) ? 0 : SystemClock.uptimeMillis();
        final long end;
        try {
            // 2 执行消息回调
            msg.target.dispatchMessage(msg);
            end = (slowDispatchThresholdMs == 0) ? 0 : SystemClock.uptimeMillis();
        } finally {
            if (traceTag != 0) {
                Trace.traceEnd(traceTag);
            }
        }
        // 设置了>0的阈值且耗时>阈值才会打印耗时日志。
        if (slowDispatchThresholdMs > 0) {
            final long time = end - start;
            if (time > slowDispatchThresholdMs) {
                Slog.w(TAG, "Dispatch took " + time + "ms on "
                        + Thread.currentThread().getName() + ", h=" +
                        msg.target + " cb=" + msg.callback + " msg=" + msg.what);
            }
        }

        if (logging != null) {
            logging.println("<<<<< Finished to " + msg.target + " " + msg.callback);
        }

        // Make sure that during the course of dispatching the
        // identity of the thread wasn't corrupted.
        final long newIdent = Binder.clearCallingIdentity();
        if (ident != newIdent) {
            Log.wtf(TAG, "Thread identity changed from 0x"
                    + Long.toHexString(ident) + " to 0x"
                    + Long.toHexString(newIdent) + " while dispatching to "
                    + msg.target.getClass().getName() + " "
                    + msg.callback + " what=" + msg.what);
        }
        // 回收message
        msg.recycleUnchecked();
    }
}
消息处理的入口在loop(),loop()的处理主要做了两点处理:
- 调用message.next获取待处理消息,
- msg.target.dispatchMessage执行回调,另外可以看到,dispatchMessage是Looper的loop方法执行的,dispatchMessage是执行在Handler的Looper线程里的,从而达到了夸线程处理的目的。
Looper的使用以及Looper是如何与线程绑定的在本文就不再展开讨论了。
dispatchMessage在前面一开始就讲解了,这里我们主要看一下next:
Message next() {
    // Return here if the message loop has already quit and been disposed.
    // This can happen if the application tries to restart a looper after quit
    // which is not supported.
    final long ptr = mPtr;
    if (ptr == 0) {
        return null;
    }

    int pendingIdleHandlerCount = -1; // -1 only during first iteration
    int nextPollTimeoutMillis = 0;
    for (;;) {
        if (nextPollTimeoutMillis != 0) {
            Binder.flushPendingCommands();
        }
        // native方法,阻塞等待,设置nextPollTimeoutMillis是唤醒时间
        nativePollOnce(ptr, nextPollTimeoutMillis);

        synchronized (this) {
            // Try to retrieve the next message.  Return if found.
            final long now = SystemClock.uptimeMillis();
            Message prevMsg = null;
            Message msg = mMessages;
            // 判断头部消息是屏障消息
            if (msg != null && msg.target == null) {
                // 遍历寻找第一个异步消息的位置
                do {
                    prevMsg = msg;
                    msg = msg.next;
                } while (msg != null && !msg.isAsynchronous());
            }
            // 如果没有
            if (msg != null) {
                if (now < msg.when) {
                    // 当前时间还没有到达最早消息要执行的时间,计算还需要等待的时间nextPollTimeoutMillis
                    nextPollTimeoutMillis = (int) Math.min(msg.when - now, Integer.MAX_VALUE);
                } else {
                    // Got a message.
                    mBlocked = false;
                    // 把目标message从链表截断取出
                    if (prevMsg != null) {
                        prevMsg.next = msg.next;
                    } else {
                        mMessages = msg.next;
                    }
                    msg.next = null;
                    if (DEBUG) Log.v(TAG, "Returning message: " + msg);
                    msg.markInUse();
                    return msg;
                }
            } else {
                // No more messages.
                nextPollTimeoutMillis = -1;
            }

            // Process the quit message now that all pending messages have been handled.
            if (mQuitting) {
                dispose();
                return null;
            }

            // If first time idle, then get the number of idlers to run.
            // Idle handles only run if the queue is empty or if the first message
            // in the queue (possibly a barrier) is due to be handled in the future.
            if (pendingIdleHandlerCount < 0
                    && (mMessages == null || now < mMessages.when)) {
                pendingIdleHandlerCount = mIdleHandlers.size();
            }
            if (pendingIdleHandlerCount <= 0) {
                // 没有idle,进入下一次循环等待新消息
                mBlocked = true;
                continue;
            }

            if (mPendingIdleHandlers == null) {
                mPendingIdleHandlers = new IdleHandler[Math.max(pendingIdleHandlerCount, 4)];
            }
            mPendingIdleHandlers = mIdleHandlers.toArray(mPendingIdleHandlers);
        }

        // Run the idle handlers.
        // We only ever reach this code block during the first iteration.
        // 如果当前没有要执行的消息(消息队列空/还没有到最早的消息要执行的时间),执行IdlerHandler
        for (int i = 0; i < pendingIdleHandlerCount; i++) {
            final IdleHandler idler = mPendingIdleHandlers[i];
            mPendingIdleHandlers[i] = null; // release the reference to the handler

            boolean keep = false;
            try {
                keep = idler.queueIdle();
            } catch (Throwable t) {
                Log.wtf(TAG, "IdleHandler threw exception", t);
            }

            if (!keep) {
                synchronized (this) {
                    mIdleHandlers.remove(idler);
                }
            }
        }

        // Reset the idle handler count to 0 so we do not run them again.
        pendingIdleHandlerCount = 0;

        // While calling an idle handler, a new message could have been delivered
        // so go back and look again for a pending message without waiting.
        nextPollTimeoutMillis = 0;
    }
}
next里是一个无限循环,在nativePollOnce处可能阻塞等待,当有新消息入队需要主动唤醒或设置的超时到点唤醒就会跳出阻塞等待向下执行。
接下来,将目标消息指向链表头位置,即最早要执行的消息,然后判断同步屏障,如果开启,则向后定位到首个异步消息的位置作为目标消息指向位置。
然后再判断如果目标消息执行之间在当前时间之后,说明还没有到执行时间,把(when-now)作为新的等待时间;如果目标消息执行时间已经到了,说明目标消息就是当前要执行的消息,则返回当前目标消息。另外如果压根没有找到目标消息,即当前没有可用消息,则等待时间设置为-1。
目标消息没有到执行时间的情况/没有消息要执行的情况,会安排执行IdleHandler,执行完毕后进入下一次循环,把计算的等待时间赋给nativePollOnce让他继续阻塞等待。
nativePollOnce是如何做到阻塞等待和定时唤醒的呢?我们现在知道的是调用nativePollOnce(ptr, nextPollTimeoutMillis)设置超时时间,到达指定时间会自动唤醒;或者调用nativeWake(mPtr)直接唤醒,这个在前面enqueueMessage时出现过。那么我们就从这里入手简单看一下:
void NativeMessageQueue::pollOnce(JNIEnv* env, jobject pollObj, int timeoutMillis) {
    mPollEnv = env;
    mPollObj = pollObj;
    mLooper->pollOnce(timeoutMillis);
    mPollObj = NULL;
    mPollEnv = NULL;

    if (mExceptionObj) {
        env->Throw(mExceptionObj);
        env->DeleteLocalRef(mExceptionObj);
        mExceptionObj = NULL;
    }
}
nativePollOnce实际最终调用到Looper->pollOnce,这里整体看一下Looper的情况:
Looper::Looper(bool allowNonCallbacks) :
        mAllowNonCallbacks(allowNonCallbacks), mSendingMessage(false),
        mPolling(false), mEpollFd(-1), mEpollRebuildRequired(false),
        mNextRequestSeq(0), mResponseIndex(0), mNextMessageUptime(LLONG_MAX) {
    // 1 创建eventfd处理通知事件
    mWakeEventFd = eventfd(0, EFD_NONBLOCK | EFD_CLOEXEC);
    LOG_ALWAYS_FATAL_IF(mWakeEventFd < 0, "Could not make wake event fd: %s",
                        strerror(errno));

    AutoMutex _l(mLock);
    rebuildEpollLocked();
}

void Looper::rebuildEpollLocked() {
    // Close old epoll instance if we have one.
    if (mEpollFd >= 0) {
        close(mEpollFd);
    }

    // Allocate the new epoll instance and register the wake pipe.
    // 2 创建epoll
    mEpollFd = epoll_create(EPOLL_SIZE_HINT);
    LOG_ALWAYS_FATAL_IF(mEpollFd < 0, "Could not create epoll instance: %s", strerror(errno));

    struct epoll_event eventItem;
    memset(& eventItem, 0, sizeof(epoll_event)); // zero out unused members of data field union
    eventItem.events = EPOLLIN;
    eventItem.data.fd = mWakeEventFd;
    // 3 epoll注册文件描述符mWakeEventFd
    int result = epoll_ctl(mEpollFd, EPOLL_CTL_ADD, mWakeEventFd, & eventItem);
    LOG_ALWAYS_FATAL_IF(result != 0, "Could not add wake event fd to epoll instance: %s",
                        strerror(errno));

    for (size_t i = 0; i < mRequests.size(); i++) {
        const Request& request = mRequests.valueAt(i);
        struct epoll_event eventItem;
        request.initEventItem(&eventItem);

        int epollResult = epoll_ctl(mEpollFd, EPOLL_CTL_ADD, request.fd, & eventItem);
        if (epollResult < 0) {
            ALOGE("Error adding epoll events for fd %d while rebuilding epoll set: %s",
                  request.fd, strerror(errno));
        }
    }
}

void Looper::wake() {
    uint64_t inc = 1;
    // write mWakeEventFd 触发IO事件,唤醒epoll_wait
    ssize_t nWrite = TEMP_FAILURE_RETRY(write(mWakeEventFd, &inc, sizeof(uint64_t)));
    if (nWrite != sizeof(uint64_t)) {
        if (errno != EAGAIN) {
            LOG_ALWAYS_FATAL("Could not write wake signal to fd %d: %s",
                    mWakeEventFd, strerror(errno));
        }
    }
}

int Looper::pollInner(int timeoutMillis) {
    // Adjust the timeout based on when the next message is due.
    if (timeoutMillis != 0 && mNextMessageUptime != LLONG_MAX) {
        nsecs_t now = systemTime(SYSTEM_TIME_MONOTONIC);
        int messageTimeoutMillis = toMillisecondTimeoutDelay(now, mNextMessageUptime);
        if (messageTimeoutMillis >= 0
                && (timeoutMillis < 0 || messageTimeoutMillis < timeoutMillis)) {
            timeoutMillis = messageTimeoutMillis;
        }
    }

    // Poll.
    int result = POLL_WAKE;
    mResponses.clear();
    mResponseIndex = 0;

    // We are about to idle.
    mPolling = true;

    struct epoll_event eventItems[EPOLL_MAX_EVENTS];
    // 等待IO事件唤醒,或者timeoutMillis超时唤醒
    int eventCount = epoll_wait(mEpollFd, eventItems, EPOLL_MAX_EVENTS, timeoutMillis);
    ...
我们只需要关注一下是如何等待和被唤醒的。可以看到:
- pollInner函数中有epoll_wait动作:epoll_wait(mEpollFd, eventItems, EPOLL_MAX_EVENTS, timeoutMillis),阻塞等待就是在epoll_wait这里。
- Looper构造时创建了epoll:epoll_create,并且注册了文件描述符mWakeEventFd:epoll_ctl(mEpollFd, EPOLL_CTL_ADD, mWakeEventFd, & eventItem)。
- wake()有唤醒动作:write(mWakeEventFd, &inc, sizeof(uint64_t)),通过写文件IO动作触发epoll监听。
可以看出,阻塞等待是epoll_wait造成的,他设置有超时唤醒,是我们在nativePollOnce传入的;另外wake()也可以直接唤醒epoll_wait,实际wake()就是由我们nativeWake调用到的,前面讲过的enqueueMessage时会评估调用。epoll机制在这里就不展开讲解了。
三、其他补充:新增监控消息处理日志信息,需要使用者设置打开。
另外,在前面loop()代码讲解里,我们看到新版本Google给我们提供了一组针对消息处理的维测日志,用来监控消息处理耗时情况等,前面代码讲解在代码中有注释,这里再做一下总结:
public static void loop() {
    final Looper me = myLooper();
    if (me == null) {
        throw new RuntimeException("No Looper; Looper.prepare() wasn't called on this thread.");
    }
    final MessageQueue queue = me.mQueue;

    Binder.clearCallingIdentity();
    final long ident = Binder.clearCallingIdentity();

    for (;;) {
        Message msg = queue.next(); // might block
        if (msg == null) {
            return;
        }

        // 这里是提供监测消息处理耗时的维护日志,使用者通过setMessageLogging使用
        final Printer logging = me.mLogging;
        // 1 消息开始执行日志打印
        if (logging != null) {
            logging.println(">>>>> Dispatching to " + msg.target + " " +
                    msg.callback + ": " + msg.what);
        }

        // 2 使用者通过setSlowDispatchThresholdMs设置阈值,耗时超过阈值才会
        final long slowDispatchThresholdMs = me.mSlowDispatchThresholdMs;
        // 3 使用者通过setTraceTag设置打开systrace
        final long traceTag = me.mTraceTag;
        // 3 systrace开始标签
        if (traceTag != 0 && Trace.isTagEnabled(traceTag)) {
            Trace.traceBegin(traceTag, msg.target.getTraceName(msg));
        }
        final long start = (slowDispatchThresholdMs == 0) ? 0 : SystemClock.uptimeMillis();
        final long end;
        try {
            // 执行消息回调
            msg.target.dispatchMessage(msg);
            end = (slowDispatchThresholdMs == 0) ? 0 : SystemClock.uptimeMillis();
        } finally {
            // 3 systrace结束标签
            if (traceTag != 0) {
                Trace.traceEnd(traceTag);
            }
        }
        // 2 设置了>0的阈值且耗时>阈值才会打印耗时日志。
        if (slowDispatchThresholdMs > 0) {
            final long time = end - start;
            if (time > slowDispatchThresholdMs) {
                Slog.w(TAG, "Dispatch took " + time + "ms on "
                        + Thread.currentThread().getName() + ", h=" +
                        msg.target + " cb=" + msg.callback + " msg=" + msg.what);
            }
        }
        // 1 消息执行结束日志打印
        if (logging != null) {
            logging.println("<<<<< Finished to " + msg.target + " " + msg.callback);
        }

        // Make sure that during the course of dispatching the
        // identity of the thread wasn't corrupted.
        final long newIdent = Binder.clearCallingIdentity();
        if (ident != newIdent) {
            Log.wtf(TAG, "Thread identity changed from 0x"
                    + Long.toHexString(ident) + " to 0x"
                    + Long.toHexString(newIdent) + " while dispatching to "
                    + msg.target.getClass().getName() + " "
                    + msg.callback + " what=" + msg.what);
        }
        msg.recycleUnchecked();
    }
}
1 打印消息处理开始和结束日志,其中包含msg.target/msg.callback/msg.what信息。
public interface Printer {
    void println(String x);
}

public void setMessageLogging(@Nullable Printer printer) {
    mLogging = printer;
}
通过Looper提供的setMessageLogging(@Nullable Printer printer)方法打开。需要传入Printer重写其println方法。
2 打印消息执行耗时情况。通过Looper提供的setSlowDispatchThresholdMs(long slowDispatchThresholdMs)方法,需要设置阈值时间>0。设置后,当消息执行时间大于阈值时会打印日志,日志包含耗时大小、msg.target、msg.callback、msg.what信息。
3 systrace。通过Looper提供的setTraceTag(long traceTag) 方法打开。