【Maven】
Maven
- Maven简介
-
-
- 仓库
- 坐标
-
- Maven项目构建
- 依赖管理
- 生命周期及插件
-
- 插件
- 模块拆分与开发
-
- 聚合
- 继承
- 属性
- 版本管理
- 资源配置
- 多环境开发配置
- 跳过测试
- 私服
Maven简介
Maven的本质时一个项目管理工具,将项目开发和管理过程抽象成一个项目对象模型(POM)
POM(Project Object Model):项目对象模型
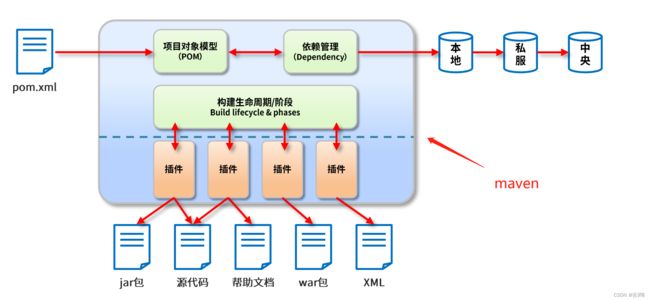
maven作用:
- 项目构建:提供标准的,跨平台的自动化项目构建方式
- 依赖管理:方便快捷的管理项目依赖的的资源(jar包),避免资源间的版本冲突问题
- 统一开发结构:提供标准的,统一的项目结构
仓库
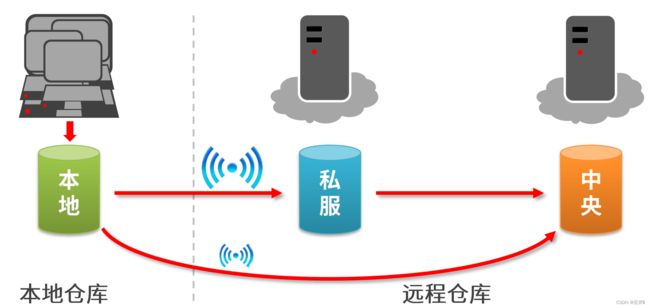
仓库:用于存储资源,包含各种jar包
仓库分类:
- 本地仓库:自己电脑上存储资源的仓库,连接远程仓库获取资源
- 远程仓库:非本地电脑上的仓库,为本地仓库提供资料
- 中央仓库:Maven团队维护,存储所有资源的仓库
- 私服:部门/公司范围内存储资源的仓库,从中央仓库获取资源
- 私服的作用:
坐标
坐标:Maven中的坐标用于描述仓库中资源的位置
坐标地址:https://repo1.maven.org/maven2/
仓库地址:https://mvnrepository.com/
坐标组成:
- groupId:定义当前Maven项目隶属组织名称
- aritfactId:定义当前Maven项目名称
- version:定义当前项目版本号
- packaging:定义改项目的打包方式
Maven坐标的作用:
使用唯一标识,唯一性定位资源位置,通过该标识可以将资源的识别与下载工作交互由机器完成。
本地仓库位置:
默认位置:登录用户名所在目录下的.m2文件夹中
<localRepository>${user.home}/.m2/repository</localRepository>
自定义位置:
<localRepository>D:\maven\repository</localRepository>
默认仓库位置:
<repositories>
	<repository>
		<id>central</id>
		<name>Central Repository</name>
		<url>https://repo.maven.apache.org/maven2</url>
		<layout>default</layout>
		<snapshots>
		<enabled>false</enabled>
		</snapshots>
	</repository>
</repositories>
在seting文件中配置阿里云镜像仓库
<mirrors>
	<!--配置具体的仓库的下载镜像-->
	<mirror>
		<!-- 此镜像的唯一标识符,用来区分不同的mirror元素 -->
		<id>nexus-aliyun</id>
		<!-- 对哪种仓库进行镜像,简单说就是替代哪个仓库 -->
		<mirrorOf>central</mirrorOf>
		<!-- 镜像名称 -->
		<name>Nexus aliyun</name>
		<!-- 镜像URL -->
		<url>http://maven.aliyun.com/nexus/content/groups/public</url>
	</mirror>
</mirrors>
Maven项目构建
Maven构建命令使用mvn开头,后面添加功能参数,可以一次执行多个命令,使用空格分隔。
| 命令 | 释义 |
|---|---|
| mvn complie | 编译 |
| mvn clean | 清理 |
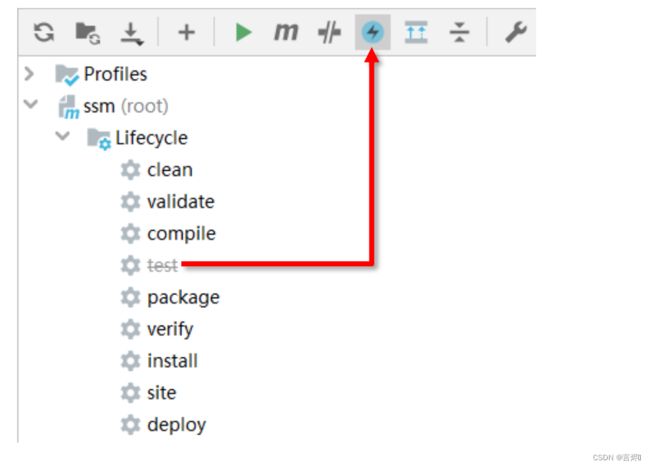
| mvn test | 测试 |
| mvn package | 打包 |
| mvn install | 安装到本地仓库 |
1.项目编写成功后,执行mvn install命令
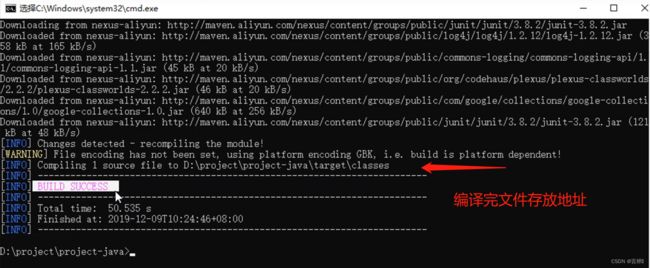
2.执行mvn test命令,先编译,后测试,保存测试结果
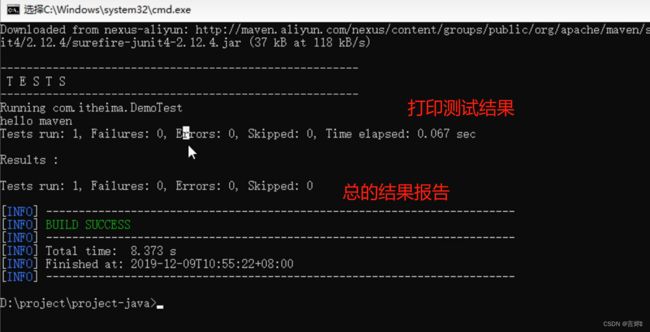

3.执行mvn package命令

先执行编译,测试后编译,再test,最后执行打包指令
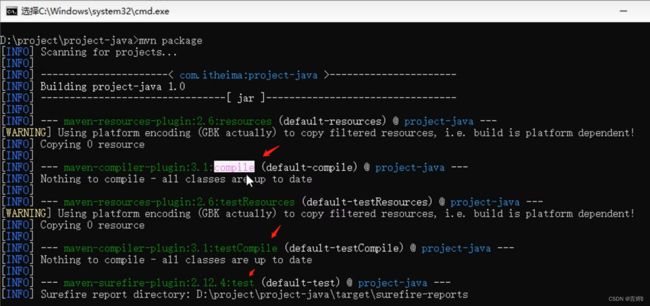
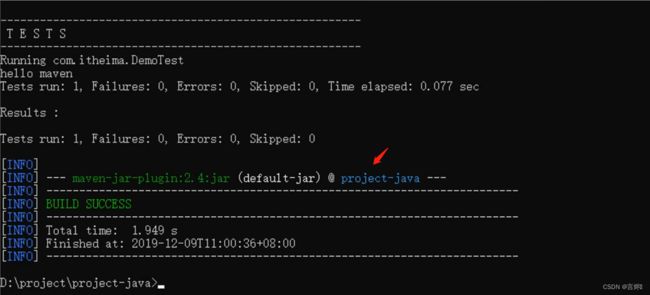
4.执行mvn install命令,执行编译,测试,打包,最后将jar包安装到本地仓库

maven命令创建工程:
mvn archetype:generate
	-DgroupId={project-packaging}
	-DartifactId={project-name}
	-DarchetypeArtifactId=maven-archetype-quickstart
	-DinteractiveMode=false
创建java工程
mvn archetype:generate -DgroupId=com.itheima -DartifactId=java-project -
DarchetypeArtifactId=maven-archetype-quickstart -Dversion=0.0.1-snapshot -
DinteractiveMode=false
创建web工程
mvn archetype:generate -DgroupId=com.itheima -DartifactId=web-project -
DarchetypeArtifactId=maven-archetype-webapp -Dversion=0.0.1-snapshot -
DinteractiveMode=false
maven配置Tomcat7运行插件:
<build>
	<plugins>
		<plugin>
			<groupId>org.apache.tomcat.mavengroupId>
			<artifactId>tomcat7-maven-pluginartifactId>
			<version>2.1version>
			<configuration>
				<port>80port> 端口
				<path>/path>  路径
			configuration>
		plugin>
	plugins>
build>
依赖管理
依赖指当前项目运行所需的jar,一个项目可以设置多个依赖。
依赖配置:
<dependencies>
	<!— 设置具体的依赖-->
	<dependency>
		<!— 依赖所属群组id-->
		<groupId>junitgroupId>
		<!— 依赖所属项目id-->
		<artifactId>junitartifactId>
		<!— 依赖版本号 -->
		<version>4.12version>
	dependency>
dependencies>
依赖传递(相对概念):
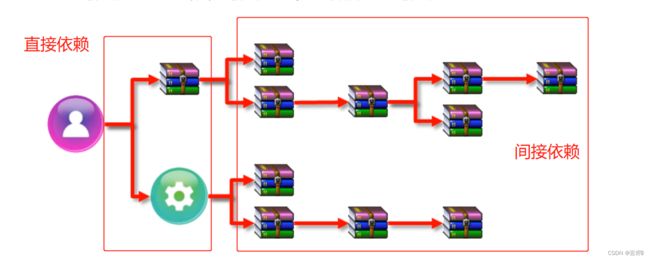
- 直接依赖:在当前项目中通过依赖配置建立的依赖关系
- 间接依赖:被依赖的资源依赖其他资源,当前项目间接依赖其他资源
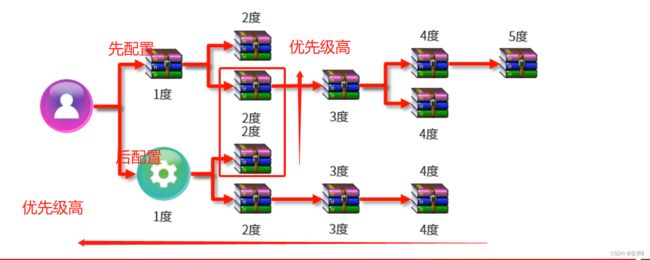
- 路径优先:当依赖中出现相同的资源时,层级越深,优先级越低,层级越低,优先级越高。
- 声明优先:当资源在相同层级被依赖时,配置顺序靠前的覆盖配置顺序靠后的
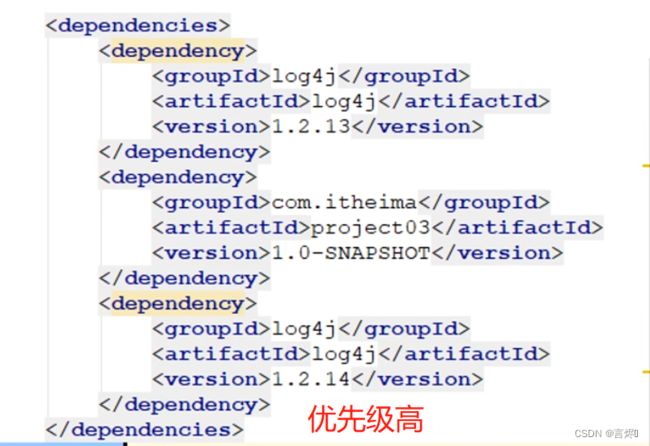
- 特殊优先:当同级配置了相同资源的不同版本,后配置的覆盖先配置的
<dependency>
	<groupId>junit</groupId>
	<artifactId>junit</artifactId>
	<version>4.12</version>
	<optional>true</optional>
</dependency>
排除依赖:主动断开依赖的资源,被排除的资源无需指定版本,通过设置
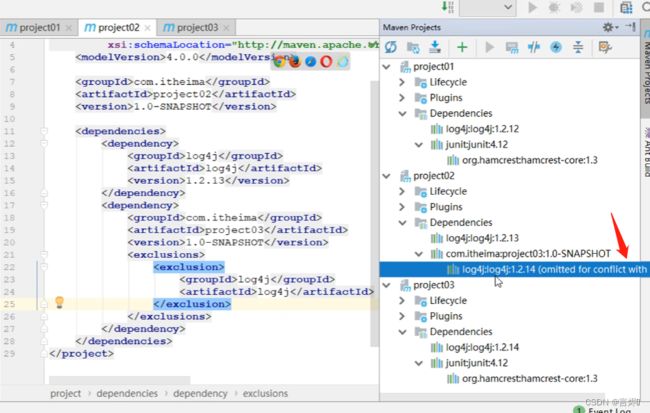
<dependency>
	<groupId>com.heima</groupId>
	<artifactId>project03</artifactId>
	<version>1.0.-SNAPSHOT</version>
	<exclusions>
		<exclusion>
		<groupId>log4j</groupId>
		<artifactId>log4j</artifactId>
		</exclusion>
	</exclusions>
</dependency>
依赖范围: 依赖的jar默认情况可以在任何地方使用,可以通过scope标签设定其作用范围
作用范围:
- 主程序范围有效(main文件夹范围内)
- 测试程序范围有效(test文件夹范围内)
- 是否参与打包(package指令范围内)
| scope | 主程序 | 测试代码 | 打包 | 范例 |
|---|---|---|---|---|
| comile(默认) | Y | Y | Y | log4j |
| test | Y | junit | ||
| provided | Y | Y | servlet-api | |
| runtime | Y | jdbc |
依赖范围传递性
带有依赖范围的资源在进行传递时,作用范围将收到影响
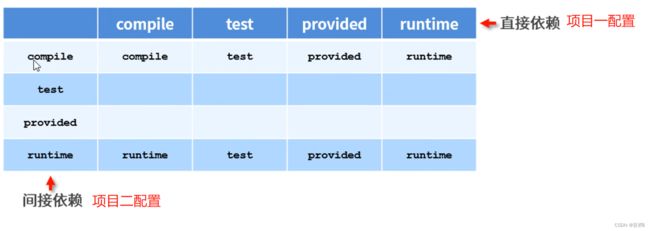
生命周期及插件
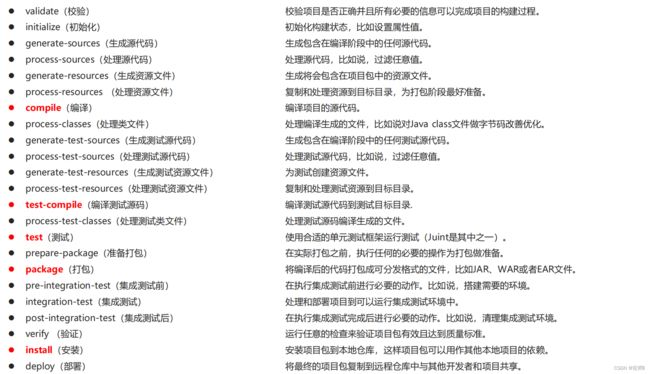
maven构建生命周期描述的是一次构建过程经历了多少个事件。
maven对项目构建的生命周期划分为3套:
- clean:清理工作
- default:核心工作,例如编译,测试,打包,部署等
- site:产生报告,发布站点
clean生命周期
- pre-clean:执行一些需要再clean之前完成的工作
- clean:移除所有上次构建生成的文件
- post-clean:执行一些需要再clean之后立刻完成的工作
- default构建生命周期
- pre-site:执行一些需要在生成站点文档之前完成的工作
- site:生成项目的站点文档
- post-site:执行一些需要在生成站点文档之后完成的工作,并且为部署做准备
- site-deploy:将生成的站点文档部署到特定的服务器上
插件
- 插件与生命周期内的阶段绑定,在执行到对应生命周期时执行对应的插件功能
- 默认maven在各个生命周期上绑定有预设的功能
- 通过插件可以自定义其他功能
定义哪个生命周期执行哪个插件
<build>
	<plugins>
	<plugin>
		<groupId>org.apache.maven.plugins</groupId>
		<artifactId>maven-source-plugin</artifactId>
		<version>2.2.1</version>
	<executions>
		<execution>
			<goals>
			<goal>jar</goal> #对源码打包
			</goals>
			<phase>generate-test-resources</phase> #插件执行时期
		</execution>
	</executions>
	</plugin>
	</plugins>
</build>
模块拆分与开发
聚合
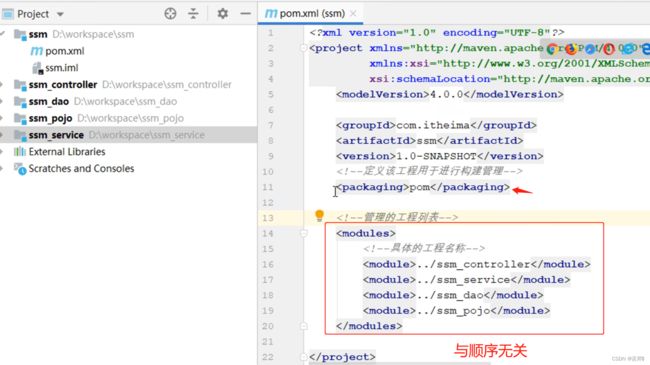
聚合:聚合用于快速构建maven工程,一次性构建多个项目/模块。
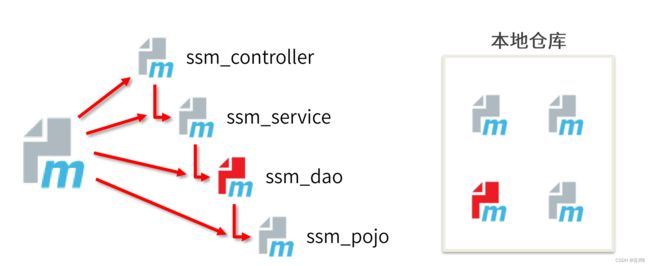
创建一个空模块,打包类型定义为pom
<packaging>pom</packaging>
定义当前模块进行构建时关联的其他模块名称
<modules>
	<module>../ssm_controller</module>
	<module>../ssm_service</module>
	<module>../ssm_dao</module>
	<module>../ssm_pojo</module>
</modules>
继承
通过继承可以实现在子工程中沿用父工程中的配置,避免子工程中依赖版本冲突。
在子工程中声明其父工程坐标与对应的位置。
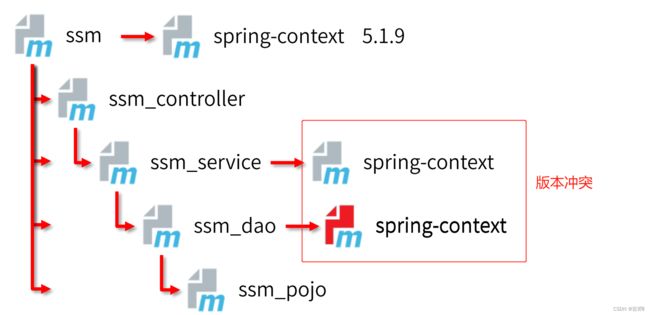
1.父工程编写:
<dependencyManagement>

	<dependencies>

		<dependency>
		<groupId>org.springframeworkgroupId>
		<artifactId>spring-contextartifactId>

		<version>5.1.9.RELEASEversion>
		dependency>


	<dependencies>
<dependencyManagement>


    <build>
        <pluginManagement>

            <plugins>

                <plugin>
                    <groupId>org.apache.tomcat.mavengroupId>
                    <artifactId>tomcat7-maven-pluginartifactId>
                    <version>2.1version>
                    <configuration>
                        <port>80port>
                        <path>/path>
                    configuration>
                plugin>
            plugins>
        pluginManagement>
    build>
2.在子工程中定义依赖关系,无需声明依赖版本,版本参照父工程中依赖的版本
<parent>
	<groupId>com.itheimagroupId>
	<artifactId>ssmartifactId>
	<version>1.0-SNAPSHOTversion>

	<relativePath>../ssm/pom.xmlrelativePath>
parent>

<modelVersion>4.0.0modelVersion>


<artifactId>ssm_pojoartifactId>
<packaging>jarpackaging>


<dependencies>

	<dependency>
	<groupId>org.springframeworkgroupId>
	<artifactId>spring-contextartifactId>
	dependency>
dependencies>

<build>

    <plugins>

       <plugin>
            <groupId>org.apache.tomcat.mavengroupId>
            <artifactId>tomcat7-maven-pluginartifactId>
       plugin>
     plugins>
build>
- 作用
- 聚合用于快速构建项目
- 继承用于快速配置
- 相同点
- 聚合与继承的pom.xml 文件打包方式均为pom,可以将两种关系制作到同一个pom文件中
- 聚合与继承均属于设计型模块,并无实际的模块内容
- 不同点
- 聚合是当前模块中配置关系,聚合可以感知到参与聚合的模块有哪些
- 继承是子模块中配置关系,父模块无法感知哪些子模块继承了自己
属性
自定义属性: 等同于定义变量,方便统一维护。
定义自定义属性:
<properties>
	<spring.version>5.1.9.RELEASEspring.version>
	<junit.version>4.12junit.version>
properties>
调用:
<dependency>
	<groupId>org.springframeworkgroupId>
	<artifactId>spring-contextartifactId>
	<version>${spring.version}version>
dependency>
<dependency>
	<groupId>junitgroupId>
	<artifactId>junitartifactId>
	<version>${junit.version}version>
dependency>
内置属性: 使用maven内置属性,快速配置
${basedir}
${version}
调用:
 	<groupId>com.itheimagroupId>
    <artifactId>ssmartifactId>
    <version>1.0-SNAPSHOTversion>
    <packaging>pompackaging>


    <dependencyManagement>

        <dependencies>

            <dependency>
                <groupId>com.itheimagroupId>
                <artifactId>ssm_pojoartifactId>
                <version>${version}version>
            dependency>
          dependencies>
    dependencyManagement>
Setting属性: 使用Maven配置文件setting.xml中的标签属性,用于动态配置
调用格式:
${settings.localRepository}
Java系统属性: 读取Java系统属性
调用格式:
${user.home}
系统属性查询方式:mvn help:system
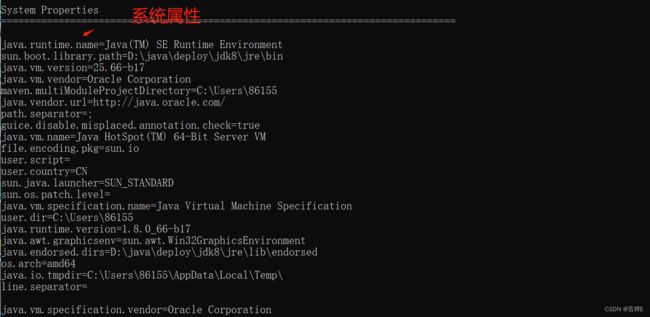
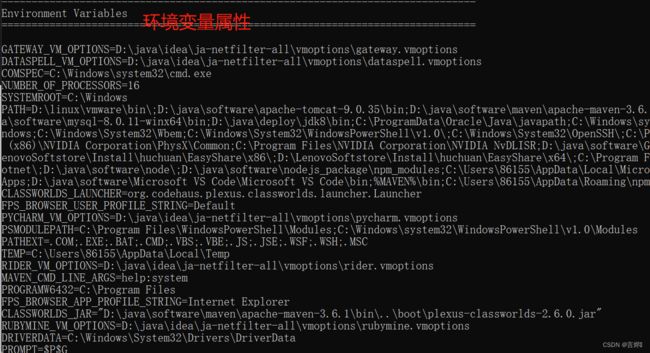
环境变量属性: 读取环境变量属性
调用格式:
${env.JAVA_HOME}
版本管理
- SNAPSHOT快照版本
- 项目开发过程中,为方便团队成员合作,解决模块间相互依赖和时时更新的问题,开发者堆每个模块进行构建的时候,输出的临时版本叫做快照版本(测试阶段版本)
- 快照版本会随着开发的进展不断更新
- RELEASE发布版本SNAPSHOT快照版本
- 项目开发到进入阶段里程碑后,向团队外部发布较为稳定的版本,这种版本所对应的构建文件是稳定的,即便进行后续的功能开发,也不会改变当前发布版本内容,这种版本为发布版本。
工程版本号约定
- <主版本>.<次版本>.<增量版本>.<里程碑版本>
- 主版本:表示项目重大架构的变更,如spring5相较于spring4的变更
- 次版本:表示有较大的功能增加和变化,或者全面系统地修复漏洞
- 增量版本:表示有重大漏洞的修复
- 里程碑版本:表明一个版本的里程碑(版本内部)。这样的版本同下一个正式版本相比,相对来说不是很稳定,有待更多的测试。
资源配置
定义资源文件引用pom属性,集中统一管理
1.pom.xml文件修改,设置文件路径
<properties>
     <jdbc.url>jdbc:mysql://127.2.2.2:3306/ssm_dbjdbc.url>
properties>
<build>


        <resources>
            <resource>
                <directory>${project.basedir}/src/main/resourcesdirectory>
                <filtering>truefiltering>
            resource>
        resources>

        <testResources>
            <testResource>
                <directory>${project.basedir}/src/test/resourcesdirectory>
                <filtering>truefiltering>
            testResource>
     testResources>
build>
2.资源文件修改,使用${属性名}引用pom属性
jdbc.driver=com.mysql.jdbc.Driver
jdbc.url=${jdbc.url}
jdbc.username=root
jdbc.password=itheima
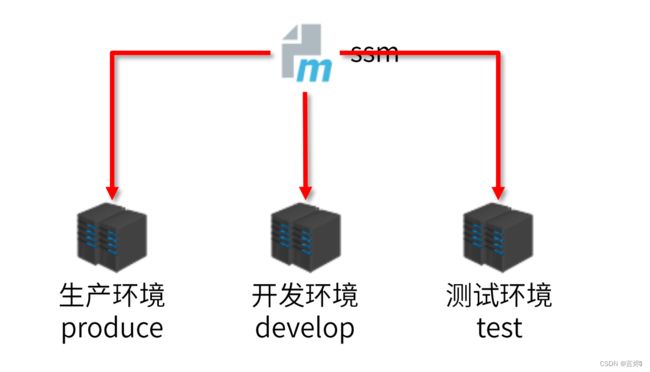
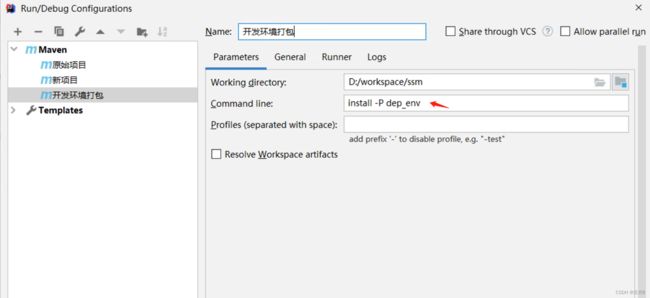
多环境开发配置
    <profiles>

        <profile>

            <id>pro_envid>

            <properties>
                <jdbc.url>jdbc:mysql://127.1.1.1:3306/ssm_dbjdbc.url>
            properties>

            <activation>
                <activeByDefault>trueactiveByDefault>
            activation>
        profile>

        <profile>
            <id>dep_envid>
            <properties>
                <jdbc.url>jdbc:mysql://127.2.2.2:3306/ssm_dbjdbc.url>
            properties>
        profile>
    profiles>
跳过测试
跳过测试环节的应用场景:
- 整体模块功能未开发
- 模块中某个功能未开发完毕
- 单个功能更新调试导致其他功能失败
- 快速打包
跳过测试:
- 命令行:执行的指令生命周期必须包含测试环节
mvn 指令 –D skipTests
mvn install –D skipTests

跳过一些测试
mvn clean install -DskipTests=MyTest1,MyTest2

指定执行某些测试
mvn test -Dtest=MyTest1,MyTest2
<plugin>
	<!--可省略-->
	<groupId>org.apache.maven.plugins</groupId>
	<artifactId>maven-surefire-plugin</artifactId>
	<version>2.22.1</version>
	<configuration>
		<skipTests>true</skipTests>
		<!--设置跳过测试-->
		<includes>
			<!--包含指定的测试用例 -->
			<include>**/User*Test.java</include>
		</includes>
		<!--<excludes>
			<!--排除测试用例 -->
			<exclude>**/User*TestCase.java</exclude>
		</excludes>-->
	</configuration>
</plugin>
私服
Nexus是Sonatype公司的一款maven私服产品。
下载地址:https://help.sonatype.com/repomanager3/download
下载解压后目录:

在bin目录中输入:nexus /run nexus启动:

访问默认端口:8081,http://localhost:8081
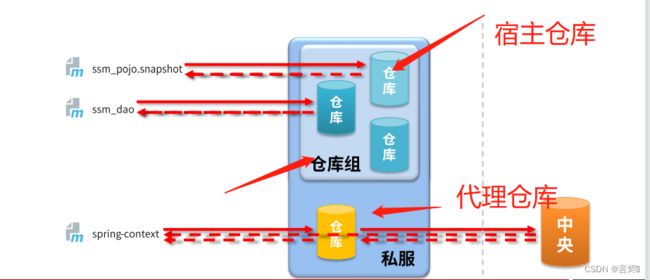
仓库分类:
- 宿主仓库hosted:保存无法从中央仓库获取的资源,按需存放资源的仓库(以上线/开发中)
- 自主研发的资源
- 第三方非开源项目,比如oracle-jdbc
- 代理仓库proxy
- 代理远程仓库,通过nexus访问其他公共仓库,例如中央仓库,阿里云仓库
- 仓库组group
- 将若干个仓库组成一个群组(可以是宿主仓库,也可以是代理仓库),简化配置
- 仓库组不能保存资源,属于设计型仓库,便于取资源
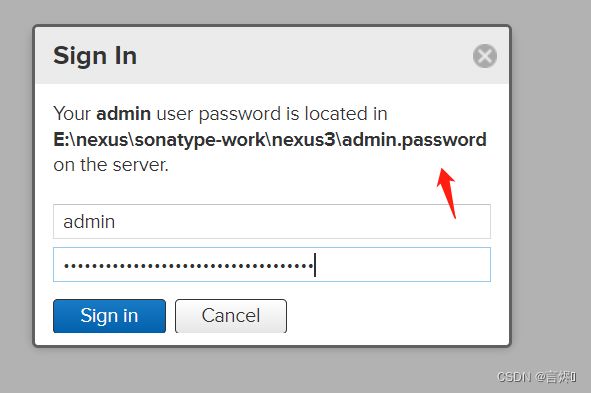
进入页面,提示默认密码位置,之后修改密码
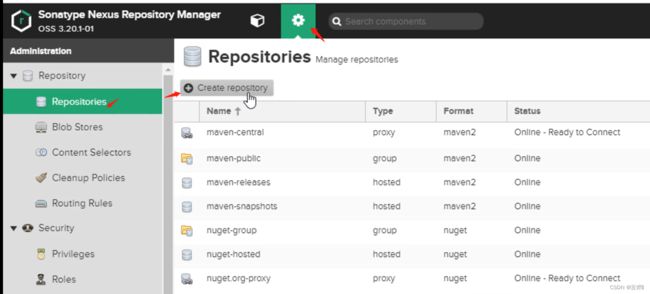
进入首页:

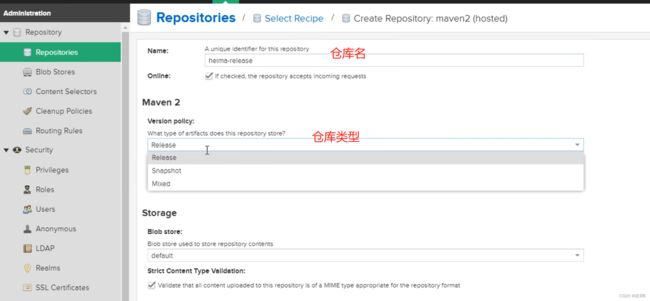
创建仓库:
选择类型:
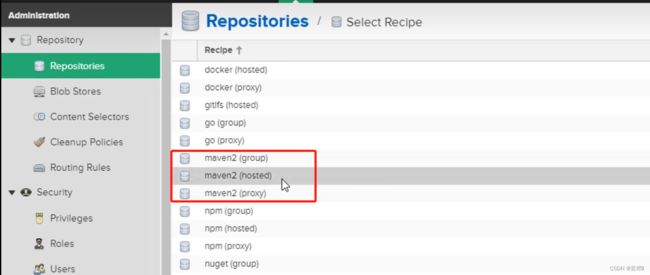
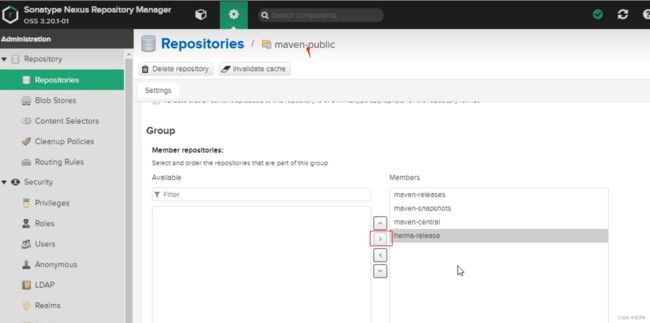
添加到public群组中
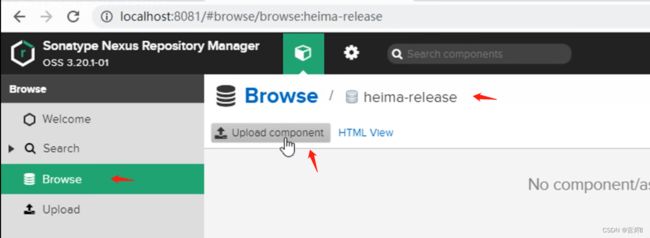
上传组件
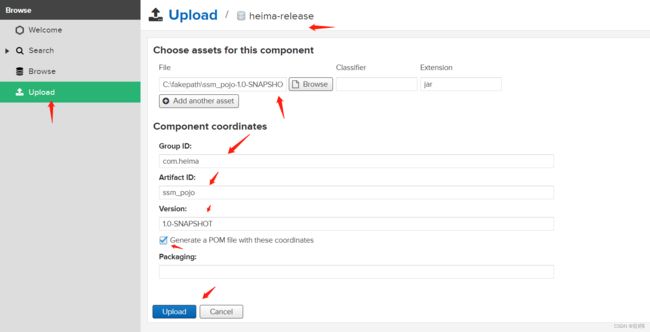
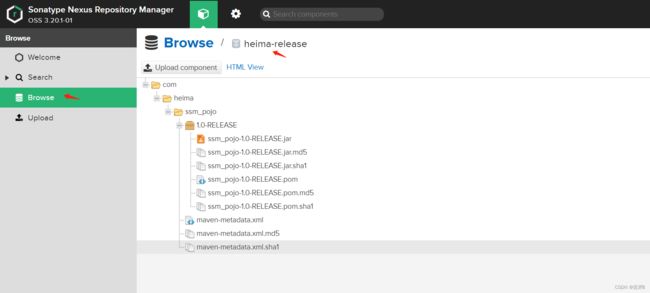
RELEASE版本SNAPSHOT版本,会做一个版本校验,需要统一

查看:
Idea环境中资源上传和下载:
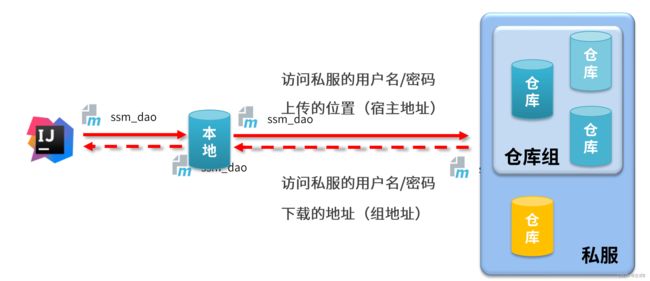
setting.xml配置本地仓库访问私服的权限(下载地址)
<servers>
	<server>
		<id>heima-releaseid>
		<username>adminusername>
		<password>adminpassword>
	server>
	<server>
		<id>heima-snapshotsid>
		<username>adminusername>
		<password>adminpassword>
	server>
servers>
setting.xml配置本地仓库来源为私服
<mirrors>
	<mirror>
		<id>nexus-heimaid>
		<mirrorOf>*mirrorOf>
		<url>http://localhost:8081/repository/maven-public/url>
	mirror>
mirrors>
配置当前项目访问私服上传资源的保存位置(pom.xml文件)
<distributionManagement>
	<repository>
		<id>heima-releaseid>
		<url>http://localhost:8081/repository/heima-release/url>
		repository>
	<snapshotRepository>
		<id>heima-snapshotsid>
		<url>http://localhost:8081/repository/heima-snapshots/url>
	snapshotRepository>
distributionManagement>
发布资源到私服命令
mvn deploy
