react+ts+router+redux+node+hooks+antd项目搭建
之前有写过react项目模块但是没有系统性的学过react,过一遍。ts,es6不会介绍语法,自行百度。
Ts初始化项目
yarn create react-app 项目名称 --template=typescript

组件的基础写法以及通信
// App.tsx
import React, { Component } from 'react';
import './App.css';
import Home from './Home/Home'
import Counter from './Counter/index'

class App extends Component<any, any>{
  getInfo = (info:string) => {
    console.log(`来自组件的回调:${info}`)
  }
  render(): React.ReactNode {

      return (
        <>
          <Home name="这是一个组件" callBack={this.getInfo}></Home>
          <Counter></Counter>
          <UserList></UserList>
        </>
      )
  }
}

export default App;

// Home.tsx
import { Component, ReactNode } from "react";

interface IProps {
    name: string,
    age?: number,
    user?: User,
    callBack: (info: string) => void
}

interface User {
    sex: boolean,
    address: string
}


class Home extends Component<IProps, any>{

    send = () => {
        this.props.callBack('执行')
    }

    render(): ReactNode {
        return (
            <div className="box">
                <h1>这是一个组件</h1>
                <span onClick={this.send}>{this.props.name}</span>
            </div>
        )
    }
}


class Home extends Component<IProps, any>{
    render(): ReactNode {
        return (
            <>
                <h1>这是一个组件</h1>
                <span>{this.props.name}</span>
            </>
        )
    }
}

export default Home


// Counter.tsx
import { Component, ReactNode } from "react";

interface IState {
    counter: number
}

let timer:any = null

export default class Counter extends Component<any,IState>{
    constructor(props:any, context: any){
        super(props, context)

        this.state = {
            counter: 0
        }
    }

    componentDidMount() {
        // state更新是异步的 通过setState来更新值 不允许this.state.xx = xx写法
        // state的更新会导致组件重新更新(重新render)
        timer = setInterval(() => {
            this.setState({
                counter: this.state.counter + 1
            })
        },2000)
    }

    componentWillUnmount() {
        clearInterval(timer)
    }


    render(): ReactNode {
        return (
            <>
                计数器: {this.state.counter}
            </>
        )
    }
}
路由
import React, { Component } from 'react';
import './App.css';
import Home from './Home/Home'
import Counter from './Counter/index'
import {
BrowserRouter as Router,
Routes,
Route
} from 'react-router-dom'
/**
* React Router v6
* Router: 用于包装不同的路线,它使用HTML5 historyAPI来跟踪React应用程序中的路由历史记录
* Routes: v5版本Switch组件的升级版,它包括相对路由和链接、自动路由排名、嵌套路由和布局等功能
* Route: 负责渲染React组件的UI。
它有一个称为path的属性,该属性始终与应用程序的当前URL匹配。
第二个需要的属性叫做element,当遇到当前的URL时,会告诉Route组件要渲染哪个React组件(v5中则是使用component属性)
* Link: 避免刷新页面
*/
class App extends Component<any, any>{
constructor(props: any, context: any){
super(props, context)
this.state = {
id: 1
}
}
render(): React.ReactNode {
return (
<div>
<Router>
<nav style={{ margin: 10 }}>
<Link to="/" style={{ padding: 5 }}>
Home
</Link>
<Link to={`/counter/${this.state.id}`} style={{ padding: 5 }}>
About
</Link>
// 类组件中this.props.history, this.props.match获取到的都是undefined
// v5中是支持这么取参数的,v6下得用window.location来取
// 查了下说v6主要拥抱hooks,放弃了之前的取法。有其他取参方案的希望大佬可以提供下。
</nav>
<Routes>
<Route path="/" element={<Home name="这是传递给组件的值"/>} />
<Route path="/counter/*" element={<Counter />} />
</Routes>
</Router>
{/* v5中使用switch 后续demo中使用的是v5
*/}
// 非根路由中可以使用withRouter 进行this.props.history.push('/*')跳转
</div>
)
}
}
export default App;
写一个简单的路由控制
// App.tsx

import React, { Component, ReactNode, Suspense } from 'react';
import './App.css';
import { router } from './router/index'
import { Layout, Menu } from 'antd';
import {
  PieChartOutlined,
  MailOutlined,
} from '@ant-design/icons';
import {
  BrowserRouter as Router,
  Link,
  Route,
  Switch
} from 'react-router-dom';

const { SubMenu } = Menu;
const { Footer, Sider, Content } = Layout;

interface IRouter {
  id: number,
  path: string,
  title: string,
  exact: boolean,
  component: ReactNode,
  children?: IRouter[]
}

class App extends Component<any, any>{

  constructor(props: any, context: any) {
    super(props, context)
    this.state = {}
  }

  componentDidMount = () => {

  }

  render(): React.ReactNode {

    return (
        <Router>
          <Suspense fallback={<div>Loading...</div>}>
            <Layout>
              <Sider>
                <Menu
                  defaultSelectedKeys={['1']}
                  defaultOpenKeys={['sub1']}
                  mode="inline"
                  theme="dark"
                >
                  {
                    router.map((r: IRouter) => {
                      if (r.children) {
                        return (
                          <SubMenu key={r.id} icon={<MailOutlined />} title={r.title}>
                            {
                              r.children.map((v: IRouter) => {
                                return (
                                  <Menu.Item key={v.id}>
                                    <Link to={v.path}>{v.title}</Link>
                                  </Menu.Item>
                                )
                              })
                            }
                          </SubMenu>
                        )
                      } else {
                        return (
                          <Menu.Item key={r.id} icon={<PieChartOutlined />}>
                            <Link to={r.path}>{r.title}</Link>
                          </Menu.Item>
                        )
                      }
                    })
                  }
                </Menu>
              </Sider>
              <Layout>
                <Content>
                  {
                    router.map((r: IRouter) => {
                      if (r.children) {
                        return (
                          <Switch key={r.id}>
                            {
                              r.children.map((v: IRouter) => {
                                return (
                                  <Route key={v.id} path={v.path} exact={v.exact}>{v.component}</Route>
                                )
                              })
                            }
                          </Switch>
                        )
                      } else {
                        return (
                          <Switch key={r.id}>
                            <Route path={r.path} exact={r.exact}>
                              {r.component}
                            </Route>
                          </Switch>
                        )
                      }
                    })
                  }
                </Content>
                <Footer>Footer</Footer>
              </Layout>
            </Layout>
          </Suspense>
        </Router>
    )
  }
}

export default App;
// touter/index.tsx
import { ReactNode, lazy } from "react"

const Home = lazy(() => import('../pages/Home/Home'))
const User = lazy(() => import('../pages/User/index'))
const UserDetail = lazy(() => import('../pages/User/comp/detail'))

interface IRouter{
    id: number,
    path: string,
    title: string,
    exact: boolean,
    component: ReactNode,
    children?: IRouter[]
}

export const router:IRouter[] = [
    {
        id: 1,
        path: '/',
        title: 'Home page',
        exact: true,
        component: () => (<Home name="这是传递给组件的值"></Home>)
    },
    {
        id:2,
        path: '/User',
        title: 'User page',
        exact: true,
        component: () => (<User/>),
        children: [
            {
                id: 3,
                path: '/user/detail',
                title: 'user detail',
                exact: true,
                component: () => (<UserDetail/>)
            }
        ]
    }
]
Redux
yarn add redux
你需要action这个普通对象来描述发生了生命,而不是直接改变state。然后,编写一个名为reducer的特殊函数,来决定如何基于action来更新整个应用的状态树。
在典型的Redux应用程序中,只有一个store以及一个根reducer函数。随着应用程序的增长,您可以将根reducer拆分为较小的reducer,分别在状态树的不同部分上进行操作。这就像在React应用程序中只有一个根组件一样,但是它是由许多小组件组成的。
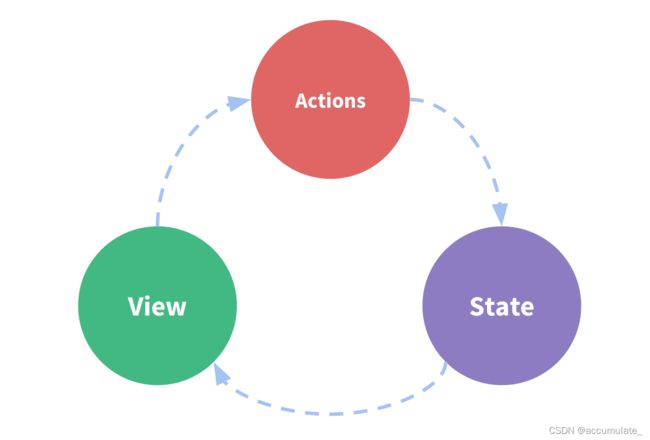
- state:驱动应用的真实数据源头
- view:基于当前状态的UI声明性描述
- actions:根据用户输入在应用程序中发生的事件,并触发状态更新(记录改变的动作由reducer来改变)
用state来描述应用程序在特定时间点的状况
基于state来渲染View
当发生某些事情时,state会根据发生的事情进行更新,生成新的state
基于新的state重新渲染View

- Redux使用’单项数据流’
State描述了应用程序在某个时间点的状态,UI基于该状态渲染
当应用程序中发生某些事情时:
- UI dispatch 一个action
- store调用reducer,随后根据发生的事情来更新state
- store通知UI state发生变化
UI 基于新state重新渲染
// 目录结构
-src
	-store
		-aciton
			index.tsx
		-reducer
			index.tsx
		index.tsx
//store/index.tsx
import { createStore } from "redux";
import { reducer } from "./reducer";

const store = createStore(reducer)

export default store
// aciton/index.tsx
// 需要执行的操作
export const sendAction = () => {
    return {
        type: 'send_type',
        value: 'this is action'
    }
}
// reducer/index.tsx
interface IAction {
    type: string,
    value: any
}

const initState = {
    value: 'init'
}

export const reducer = (state = initState, action: IAction) => {
    // 修改数据
    switch (action.type) {
        case 'send_type':
            return Object.assign({key: '改变'}, state, action)

        default:
            return state
    }
}
// Home.tsx

import { Button } from "antd";
import { Component, ReactNode } from "react";
import './Home.css'
import store from '../../store'
import { sendAction } from '../../store/action'

interface IProps {
    name: string,
    age?: number,
    user?: User
}

interface User {
    sex: boolean,
    address: string
}


class Home extends Component<IProps, any>{

    clickBtn = () => {
        const action = sendAction()
        store.dispatch(action)
    }

    componentDidMount(){
        store.subscribe(() => {
            console.log(store.getState())
        })
    }

    render(): ReactNode {
        return (
            <div className="box">
                <h1>这是一个组件</h1>
                <span>{this.props.name}</span>
                <Button type="primary" onClick={this.clickBtn}>Home</Button>
            </div>
        )
    }
}


export default Home
Hooks
React组件创建方式,一种是类组件,一种是纯函数组件。前面都是以类组件形式写的不再介绍。
纯函数组件相对于类组件有以下几点不足:
- 纯函数组件没有状态
- 纯函数组件没有生命周期
- 纯函数组件没有this
- 只能是纯函数
React Hooks就是加强版的函数组件,可以完全不使用class,就能写出一个全功能的组件
useState():状态钩子
import { Button } from 'antd'
import React, { useState } from 'react'

interface IProps {
    num: number
}

const AddCount = (props: IProps) => {
	// useState(state, setState)
    const [state, setState] = useState({
        count: props.num
    });
    const updateCount = () => {
        setState({ ...state, count: state.count + 1 });
      };

    return <>
        <p>{state.count}</p>
        <Button type="primary" onClick={updateCount}>Home</Button>
    </>
}

export default AddCount
useContext():共享状态钩子
该钩子的作用是,在组件之间共享状态。
import { Button } from 'antd'
import React, { createContext, useContext, useState } from 'react'

interface IProps {
    num: number
}

const AppContext = createContext({text: ''})

const AddCount = (props: IProps) => {
    // useState(state, setState)
    const [state, setState] = useState({
        count: props.num,
    });
    const updateCount = () => {
        setState({ ...state, count: state.count + 1 });
    };

    return <>
        <p>{state.count}</p>
        <Button type="primary" onClick={updateCount}>点击</Button>
        {/* 在下发状态组件内修改text值时,子组件内状态也会更改 */}
        <AppContext.Provider value={{text: state.count.toString()}} >
            <Add></Add>
            <Del></Del>
        </AppContext.Provider>
    </>
}

// 在子组件中修改text值时候,在其他子组件内是不会发生改变的
const Add = () => {
    const {text} = useContext(AppContext)
    return <>
        {`这里是Add组件${text}`}
    </>
}

const Del = () => {
    const {text} = useContext(AppContext)
    return <>
        {`这里是Del组件${text}`}
    </>
}

export default AddCount
useReducer():Action钩子
前面有提到redux中是页面出发action然后通过reducer来修改state。useReducer()中是这样
const [state,dispatch] = useReducer(reducer, initialState)
/**
	它接收reducer函数和状态的初始值作为参数,返回一个数组,其中第一项为当前的状态值,第二项为发送action的dispatch函数。
*/
import { Button } from "antd"
import { useReducer } from "react"

const initialState = {
    count: 0,
}

const reducer = (state: any, action: any) => {
    switch (action.type) {
        case 'a':
            return { ...state, count: state.count + 1 };
        case 'b':
            return { ...state, count: state.count - 1 };
        default:
            return { ...state, count: state.count };
    }
}

const A = () => {
    const [state, dispatch] = useReducer(reducer, initialState)
    return <>
        我是A组件--{state.count}---
        <Button type="primary" onClick={() => dispatch({ type: 'a' })}>a</Button>
        <Button type="primary" onClick={() => dispatch({ type: 'b' })}>b</Button>
        <Button type="primary" onClick={() => dispatch({ type: 'c' })}>c</Button>
    </>
}

export default A

// 这写法感觉和redux一毛一样...
useEffect():副作用钩子
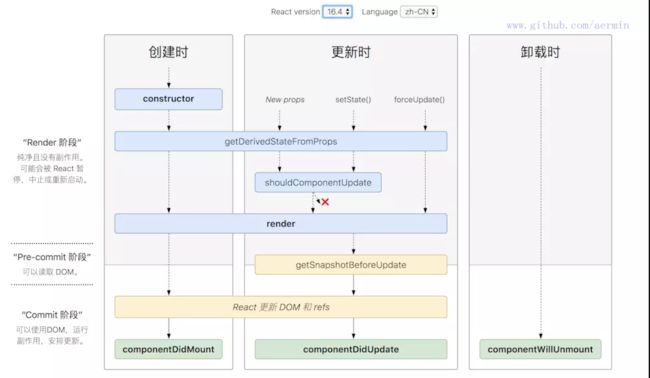
useEffect可以是看作componentDidMount、componentDidUpdate、componentwillUnmount三者结合。
useEffect( cllback, [source] )

useEffect(() => {
	// source参数不传时,则第一次渲染之后和每次更新之后都会执行
})

useEffect(() => {
	// source参数传[]时, 则外部的函数只会在初始化时调用一次,
	// 返回的那个函数也只会最终在组件卸载时调用一次
	console.log('componentDidMount')
	return () => {
		console.log('componentwillUnmount')
	}
},[])

useEffect(() => {
	// source参数有值时,则只会监听到数组中的值发生改变后,才优先调用返回的那个函数,再调用外部的函数
}, [count])
代理、请求、环境配置
- 代理
yarn run eject可以把配置文件显示出来 在webpack.config.js中配置代理也可以。
这里推荐另外一种
yarn add http-proxy-middleware
src下新增setupProxy.js文件 不需要再做引入操作,这个webapck会自动读取
const { createProxyMiddleware } = require('http-proxy-middleware');

module.exports = function(app) {

    app.use('/api', createProxyMiddleware({
    	// 这里路径我配的node启的地址
      target: 'xxxxx',
      changeOrigin: true,
      pathRewrite: { //路径替换
        '^/api': '',
      }
    }));

    app.use('/api2', createProxyMiddleware({
      target: 'http://xxx.com',
      changeOrigin: true,
      pathRewrite: { //路径替换
        '^/api2': '/api', // axios 访问/api2 == target + /api
      }
    }));

};
- 请求
yarn add axios
-src/api/axios.ts request.ts
// axios.ts
import { notification } from 'antd';
import axios from 'axios'

axios.defaults.headers.post['Content-Type'] = 'application/json' // post请求头设置

let config = {
    // baseURL: process.env.VUE_APP_API_BASE_URL || '', //请求地址
    baseURL: process.env.NODE_ENV === 'production'? '/' : '/api', //请求地址
    timeout: 60 * 1000, //超时时间
    withCredentials: true, //axios请求开启cookie,支持跨域请求携带cookie
};

const _axios = axios.create(config);

// 请求拦截
_axios.interceptors.request.use(
    function (config) {
    //   config.headers[ 'AccessToken' ] = getToken()
      return config;
    },
    function (error) {
        return Promise.reject(error);
    }
);

// 响应拦截
_axios.interceptors.response.use(
    function (response) {
        const { data } = response
        if (data.code !== 200){
          notification.error({ message: data.message || data.error || '服务器异常', duration: 4})
        }
        return data;
    },
    function (error) {
        let response = error.response
        if (response){
          let data = response.data
          let status = response.status
          switch (status) {
            case 401:
            //   removeToken()
            //   router.go(0)
              break
            default:
              notification.error({
                message: '系统提示',
                description: data.message || data.error || data || '服务器异常',
                duration: 4
              })
              break
          }
        }
        return Promise.reject(error);
    }
);

export default _axios
import request from './axios'

//post
export function POST(url: string, parameter?: any) {
    return request({
      url: url,
      method: 'post',
      data: parameter
    })
  }

  //get
  export function GET(url: string, parameter?: any) {
    return request({
      url: url,
      method: 'get',
      params: parameter
    })
  }

  //put
  export function PUT(url: string, parameter?: any) {
    return request({
      url: url,
      method: 'put',
      data: parameter
    })
  }

  //delete
  export function DELETE(url: string, parameter?:any) {
    return request({
      url: url,
      method: 'delete',
      params: parameter
    })
  }
// 请求
import {GET} from '../../api/request'

GET('/users').then((res:any) => {
     if(res.success){
     }
 })
- 开发环境配置
这个就没提供了dev环境 pro环境 ······
在更新中···