SpringCloud-Feign,Hystrix,Gateway(请求路由-跨域-限流-过滤器鉴权)
目录
-
- SpringCloud
-
- Feign声明式服务调用
- Hystrix熔断器
-
- Hystrix降级
- Hystrix熔断
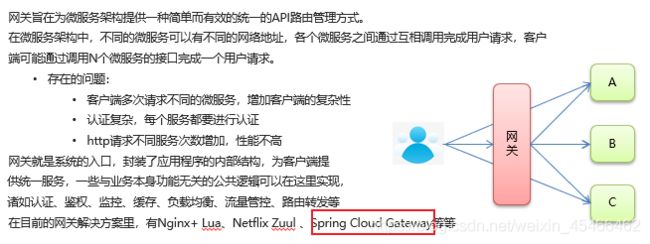
- Gateway网关
-
- Gateway网关路由配置
- Gateway网关过滤器
- 全局过滤器:
- 局部过滤器:
-
- 自定义局部过滤器类
- 使用网关实现跨域操作
- 网关限流
-
- 网关限流代码实现
- Base64编码
- 使用JWT实现微服务鉴权结合网关过滤器识别token
-
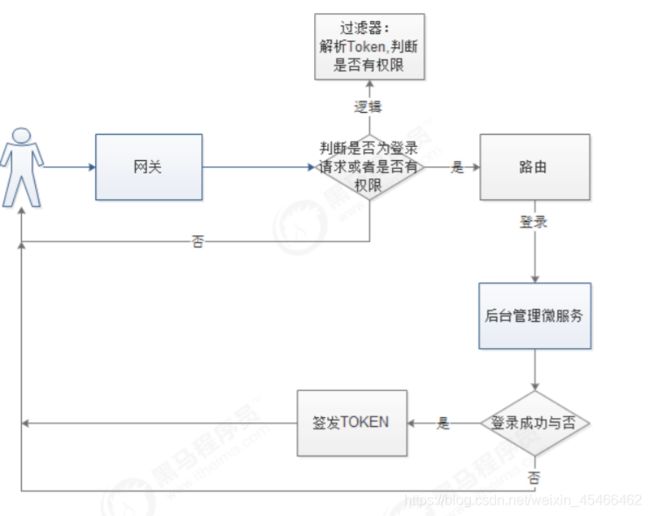
- 实现逻辑
- 微服务鉴权代码实现
-
- 1. 登录服务端实现:
- 2.网关过滤器验证token
Feign服务调用,Hystrix降级以及熔断机制,Gateway网关请求路由-跨域-限流-过滤器鉴权
SpringCloud
Feign声明式服务调用
Feign底层依赖于Ribbon来实现负载均衡和远程调用
- 简化远程调用:不再使用RestTemplate来完成RPC,而是使用Feign接口
- 消费端客户端引入open-feign依赖
        <dependency>
            <groupId>org.springframework.cloudgroupId>
            <artifactId>spring-cloud-starter-openfeignartifactId>
        dependency>
- 编写Feidn调用接口
模拟的是订单调用产品服务
/**产品的Feign声明式接口,用于发起RPC*/
@FeignClient(value = "eureka-provider")
//value指定的服务提供者应用名称
public interface ProductFeign {
    /**此处和peovider服务中的ProductController的方法声明一样
    * String url = "http://EUREKA-PROVIDER/product/findOne/"+id;
    * EUREKA-PROVIDER由@FeignClient(value = "eureka-provider")代替
    * /product/findOne/"+id由该方法声明代替
    * */
    @RequestMapping("/product/findOne/{id}")
    public Product findById(@PathVariable("id") int id);

}
- 引导类中添加注解,来开启Feign功能
//开启Feign功能
@EnableFeignClients
@SpringBootApplication
public class CustomerApp {
    public static void main(String[] args) {
        SpringApplication.run(CustomerApp.class);
    }
}
- customer端实现RPC
@RestController
@RequestMapping("/orders")
public class IOrdersController {
    @Autowired
    private ProductFeign productFeign;
    /*使用Feign来完成RPC*/
    @GetMapping("/find/{id}")
    public Product find(@PathVariable("id") int id) {
        Product byId = productFeign.findById(id);
        return byId;
    }
}
- 启动服务完成调用
- 超时设置
# 设置Ribbon的超时时间
ribbon:
  ConnectTimeout: 1000 # 连接超时时间 默认1s
  ReadTimeout: 3000 # 逻辑处理的超时时间 默认1s
- 日志功能
记录的时远程调用过程种Http数据信息
- 设置当前的日志级别 debug
# 设置当前的日志级别 debug,feign只支持记录debug级别的日志
logging:
  level:
    com.itheima: debug
- 编写配置类,注入Logger.Level对象
@Configuration
public class FeignLogConfig {
    /*
        NONE,不记录
        BASIC,记录基本的请求行,响应状态码数据
        HEADERS,记录基本的请求行,响应状态码数据,记录响应头信息
        FULL;记录完成的请求 响应数据
     */
    @Bean
    public Logger.Level level(){
        return Logger.Level.FULL;
    }
}
- Geign接口使用注解启用该Bean
/**产品的Feign声明式接口,用于发起RPC*/
@FeignClient(value = "FEIGN-PROVIDER",configuration = FeignLogConfig.class)
//value指定的服务提供者应用名称
//configuration用于加载日志Bean配置类
public interface ProductFeign {
    @RequestMapping("/product/findOne/{id}")
    public Product findById(@PathVariable("id") int id);

}
Hystrix熔断器
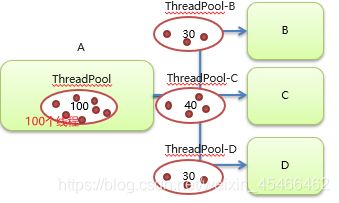
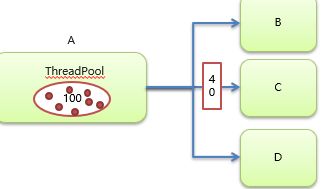
开源的延迟和容错库,用于隔离访问远程服务,第三方库,防止出现级联失败(雪崩,多级服务调用)
雪崩:一个服务失败,导致整个线路的调用失败的情况
主要功能:
- 隔离
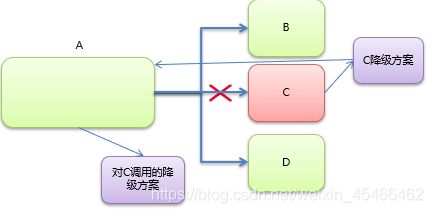
Hystrix降级
包括异常降级,以及网络超时降级
- 服务提供方降级
@RestController
@RestController
@RequestMapping("/product")
public class IProductController {
    @Autowired
    private IProductService iProductService;
    /*@RequestMapping("/findOne")
    public Product findById(int id){
        return iProductService.findById(id);
    }*/
    @RequestMapping("/findOne/{id}")
    @HystrixCommand(fallbackMethod = "findById_back",commandProperties = {
            //设置hystrix的超时时间
            @HystrixProperty(name = "execution.isolation.thread.timeoutInMilliseconds",value = "5000")
    })
    //fallbackMethod指定降级后调用的方法
    public Product findById(@PathVariable("id") int id){
        //1.制造异常以降级
        //int i=3/0;
        //2.超时来降级,默认1秒
        try {
            Thread.sleep(3000);
        } catch (InterruptedException e) {
            e.printStackTrace();
        }

        return iProductService.findById(id);
    }
    /**定义降级方法*/
    public Product findById_back(int id){
        System.out.println("降级了");
        return new Product(111,"降级了",20,20);
    }
}
- 使用注解在原方法上配置降级方法
需要导入提供该注解的依赖
<dependency>
            <groupId>com.netflix.hystrixgroupId>
            <artifactId>hystrix-javanicaartifactId>
        dependency>
- 在引导类开启hystrix功能,使用注解
/*启动类*/
@SpringBootApplication
@EnableEurekaClient //该注解 在新版本中可以省略
@EnableHystrix//开启Hystrix功能
public class ProviderApp {
    public static void main(String[] args) {
        SpringApplication.run(ProviderApp.class);
    }
}
- 服务消费方降级
- 定义feign调用接口实现类,复写方法,即降级方法
/**实现feign接口,即方法的降级*/
@Component
public class ProductFeignImpl implements ProductFeign {
    @Override
    public Product findById(int id) {
        return new Product(200,"消费放被降级了",200,200);
    }
}
- 在FeignClient 注解中使用fallbanck属性设置降级处理类
/**产品的Feign声明式接口,用于发起RPC*/
@FeignClient(value = "hystrix-provider",fallback = ProductFeignImpl.class)//value指定的服务提供者应用名称
//fallback指定降级方法的实现类
public interface ProductFeign {
    @RequestMapping("/product/findOne/{id}")
    public Product findById(@PathVariable("id") int id);
}
- 配置开启feign对hystrix的支持
#开启feign对hystrix的支持
feign:
  hystrix:
    enabled: true
- RPC消息提供者,该服务睡了两秒,故降级
因为默认连接时间是1s
@RestController
@RequestMapping("/product")
public class IProductController {
    @Autowired
    private IProductService iProductService;
    /*@RequestMapping("/findOne")
    public Product findById(int id){
        return iProductService.findById(id);
    }*/
    @RequestMapping("/findOne/{id}")
    @HystrixCommand(fallbackMethod = "findById_back",commandProperties = {
            //设置hystrix的超时时间
            @HystrixProperty(name = "execution.isolation.thread.timeoutInMilliseconds",value = "3000")
    })
    //fallbackMethod指定降级后调用的方法
    public Product findById(@PathVariable("id") int id){
        //1.制造异常以降级
        //int i=3/0;
        //2.超时来降级,默认1秒
        try {
            Thread.sleep(2000);
        } catch (InterruptedException e) {
            e.printStackTrace();
        }

        return iProductService.findById(id);
    }
    /**定义降级方法*/
    public Product findById_back(int id){
        System.out.println("降级了");
        return new Product(111,"降级了",20,20);
    }
}
# 设置Ribbon的超时时间
ribbon:
  ConnectTimeout: 1000 # 连接超时时间 默认1s
  ReadTimeout: 1000 # 逻辑处理的超时时间 默认1s
Hystrix熔断
熔断机制:断路器
- 默认自动开启:
默认配置是
在服务方注解 HystrixCommand上修改配置(默认监控时间5s,失败次数20次,失败率)
@RequestMapping("/findOne/{id}")
    @HystrixCommand(fallbackMethod = "findById_back",commandProperties = {
            //设置hystrix的超时时间
            @HystrixProperty(name = "execution.isolation.thread.timeoutInMilliseconds",value = "3000"),
            //设置熔断机制配置
            //监控时间 默认5000 毫秒
            @HystrixProperty(name="circuitBreaker.sleepWindowInMilliseconds",value = "5000"),
            //失败次数。默认20次
            @HystrixProperty(name="circuitBreaker.requestVolumeThreshold",value = "20"),
            //失败率 默认50%
            @HystrixProperty(name="circuitBreaker.errorThresholdPercentage",value = "50")
    })
    //fallbackMethod指定降级后调用的方法
    public Product findById(@PathVariable("id") int id){
        //用id不同来模拟降级
        if(id==1){
            //1.制造异常以降级
            int i=3/0;
        }
        //2.超时来降级,默认1秒
        /*try {
            Thread.sleep(2000);
        } catch (InterruptedException e) {
            e.printStackTrace();
        }*/

        return iProductService.findById(id);
    }
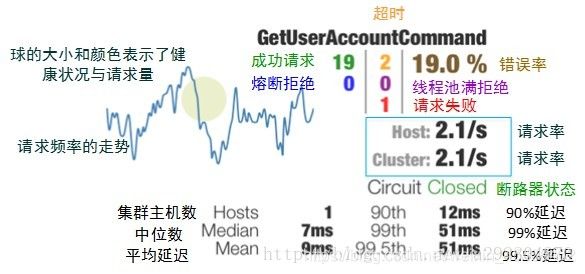
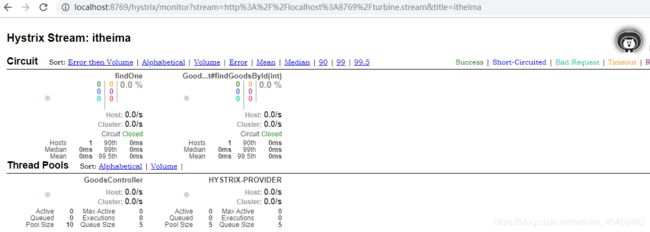
- 熔断监控Turbine
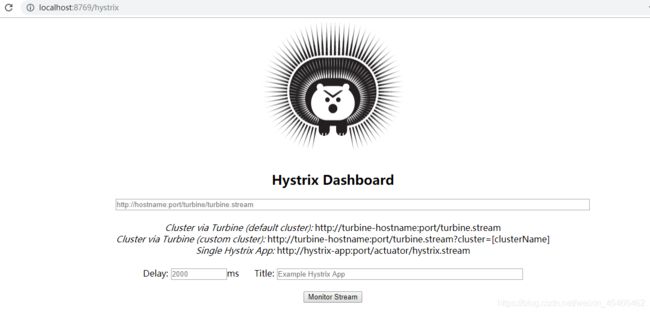
提供了Hystrix-dashboard,实时监控微服务运行状态,缺点是只能监控一个微服务
故使用Turbine,进行聚合监控(底层还是Hystrix-dashboard) - 搭建Turbine监控平台:
- 创建监控模块
创建hystrix-monitor模块,使用Turbine聚合监控多个Hystrix dashboard功能 - 引入Turbine聚合监控起步依赖
<dependencies>
        <dependency>
            <groupId>org.springframework.cloudgroupId>
            <artifactId>spring-cloud-starter-netflix-hystrix-dashboardartifactId>
        dependency>

        <dependency>
            <groupId>org.springframework.cloudgroupId>
            <artifactId>spring-cloud-starter-netflix-turbineartifactId>
        dependency>

        <dependency>
            <groupId>org.springframework.bootgroupId>
            <artifactId>spring-boot-starter-actuatorartifactId>
        dependency>

        <dependency>
            <groupId>org.springframework.cloudgroupId>
            <artifactId>spring-cloud-starter-netflix-eureka-clientartifactId>
        dependency>


        <dependency>
            <groupId>org.springframework.bootgroupId>
            <artifactId>spring-boot-starter-testartifactId>
            <scope>testscope>
        dependency>
    dependencies>

    <build>
        <plugins>
            <plugin>
                <groupId>org.springframework.bootgroupId>
                <artifactId>spring-boot-maven-pluginartifactId>
            plugin>
        plugins>
    build>
- 修改application.yml
spring:
  application.name: hystrix-monitor
server:
  port: 8769
turbine:
  combine-host-port: true
  # 配置需要监控的服务名称列表
  app-config: hystrix-provider,hystrix-consumer
  cluster-name-expression: "'default'"
  aggregator:
    cluster-config: default
  #instanceUrlSuffix: /actuator/hystrix.stream
eureka:
  client:
    serviceUrl:
      defaultZone: http://localhost:8761/eureka/
- 创建启动类,添加注解
@SpringBootApplication
@EnableEurekaClient

@EnableTurbine //开启Turbine 很聚合监控功能
@EnableHystrixDashboard //开启Hystrix仪表盘监控功能
public class HystrixMonitorApp {

    public static void main(String[] args) {
        SpringApplication.run(HystrixMonitorApp.class, args);
    }

}
- 修改被监控模块
搭建Turbine监控平台后
- 导入依赖
<dependency>
            <groupId>org.springframework.bootgroupId>
            <artifactId>spring-boot-starter-actuatorartifactId>
        dependency>

        <dependency>
            <groupId>org.springframework.cloudgroupId>
            <artifactId>spring-cloud-starter-netflix-hystrixartifactId>
        dependency>

        <dependency>
            <groupId>org.springframework.cloudgroupId>
            <artifactId>spring-cloud-starter-netflix-hystrix-dashboardartifactId>
        dependency>
- 配置Bean
为了方便,将其配置在启动类中。
@Bean
    public ServletRegistrationBean getServlet() {
        HystrixMetricsStreamServlet streamServlet = new HystrixMetricsStreamServlet();
        ServletRegistrationBean registrationBean = new ServletRegistrationBean(streamServlet);
        registrationBean.setLoadOnStartup(1);
        registrationBean.addUrlMappings("/actuator/hystrix.stream");
        registrationBean.setName("HystrixMetricsStreamServlet");
        return registrationBean;
    }
- 启动类上添加注解@EnableHystrixDashboard
@EnableEurekaClient
@SpringBootApplication
@EnableFeignClients
@EnableDiscoveryClient
@EnableHystrixDashboard // 开启Hystrix仪表盘监控功能
public class ConsumerApp {


    public static void main(String[] args) {
        SpringApplication.run(ConsumerApp.class,args);
    }
    @Bean
    public ServletRegistrationBean getServlet() {
        HystrixMetricsStreamServlet streamServlet = new HystrixMetricsStreamServlet();
        ServletRegistrationBean registrationBean = new ServletRegistrationBean(streamServlet);
        registrationBean.setLoadOnStartup(1);
        registrationBean.addUrlMappings("/actuator/hystrix.stream");
        registrationBean.setName("HystrixMetricsStreamServlet");
        return registrationBean;
    }
}
- 启动测试
启动服务
-
eureka-server
-
hystrix-provider
-
hystrix-consumer
-
hystrix-monitor
界面中输入监控的Url地址 http://localhost:8769/turbine.stream,监控时间间隔2000毫秒和title
Gateway网关
Gateway网关路由配置
- 使用步骤:
- 搭建网关模块
引入springBoot起步依赖和SpringCloud依赖 - 引入依赖
    <dependencies>


        <dependency>
            <groupId>org.springframework.cloudgroupId>
            <artifactId>spring-cloud-starter-gatewayartifactId>
        dependency>


    dependencies>
-
编写启动类
-
编写配置文件
动态路由 配置
server:
  port: 80

spring:
  application:
    name: api-gateway-server

  cloud:
    # 网关配置
    gateway:
      # 路由配置:转发规则
      routes: #集合。
      # id: 唯一标识。默认是一个UUID
      # uri: 转发路径
      # predicates: 条件,用于请求网关路径的匹配规则
      # filters:配置局部过滤器的
		#配置每个服务的路由
        - id: gateway-provider
          # 静态路由
          # uri: http://localhost:8001/
          # 动态路由
          uri: lb://GATEWAY-PROVIDER
          predicates:
          - Path=/product/**

#eureka配置,用于启用动态路由
eureka:
  client:
    service-url:
      defaultZone: http://localhost:8761/eureka
静态配置
server:
  port: 80

spring:
  application:
    name: api-gateway-server

  cloud:
    # 网关配置
    gateway:
      # 路由配置:转发规则
      routes: #集合。
      # id: 唯一标识。默认是一个UUID
      # uri: 转发路径
      # predicates: 条件,用于请求网关路径的匹配规则
      # filters:配置局部过滤器的

        - id: gateway-provider
          # 静态路由
          uri: http://localhost:8000/
          predicates:
          - Path=/product/**
一定注意层级关系
server:
  port: 80

spring:
  application:
    name: api-gateway-server

  cloud:
    # 网关配置
    gateway:
      # 路由配置:转发规则
      routes: #集合。
      # id: 唯一标识。默认是一个UUID
      # uri: 转发路径
      # predicates: 条件,用于请求网关路径的匹配规则
      # filters:配置局部过滤器的

      - id: gateway-provider
        # 静态路由
        # uri: http://localhost:8001/
        # 动态路由
        uri: lb://GATEWAY-PROVIDER #服务名称
        predicates:
        - Path=/goods/**
-
启动测试
流程:通过predicates的Path来匹配合适请求,后拼接uri,即是完整请求路径
优点:简化了各服务间端口配置,只需要访统一网关端口即可
http://localhost:8000/product/findOne/2–>http://localhost/product/findOne/2
-
静态路由:
Gateway网关静态路由与eureka无关
不需要引入eurekaclient依赖 -
动态路由:配合eureka实现
只需引入eureka客户端及编辑配置
        <dependency>
            <groupId>org.springframework.cloudgroupId>
            <artifactId>spring-cloud-starter-netflix-eureka-clientartifactId>
        dependency>
server:
  port: 80

spring:
  application:
    name: api-gateway-server

  cloud:
    # 网关配置
    gateway:
      # 路由配置:转发规则
      routes: #集合。
      # id: 唯一标识。默认是一个UUID
      # uri: 转发路径
      # predicates: 条件,用于请求网关路径的匹配规则
      # filters:配置局部过滤器的

      - id: gateway-provider
        # 静态路由
        # uri: http://localhost:8001/
        # 动态路由
        uri: lb://GATEWAY-PROVIDER #服务名称
        predicates:
        - Path=/goods/**
- 微服务名称配置
问题:当微服务过多是Controller难免会有重复,如订单orders/,此时希望在路径前以应用名称作为唯一标识来做区分
实现:yaml中配置gateway的 discovery属性
eurekaServer中服务名称为大写,需设置识别小写
spring:
  application:
    name: api-gateway-server

  cloud:
    # 网关配置
    gateway:
      # 路由配置:转发规则
      routes:
        - id: gateway-provider
          uri: lb://GATEWAY-PROVIDER
          predicates:
          - Path=/product/**
      # 微服务名称配置,用于做标识
      discovery:
        locator:
          enabled: true # 设置为true 请求路径前可以添加微服务名称
          lower-case-service-id: true # 允许为小写
Gateway网关过滤器
过滤器:
- 内置过滤器工厂
内置的过滤器工厂
这里简单将Spring Cloud Gateway内置的所有过滤器工厂整理成了一张表格。如下:
| 过滤器工厂 | 作用 | 参数 |
|---|---|---|
| AddRequestHeader | 为原始请求添加Header | Header的名称及值 |
| AddRequestParameter | 为原始请求添加请求参数 | 参数名称及值 |
| AddResponseHeader | 为原始响应添加Header | Header的名称及值 |
| DedupeResponseHeader | 剔除响应头中重复的值 | 需要去重的Header名称及去重策略 |
| Hystrix | 为路由引入Hystrix的断路器保护 | HystrixCommand的名称 |
| FallbackHeaders | 为fallbackUri的请求头中添加具体的异常信息 | Header的名称 |
| PrefixPath | 为原始请求路径添加前缀 | 前缀路径 |
| PreserveHostHeader | 为请求添加一个preserveHostHeader=true的属性,路由过滤器会检查该属性以决定是否要发送原始的Host | 无 |
| RequestRateLimiter | 用于对请求限流,限流算法为令牌桶 | keyResolver、rateLimiter、statusCode、denyEmptyKey、emptyKeyStatus |
| RedirectTo | 将原始请求重定向到指定的URL | http状态码及重定向的url |
| RemoveHopByHopHeadersFilter | 为原始请求删除IETF组织规定的一系列Header | 默认就会启用,可以通过配置指定仅删除哪些Header |
| RemoveRequestHeader | 为原始请求删除某个Header | Header名称 |
| RemoveResponseHeader | 为原始响应删除某个Header | Header名称 |
| RewritePath | 重写原始的请求路径 | 原始路径正则表达式以及重写后路径的正则表达式 |
| RewriteResponseHeader | 重写原始响应中的某个Header | Header名称,值的正则表达式,重写后的值 |
| SaveSession | 在转发请求之前,强制执行WebSession::save操作 |
无 |
| secureHeaders | 为原始响应添加一系列起安全作用的响应头 | 无,支持修改这些安全响应头的值 |
| SetPath | 修改原始的请求路径 | 修改后的路径 |
| SetResponseHeader | 修改原始响应中某个Header的值 | Header名称,修改后的值 |
| SetStatus | 修改原始响应的状态码 | HTTP 状态码,可以是数字,也可以是字符串 |
| StripPrefix | 用于截断原始请求的路径 | 使用数字表示要截断的路径的数量 |
| Retry | 针对不同的响应进行重试 | retries、statuses、methods、series |
| RequestSize | 设置允许接收最大请求包的大小。如果请求包大小超过设置的值,则返回 413 Payload Too Large |
请求包大小,单位为字节,默认值为5M |
| ModifyRequestBody | 在转发请求之前修改原始请求体内容 | 修改后的请求体内容 |
| ModifyResponseBody | 修改原始响应体的内容 | 修改后的响应体内容 |
| Default | 为所有路由添加过滤器 | 过滤器工厂名称及值 |
**Tips:**每个过滤器工厂都对应一个实现类,并且这些类的名称必须以GatewayFilterFactory结尾,这是Spring Cloud Gateway的一个约定,例如AddRequestHeader对应的实现类为AddRequestHeaderGatewayFilterFactory。
使用时在filters下使用即可
- 局部过滤器:
- id: gateway-provider
        # 静态路由
        # uri: http://localhost:8001/
        # 动态路由
        uri: lb://GATEWAY-PROVIDER
        predicates:
        - Path=/goods/**
		#此过滤器用于在发送请求时拼接一个名为username的参数值为jack
		# 此处也是数组类型
        filters:
        - AddRequestParameter=username,jack
获取时只需要Controller中控制器方法形参中传入该参数即可
全局过滤器:
不需要再配置文件中配置,系统初始化时加载,并作用在每个路由上。
过滤器必须实现GlobalFilter和Ordered接口
步骤:
- 定义类实现GlobalFilter和Ordered接口
XXXFilter - 实现方法
/*定义的全局过滤器*/
@Component//注册为Bean
public class MyFilter implements GlobalFilter, Ordered {
    /**过滤器内部逻辑处理方法*/
    @Override
    public Mono<Void> filter(ServerWebExchange exchange, GatewayFilterChain chain) {

        System.out.println("自定义全局过滤器执行了~~~");

        return chain.filter(exchange);//放行操作
    }

    /**
     * 过滤器排序
     * @return 数值越小 越先执行
     */
    @Override
    public int getOrder() {
        return 0;
    }
}
- 完成逻辑处理,如权限检测等等
局部过滤器:
GateWay提供了很多局部过滤器。上表中已经列出部分。
那么如何自定义一个局部过滤器呢?
自定义局部过滤器类
/**
 * GateWay网关的局部过滤器
 *      */
@Component
public class MyParamGatewayFilterFactory extends AbstractGatewayFilterFactory<MyParamGatewayFilterFactory.Config> {
    /**使用日志纪记录相关信息*/
    private final static Logger log = LoggerFactory.getLogger(MyParamGatewayFilterFactory.class);

    public MyParamGatewayFilterFactory() {
        super(Config.class);
    }
    /**
     * 绑定Config类的参数的值为yaml中配置的值*/
    @Override
    public List<String> shortcutFieldOrder() {
        //指定把yaml配置的过滤器的值赋值给配置类的param属性。 - MyParam=name即param=name
        //如果Config中定义了多个属性时候传入即可。例如声明了config中有name和age  配置文件中为- MyParam=name,age
        //return Arrays.asList("param","age");
        return Arrays.asList("param");
    }
    /**
     * 过滤相关操作,定义自己的过滤逻辑。Config为配置类传来的yaml配置类中配置的局部过滤器的的参数的值*/
    @Override
    public GatewayFilter apply(Config config) {
        return (exchange, chain) -> {
            log.info("进入过滤器");
            // http://localhost:9090/admins/demos?name=yh 相当于config.param ==> name
            //获取请求参数中param对应的参数名 的参数值
            ServerHttpRequest request = exchange.getRequest();
            if (request.getQueryParams().containsKey(config.param)){//此处循环遍历是因为可以为一个参数名称指定多个值。如name=yh&name=zq
                //一般一个属性只给传一个值
                //String value=request.getQueryParams().get(config.param).get(0);
                request.getQueryParams().get(config.param).forEach((v) -> {
                    log.info("获得请求的参数::"+config.param+"="+ v);
                    //做相应的业务处理
                });
            }
            return chain.filter(exchange);//执行请求
        };
    }
    /**
     * 自定义配置类
     *      用于接收yaml中过滤器配置的参数。 - MyParam=name  即param=name.在shortcutFieldOrder方法中进行绑定*/

    public static class Config{
        //对应配置在application.yml配置文件中的过滤器参数名
        private String param;

        public String getParam() {
            return param;
        }
        public void setParam(String param) {
            this.param = param;
        }
    }
}
在配置文件中配置该过滤器即可
server:
  port: 9090
spring:
#   application:
#     name: API-GATEWAY
  cloud:
    # nacos:
    #   server-addr: 8.142.68.138:8848
    gateway:
      routes: #配置路由规则
        # admins
        - id: admins_router
          # 配置路由到的地址ip:port
          uri: lb://API-ADMINS
          # 配置路径的映射
          predicates:
            - Path=/admins/**
          filters:
            # 去除断言前的路径.1代表去除一级
            - StripPrefix=1
            - MyParam=name
通过网关访问访问admin服务的demos
发现后台打印name请求参数的值。
使用网关实现跨域操作
修改application.yml ,在spring.cloud.gateway节点添加配置,
globalcors:
	cors‐configurations:
		'[/**]': # 匹配所有请求
			allowedOrigins: "*" #跨域处理 允许所有的域
			allowedMethods: # 支持的方法
				‐ GET
				‐ POST
				‐ PUT
				‐ DELETE
网关限流
当我们的系统被频繁的请求
的时候,就有可能将系统压垮
所以需要做限流,每个服务都做麻烦,由此在网关做统一限流,通常使用令牌桶算法,一般由redis实现
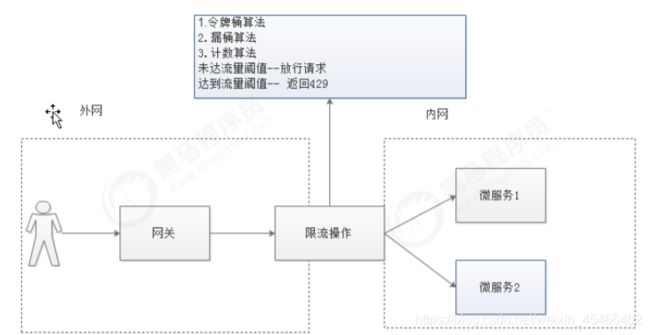
- 令牌桶算法
令牌桶算法是比较常见的限流算法之一,大概描述如下:
1)所有的请求在处理之前都需要拿到一个可用的令牌才会被处理;
2)根据限流大小,设置按照一定的速率往桶里添加令牌;
3)桶设置最大的放置令牌限制,当桶满时、新添加的令牌就被丢弃或者拒绝;
4)请求达到后首先要获取令牌桶中的令牌,拿着令牌才可以进行其他的业务逻辑,处理
完业务逻辑之后,将令牌直接删除;
5)令牌桶有最低限额,当桶中的令牌达到最低限额的时候,请求处理完之后将不会删除
令牌,以此保证足够的限流
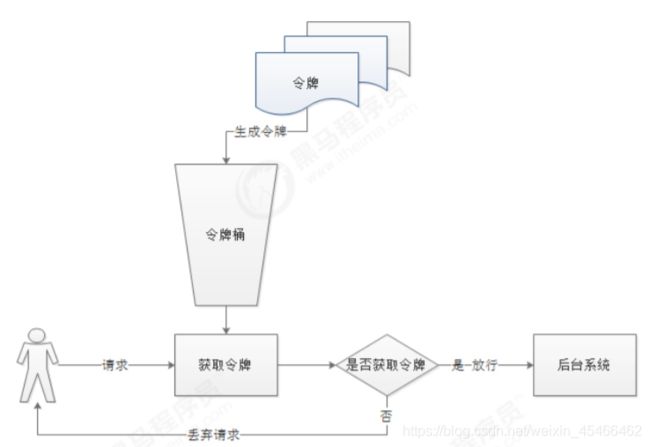
- 实现方式:
Guava(读音: 瓜哇)是其中之一,redis客户端也有其实
现。
网关限流代码实现
- 使用redis客户端实现网管令牌桶算法的限流
需求:每个ip地址1秒内只能发送1次请求,多出来的请求返回429错误。
(1)spring cloud gateway 默认使用redis的RateLimter限流算法来实现。所以我们要
使用首先需要引入redis的依赖
        <dependency>
            <groupId>org.springframework.bootgroupId>
            <artifactId>spring-boot-starter-data-redis-reactiveartifactId>
            <version>2.1.3.RELEASEversion>
        dependency>
(2)配置一个KeyResolver的Bean
在GatewayApplicatioin引导类中添加如下代码,KeyResolver用于计算某一个类型的限
流的KEY也就是说,可以通过KeyResolver来指定限流的Key。
@SpringBootApplication
@EnableEurekaClient
public class GatewayApplication {
    public static void main(String[] args) {
        SpringApplication.run(GatewayApplication.class, args);
    }

    //定义一个KeyResolver
    @Bean
    public KeyResolver ipKeyResolver() {
        return new KeyResolver() {
            @Override
            public Mono<String> resolve(ServerWebExchange exchange) {
                //限流的具体对象
                return Mono.just(exchange.getRequest().getRemoteAddress().getHostName());
            }
        };
    }
}
(3)修改application.yml中配置项,filter中指定限制流量的配置以及redis的配置,修改后最
终配置如下:
spring:
  cloud:
    gateway:
      routes:
        - id: goods
          uri: lb://goods
          predicates:
            - Path=/goods/**
          filters:
            - StripPrefix= 1
            ‐ name: RequestRateLimiter #请求数限流 名字不能随便写
              args:
                key‐resolver: "#{@ipKeyResolver}" #与引导类中定义的限流Bean方法名称一样
                redis‐rate‐limiter.replenishRate: 1 #令牌桶每秒填充平均速率
                redis‐rate‐limiter.burstCapacity: 1 #令牌桶总容量

  # 配置Redis 127.0.0.1可以省略配置
redis:
host: 192.168.200.128
port: 6379
解释:
burstCapacity:令牌桶总容量。
replenishRate:令牌桶每秒填充平均速率。
key-resolver:用于限流的键的解析器的 Bean 对象的名字。它使用 SpEL 表达式根
据#{@beanName}从 Spring 容器中获取 Bean 对象。
Base64编码
Base64是网络上最常见的用于传输8Bit字节代码的编码方式之一。Base64编码可用于在
HTTP环境下传递较长的标识信息。采用Base64编码解码具有不可读性,即所编码的数据
不会被人用肉眼所直接看到。注意:Base64只是一种编码方式,不算加密方法
使用JWT实现微服务鉴权结合网关过滤器识别token
客户端请求头生成token
网关过滤器解析token完成鉴权
JWT简介以及操作
https://blog.csdn.net/weixin_45466462/article/details/115185280
实现逻辑
- 用户进入网关开始登陆,网关过滤器进行判断,如果是登录,则路由到后台管理微服务进行登录
- 用户登录成功,后台管理微服务签发JWT TOKEN信息返回给用户
- 用户再次进入网关开始访问,网关过滤器接收用户携带的TOKEN
- 网关过滤器解析TOKEN ,判断是否有权限,如果有,则放行,如果没有则返回未认证错误
微服务鉴权代码实现
1. 登录服务端实现:
- 登录模块引入jjwt依赖
在changgou_service_system添加依赖
<dependency>
<groupId>io.jsonwebtokengroupId>
<artifactId>jjwtartifactId>
<version>0.9.0version>
dependency>
- 创建jjwt工具类: JwtUtil
/**
 * JWT工具类
 */
public class JwtUtil {

    //有效期为
    public static final Long JWT_TTL = 3600000L;// 60 * 60 *1000  一个小时
    //设置秘钥明文
    public static final String JWT_KEY = "yh";

    /**
     * 创建token
     * @param id
     * @param subject
     * @param ttlMillis
     * @return
     */
    public static String createJWT(String id, String subject, Long ttlMillis) {

        SignatureAlgorithm signatureAlgorithm = SignatureAlgorithm.HS256;
        long nowMillis = System.currentTimeMillis();
        Date now = new Date(nowMillis);
        if(ttlMillis==null){
            ttlMillis=JwtUtil.JWT_TTL;
        }
        long expMillis = nowMillis + ttlMillis;
        Date expDate = new Date(expMillis);
        SecretKey secretKey = generalKey();

        JwtBuilder builder = Jwts.builder()
                .setId(id)              //唯一的ID
                .setSubject(subject)   // 主题  可以是JSON数据
                .setIssuer("admin")     // 签发者
                .setIssuedAt(now)      // 签发时间
                .signWith(signatureAlgorithm, secretKey) //使用HS256对称加密算法签名, 第二个参数为秘钥
                .setExpiration(expDate);// 设置过期时间
        return builder.compact();
    }

    /**
     * 生成加密后的秘钥 secretKey
     * @return
     */
    public static SecretKey generalKey() {
        byte[] encodedKey = Base64.getDecoder().decode(JwtUtil.JWT_KEY);
        SecretKey key = new SecretKeySpec(encodedKey, 0, encodedKey.length, "AES");
        return key;
    }

    /**
     * 解析
     *
     * @param jwt
     * @return
     * @throws Exception
     */
    public static Claims parseJWT(String jwt) throws Exception {
        SecretKey secretKey = generalKey();
        return Jwts.parser()
                .setSigningKey(secretKey)
                .parseClaimsJws(jwt)
                .getBody();
    }
}
- 登录Controller层实现签发Token
/**
* 登录
* @param admin
* @return
*/
@PostMapping("/login")
public Result login(@RequestBody Admin admin){
boolean login = adminService.login(admin);
if(login){ //如果验证成功
Map<String,String> info = new HashMap<>();
info.put("username",admin.getLoginName());
String token =
JwtUtil.createJWT(UUID.randomUUID().toString(), admin.getLoginName(),
null);
info.put("token",token);
return new Result(true, StatusCode.OK,"登录成功",info);
}else{
return new Result(false,StatusCode.LOGINERROR,"用户名或密码错
误");
}
}
2.网关过滤器验证token
- 网关服务中添加jjwt依赖
在changgou_gateway_system网关系统添加依赖
        <dependency>
            <groupId>io.jsonwebtokengroupId>
            <artifactId>jjwtartifactId>
            <version>0.9.0version>
        dependency>
- 创建JWTUtil工具类
/**
 * JWT工具类
 */
public class JwtUtil {

    //有效期为
    public static final Long JWT_TTL = 3600000L;// 60 * 60 *1000  一个小时
    //设置秘钥明文
    public static final String JWT_KEY = "yh";

    /**
     * 创建token
     * @param id
     * @param subject
     * @param ttlMillis
     * @return
     */
    public static String createJWT(String id, String subject, Long ttlMillis) {

        SignatureAlgorithm signatureAlgorithm = SignatureAlgorithm.HS256;
        long nowMillis = System.currentTimeMillis();
        Date now = new Date(nowMillis);
        if(ttlMillis==null){
            ttlMillis=JwtUtil.JWT_TTL;
        }
        long expMillis = nowMillis + ttlMillis;
        Date expDate = new Date(expMillis);
        SecretKey secretKey = generalKey();

        JwtBuilder builder = Jwts.builder()
                .setId(id)              //唯一的ID
                .setSubject(subject)   // 主题  可以是JSON数据
                .setIssuer("admin")     // 签发者
                .setIssuedAt(now)      // 签发时间
                .signWith(signatureAlgorithm, secretKey) //使用HS256对称加密算法签名, 第二个参数为秘钥
                .setExpiration(expDate);// 设置过期时间
        return builder.compact();
    }

    /**
     * 生成加密后的秘钥 secretKey
     * @return
     */
    public static SecretKey generalKey() {
        byte[] encodedKey = Base64.getDecoder().decode(JwtUtil.JWT_KEY);
        SecretKey key = new SecretKeySpec(encodedKey, 0, encodedKey.length, "AES");
        return key;
    }

    /**
     * 解析
     *
     * @param jwt
     * @return
     * @throws Exception
     */
    public static Claims parseJWT(String jwt) throws Exception {
        SecretKey secretKey = generalKey();
        return Jwts.parser()
                .setSigningKey(secretKey)
                .parseClaimsJws(jwt)
                .getBody();
    }
}
- 创建过滤器,用于token验证
/**JWT token验证过滤器*/
@Component
public class AuthorizeFilter implements GlobalFilter, Ordered {
    private static final String AUTHORIZE_TOKEN = "token";
    @Override
    public Mono<Void> filter(ServerWebExchange exchange, GatewayFilterChain chain) {
        //1.获取请求
        ServerHttpRequest request = exchange.getRequest();
        //2.获取响应
        ServerHttpResponse response = exchange.getResponse();
        //3.如果是登录请求则放行
        if (request.getURI().getPath().contains("/admin/login")){
            return chain.filter(exchange);
        }
        //4.获取请求头
        HttpHeaders headers = request.getHeaders();
        //5.请求头中获取令牌登录生成的token
        String token = headers.getFirst(AUTHORIZE_TOKEN);
        //6.判断请求头中是否有令牌token
        if (StringUtils.isEmpty(token)){
            //7.无则响应中放入返回的状态码,没有权限访问
            response.setStatusCode(HttpStatus.UNAUTHORIZED);
            //8.返回响应
            return response.setComplete();
            }
        //9.如果请求头中有令牌token,则解析令牌
        try {
            JwtUtil.parseJWT(token);
        }catch (Exception e){
            e.printStackTrace();
            //10.解析出错设置相应信息
            response.setStatusCode(HttpStatus.UNAUTHORIZED);
            //11.返回响应
            return response.setComplete();
        }
        //12.放行
        return chain.filter(exchange);
    }

    @Override
    public int getOrder() {
        return 0;
    }
}
- 测试:
注意: 数据库中管理员账户为 : admin , 密码为 : 123456
如果不携带token直接访问,则返回401错误
postman输入路由访问路径
Header中添加token信息

在Body中添加json信息

测试添加用户功能,令牌访问成功

