Spring Bean的作用域
1.写在前面
前面的博客我们已经介绍完Spring的依赖的查找来源,依赖注入的来源等等相关知识,今天我们继续来介绍Spring的Bean的作用域。
2.Spring Bean作用域
作用域
3.“singleton” Bean作用域
配置
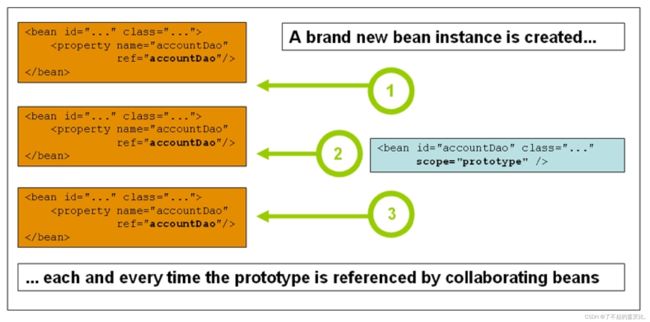
4.“prototype” Bean作用域
配置
注意事项
- Spring 容器没有办法管理 prototype Bean 的完整生命周期, 也没有办法记录实例的存在。 销毁回调方法将不会执行, 可以利用
BeanPostProcessor进行清扫工作。
示例代码如下:
package org.learn.spring.bean.scope;

import org.learn.spring.ioc.overview.domain.User;
import org.springframework.beans.BeansException;
import org.springframework.beans.factory.BeanFactory;
import org.springframework.beans.factory.DisposableBean;
import org.springframework.beans.factory.annotation.Autowired;
import org.springframework.beans.factory.annotation.Qualifier;
import org.springframework.beans.factory.config.BeanDefinition;
import org.springframework.beans.factory.config.BeanPostProcessor;
import org.springframework.beans.factory.config.ConfigurableBeanFactory;
import org.springframework.beans.factory.config.ConfigurableListableBeanFactory;
import org.springframework.context.annotation.AnnotationConfigApplicationContext;
import org.springframework.context.annotation.Bean;
import org.springframework.context.annotation.Scope;

import java.util.Map;


// Bean的作用域示例
// 结论一:
// singleton Bean 无论是依赖注入和依赖查找都是同一个对象
// prototype Bean 无论是依赖注入和依赖查找每次都是新的对象

// 结论二:
// 如果注入的是集合类型对象,singleton Bean 和 prototype Bean 均只存在一个
// prototype Bean 有别于其他地方的依赖注入 prototype Bean

// 结论三:
// 无论是 singleton Bean 还是 prototype Bean 都会执行初始化方法回调
// 不过仅 singleton Bean 会执行销毁方法回调
public class BeanScopeDemo implements DisposableBean {

    @Bean
    // 默认singleton
    public static User singletonUser() {
        return createUser();
    }

    @Bean
    @Scope(ConfigurableBeanFactory.SCOPE_PROTOTYPE)
    public static User prototypeUser() {
        return createUser();
    }

    @Autowired
    @Qualifier("singletonUser")
    private User singletonUser;

    @Autowired
    @Qualifier("singletonUser")
    private User singletonUser1;

    @Autowired
    @Qualifier("prototypeUser")
    private User prototypeUser;

    @Autowired
    @Qualifier("prototypeUser")
    private User prototypeUser1;

    @Autowired
    @Qualifier("prototypeUser")
    private User prototypeUser2;

    @Autowired
    private Map<String, User> users;

    @Autowired
    private ConfigurableListableBeanFactory beanFactory; // Resolvable Dependency

    private static User createUser() {
        User user = new User();
        user.setId(System.nanoTime());
        return user;
    }

    public static void main(String[] args) {
        // 创建BeanFactory的容器
        AnnotationConfigApplicationContext applicationContext = new AnnotationConfigApplicationContext();
        // 注册Configuration Class 配置类 -> Spring Bean
        applicationContext.register(BeanScopeDemo.class);

        applicationContext.addBeanFactoryPostProcessor(beanFactory -> {
            beanFactory.addBeanPostProcessor(new BeanPostProcessor() {
                @Override
                public Object postProcessAfterInitialization(Object bean, String beanName) throws BeansException {
                    System.out.printf("%s Bean 名称:%s 在初始化回调...%n", bean.getClass().getName(), beanName);
                    return bean;
                }
            });
        });

        // 启动应用上下文
        applicationContext.refresh();

        scopedBeansByLookup(applicationContext);

        scopedBeansByInjection(applicationContext);

        // 显示的关闭spring应用上下文
        applicationContext.close();
    }

    private static void scopedBeansByLookup(AnnotationConfigApplicationContext applicationContext) {
        for (int i = 0; i < 3; i++) {
            // singletonUser 每次查找的都是共享的Bean
            User singletonUser = applicationContext.getBean("singletonUser", User.class);
            System.out.println("singletonUser = " + singletonUser);

            // prototypeUser 每次查找的都是生成新的Bean
            User prototypeUser = applicationContext.getBean("prototypeUser", User.class);
            System.out.println("prototypeUser = " + prototypeUser);
        }
    }

    private static void scopedBeansByInjection(AnnotationConfigApplicationContext applicationContext) {
        BeanScopeDemo beanScopeDemo = applicationContext.getBean(BeanScopeDemo.class);

        System.out.println("beanScopeDemo.singletonUser = " + beanScopeDemo.singletonUser);
        System.out.println("beanScopeDemo.singletonUser1 = " + beanScopeDemo.singletonUser1);

        System.out.println("beanScopeDemo.prototypeUser = " + beanScopeDemo.prototypeUser);
        System.out.println("beanScopeDemo.prototypeUser1 = " + beanScopeDemo.prototypeUser1);
        System.out.println("beanScopeDemo.prototypeUser2 = " + beanScopeDemo.prototypeUser2);

        System.out.println("beanScopeDemo.users = " + beanScopeDemo.users);
    }

    @Override
    public void destroy() throws Exception {

        System.out.println("当前BeanScopeDemo Bean 正在销毁中....");

        this.prototypeUser.destroy();
        this.prototypeUser1.destroy();
        this.prototypeUser2.destroy();

        for (Map.Entry<String, User> entry : this.users.entrySet()) {
            String beanName = entry.getKey();
            BeanDefinition beanDefinition = beanFactory.getBeanDefinition(beanName);
            if (beanDefinition.isPrototype()) { // 如果当前Bean 是 prototype scope
                User user = entry.getValue();
                user.destroy();
            }
        }

        System.out.println("当前BeanScopeDemo Bean 正在销毁完成....");

    }
}
5.“request” Bean作用域
配置
- XML -
- Java 注解 - @RequestScope 或 @Scope(WebApplicationContext.SCOPE_REQUEST)
实现
- API - RequestScope
每次返回给前端的对象都是不一样的,但是spring中生成的对象是同一个。
6.“session” Bean作用域
配置
- XML -
- Java 注解 - @SessionScope 或 @Scope(WebApplicationContext.SCOPE_SESSION)
实现
- API - SessionScope
每次返回给前端的对象是一样的(sessionId是一样的时候)但是spring中生成的对象是同一个。
7.“application” Bean作用域
配置
- XML -
- Java 注解 - @ApplicationScope 或 @Scope(WebApplicationContext.SCOPE_APPLICATION)
实现
- API - ServletContextScope
8.自定义 Bean 作用域
实现 Scope
- org.springframework.beans.factory.config.Scope
注册 Scope
-
API - org.springframework.beans.factory.config.ConfigurableBeanFactory#registerScope
-
配置
<bean class="org.springframework.beans.factory.config.CustomScopeConfigurer">
	<property name="scopes">
		<map>
			<entry key="...">
			entry>
		map>
	property>
bean>
示例代码如下:
package org.learn.spring.bean.scope;

import org.springframework.beans.factory.ObjectFactory;
import org.springframework.beans.factory.config.Scope;
import org.springframework.core.NamedThreadLocal;

import java.util.HashMap;
import java.util.Map;

// ThreadLocal 级别的 Scope
public class ThreadLocalScope implements Scope {

    public static final String SCOPE_NAME = "thread-local";

    private final NamedThreadLocal<Map<String, Object>> threadLocal = new NamedThreadLocal("thread-local-scope") {
        public Map<String, Object> initialValue() {
            return new HashMap<>();
        }
    };

    // 通过容器去取
    @Override
    public Object get(String name, ObjectFactory<?> objectFactory) {

        // 非空
        Map<String, Object> context = getContext();
        Object object = context.get(name);
        if (object == null) {
            object = objectFactory.getObject();
            context.put(name, object);
        }
        return object;
    }

    private Map<String, Object> getContext() {
        return threadLocal.get();
    }

    // 删除的时候调用
    @Override
    public Object remove(String name) {
        Map<String, Object> context = getContext();
        return context.remove(name);
    }

    // 注册一个销毁系统的回调
    @Override
    public void registerDestructionCallback(String name, Runnable callback) {
        // TODO
    }

    @Override
    public Object resolveContextualObject(String key) {
        Map<String, Object> context = getContext();
        return context.get(key);
    }

    // 返回一个会话的id
    @Override
    public String getConversationId() {
        Thread thread = Thread.currentThread();
        return String.valueOf(thread.getId());
    }
}
package org.learn.spring.bean.scope;

import org.learn.spring.ioc.overview.domain.User;
import org.springframework.aop.ThrowsAdvice;
import org.springframework.context.annotation.AnnotationConfigApplicationContext;
import org.springframework.context.annotation.Bean;
import org.springframework.context.annotation.Scope;

// 自定义 Scope 示例
public class ThreadLocalScopeDemo {

    @Bean
    @Scope(ThreadLocalScope.SCOPE_NAME)
    public User user() {
        return createUser();
    }

    private static User createUser() {
        User user = new User();
        user.setId(System.nanoTime());
        return user;
    }

    public static void main(String[] args) {
        // 创建BeanFactory的容器
        AnnotationConfigApplicationContext applicationContext = new AnnotationConfigApplicationContext();
        // 注册Configuration Class 配置类 -> Spring Bean
        applicationContext.register(ThreadLocalScopeDemo.class);

        applicationContext.addBeanFactoryPostProcessor(beanFactory -> {
            // 注册自定义Scope
            beanFactory.registerScope(ThreadLocalScope.SCOPE_NAME, new ThreadLocalScope());
        });

        // 启动应用上下文
        applicationContext.refresh();

        scopedBeansByLookup(applicationContext);

        applicationContext.close();
    }

    private static void scopedBeansByLookup(AnnotationConfigApplicationContext applicationContext) {

        for (int i = 0; i < 3; i++) {
            Thread thread = new Thread(() -> {
                User user = applicationContext.getBean("user", User.class);
                System.out.printf("[Thread id : %d] user = %s %n", Thread.currentThread().getId(), user);
            });

            // 启动线程
            thread.start();
            // 强制线程执行完成
            try {
                thread.join();
            } catch (InterruptedException e) {
                throw new RuntimeException(e);
            }
        }
    }
}
运行的结果如下:
9.面试题
9.1 Spring 內建的 Bean 作用域有几种?
singleton、 prototype、 request、 session、 application 以及websocket
9.2 singleton Bean 是否在一个应用是唯一的?
否, singleton bean 仅在当前 Spring IoC 容器( BeanFactory) 中是单例对象。
9.3 application” Bean 是否被其他方案替代?
可以的, 实际上, “ application” Bean 与“ singleton” Bean 没有本质区别


