Spring Boot多模块项目搭建介绍
Spring Boot多模块项目搭建介绍
本文主要介绍如何使用IDEA搭建多模块的Spring Boot项目,项目使用Spring Boot + MyBatis的技术架构。
一、搭建父模块
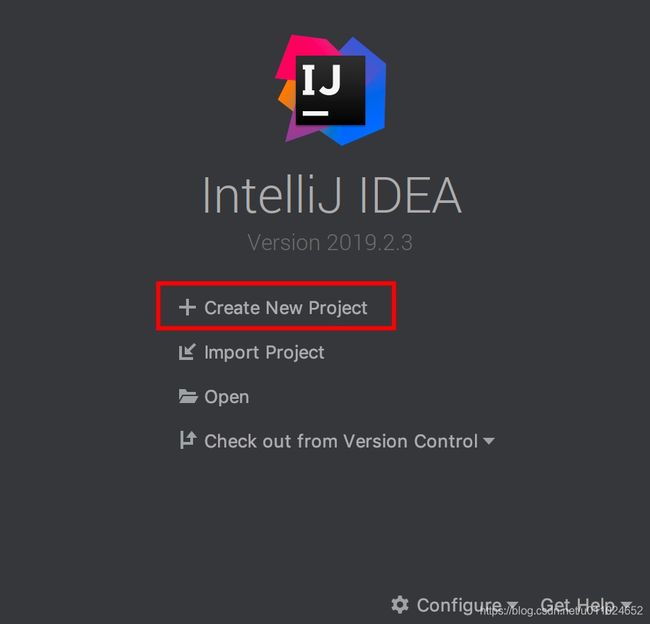
- 使用IDEA新建一个Project:
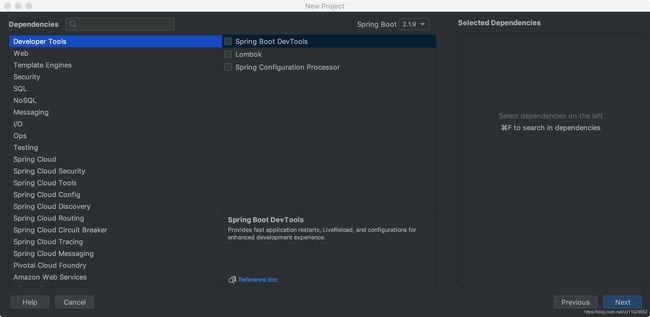
- 选择Spring Initializr,点击【Next】:
- 填写项目的GroupId、ArtifactId等项目信息,因为是示例代码,所以这些项目信息都填写为默认的信息,填写完这些信息之后点击【Next】:
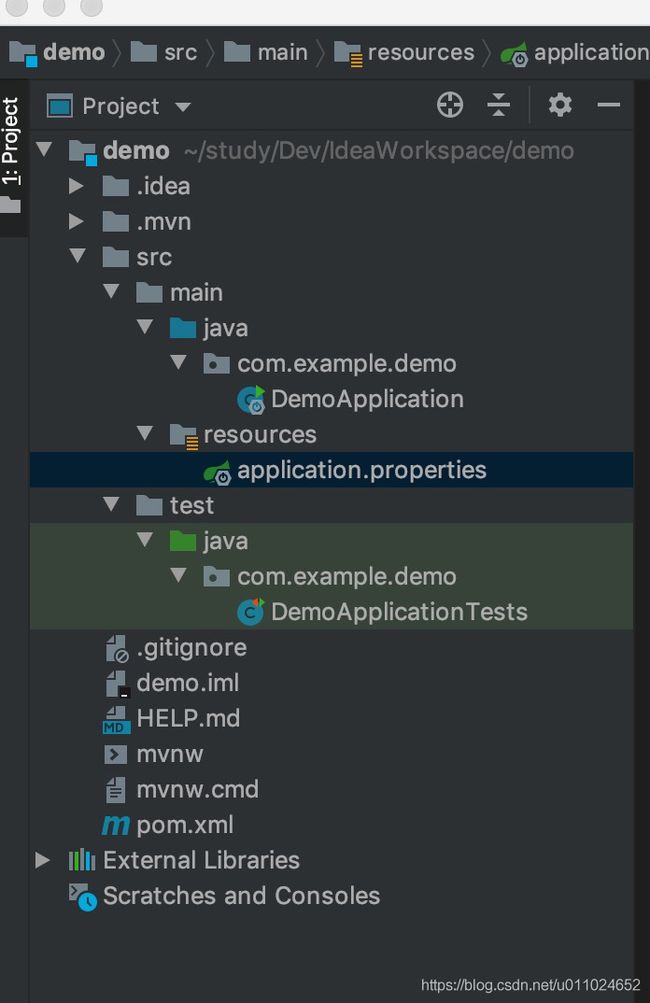
- 自动生成的项目结构如下所示:
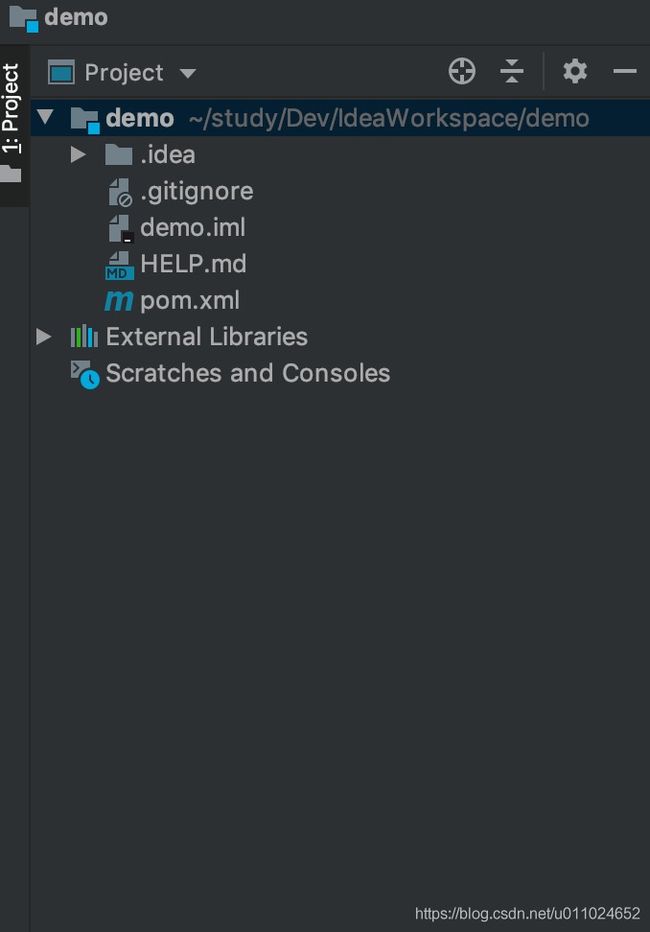
- 作为父模块,应该删除不需要的文件夹、文件,在这里,我删除了.mvn文件夹、src文件夹、mvnw、mvnw.cmd,最后保留的项目结构如下:
到这里,父模块的搭建就完成了,下面介绍web子模块的搭建过程。
二、搭建web子模块
web模块作为系统的前端,是整个系统的前台入口,搭建web模块的步骤如下:
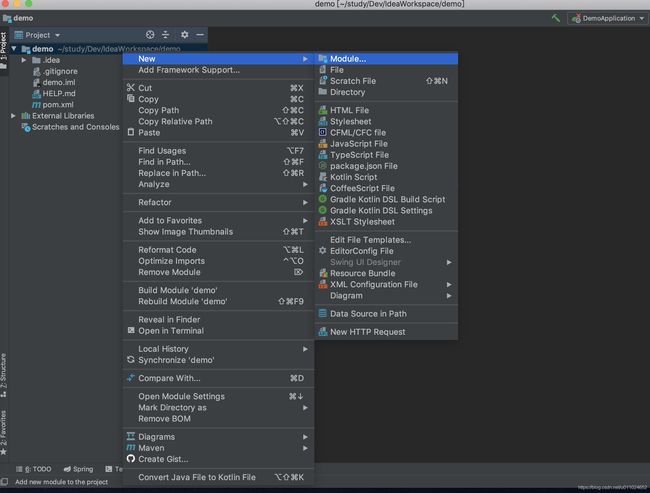
- 选中父模块demo,右键,选择New->Moudle…:
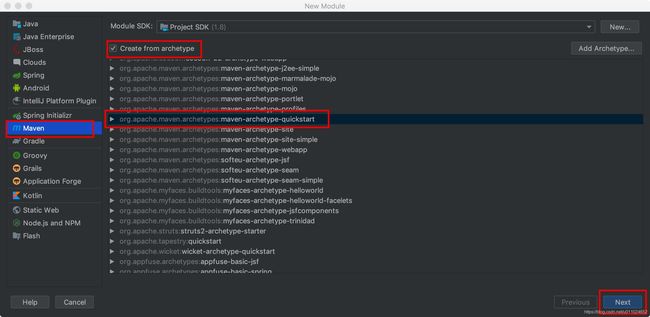
- Moudle类型选择Maven,选中Create from archetype,再选择maven-archetype-quickstart,点击【Next】:
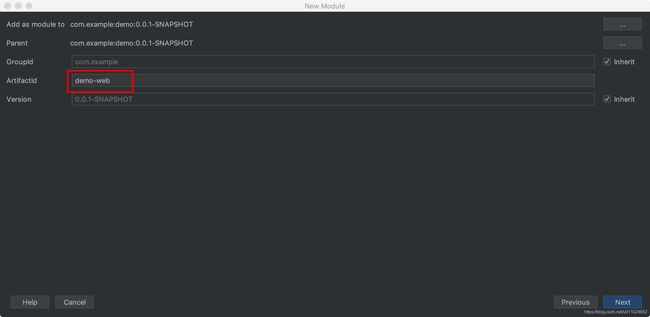
- 填写子模块的ArtifactId为demo-web,点击【Next】:
- 下一项直接点击【Next】,到最后修改Moudle name为demo-web,点击【Finish】:
到这里,一个简单的web子模块就建好了,暂时先不调整子模块的Maven依赖,后续会详细介绍。
三、搭建biz子模块和common子模块
biz模块作为系统的业务模块,主要包含系统的业务处理、数据库操作等,属于系统的后台,web模块的功能需要依赖biz模块。
common子模块属于公共模块,它主要包含了一些系统前台、后台都需要使用的信息,例如:常量、异常的定义等,web模块和biz模块都需要依赖于common模块。
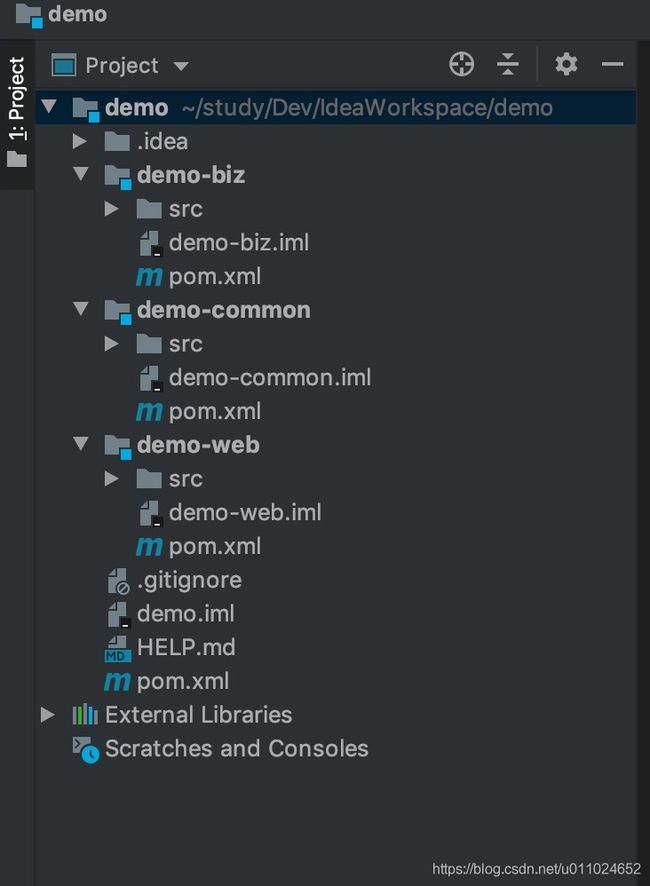
biz子模块和common子模块的搭建过程和web子模块类似,这里就不详细介绍了,具体步骤可以参照上面web子模块的搭建步骤,最后所有模块都搭建完成后整个的结构如下:
四、修改模块的依赖
- 先修改父模块的pom.xml,父模块负责管理子模块的依赖,因此需要添加dependencyManagement元素,通过该元素能够确保子模块依赖的jar包版本统一。本项目使用到了Spring Boot、MyBatis,测试用到了JUnit,可以先在父模块中添加这些jar包的依赖:
    <properties>
        <java.version>1.8java.version>
      	<spring.boot.version>2.1.9.RELEASEspring.boot.version>
        <junit.version>4.11junit.version>
		<mybatis.spring.boot.version>2.1.0mybatis.spring.boot.version>
    properties>

    <dependencyManagement>
        <dependencies>
            <dependency>
                <groupId>org.springframework.bootgroupId>
                <artifactId>spring-boot-starter-webartifactId>
                <version>${spring.boot.version}version>
            dependency>
            <dependency>
                <groupId>org.mybatis.spring.bootgroupId>
                <artifactId>mybatis-spring-boot-starterartifactId>
                <version>${mybatis.spring.boot.version}version>
            dependency>
            <dependency>
                <groupId>junitgroupId>
                <artifactId>junitartifactId>
                <version>${junit.version}version>
            dependency>
        dependencies>
    dependencyManagement>
- 接着可以添加web子模块的依赖了,web子模块是系统的入口,系统启动之后访问的就是 web子模块,所以Spring Boot的启动程序应该定义在web子模块中,另外因为web子模块依赖于biz子模块和common子模块,因此也需要引入相应模块作为依赖,这样web子模块最后生成的pom.xml如下:
<project xmlns="http://maven.apache.org/POM/4.0.0" xmlns:xsi="http://www.w3.org/2001/XMLSchema-instance"
  xsi:schemaLocation="http://maven.apache.org/POM/4.0.0 http://maven.apache.org/xsd/maven-4.0.0.xsd">
  <modelVersion>4.0.0modelVersion>

  <parent>
    <groupId>com.examplegroupId>
    <artifactId>demoartifactId>
    <version>0.0.1-SNAPSHOTversion>
  parent>

  <groupId>com.examplegroupId>
  <artifactId>demo-webartifactId>
  <version>0.0.1-SNAPSHOTversion>

  <name>demo-webname>

  <dependencies>
    <dependency>
      <groupId>com.examplegroupId>
      <artifactId>demo-bizartifactId>
      <version>${project.version}version>
    dependency>
    <dependency>
      <groupId>com.examplegroupId>
      <artifactId>demo-commonartifactId>
      <version>${project.version}version>
    dependency>
    <dependency>
      <groupId>org.springframework.bootgroupId>
      <artifactId>spring-boot-starter-webartifactId>
    dependency>
    <dependency>
      <groupId>junitgroupId>
      <artifactId>junitartifactId>
      <scope>testscope>
    dependency>
  dependencies>

  <build>
    <pluginManagement>
      <plugins>
      plugins>
    pluginManagement>
  build>
project>
这里需要注意的一点的是,web模块中必须添加parent元素表明demo模块作为父模块:
<parent>
    <groupId>com.examplegroupId>
    <artifactId>demoartifactId>
    <version>0.0.1-SNAPSHOTversion>
parent>
因为IDEA新建子模块的时候会自动在demo模块的pom.xml中添加moudle表示模块的聚合:
<modules>
    <module>demo-webmodule>
    <module>demo-bizmodule>
    <module>demo-commonmodule>
modules>
但是IDEA并不会在子模块中自动添加parent标签指定父模块,如果不指定父模块,那么在父模块中使用dependencyManagement统一管理jar包的版本号在子模块中将不会生效,在子模块使用类似于以下的引用将会提示没有指定版本号的错误:
<dependency>
	<groupId>org.springframework.bootgroupId>
	<artifactId>spring-boot-starter-webartifactId>
dependency>
- web子模块的依赖定义好之后,可以写一个测试代码来测试一下,我们首先定义一个Spring Boot的启动程序:
package com.example;

import org.springframework.boot.SpringApplication;
import org.springframework.boot.autoconfigure.SpringBootApplication;

@SpringBootApplication
public class DemoApplication {

    public static void main(String[] args) {
        SpringApplication.run(DemoApplication.class, args);
    }

}
接着我们定义一个Controller:
package com.example.controller;

import org.springframework.web.bind.annotation.RequestMapping;
import org.springframework.web.bind.annotation.RestController;

@RestController
public class TestController {

    @RequestMapping("/testWeb")
    public String testWebMoudle() {
        return "Hello World";
    }

}
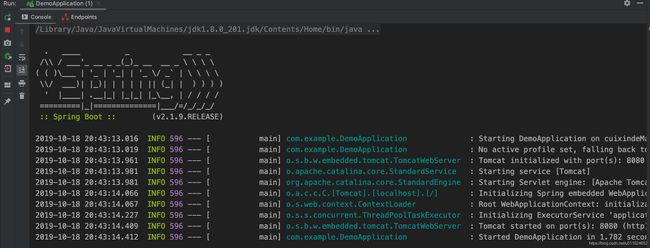
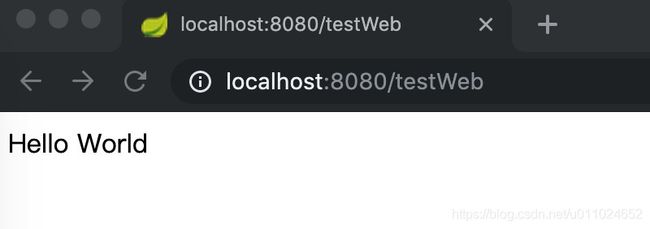
这个Controller很简单,就是直接返回一个字符串Hello World,现在就我们可以启动这个应用程序了,直接执行DemoApplication中的main函数,我们可以看到在控制台打印了一系列的启动信息:
如果启动没有报错,我们访问相应的地址,能够在浏览器看到我们返回的Hello World字符串:
到这里web子模块的搭建就已经全部成功了。
- 接着我们添加biz子模块的依赖,biz子模块是系统的后台业务逻辑层和模型层,因此需要依赖MyBatis来操作数据库,我们还用到了MyBatis Generator自动生成MyBatis相关文件,因此我们需要MyBatis Generator的依赖。另外系统使用MySQL数据库,因此也需要依赖于MySQL的JDBC驱动。这样一来,原本在父模块中管理的jar包已经不够我们使用了,需要增加新的依赖:
            <dependency>
                <groupId>mysqlgroupId>
                <artifactId>mysql-connector-javaartifactId>
                <version>${mysql-connector.version}version>
            dependency>
            <dependency>
                <groupId>org.mybatis.generatorgroupId>
                <artifactId>mybatis-generator-maven-pluginartifactId>
                <version>${mybatis-generator.version}version>
            dependency>
我们增加了MyBatis Generator和MySQL驱动的相关依赖,这些依赖在biz模块中也需要引入。当然了,biz模块也需要引入common这个公共模块,到最后,biz模块的生成的pom.xml文件如下:
<project xmlns="http://maven.apache.org/POM/4.0.0" xmlns:xsi="http://www.w3.org/2001/XMLSchema-instance"
  xsi:schemaLocation="http://maven.apache.org/POM/4.0.0 http://maven.apache.org/xsd/maven-4.0.0.xsd">
  <modelVersion>4.0.0modelVersion>

  <parent>
    <groupId>com.examplegroupId>
    <artifactId>demoartifactId>
    <version>0.0.1-SNAPSHOTversion>
  parent>

  <groupId>com.examplegroupId>
  <artifactId>demo-bizartifactId>
  <version>0.0.1-SNAPSHOTversion>

  <name>demo-bizname>

  <dependencies>
    <dependency>
      <groupId>com.examplegroupId>
      <artifactId>demo-commonartifactId>
      <version>${project.version}version>
    dependency>
    <dependency>
      <groupId>org.mybatis.spring.bootgroupId>
      <artifactId>mybatis-spring-boot-starterartifactId>
    dependency>
    <dependency>
      <groupId>mysqlgroupId>
      <artifactId>mysql-connector-javaartifactId>
    dependency>
    <dependency>
      <groupId>junitgroupId>
      <artifactId>junitartifactId>
      <scope>testscope>
    dependency>
  dependencies>

  <build>
    <pluginManagement>
      <plugins>
        <plugin>
          <groupId>org.mybatis.generatorgroupId>
          <artifactId>mybatis-generator-maven-pluginartifactId>
          <configuration>
            <verbose>trueverbose>
            <overwrite>trueoverwrite>
          configuration>
          <dependencies>
            <dependency>
              <groupId>mysqlgroupId>
              <artifactId>mysql-connector-javaartifactId>

              <version>${mysql-connector.version}version>
            dependency>
          dependencies>
        plugin>

        <plugin>
          <groupId>org.eclipse.m2egroupId>
          <artifactId>lifecycle-mappingartifactId>
          <version>1.0.0version>
          <configuration>
            <lifecycleMappingMetadata>
              <pluginExecutions>
                <pluginExecution>
                  <pluginExecutionFilter>
                    <groupId>org.apache.maven.pluginsgroupId>
                    <artifactId>maven-enforcer-pluginartifactId>
                    <versionRange>[1.2,)versionRange>
                    <goals>
                      <goal>enforcegoal>
                    goals>
                  pluginExecutionFilter>
                  <action>
                    <ignore />
                  action>
                pluginExecution>
              pluginExecutions>
            lifecycleMappingMetadata>
          configuration>
        plugin>
      plugins>
    pluginManagement>
  build>
project>
- biz子模块所有的依赖都定义好之后,我们可以测试一下,假设我们数据库中有一张user表,里面保存了一些用户信息:
我们想从数据库中获取user_id为001的用户信息并打印在浏览器上,我们首先需要使用MyBatis Generator插件自动生成相关代码:
在UserMapper.java中新增一个根据user_id查询用户信息的方法:
User selectByPriKey(@Param("userId") String userId);
同时需要在UserMapper.xml中增加相应的SQL:
<select id="selectByPriKey" resultMap="BaseResultMap" parameterType="java.lang.String">
    select * from user where user_id=#{userId}
select>
到这里数据库操作层的工作就已经完成了,接下来需要定义Service,我们定义一个UserService,并在其中添加一个查询方法:
package com.example.service;

import com.example.model.User;

public interface UserService {

    public User queryUserByUserId(String userId);

}
然后实现这个Service:
package com.example.service.impl;

import com.example.dao.UserMapper;
import com.example.model.User;
import com.example.service.UserService;
import org.springframework.beans.factory.annotation.Autowired;
import org.springframework.stereotype.Service;

@Service
public class UserServiceImpl implements UserService {

    @Autowired
    UserMapper userMapper;

    @Override
    public User queryUserByUserId(String userId) {
        return userMapper.selectByPriKey(userId);
    }
}
Service层全部实现完成之后,就可以在Controller中调用这个Service了,我们只需要在Controller中新写一个方法即可:
@RequestMapping("/testModel")
public String testModel() {
    return userService.queryUserByUserId("001").toString();
}
所有的测试代码都已经完成了,但是现在测试代码并不能正确执行,因为我们没有向Spring Boot中添加JDBC、MyBatis等相关配置信息,这些信息都是需要配置在application.properties中:
spring.datasource.driverClassName = com.mysql.jdbc.Driver
spring.datasource.url = jdbc:mysql://localhost:3306/myblogdb?useUnicode=true&characterEncoding=utf-8
spring.datasource.username = root
spring.datasource.password = root

mybatis.mapper-locations = classpath:mapper/*.xml
application.properties里面配置了一些系统属性、环境变量等信息,Spring Boot启动时会加载这个配置文件,配置完成后,我们启动应用尝试一下,启动之后发现报错:
***************************
APPLICATION FAILED TO START
***************************

Description:

Field userMapper in com.example.service.impl.UserServiceImpl required a bean of type 'com.example.dao.UserMapper' that could not be found.

The injection point has the following annotations:
	- @org.springframework.beans.factory.annotation.Autowired(required=true)


Action:

Consider defining a bean of type 'com.example.dao.UserMapper' in your configuration.


Process finished with exit code 1
这是因为没有找到UserMapper这个类,我们需要在DemoApplication中使用@MapperScan注解增加数据库操作层的包扫描:
package com.example;

import org.mybatis.spring.annotation.MapperScan;
import org.springframework.boot.SpringApplication;
import org.springframework.boot.autoconfigure.SpringBootApplication;

@SpringBootApplication
@MapperScan("com.example.dao")
public class DemoApplication {

    public static void main(String[] args) {
        SpringApplication.run(DemoApplication.class, args);
    }

}
所有这些都准备完成之后,启动应用,访问相应的地址,即可获取到用户信息并打印到浏览器中:
- 接下来是common子模块,这个模块主要保存一些前后端都需要使用的公共信息,例如常量、异常等,这个模块不涉及业务代码,所以不用引入其他的依赖包,因此它的pom.xml文件如下:
<project xmlns="http://maven.apache.org/POM/4.0.0" xmlns:xsi="http://www.w3.org/2001/XMLSchema-instance"
  xsi:schemaLocation="http://maven.apache.org/POM/4.0.0 http://maven.apache.org/xsd/maven-4.0.0.xsd">
  <modelVersion>4.0.0modelVersion>

  <parent>
    <groupId>com.examplegroupId>
    <artifactId>demoartifactId>
    <version>0.0.1-SNAPSHOTversion>
  parent>

  <groupId>com.examplegroupId>
  <artifactId>demo-commonartifactId>
  <version>0.0.1-SNAPSHOTversion>

  <name>demo-commonname>

  <dependencies>
    <dependency>
      <groupId>junitgroupId>
      <artifactId>junitartifactId>
      <scope>testscope>
    dependency>
  dependencies>

project>
- 我们也可以写一段代码来测试一下公共模块,我们在公共模块中添加一个常量类:
package com.example;

public interface Const {

    String TEST_HELLO = "Hello Hello";

}
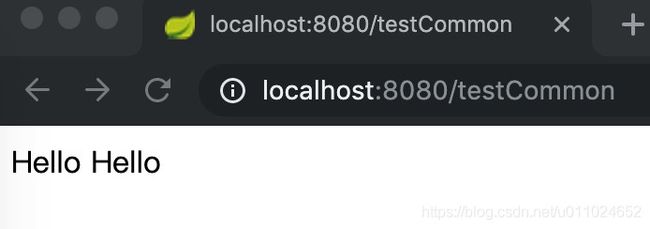
然后我们从Controller中获取这个常量并显示在浏览器中,只需要在Controller中新增一个方法即可:
@RequestMapping("/testCommon")
public String testCommon() {
    return Const.TEST_HELLO;
}
访问相应的链接,即可获取到常量的值:
- 到这里子模块所有的依赖都已经添加完成了,最后我们整理一下父模块的依赖,最终生成的pom.xml文件如下:
<project xmlns="http://maven.apache.org/POM/4.0.0" xmlns:xsi="http://www.w3.org/2001/XMLSchema-instance"
         xsi:schemaLocation="http://maven.apache.org/POM/4.0.0 https://maven.apache.org/xsd/maven-4.0.0.xsd">
    <modelVersion>4.0.0modelVersion>
    <packaging>pompackaging>
    <modules>
        <module>demo-webmodule>
        <module>demo-bizmodule>
        <module>demo-commonmodule>
    modules>

    <groupId>com.examplegroupId>
    <artifactId>demoartifactId>
    <version>0.0.1-SNAPSHOTversion>
    <name>demoname>
    <description>Demo project for Spring Bootdescription>

    <properties>
        <java.version>1.8java.version>
        <project.version>0.0.1-SNAPSHOTproject.version>
        <spring.boot.version>2.1.9.RELEASEspring.boot.version>
        <junit.version>4.11junit.version>
        <mybatis.spring.boot.version>2.1.0mybatis.spring.boot.version>
        <mysql-connector.version>5.1.48mysql-connector.version>
        <mybatis-generator.version>1.3.2mybatis-generator.version>
    properties>

    <dependencyManagement>
        <dependencies>
            <dependency>
                <groupId>org.springframework.bootgroupId>
                <artifactId>spring-boot-starter-webartifactId>
                <version>${spring.boot.version}version>
            dependency>
            <dependency>
                <groupId>org.mybatis.spring.bootgroupId>
                <artifactId>mybatis-spring-boot-starterartifactId>
                <version>${mybatis.spring.boot.version}version>
            dependency>
            <dependency>
                <groupId>mysqlgroupId>
                <artifactId>mysql-connector-javaartifactId>
                <version>${mysql-connector.version}version>
            dependency>
            <dependency>
                <groupId>org.mybatis.generatorgroupId>
                <artifactId>mybatis-generator-maven-pluginartifactId>
                <version>${mybatis-generator.version}version>
            dependency>
            <dependency>
                <groupId>junitgroupId>
                <artifactId>junitartifactId>
                <version>${junit.version}version>
            dependency>
        dependencies>
    dependencyManagement>

    <build>
        <plugins>
            <plugin>
                <groupId>org.springframework.bootgroupId>
                <artifactId>spring-boot-maven-pluginartifactId>
            plugin>
        plugins>
    build>

project>
五、总结
本文主要介绍了搭建Spring Boot多模块应用的通用流程,根据文中介绍的步骤可以很快地搭建一套能够运行的多模块应用,当然本文中涉及的组件只是最基础的,开发者完全可以根据自己的实际情况增删组件。
