分布式缓存-Redis 哨兵
一、哨兵的作用和工作原理
1.1 哨兵的结构和作用
Redis 提供了哨兵(Sentinel)机制来实现主从集群的自动故障恢复。哨兵的结构和作用如下:

- 监控: Sentinel 会不断检查您的 master 和 slave 是否按预期工作
- 自动故障恢复: 如果 master 故障,Sentinel 会将一个 slave 提升为 master。当故障实例恢复后也以新的 master 为主。
- 通知: Sentinel 充当 Redis 客户端的服务发现来源,当集群发生故障转移时,会将最新信息推送给 Redis 的客户端。简单来说,就是当 Redis 集群中的主从地址发生变化,Sentinel 会将服务状态的变更通知 Redis 客户端,这样 Redis 客户端就可以知道新的主从节点了,从而改变节点的访问地址。
1.2 哨兵的监控原理
Sentinel 基于心跳机制检测服务状态,每隔 1 秒向集群的每个实例发送 ping 命令:
- 主观下线:如果某 Sentinel 节点发现某实例未在规定时间响应,则认为该实例主观下线。
- 客观下线:若超过指定数量(quorum)的 Sentinel 都认为该实例主观下线,则该实例客观下线。quorum 值最好超过 Sentinel 实例数量的一半。

1.3 集群故障恢复原理
一旦发现 master 故障,Sentinel 需要在 slave 中选择一个作为新的 master,选择依据是这样的:
- 首先会判断 slave 节点与 master 节点断开时间长短,如果超过指定值(down-after-millisenconds*10)则会排除该 slave 节点
- 然后判断 slave 节点的 slave-prority 值,越小优先级越高,如果是 0 则永不参与选举
- 如果 slave-prority 一样,则判断 slave 节点的 offset 值,越大说明数据越新,优先级越高
- 最后判断 slave 节点的运行 id 大小,越小优先级越高
当选中了其中一个 slave 作为新的 master 后(例如 slave1),故障转移的步骤如下:
- Sentinel 给备选的 slave1 节点发送
slaveof no one命令,让该节点称为 master - Sentinel 给所有其他 slave 发送
slave of slave1的IP地址 slave1的端口号命令,让这些 slave 成为新 master 的从节点,开始从新的 master 上同步数据。 - 最后,Sentinel 将故障节点标记为 slave,当故障节点恢复后会自动成为新的 master 的 slave 节点。
1.4 总结
Sentinel 的三个作用是什么?
- 监控
- 故障转移
- 通知
Sentinel 如何判断一个 Redis 实例是否健康?
- 每个 1 秒发送一次 PING 命令,如果超过一定时间没有响应则认为是主观下线
- 如果大多数 Sentinel 都认为实例主观下线,则判定服务下线
故障转移步骤有哪些?
- 首先选定一个 slave 作为新的 master,执行
slaveof no one命令 - 然后让所有节点都执行
slaveof 新master - 修改故障节点配置,添加
slaveof 新master
二、搭建哨兵集群
2.1 集群结构
这里我们搭建一个三节点形成的Sentinel集群,来监管之前的Redis主从集群。如图:

三个sentinel实例信息如下:
| 节点 | IP | PORT |
|---|---|---|
| s1 | Redis服务的IP地址 | 27001 |
| s2 | Redis服务的IP地址 | 27002 |
| s3 | Redis服务的IP地址 | 27003 |
2.2 准备实例和配置
要在同一台虚拟机开启3个实例,必须准备三份不同的配置文件和目录,配置文件所在目录也就是工作目录。
我们创建三个文件夹,名字分别叫s1、s2、s3:
# 进入/usr/local/src/myredis目录
cd /usr/local/src/myredis
# 创建目录
mkdir s1 s2 s3
如图:
 然后我们在s1目录创建一个sentinel.conf文件,添加下面的内容:
port 27001
sentinel announce-ip 主节点IP地址
sentinel monitor mymaster 主节点IP地址 7001 2
sentinel down-after-milliseconds mymaster 5000
sentinel failover-timeout mymaster 60000
dir "/usr/local/src/myredis/s1"
解读:
port 27001:是当前sentinel实例的端口sentinel monitor mymaster 主节点IP地址 7001 2:指定主节点信息mymaster:主节点名称,自定义,任意写主节点IP 7001:主节点的ip和端口2:选举master时的quorum值
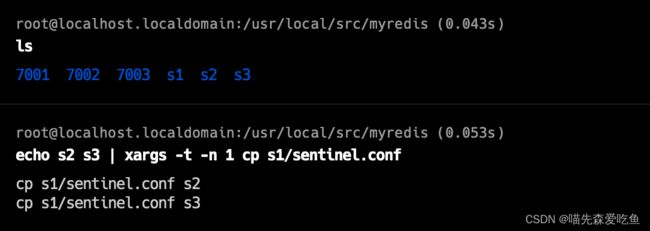
然后将s1/sentinel.conf文件拷贝到s2、s3两个目录中(在/usr/local/src/myredis目录执行下列命令):
# 方式一:逐个拷贝
cp s1/sentinel.conf s2
cp s1/sentinel.conf s3
# 方式二:管道组合命令,一键拷贝
echo s2 s3 | xargs -t -n 1 cp s1/sentinel.conf
修改s2、s3两个文件夹内的配置文件,将端口分别修改为27002、27003:
sed -i -e 's/27001/27002/g' -e 's/s1/s2/g' s2/sentinel.conf
sed -i -e 's/27001/27003/g' -e 's/s1/s3/g' s3/sentinel.conf
2.3 启动
为了方便查看日志,我们打开3个ssh窗口,分别启动3个redis实例,启动命令:
# 第1个
redis-sentinel s1/sentinel.conf
# 第2个
redis-sentinel s2/sentinel.conf
# 第3个
redis-sentinel s3/sentinel.conf
启动后:
2.4 测试
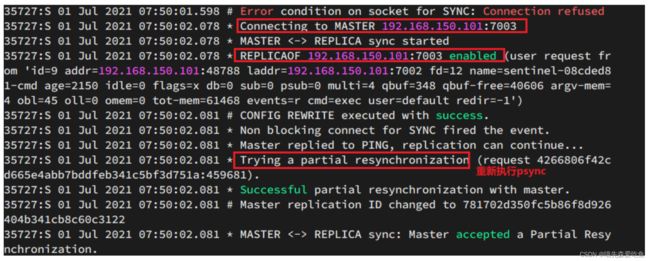
尝试让master节点7001宕机,查看sentinel日志:

查看 7003 日志:

三、RedisTemplate 连接哨兵
在 Sentinel 集群监管下的 Redis 主从集群,其节点会因为自动故障转移而发生变化,Redis 的客户端必须感知这种变化,及时更新连接信息。Spring 的 RedisTemplate 底层利用 Lettuce 实现了节点的感知和自动切换。
首先,引入Demo工程:
pom.xml
<project xmlns="http://maven.apache.org/POM/4.0.0" xmlns:xsi="http://www.w3.org/2001/XMLSchema-instance"
         xsi:schemaLocation="http://maven.apache.org/POM/4.0.0 https://maven.apache.org/xsd/maven-4.0.0.xsd">
    <modelVersion>4.0.0modelVersion>
    <parent>
        <groupId>org.springframework.bootgroupId>
        <artifactId>spring-boot-starter-parentartifactId>
        <version>2.3.9.RELEASEversion>
        <relativePath/>
    parent>
    <groupId>cn.itcastgroupId>
    <artifactId>redis-demoartifactId>
    <version>0.0.1-SNAPSHOTversion>
    <name>redis-demoname>
    <description>Demo project for Spring Bootdescription>
    <properties>
        <java.version>1.8java.version>
    properties>
    <dependencies>
        <dependency>
            <groupId>org.springframework.bootgroupId>
            <artifactId>spring-boot-starter-webartifactId>
        dependency>
        <dependency>
            <groupId>org.springframework.bootgroupId>
            <artifactId>spring-boot-starter-data-redisartifactId>
        dependency>

        <dependency>
            <groupId>org.projectlombokgroupId>
            <artifactId>lombokartifactId>
            <optional>trueoptional>
        dependency>
        <dependency>
            <groupId>org.springframework.bootgroupId>
            <artifactId>spring-boot-starter-testartifactId>
            <scope>testscope>
            <exclusions>
                <exclusion>
                    <groupId>org.junit.vintagegroupId>
                    <artifactId>junit-vintage-engineartifactId>
                exclusion>
            exclusions>
        dependency>
    dependencies>

    <build>
        <plugins>
            <plugin>
                <groupId>org.springframework.bootgroupId>
                <artifactId>spring-boot-maven-pluginartifactId>
                <configuration>
                    <excludes>
                        <exclude>
                            <groupId>org.projectlombokgroupId>
                            <artifactId>lombokartifactId>
                        exclude>
                    excludes>
                configuration>
            plugin>
        plugins>
    build>

project>
application.yml
logging:
  level:
    io.lettuce.core: debug
  pattern:
    dateformat: MM-dd HH:mm:ss:SSS
spring:
  redis:
    sentinel:
      master: mymaster
      nodes:
        - 192.168.150.101:27001
        - 192.168.150.101:27002
        - 192.168.150.101:27003
创建 HelloController
package cn.itcast.redisdemo.web;

import org.springframework.beans.factory.annotation.Autowired;
import org.springframework.data.redis.core.StringRedisTemplate;
import org.springframework.web.bind.annotation.GetMapping;
import org.springframework.web.bind.annotation.PathVariable;
import org.springframework.web.bind.annotation.RestController;

@RestController
public class HelloController {

    @Autowired
    private StringRedisTemplate redisTemplate;

    @GetMapping("/get/{key}")
    public String hi(@PathVariable String key) {
        return redisTemplate.opsForValue().get(key);
    }

    @GetMapping("/set/{key}/{value}")
    public String hi(@PathVariable String key, @PathVariable String value) {
        redisTemplate.opsForValue().set(key, value);
        return "success";
    }
}
启动类:
package cn.itcast.redisdemo;

import io.lettuce.core.ReadFrom;
import org.springframework.boot.SpringApplication;
import org.springframework.boot.autoconfigure.SpringBootApplication;
import org.springframework.boot.autoconfigure.data.redis.LettuceClientConfigurationBuilderCustomizer;
import org.springframework.context.annotation.Bean;
import org.springframework.data.redis.connection.lettuce.LettuceClientConfiguration;

@SpringBootApplication
public class RedisDemoApplication {

    public static void main(String[] args) {
        SpringApplication.run(RedisDemoApplication.class, args);
    }

    @Bean
    public LettuceClientConfigurationBuilderCustomizer clientConfigurationBuilderCustomizer(){
        return clientConfigurationBuilder -> clientConfigurationBuilder.readFrom(ReadFrom.REPLICA_PREFERRED);
    }
}
步骤:
1、在 pom 文件中引入 Redis 的 starter 依赖
在项目的pom文件中引入依赖:
<dependency>
    <groupId>org.springframework.bootgroupId>
    <artifactId>spring-boot-starter-data-redisartifactId>
dependency>
2、配置Redis地址
然后在配置文件application.yml中指定redis的sentinel相关信息:
spring:
  redis:
    sentinel:
      master: mymaster
      nodes:
        - 192.168.150.101:27001
        - 192.168.150.101:27002
        - 192.168.150.101:27003
3、配置读写分离
在项目的启动类中,添加一个新的bean:
@Bean
public LettuceClientConfigurationBuilderCustomizer clientConfigurationBuilderCustomizer(){
    return clientConfigurationBuilder -> clientConfigurationBuilder.readFrom(ReadFrom.REPLICA_PREFERRED);
}
这个bean中配置的就是读写策略,包括四种:
- MASTER:从主节点读取
- MASTER_PREFERRED:优先从master节点读取,master不可用才读取replica
- REPLICA:从slave(replica)节点读取
- REPLICA _PREFERRED:优先从slave(replica)节点读取,所有的slave都不可用才读取master


