SpringBoot学习笔记(三)——集成Swagger后端API文档
不知道现在还有没有小伙伴不知道什么是API文档的了,我当时初学的时候可以不太理解的,所以这里给不懂的小伙伴们简单讲一下。
现在主流的开发方式为VUE+SpringBoot,由SpringBoot提供接口,在VUE连接对应接口进行访问,将接口返回的数据进行展示,VUE与SpringBoot是两个项目,也就是前后端分离结构,前端开发使用VUE,后端开发使用SpringBoot。
此时,就需要前后端开发人员进行沟通,前端需要知道后端将会返回什么结构的数据,以便接收并展示。后端人员就需要编写一个API文档(也叫做接口文档)。当参数有改变的时候还需要实时更新文档,还要提醒前端人员我更新文档了,这就超级费劲(工作中的沟通代价实在太大了...)
所以就出现了Swagger在线文档。他替我们解决了这种难题。
1.添加依赖
			io.springfox
			springfox-swagger2
			2.9.2


			io.springfox
			springfox-swagger-ui
			2.9.2


---------------------------------------------------------------------


			io.springfox
			springfox-swagger2
			2.9.2


					io.swagger
					swagger-models


			io.swagger
			swagger-models
			1.5.21


			io.springfox
			springfox-swagger-ui
			2.9.2
2-1.创建java配置文件
package com.springBoot.helloworld.config;

import org.springframework.boot.autoconfigure.condition.ConditionalOnProperty;
import org.springframework.context.annotation.Bean;
import org.springframework.context.annotation.Configuration;
import org.springframework.web.servlet.config.annotation.ResourceHandlerRegistry;
import org.springframework.web.servlet.config.annotation.WebMvcConfigurationSupport;
import springfox.documentation.builders.ApiInfoBuilder;
import springfox.documentation.builders.PathSelectors;
import springfox.documentation.builders.RequestHandlerSelectors;
import springfox.documentation.service.Contact;
import springfox.documentation.spi.DocumentationType;
import springfox.documentation.spring.web.plugins.Docket;
import springfox.documentation.swagger2.annotations.EnableSwagger2;

/**
 * @author Me
 * @date 2022/3/27 18:19
 */
@EnableSwagger2
@Configuration
// 此注解的含义是可以在多环境的配置文件中指定swagger是否开启
// prefix表示关联到此key
// value表示取swagger2.enable的值
// havingValue表示当swagger2.enable的值为true时,才加载下面的配置
@ConditionalOnProperty(prefix = "swagger2", value = {"enable"}, havingValue = "true")
public class SwaggerConfig extends WebMvcConfigurationSupport {

    @Bean
    public Docket docket() {
        return new Docket(DocumentationType.SWAGGER_2)
                // 开启SwaggerApi文档
                .enable(true)
                // apiInfo配置页面显示信息
                .apiInfo(new ApiInfoBuilder().title("title")
                .description("description")
                .version("version")
                .termsOfServiceUrl("termsUrl")
                // 作者信息
                .contact(new Contact("啥时能挣6000块", "www.xxx.com", "[email protected]"))
                .license("license")
                .licenseUrl("licenseUrl")
                .build())
                // 页面显示那些文档
                .select()
                // 扫描指定包
                .apis(RequestHandlerSelectors.basePackage("com.springBoot.helloworld.controller"))
                // 扫描指定路径
                .paths(PathSelectors.any())
                .build();
    }


    // 由于本人使用SpringBoot项目版本为2.6以上,此时启动报错,所以需要添加如下方法
    // 如果您使用的SpringBoot版本为2.6以下,则不需要添加
    // SpringBoot具体版本在pom.xml文件中可见
    @Override
    protected void addResourceHandlers(ResourceHandlerRegistry registry) {
        registry.addResourceHandler("/**").addResourceLocations(
                "classpath:/static/");
        registry.addResourceHandler("swagger-ui.html").addResourceLocations(
                "classpath:/META-INF/resources/");
        registry.addResourceHandler("/webjars/**").addResourceLocations(
                "classpath:/META-INF/resources/webjars/");
        super.addResourceHandlers(registry);
    }
}
2-2.编写配置文件
#Swagger开关false为关闭,true为开启
swagger2:
  enable: false
3.创建controller
package com.springBoot.helloworld.controller;

import org.springframework.web.bind.annotation.GetMapping;
import org.springframework.web.bind.annotation.RestController;

import java.sql.SQLException;

/**
 * @author Me
 * @date 2022/3/19 15:14
 */
@RestController
public class springBootController {

    @GetMapping("/index")
    public String test() throws SQLException {
        return "helloworld";
    }
}
4.访问Swagger在线文档
地址为:http://localhost:自己的端口号/swagger-ui.html
在线文档样式如下
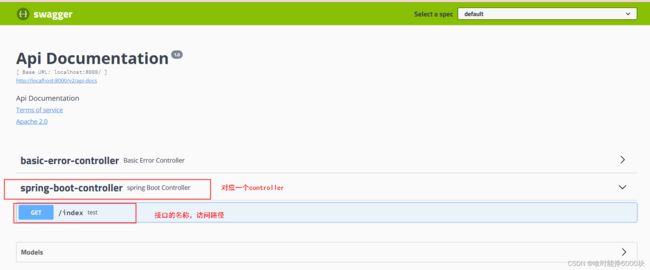


5-1.配置Controller注解
package com.springBoot.helloworld.controller;

import io.swagger.annotations.Api;
import io.swagger.annotations.ApiOperation;
import org.springframework.web.bind.annotation.GetMapping;
import org.springframework.web.bind.annotation.RestController;

import java.sql.SQLException;

/**
 * @author Me
 * @date 2022/3/19 15:14
 */
@RestController
// 配置这个注解会显示你的controller名称
@Api(value = "controller标题", tags = "controller标题")
public class springBootController {

    @GetMapping("/index")
    // 配置这个注解会显示你的接口名称
    @ApiOperation(value = "接口标题", notes = "接口标题")
    public String test() throws SQLException {
        return "helloworld";
    }
}
5-2.配置实体类注解
package com.springBoot.helloworld.pojo;

import io.swagger.annotations.ApiModel;
import io.swagger.annotations.ApiModelProperty;
import lombok.Data;

import java.io.Serializable;

/**
 * @author ME
 * @date 2022/3/20 13:33
 */
// lombok的注解,用了此注解,我们就不需要再手动写get/set/toString方法了
@Data
// 会显示实体类信息
@ApiModel(description = "实体类注解")
public class Person implements Serializable {

    // 会在文档中显示字段含义
    @ApiModelProperty(value = "名称", name = "name")
    private String name;
    @ApiModelProperty(value = "班级", name = "myClass")
    private String myClass;
    @ApiModelProperty(value = "年龄", name = "age")
    private String age;
}
SpringBoot集成Swagger今天就介绍到这里了。
下一篇请戳↓
SpringBoot学习笔记(四)——手写自定义SpringBoot启动器