Python学习笔记
Python官网:https://www.python.org/

点击docs,之后选择简体中文,选择turorial

Python可以直接进行运算

python输入一个int
>>> x = int(input("Please enter an integer: "))
Please enter an integer: 42
>>> if x < 0:
...     x = 0
...     print('Negative changed to zero')
... elif x == 0:
...     print('Zero')
... elif x == 1:
...     print('Single')
... else:
...     print('More')
...
More
python读入一行中多个数字
a,b=map(int,input().split(' '))
Python输出,用类似c++的方式
python输出,输出后面跟空格,默认的print()为换行输出,如果想输出后面跟空格,则加入end=''即可。
print(“%d %lf”%(3,4.2))
import math
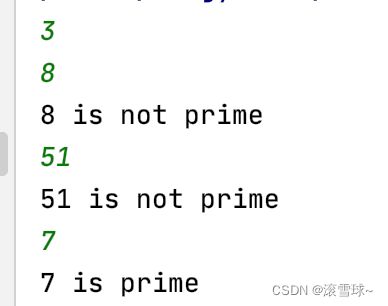
n=int(input())
for i in range(n):
    x=int(input())
    flag=1
    if x<2:
        flag=0
    for j in range(2,int(math.sqrt(x))+1):
        if x%j==0:
            flag=0
            break
    if flag==1:
        print("%d is prime"%(x))
    else:
        print("%d is not prime"%(x))
Python支持常见的主流平台,Python程序在mac上和windows上都可以用
python的导包
任何一个程序如果要用函数或者类,则在上方必须有import函数或者相应的类
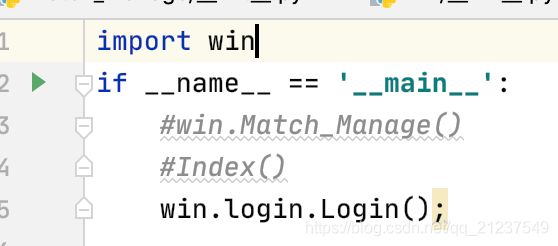
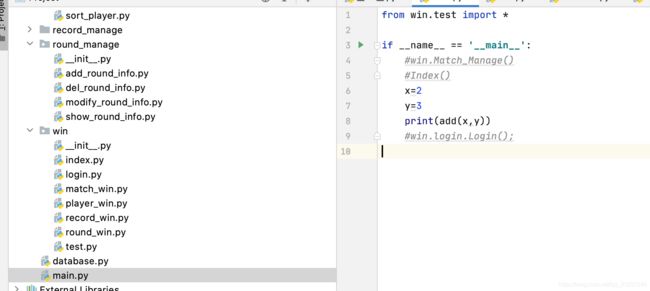
用绝对路径导包,这样的好处是直接可以用很短的名字直接调,但是当有同名时会非常不好用

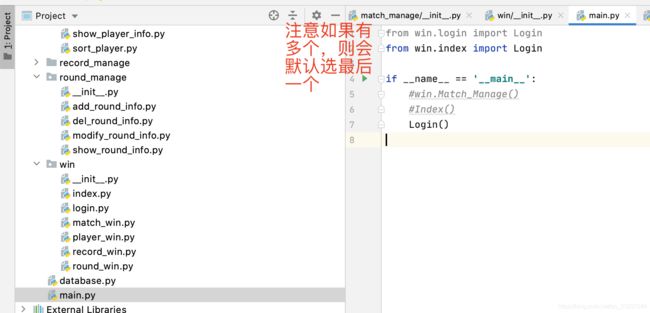
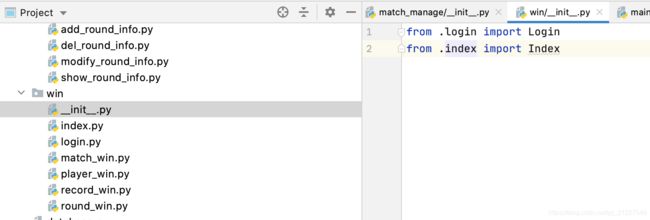
用初始化直接导包,这样可以在__init__中,预先导入,在引用时要写全路径名
python模块中__init__.py的作用
参考:https://blog.csdn.net/yucicheung/article/details/79445350
init.py的作用是让一个呈结构化分布(以文件夹形式组织)的代码文件夹变成可以被导入import的软件包。
python输出字典中的所有键值与对应值
参考:https://blog.csdn.net/a411178010/article/details/78548168
#创建一个存储一个学生的信息,通过遍历可以取出所有信息
student={'name':'xiaoming','age':11,'school':'tsinghua'}
for key,value in student.items():
    print(key+':'+str(value))
python重写文件
参考:https://www.jb51.net/article/191466.htm
覆盖原来内容(重写)
print("i'm the first.")
print(__name__)
if __name__=="__main__":
    print("i'm the second.")
    txt= 'landmark.txt'
    wrf=open(txt, 'w')
    wrf.write('test01' + '\n')
    wrf.close()

    txt= 'landmark.txt'
    wrf=open(txt, 'w')
    wrf.write('test02' + '\n')
    wrf.close()
不覆盖原来内容(继续写)
print("i'm the first.")
print(__name__)
if __name__=="__main__":
    print("i'm the second.")
    txt= 'landmark.txt'
    wrf=open(txt, 'w')
    wrf.write('test01' + '\n')
    wrf.close()

    txt= 'landmark.txt'
    wrf=open(txt, 'a')
    wrf.write('test02' + '\n')
    wrf.close()
Python获取今天的时间
import time
today = time.strftime("%Y-%m-%d")  # 设置当天日期
print(today)
Python的注释
python中的注释有多种
对于一句话的注释可以直接在前面加#
对于整段的注释可以直接用
‘’‘代码段’‘’
这样就可以整段注释出来
也可以一整段选中然后按 ctrl+/
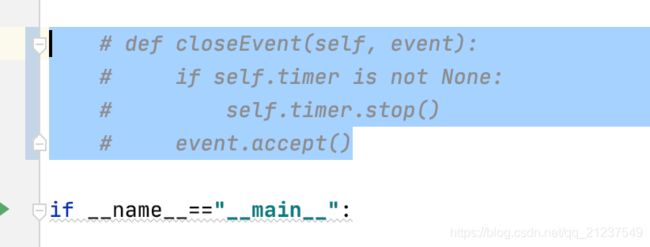
要注意不要和别的快捷键冲突,比如qq五笔,记得关键有冲突的软件即可。

Python文件输出
x=int(input("输入x"))
y=int(input("输入y"))
fp=open(r'1.txt','a+')
print(str(x+y),file=fp)
Python读入csv文件
import csv
g=[[0 for i in range(100)]for j in range(1000)]
with open('weizu.1.0002.csv', 'r') as f:
    reader = csv.reader(f)
    x=0
    print(type(reader))
    for row in reader:
        x+=1
        y=0
        for num in row:
            y+=1
            g[x][y]=num
Python输出换行与不换行
for i in range(1,x+1):
    for j in range(1,y+1):
        print(g[i][j],end=" ")#相当于不换行,末尾是空格
    print()#默认是换行的
Python的函数使用
def cal(l,r):
    return (l+r)*(r-l+1)/2
n=int(input())
r=1
for l in range(1,n//2+1):
    while(cal(l,r+1)<=n):
        r=r+1
    if(cal(l,r)==n):
        print(l,r)
Python列表list使用与倒着for循环
//题目链接:https://www.luogu.com.cn/problem/P2392
input()
ans=0
for i in range(4):
    s=list(map(int,input().split()))
    dp=[0 for j in range(610)]
    sum=0
    for j in s:
        sum+=j
    dp[0]=1
    for j in s:
        for k in range(sum//2,j-1,-1):
            if dp[k-j]:
                dp[k]=1
    for j in range(sum//2,-1,-1):
        if dp[j]:
            ans+=sum-j
            break
print(ans)
Python文件打开与文件中一行行读入
f = open('test.txt')
n=int(f.readline())
max1=0
a=[0 for i in range(11000)]
for i in range(n):
    x=int(f.readline())
    a[x]+=1
    max1=max(x,max1)
ans=0
mo=1000000007
for i in range(1,max1//2+1):
    if a[i]>0:
        for j in range(i+1,max1-i+1):
            if a[j]>0 and a[i+j]>=2:
                ans=(ans+a[i]*a[j]*a[i+j]*(a[i+j]-1)//2)%mo
        if a[i]>=2:
            ans=(ans+a[i]*(a[i]-1)//2*a[i+i]*(a[i+i]-1)//2)%mo
print(ans)
Python中的读入一行数(用字符串读入后split,再化成int) Python中不换行输出(同一行输出)
def add():
    flag=[1 for i in range(0,n+1)]
    mark=n
    flag[a[mark]]=0
    while a[mark-1]>a[mark]:
        mark-=1
        flag[a[mark]]=0
    mark-=1
    for i in range(a[mark]+1,n+1):
        if flag[i]==0:
            flag[i]=1
            flag[a[mark]]=0
            a[mark]=i
            break
    for i in range(1,n+1):
        if flag[i]==0:
            mark+=1
            a[mark]=i
n=int(input())
m=int(input())
s=input().split()
a=[0 for i in range(n+1)]
for i in range(1,n+1):
    a[i]=int(s[i-1])
'''a=[0]+[int(i) for i in input().split()]'''//这个直接行读入存入a中也行,前面加个[0]相当于补个0的位置,读进来的数从第1个开始存
for i in range(m):
    add()
for i in range(1,n+1):
    print(str(a[i])+" ",end="")
Python多维数组使用方法
注意多维的是倒过来的定义方式
比如[1000000][3]为[[0 for i in range(3)]for j in range(1000000)]
f=[[[0 for i in range(30)]for j in range(30)]for k in range(30)]
def func(a,b,c):
    if a<=0 or b<=0 or c<=0:
        return 1
    elif a>20 or b>20 or c>20:
        return func(20,20,20)
    elif f[a][b][c]>0:
        return f[a][b][c]
    elif a<b and b<c:
        f[a][b][c]=func(a,b,c-1)+func(a,b-1,c-1)-func(a,b-1,c)
        return f[a][b][c]
    else:
        f[a][b][c]=func(a-1,b,c)+func(a-1,b-1,c)+func(a-1,b,c-1)-func(a-1,b-1,c-1)
        return f[a][b][c]
while 1:
    x,y,z=map(int,input().split())
    if x==-1 and y==-1 and z==-1:
        break
    ans=func(x,y,z)
    print("w("+str(x)+', '+str(y)+', '+str(z)+") = "+str(ans))
python中断命令为这些break、continue 、exit() 、pass
n=int(input())
a=[0 for i in range(11000)]
b=[0 for i in range(11000)]
c=[0 for i in range(11000)]
d=[0 for i in range(11000)]
for i in range(n):
    x,y,xx,yy=map(int,input().split())
    a[i]=x
    b[i]=y
    c[i]=x+xx
    d[i]=y+yy
x,y=map(int,input().split())
for i in range(n-1,-1,-1):
    if x>=a[i] and x<=c[i] and y>=b[i] and y<=d[i]:
        print(i+1)
        exit()
print(-1)
python图像裁剪
将path路径中的文件全部剪成小一点的
import os
from PIL import Image
path="D:/gxq\实验室/music_dance/m2m_evaluation/picture/"
imgs=os.listdir(path)
for imgname in imgs:
    print(imgname)
    img=Image.open(path+imgname)
    cropped = img.crop((750,550,1200,1000))#左上右下
    cropped.save(path+"_cut"+imgname)
python获取当前路径
参考:https://www.cnblogs.com/Jomini/p/8636129.html
import  os
print(os.getcwd()) #获取当前工作目录路径
print(os.path.abspath('.'))#获取当前工作目录路径
print(os.path.abspath('test.txt'))#获取当前目录文件下的工作目录路径
print(os.path.abspath('..')) #获取当前工作的父目录 !注意是父目录路径
print(os.path.abspath(os.curdir)) #获取当前工作目录路径
http://www.cppcns.com/jiaoben/python/276667.html
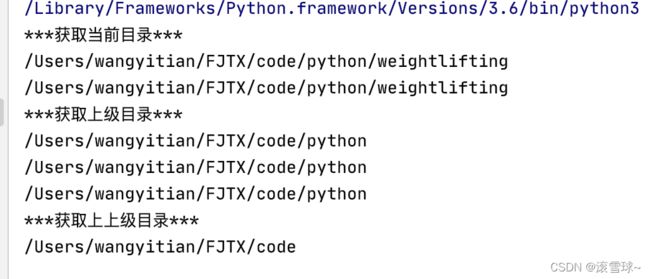
import os
print('***获取当前目录***')
print(os.getcwd())
print(os.path.abspath(os.path.dirname(__file__)))
# __file__ 为当前文件, 若果在ide中运行此行会报错,可改为 #d = path.dirname('.')
# 但是改为.后,就是获得当前目录,接着使用dirname函数访问上级目录
print('***获取上级目录***')
print(os.path.abspath(os.path.dirname(os.path.dirname(__file__))))
print(os.path.abspath(os.path.dirname(os.getcwd())))
print(os.path.abspath(os.path.join(os.getcwd(), "..")))
print('***获取上上级目录***')
print(os.path.abspath(os.path.join(os.getcwd(), "../..")))
python生成随机int
	for i in range(ncols):
		for j in range(nrows):
			if i== 0 and j == 0:
				x_point = int(#最左上角的圆心位置
					(image_width - board_pixel_width) / ncols * i + board_pixel_width)
				y_point = int(
					(image_height - board_pixel_width) / nrows * j + board_pixel_width)
			elif i == ncols - 1 and j == nrows - 1:
				x_point = int(#最右下角的圆心位置
					(image_width - board_pixel_width) / ncols * i + board_pixel_width)
				y_point = int(
					(image_height - board_pixel_width) / nrows * j + board_pixel_width)
			else:#其它点的圆心位置,在9*6网格图的点中会有上下左右偏移最多50像素的可能性
				x_point = int((image_width - board_pixel_width) / ncols * i + board_pixel_width + np.random.randint(-board_pixel_width // 4 - 1 , board_pixel_width // 4))
				y_point = int((image_height - board_pixel_width) / nrows * j + board_pixel_width + np.random.randint(-board_pixel_width // 4 - 1 , board_pixel_width // 4))
			list.append([x_point , y_point])#将这个点加入list中
			cv2.circle(res , ( x_point, y_point) , 50 , 0 , -1)#画这个圆,半径50,颜色黑,实心的
python写文件
	with open("dot1.txt" , "w") as file:#写文件,写入所有圆心
		for p in list:
			file.writelines("{} {}\n".format(p[0] , p[1]))
python写文件普通写与换行写
with open("1.txt","w") as file:
    for i in range(1,x+1):
        for j in range(1,y+1):
            file.write(g[i][j]+" ")
        file.writelines("\n")
Python读入文件中的string之后写出到其它文件
#prefix_document为我们生成的bvh的前缀文件部分
f = open('prefix_document.txt')
n=f.read()
f.close()
#将最终的bvh骨骼动画写到bvh文件夹中
with open('bvh/'+filename+".bvh","w") as file:
    #前缀描述
    file.write(n+"\n")
    file.write("MOTION"+"\n")
    file.write("Frames: "+str(x)+"\n")
    #控制我们当前的播放速度,frame_time为每一帧的时间
    frame_time=0.033333
    file.write("Frame Time: "+str(frame_time)+"\n")
    for i in range(1,x+1):
        for j in range(1,eulercnt+1):
            file.write(str(bvh_mat[i][j])+" ")
        file.write("\n")
python画圆cv2.circle
参考:https://blog.csdn.net/viven_hui/article/details/102807995
cv2.circle(img, center, radius, color[, thickness[, lineType[, shift]]])
参数说明
img:输入的图片data
center:圆心位置
radius:圆的半径
color:圆的颜色
thickness:圆形轮廓的粗细(如果为正)。负厚度表示要绘制实心圆。
lineType: 圆边界的类型。
shift:中心坐标和半径值中的小数位数。
import numpy as np
import cv2
img = np.zeros((200,200,3),dtype=np.uint8)
cv2.circle(img,(60,60),30,(0,0,255))
cv2.circle(img,(80,80),30,(0,0,255),-1)
cv2.imwrite(“1.jpg”, img)
1
2
3
4
5
6
效果如下:

Python函数返回数组
def work(a,b):
    list=[]
    list.append(a-b)
    list.append(a+b)
    return list
x=1
y=2
l=work(x,y)
print(l[0])
print(l[1])
python安装了哪些库
查找所有库:pip list
查找某个版本(比如要查Python3.7):pip3.7 list
python安装cv2
pip install opencv-python
具体版本具体安装,比如python3.7安装,则为pip3.7 install opencv-python
怎么知道mac电脑上装了哪几个python版本
参考:https://www.zhihu.com/question/270799956
![]()
pycharm: unused import statement错误解决方法
参考:https://blog.csdn.net/windscloud/article/details/80208960
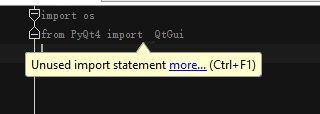
以上只是提醒你导入了但没有使用,不是报错,原因好像是因为开了PEP8自动检查 TKS!

安装Pip至指定Python版本
参考:https://blog.csdn.net/a394268045/article/details/78201682
PyCharm代码连接mysql数据库,刚开始都会遇到一些环境配置问题。
首先,MYSQLdb是python2.才有的,python3.是需要安装mysqlclient,而我mac上python2.7和python3.6是共存的。我在PyCharm上用的是python3.6.2版本。刚开始在控制台执行命令
sudo -H pip install mysqlclient
却看到mysqlclient被安装到python2.7目录下了,因为pip是python2.7下默认的命令,这不是我想要的,但怎么样才能用pip命令安装mysqlclient到python3.6.2下面呢?度娘了好久,正解是这个:
sudo python3 -m pip install mysqlclient
原来,如果想执行python3.*下面的pip命令,就需要带上python3 -m,这也算是踩的一个坑吧。
NameError: name ‘_mysql‘ is not defined
参考:https://blog.csdn.net/m0_47970692/article/details/114106262
解决Django执行manage.py 提示 NameError: name ‘_mysql’ is not defined 问题
原因是:
Mysqldb 不兼容 python3.5 以后的版本
解决办法:
使用pymysql代替MySQLdb
步骤:
安装pymysql:pip install pymysql
打开项目在setting.py的init.py,或直接在当前py文件最开头添加如下:
import pymysql
pymysql.install_as_MySQLdb()
重新执行后报错
django.core.exceptions.ImproperlyConfigured: mysqlclient 1.4.0 or newer is required; you have 0.10.1.
有一个好办法,直接指定版本,比其他的解决方法简单一些…
import pymysql
pymysql.version_info = (1, 4, 13, "final", 0)
pymysql.install_as_MySQLdb()
if name == ‘main’:
参考:https://blog.csdn.net/heqiang525/article/details/89879056
if name == ‘main’:的作用
一个python文件通常有两种使用方法,第一是作为脚本直接执行,第二是 import 到其他的 python 脚本中被调用(模块重用)执行。因此 if name == ‘main’: 的作用就是控制这两种情况执行代码的过程,在 if name == ‘main’: 下的代码只有在第一种情况下(即文件作为脚本直接执行)才会被执行,而 import 到其他脚本中是不会被执行的。举例说明如下:
![]()
- import 执行
然后在同一文件夹新建名称为 import_test.py 的脚本,输入如下代码:
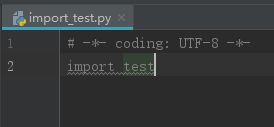
执行 import_test.py 脚本,输出结果如下:
![]()
只输出了第一行字符串。即,if name==“main”: 之前的语句被执行,之后的没有被执行。
python中的__init__(self)
参考:https://www.cnblogs.com/zmzzm/articles/12217482.html
init(self)这个时类的初始化函数
在Python中,对某个类实例进行成员赋值,可以创建不存在的成员:
>>>a=worker()
>>>a.pay=55000
>>>a.name='Bob'
如果对于每一个worker类的实例对象,都要进行如此赋值的话,这个类会变得很难使用
另外,对于用于特殊场合的类,可能要求在对象创建时,进行连接数据库、连接FTP服务器、进行API验证等操作,这些初始化操作,都可以封装在__init__()方法中进行
__init__方法使用如下规则定义:
class ex:
    def __init__(self):
        pass
__init__方法必须接受至少一个参数即self,Python中,self是指向该对象本身的一个引用,通过在类的内部使用self变量,类中的方法可以访问自己的成员变量,简单来说,self.varname的意义为”访问该对象的varname属性“
当然,init()中可以封装任意的程序逻辑,这是允许的,init()方法还接受任意多个其他参数,允许在初始化时提供一些数据,例如,对于刚刚的worker类,可以这样写:
class worker:
    def __init__(self,name,pay):
        self.name=name
        self.pay=pay
这样,在创建worker类的对象时,必须提供name和pay两个参数:
>>>b=worker('Jim',5000
Python会自动调用worker.init()方法,并传递参数。
python中mainloop的用法
参考:https://zhidao.baidu.com/question/431065341844610772.html
mainloop () 你可以把它看做是 while True:
只是循环内的代码tkinter已经给你写好了,这些代码主要是检测窗口相应的各种事件,比如鼠标移动、点击、输入、按键操作等等。
所以你写在mainloop()后面的代码是不会被执行的。
如果是界面加载完成,要计划执行一些语句,就需要用到多线程,在mainloop()之前开启线程。
tkinter.Tk,也有一个after方法可以实现类似多线程的处理,不过效果要差一些,如意出现程序假死,也就是程序未响应,但实际程序在运行
python读取数据库怎么把列名显示出来
参考:https://zhidao.baidu.com/question/297577656.html
学会使用description,可以获得所有的列名信息
class ShowPlayerInfo(object):
    def __init__(self, tree_view):
        """将所有运动员信息显示在表格上"""
        db = Database()
        x = tree_view.get_children()
        for item in x:
            tree_view.delete(item)
        db.cursor.execute("select * from player")
        player_tuple = db.cursor.fetchall()
        #列名
        index = db.cursor.description
        #print(index)
        for item in player_tuple:
            row={}
            for i in range(len(item)):
                row[index[i][0]]=item[i]
            print(row)
            tree_view.insert("", 'end', values=[row['player_name'],row['sex'],row['age'],row['nationality']])
python中的{},代表dict字典数据类型
初始化为{},求某个键值直接用{‘name’}调用即可
        for item in player_tuple:
            row={}
            for i in range(len(item)):
                row[index[i][0]]=item[i]
            print(row)
            tree_view.insert("", 'end', values=[row['player_name'],row['sex'],row['age'],row['nationality']])
python中" "与’ '的区别
参考:https://zhidao.baidu.com/question/2080748697704787828.html
1.普通字符串中没有区别:如’abc’和"abc"是一样的;
2.如果字符串中本身就有单引号或双引号,则要使用另一种引号将该字符串引起来才合法:如’he is a “student” !’ , “he is a ‘student’ !”
3.接着2说,如果字符串中本身就有单引号或双引号,还有一种合法的使用方式是,最外层使用的引号和字符串的相同,但是字符串本身的引号要使用反斜杠转义,如:
‘he is a ‘student’ !’ , “he is a “student” !”
4.再就是三引号"““abc””" , ‘’‘abc’''可以跨越多行。
*.所以就我了解到的,光单引号和双引号的使用没啥大区别
python int与string的转换
参考:https://www.cnblogs.com/EdenChanIy/p/9936578.html
1.字符串转换成int
a = '10'
int(a) //十进制string转化为int, 10
int(a, 16) //十六进制string转化为int,16
2.int转换成字符串
a = 10
str(a) //int转化为十进制string
hex(a) //int转化为十六进制string
python3里,print(f"***") 这里的f是什么用法呢?
参考:https://www.cnblogs.com/duobee/p/14250913.html
python3的 print 字符串前面加 f 表示格式化字符串,formatting,加 f 后可以在字符串里面使用大括号{ }括起来的变量和表达式,如果字符串里面没有变量或者表达式,那么前面加不加 f 输出应该都一样。

Python3.6 新增了一种 f-字符串格式化
格式化的字符串文字前缀为’f’和接受的格式字符串相似str.format()。它们包含由大括号{ }包围的替换区域。替换字段是表达式,在运行时进行评估,然后使用format()协议进行格式化。
formatted string literals, 以 f 开头,包含的{ }表达式在程序运行时会被表达式的值代替。
python判断字符串是否为空
python string转int的注意点
Python pass 语句
参考:https://www.runoob.com/python/python-pass-statement.html
参考:https://www.it610.com/article/1282027502646083584.htm
Python pass 是空语句,是为了保持程序结构的完整性。
pass 不做任何事情,一般用做占位语句。
pass
def func1():
    for i in range(1,11):
        if i % 2 == 0:
            pass
    #pass不做任何操作
        print(i)
func1()
# 1输出结果: 2 3 4 5 6 7 8 9 10
总结:Python pass是空语句,是为了保持程序结构的完整性。
np.arange()用法
参考:https://blog.csdn.net/qq_41550480/article/details/89390579
np.arange()
函数返回一个有终点和起点的固定步长的排列,如[1,2,3,4,5],起点是1,终点是6,步长为1。
参数个数情况: np.arange()函数分为一个参数,两个参数,三个参数三种情况
1)一个参数时,参数值为终点,起点取默认值0,步长取默认值1。
2)两个参数时,第一个参数为起点,第二个参数为终点,步长取默认值1。
3)三个参数时,第一个参数为起点,第二个参数为终点,第三个参数为步长。其中步长支持小数
#一个参数 默认起点0,步长为1 输出:[0 1 2]
a = np.arange(3)

#两个参数 默认步长为1 输出[3 4 5 6 7 8]
a = np.arange(3,9)

#三个参数 起点为0,终点为3,步长为0.1 输出[ 0.   0.1  0.2  0.3  0.4  0.5  0.6  0.7  0.8  0.9  1.   1.1  1.2  1.3  1.4 1.5  1.6  1.7  1.8  1.9  2.   2.1  2.2  2.3  2.4  2.5  2.6  2.7  2.8  2.9]
a = np.arange(0, 3, 0.1)
python导入当前目录的py(import),用.来表示当前目录
Python 判断字符串是否为数字
链接:https://www.cnblogs.com/wangboqi/p/7455240.html
str_1 = “123”
str_2 = “Abc”
str_3 = “123Abc”
#用isdigit函数判断是否数字
print(str_1.isdigit())
Python 实现使用空值进行赋值 None
参考:https://www.jb51.net/article/182572.htm
i = 1
i = None    # int 型数据置空
s = "string"
s = None    # 字符串型数据置空
l = [1,2,3,4]
l[2] = None   # 列表中元素置空
print(i, s, l)
python中如何把string 转换成int
用数字字符串初始化int类,就可以将整数字符串(str)转换成整数(int):
In [1]: int(‘1234’)
Out[1]: 1234
python创建文件夹
参考:https://www.cnblogs.com/monsteryang/p/6574550.html
def mkdir(path):
    # 引入模块
    import os
    # 去除首位空格
    path = path.strip()
    # 去除尾部 \ 符号
    path = path.rstrip("\\")
    # 判断路径是否存在
    # 存在     True
    # 不存在   False
    isExists = os.path.exists(path)
    # 判断结果
    if not isExists:
        os.makedirs(path)
        print(path + ' 创建成功')
        return True
    else:
        # 如果目录存在则不创建,并提示目录已存在
        print(path + ' 目录已存在')
        return False


# 定义要创建的目录
mkpath = "A\\"
# 调用函数
mkdir(mkpath)
Python判断文件是否存在
参考:https://www.cnblogs.com/jhao/p/7243043.html
判断文件是否存在
import os
os.path.exists(test_file.txt)
#True

os.path.exists(no_exist_file.txt)
#False
判断文件夹是否存在
import os
os.path.exists(test_dir)
#True

os.path.exists(no_exist_dir)
#False
可以看出用os.path.exists()方法,判断文件和文件夹是一样。
其实这种方法还是有个问题,假设你想检查文件“test_data”是否存在,但是当前路径下有个叫“test_data”的文件夹,这样就可能出现误判。为了避免这样的情况,可以这样:
只检查文件
import os
os.path.isfile("test-data")
通过这个方法,如果文件”test-data”不存在将返回False,反之返回True。
即是文件存在,你可能还需要判断文件是否可进行读写操作。
opencv打开摄像头进行拍摄
参考:https://blog.csdn.net/zhang_8626/article/details/95362329
首先记得安装包
# 我的版本 opencv-python              4.1.1.26
pip3 install opencv-python
import cv2

cap = cv2.VideoCapture(0)
i = 0
while (1):
    ret, frame = cap.read()
    k = cv2.waitKey(1)
    if k == 27:
        break
    elif k == ord('s'):
        # 注意修改保持路径
        cv2.imwrite('/Users/zuichudemuyang/Desktop/' + str(i) + '.jpg', frame)
        i += 1
    cv2.imshow("capture", frame)
cap.release()
cv2.destroyAllWindows()
Python获取秒级时间戳与毫秒级时间戳
参考:https://www.cnblogs.com/mashuqi/p/11576705.html
1、获取秒级时间戳与毫秒级时间戳、微秒级时间戳
import time
import datetime

t = time.time()

print (t)                       #原始时间数据
print (int(t))                  #秒级时间戳
print (int(round(t * 1000)))    #毫秒级时间戳
print (int(round(t * 1000000))) #微秒级时间戳
返回
1499825149.257892    #原始时间数据
1499825149           #秒级时间戳,10位
1499825149257        #毫秒级时间戳,13位
1499825149257892     #微秒级时间戳,16位
2、获取当前日期时间
dt    = datetime.datetime.now().strftime('%Y-%m-%d %H:%M:%S')
dt_ms = datetime.datetime.now().strftime('%Y-%m-%d %H:%M:%S.%f') # 含微秒的日期时间,来源 比特量化
print(dt)
print(dt_ms)
返回
2018-09-06 21:54:46
2018-09-06 21:54:46.205213
Python读取文件夹下的所有文件
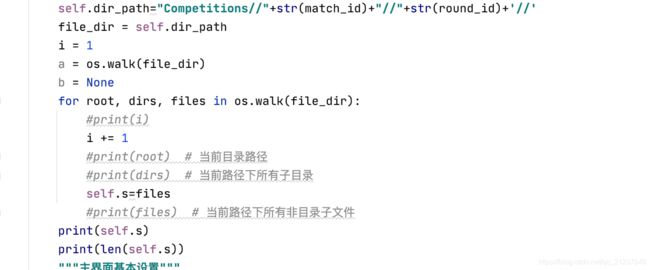
参考:https://blog.csdn.net/pynash123/article/details/88310545?utm_medium=distribute.pc_relevant.none-task-blog-2%7Edefault%7EBlogCommendFromMachineLearnPai2%7Edefault-4.control&depth_1-utm_source=distribute.pc_relevant.none-task-blog-2%7Edefault%7EBlogCommendFromMachineLearnPai2%7Edefault-4.control
import os
file_dir = r"D:\\code\\1"
i = 1
a = os.walk(file_dir)
b = None
for root, dirs, files in os.walk(file_dir):
    print(i)
    i += 1
    print(root) #当前目录路径
    print(dirs) #当前路径下所有子目录
    print(files) #当前路径下所有非目录子文件
print(b)
Python返回数组(List)长度的方法
参考:https://www.cnblogs.com/telwanggs/p/10383642.html
其实很简单,用len函数:
array = [0,1,2,3,4,5]
print(len(array))
同样,要获取一字符串的长度,也是用这个len函数,包括其他跟长度有关的,都是用这个函数。Python这样处理,如同在print的结果中自动添加一个空格来解脱程序员一样,也是一个人性化的考虑,所以在比如字符串的属性和方法中,就不再用len了,这点要注意一下。
Python List append()方法
参考:https://www.runoob.com/python/att-list-append.html
以下实例展示了 append()函数的使用方法:
#!/usr/bin/python

aList = [123, 'xyz', 'zara', 'abc'];
aList.append( 2009 );
print "Updated List : ", aList;
以上实例输出结果如下:
Updated List : [123, 'xyz', 'zara', 'abc', 2009]
Python 精确查找指定后缀名的所有文件
参考:https://blog.csdn.net/alwaysbefine/article/details/106382768
import os
for i,j,k in os.walk('f://'):
    for file in k:
        if file.endswith('.exe'):
            print(os.path.join(i,file))
#每次遍历的对象都是返回的是一个三元元组(root,dirs,files)
#在此例中 三者分别用i,j,k代替了
#root 所指的是当前正在遍历的这个文件夹的本身的地址
#dirs 是一个 list ,内容是该文件夹中所有的目录的名字(不包括子目录)
#files 同样是 list , 内容是该文件夹中所有的文件(不包括子目录)
#当然,遍历目录也可以使用os.list,但子目录不会自动递归搜索,并且如果有特殊权限文件夹,
#并不会访问成功,会报错。
#运行结果会以字符串形式打印
————————————————
下面的代码是在list中删除所有非.jpg的文件
        for i in range(self.len-1,-1,-1):
            if not self.s[i].endswith('.jpg'):
                self.s.pop(i)
Python list列表删除元素
参考:http://c.biancheng.net/view/2209.html
pop() 用法举例:
nums = [40, 36, 89, 2, 36, 100, 7]
nums.pop(3)
print(nums)
nums.pop()
print(nums)
运行结果:
[40, 36, 89, 36, 100, 7]
[40, 36, 89, 36, 100]
参考:https://blog.csdn.net/viviliao_/article/details/79518219
![]()
Python List sort()方法
参考:https://www.runoob.com/python/att-list-sort.html
sort()方法语法:
list.sort(cmp=None, key=None, reverse=False)
- cmp – 可选参数, 如果指定了该参数会使用该参数的方法进行排序。
- key – 主要是用来进行比较的元素,只有一个参数,具体的函数的参数就是取自于可迭代对象中,指定可迭代对象中的一个元素来进行排序。
- reverse – 排序规则,reverse = True 降序, reverse = False 升序(默认)。
以下实例展示了 sort() 函数的使用方法:
#!/usr/bin/python
# -*- coding: UTF-8 -*-

aList = ['123', 'Google', 'Runoob', 'Taobao', 'Facebook'];

aList.sort();
print("List : ")
print(aList)
以上实例输出结果如下:
List :
['123', 'Facebook', 'Google', 'Runoob', 'Taobao']
Python List sort()多关键字排序方法
参考:https://www.runoob.com/python/att-list-sort.html
以下实例演示了通过指定列表中的元素排序来输出列表:
#!/usr/bin/python
# -*- coding: UTF-8 -*-

# 获取列表的第二个元素
def takeSecond(elem):
    return elem[1]

# 列表
random = [(2, 2), (3, 4), (4, 1), (1, 3)]

# 指定第二个元素排序
random.sort(key=takeSecond)

# 输出类别
print('排序列表:')
print(random)
以上实例输出结果如下:
排序列表:
[(4, 1), (2, 2), (1, 3), (3, 4)]
python倒序for循环
参考:https://blog.csdn.net/sunmingyang1987/article/details/106225881/
#从10到0进行遍历循环,括号里最后一个-1是步长,实现倒序;前两个参数是起始和终止值,也是前闭后开。
for i in range(10,-1,-1):
    print(i)
按键发现按了函数没有执行(在最开始已经执行完了)
![]()
command需要改成lambda表达式
![]()
即可实现按键运行函数效果
Qtimer用法
参考:https://blog.csdn.net/jia666666/article/details/81672344
本质上就是Qtimer和start之间的函数执行
然后如果要让计时器停止,不能写在Qtimer和start之间,而应该写在中间调用的函数中
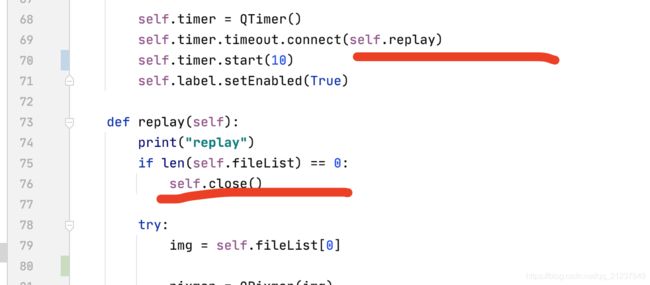
python button用法
self.var = IntVar()表示取值,可以通过修改这个值来改变选了哪一个


Python 窗体(tkinter)下拉列表框(Combobox)
参考:https://blog.csdn.net/houyanhua1/article/details/78174066?utm_medium=distribute.pc_relevant.none-task-blog-2%7Edefault%7EBlogCommendFromMachineLearnPai2%7Edefault-3.control&depth_1-utm_source=distribute.pc_relevant.none-task-blog-2%7Edefault%7EBlogCommendFromMachineLearnPai2%7Edefault-3.control
import tkinter
from tkinter import ttk
def go(*args): #处理事件,*args表示可变参数
print(comboxlist.get()) #打印选中的值
win=tkinter.Tk() #构造窗体
comvalue=tkinter.StringVar()#窗体自带的文本,新建一个值
comboxlist=ttk.Combobox(win,textvariable=comvalue) #初始化
comboxlist["values"]=("1","2","3","4")
comboxlist.current(0) #选择第一个
comboxlist.bind("<>" ,go) #绑定事件,(下拉列表框被选中时,绑定go()函数)
comboxlist.pack()
win.mainloop() #进入消息循环
Python编程:怎么设置tkinter按钮不可点
参考:https://jingyan.baidu.com/article/d5a880eb9a256252f147ccc7.html
插入语句:“disButton.config(state=tk.DISABLED)”,设置tkinter按钮不可点击。
类似的还有ACTIVATE,NORMAL,可以直接进入库中查看具体
关于python中的pyc文件
参考:https://blog.csdn.net/laobai1015/article/details/88292848
在使用git管理python项目时,总是会出现不少pyc文件,这些pyc文件不上传也是没有任何关系的。所以好奇去搜索了下。
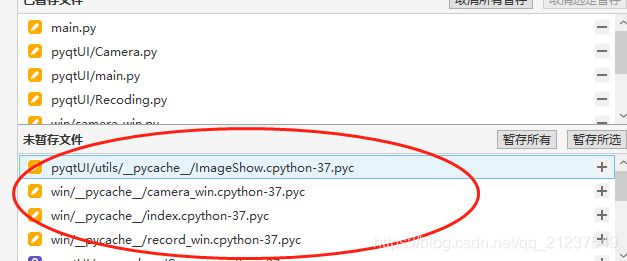
.py与.pyc的区别
最近发现在操作某些.py文件时,下面都有一个.pyc文件,开始以为是C/C++中的.c/cpp文件与.h文件的关系,后来经过查阅,原来Python的程序中,是把原始程序代码放在.py文件里,而Python会在执行.py文件的时候。将.py形式的程序编译成中间式文件(byte-compiled)的.pyc文件,这么做的目的就是为了加快下次执行文件的速度。
所以,在我们运行python文件的时候,就会自动首先查看是否具有.pyc文件,如果有的话,而且.py文件的修改时间和.pyc的修改时间一样,就会读取.pyc文件,否则,Python就会读原来的.py文件。
其实并不是所有的.py文件在与运行的时候都会差生.pyc文件,只有在import相应的.py文件的时候,才会生成相应的.pyc文件
ModuleNotFoundError: No module named 'PIL’解决方法
参考:https://blog.csdn.net/weixin_44037416/article/details/96842058
pip install pillow
参考:https://www.cnblogs.com/grimm/p/11104103.html
报错ImportError:No module named 'PIL'

缺失一个pillow的数据包,在黑窗口下

pip install -i https://pypi.douban.com/simple pillow
python中数组A[ : 2 ]的意思
参考:https://blog.csdn.net/liuyhoo/article/details/80789715
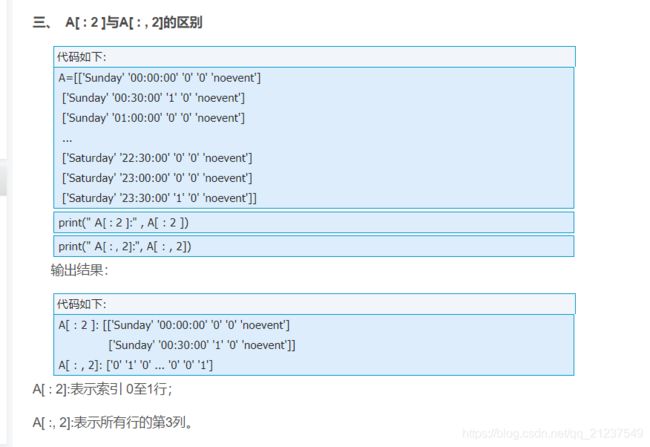
表示数组前两个。
python转json
参考:https://www.csdcb.cn/article/pythonJson.html
import json
member = {
    "name": "zhangsan",
    "age": 20
}
# python 将JSON 写文件
with open("json.json", "w") as dump_f:
    json.dump(member, dump_f)

# python 从 JSON 文件中读取
with open("json.json", "r") as dump_f:
    load_dict = json.load(dump_f)
    print(load_dict)
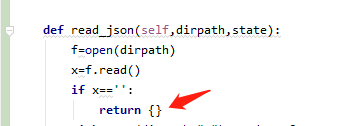
不过要注意如果文件夹为空,这样的读法会出问题,解决的方法是先用一般的读法读一下,看看文件夹是否为空,如果为空,则无需进行读入json的操作

python按照指定字符或者长度 截取字符串
参考:https://www.cnblogs.com/java-deft/p/9828399.html
a = "Hello"

print "a[1:4] 输出结果:", a[1:4]    #结果 ell
print "a[:4] 输出结果:", a[:4]    #结果 Hell
print "a[1:] 输出结果:", a[1:]    #结果 ello
python中要表示\字符,发现\是特殊字符,用’‘是无法表示的,可以用转义格式,用’\'来表示\这个字符。
函数返回空字典
判断字符串为空
对列表进行排序
参考:https://www.cnblogs.com/whaben/p/6495702.html
你也可以使用list.sort()方法来排序,此时list本身将被修改。
>>> a = [5, 2, 3, 1, 4]
>>> a.sort()
>>> a
[1, 2, 3, 4, 5]
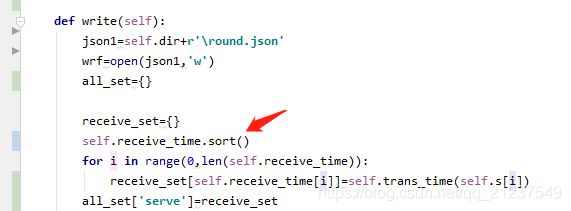
一个要注意的地方,就是对list排序的时候,要确保list中是同一种类型,不能有int有string,不然会出错,无法排序,这个可以把list输出来看一下,是否带’'。
python开线程
参考:https://www.cnblogs.com/lilyxiaoyy/p/12054441.html
import time
from threading import Thread


def func(name):
    print(f"{name}开始")
    time.sleep(0.5)
    print(f"{name}结束")


if __name__ == '__main__':
    t1 = Thread(target=func, args=("线程1",))
    t2 = Thread(target=func, args=("线程2",))
    t1.start()
    t2.start()
    print("主线程结束")
python开线程
参考:https://www.cnblogs.com/lilyxiaoyy/p/12054441.html
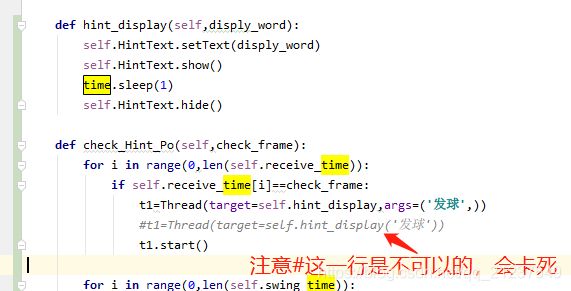
target后面为要执行的线程名,args中为需要的参数变量
t1=Thread(target=self.hint_display,args=('发球',))
t1.start()
python倒序for循环
参考:https://blog.csdn.net/sunmingyang1987/article/details/106225881/
#从10到0进行遍历循环,括号里最后一个-1是步长,实现倒序;前两个参数是起始和终止值,也是前闭后开。
for i in range(10,-1,-1):
    print(i)
10
9
8
7
6
5
4
3
2
1
0
python代码中换行
list中输出元素
参考:http://c.biancheng.net/view/2209.html
del 是 Python 中的关键字,专门用来执行删除操作,它不仅可以删除整个列表,还可以删除列表中的某些元素。
del 可以删除列表中的单个元素,格式为:
del listname[index]
tqdm的用法
参考:https://blog.csdn.net/zkp_987/article/details/81748098
tqdm可以看到当前循环的进度
from tqdm import tqdm
x=0
for i in tqdm(range(1,1000000000)):
    x+=1
python在图片上加数字
参考:https://www.jianshu.com/p/617184552cbc
from PIL import Image, ImageDraw, ImageFont,ImageColor

def add_num(image,text):
    #设置字体(字体样式,字体大小)
    font = ImageFont.truetype("arial.ttf",100)
    #设置字体颜色
    fontcolor = ImageColor.colormap.get('white')
    #ImageDraw模块的函数:Draw(image):创建一个可以在给定图像上绘图的对象
    draw = ImageDraw.Draw(image)
    #获取图片大小
    width , height = image.size
    #将文字加到图片上
    draw.text((width/2,0),text,font=font,fill=fontcolor)
    #特别要注意这个文件路径名\\head2.png这里有两个\
    image.show()
    image.save(r'D:\gxq\code\demo\Competitions\36\43\1630049576.177.jpg')

if __name__=='__main__':
    image = Image.open(r'D:\gxq\code\demo\Competitions\36\43\1630049576.177.jpg')
    num1=5
    num2=6
    #将到图片上的文本内容
    text = str(num1)+":"+str(num2)
    add_num(image,text)
# -*- coding: utf-8 -*-
import cv2
import numpy as np
from PIL import Image,ImageDraw,ImageFont

# cv2读取图片
img=cv2.imread(r'D:\gxq\code\demo\Competitions\36\43\1630049576.176.jpg')
# 在图片上添加文字信息
# 颜色参数值可用颜色拾取器获取((255,255,255)为纯白色)
# 最后一个参数bottomLeftOrigin如果设置为True,那么添加的文字是上下颠倒的
text='1213'
composite_img = cv2.putText(img, text, (100, 100), cv2.FONT_HERSHEY_SIMPLEX,
                            2.0, (255, 255, 255), 5, cv2.LINE_AA, False)
cv2.imwrite(r'D:\gxq\code\demo\Competitions\36\43\1630049576.176.jpg', composite_img)
在视频上加框
#!/usr/bin/env python
# -*- coding:utf-8 -*-
import cv2
video = "demo.mp4"
result_video = "demo-result.mp4"
#读取视频
cap = cv2.VideoCapture(video)
#获取视频帧率
fps_video = cap.get(cv2.CAP_PROP_FPS)
#设置写入视频的编码格式
fourcc = cv2.VideoWriter_fourcc(*"mp4v")
#获取视频宽度
frame_width = int(cap.get(cv2.CAP_PROP_FRAME_WIDTH))
#获取视频高度
frame_height = int(cap.get(cv2.CAP_PROP_FRAME_HEIGHT))
videoWriter = cv2.VideoWriter(result_video, fourcc, fps_video, (frame_width, frame_height))
frame_id = 0
while (cap.isOpened()):
    ret, frame = cap.read()
    if ret == True:
        frame_id += 1
        left_x_up = int(frame_width / frame_id)
        left_y_up = int(frame_height / frame_id)
        right_x_down = int(left_x_up + frame_width / 10)
        right_y_down = int(left_y_up + frame_height / 10)
        #文字坐标
        word_x = left_x_up + 5
        word_y = left_y_up + 25
        cv2.rectangle(frame, (left_x_up, left_y_up), (right_x_down, right_y_down), (55,255,155), 5)
        cv2.putText(frame, 'frame_%s' %frame_id, (word_x, word_y), cv2.FONT_HERSHEY_SIMPLEX, 1, (55,255,155), 2)
        videoWriter.write(frame)
    else:
        videoWriter.release()
        break
安装requirements.txt文件里的依赖
参考:https://blog.csdn.net/YUICUI/article/details/108471302
pip3 install -r requirements.txt
如何打开.pkl文件,查看.pkl文件里的内容(Python3.6)
参考:https://blog.csdn.net/weixin_39450145/article/details/104897934
#show_pkl.py

import pickle
path='aus_openface.pkl'   #path='/root/……/aus_openface.pkl'   pkl文件所在路径

f=open(path,'rb')
data=pickle.load(f)

print(data)
print(len(data))

#输出结果:
{'N_0000000356_00190': array([2.86, 2.27, 1.45, 1.1 , 0.  , 0.65, 0.05, 0.  , 0.75, 1.65, 0.6 , 0.  , 1.86, 0.  , 0.62, 0.25, 0.  ]),
 'N_0000001939_00054': array([0.34, 2.09, 0.  , 2.04, 0.02, 0.  , 0.  , 1.22, 0.  , 0.93, 0.37, 0.  , 0.4 , 0.  , 0.  , 0.22, 0.  ]),
 'N_0000000437_00540': array([0.  , 0.19, 0.02, 0.8 , 0.24, 1.46, 1.18, 0.37, 0.  , 0.  , 1.13, 3.37, 1.24, 0.73, 0.13, 1.83, 0.  ]),
 'N_0000001507_00202': array([1.08, 1.23, 0.  , 1.83, 0.31, 1.08, 0.04, 0.  , 0.24, 1.31, 0.  , 0.25, 0.44, 0.6 , 0.77, 0.  , 0.  ])}
4
if name == ‘main’:
参考:https://blog.csdn.net/heqiang525/article/details/89879056
if name == ‘main’:的作用
一个python文件通常有两种使用方法,第一是作为脚本直接执行,第二是 import 到其他的 python 脚本中被调用(模块重用)执行。因此 if name == ‘main’: 的作用就是控制这两种情况执行代码的过程,在 if name == ‘main’: 下的代码只有在第一种情况下(即文件作为脚本直接执行)才会被执行,而 import 到其他脚本中是不会被执行的。
python如果pip下载慢可以在后面加镜像资源
参考:https://mirrors.tuna.tsinghua.edu.cn/help/pypi/
临时使用
pip install xxx -i https://pypi.tuna.tsinghua.edu.cn/simple some-package
注意,simple 不能少, 是 https 而不是 http
设为默认
升级 pip 到最新的版本 (>=10.0.0) 后进行配置:
pip install pip -U
pip config set global.index-url https://pypi.tuna.tsinghua.edu.cn/simple
如果您到 pip 默认源的网络连接较差,临时使用本镜像站来升级 pip:
pip install -i https://pypi.tuna.tsinghua.edu.cn/simple pip -U
print(doc)用处
参考:https://blog.csdn.net/qq_43391414/article/details/112348819
"""hello"""
"""world"""
#helloworld
print(__doc__)
"""hahahah"""
print(__doc__)
输出
![]()
即print(doc)语句的作用是:打印该语句前面但离得最近的那个大段注释(也叫说明文档)。""""""范围内的叫做大段注释,#是单行注释。
ch = 0xFF & cv2.waitKey(1)的意思
            ch = 0xFF & cv2.waitKey(1)
            if ch == 27:
                break
参考:https://blog.csdn.net/Ryan_Dreambig/article/details/104845274
cv2.waitKey(1)在有按键按下的时候返回按键的ASCII值,否则返回-1
& 0xFF的按位与操作只取cv2.waitKey(1)返回值最后八位,因为有些系统cv2.waitKey(1)的返回值不止八位
总体效果
键盘按下并把ch赋值为按下的键,如果ch==27(ESC)即退出键,则退出
python中[-1]、[:-1]、[::-1]、[n::-1]使用方法
参考:https://blog.csdn.net/weixin_37985288/article/details/97633239
import numpy as np
a=np.random.rand(5)
print(a)
[ 0.64061262  0.8451399   0.965673    0.89256687  0.48518743]
print(a[-1]) ###取最后一个元素
[0.48518743]
print(a[:-1])  ### 除了最后一个取全部
[ 0.64061262  0.8451399   0.965673    0.89256687]
print(a[::-1]) ### 取从后向前(相反)的元素
[ 0.48518743  0.89256687  0.965673    0.8451399   0.64061262]
print(a[2::-1]) ### 取从下标为2的元素翻转读取
[ 0.965673  0.8451399   0.64061262]
Opencv中waitKey()
参考:https://blog.csdn.net/u012785169/article/details/87391743
int waitKey(int delay=0)
1.waitKey()函数的功能是不断刷新图像,频率为delay,单位是ms,返回值为当前键盘按下的值,没有按键时返回-1.
2.显示图片和视频时,会在imshow()时,通常会在后面加上while(cvWaitKey(n)==key)为大于等于0的数即可,那么程序将在此处循环运行直到按键响应为key时之后继续。
3.delay:为0时,则会一直显示这一帧,”delay“,在显示视频和摄像头时有用,用于设置在显示完一帧图像后程序等待“delay"ms再显示下一帧视频。
4.返回值:每经过“delay”ms后更新,如果delay>0,那么超过指定的时间则返回-1,如果delay=0,由于一直显示这一帧,将没有返回值,直到有按键按下的时候返回按键的值。eg:if( cvWaitKey(10) >= 0 ) 是说10ms中按任意键进入此if块,while(waitkey(2)!=27) …,表示不按Esc按键则一直在2ms后显示。
argparse.ArgumentParser
可以在cmd中运行时输入相应的值,好处是方便运行,在运行时可以直接带变量输入,如果没有这个功能的话,每次要么用输入输出的方式进行交互,要么直接在代码里写固定,每次需要改变变量都去代码里改,不方便
import argparse
parser=argparse.ArgumentParser(prog="Interactive Graph Cut",
                               description="Interactively segment an image",add_help=True)
parser.add_argument('-i','--INFILE',help='Input image file to segment.',required=False)
parser.add_argument('-o','--OUTFILE',help='Used to save segmented images.',required=False)

args=parser.parse_args()

print(111)
print(args.INFILE)
print(args.OUTFILE)

如果不输入

声明的时候的prog和description为输错时或者用户输入-h时会输出的提示
后面的required表示是否这个变量一定需要在执行时代入,如果为True则必须代入,False则为可代可不代
minimize
迭代法
def mini_func(paramf, Ins_res, ext_points,img):
    print(paramf)
    f = paramf[0]
    Ins_res['K'][0][0] = f
    Ins_res['K'][1][1] = f
    param = extract_parameter(ext_points, img, Ins_res)

    points_2d = ext_points['2d']
    points_3d = ext_points['3d']

    cam_points = convert_world2cam(points_3d, param['rot'], param['tran'])
    img_points = convert_cam2img(cam_points, param['intrinsic'])

    loss = 0
    for i in range(len(img_points)):
        loss += math.fabs(img_points[i][0] - points_2d[i][0])
        loss += math.fabs(img_points[i][1] - points_2d[i][1])

    return loss

res_ = minimize(mini_func,params,args=(Ins_res, ext_points, img_path),method='Powell', options={'disp': False, 'maxiter': 20000})
相当于改变变量的值,然后在区域中找到极小值。
python代入默认值
参考:http://c.biancheng.net/view/2256.html
下面程序演示了如何定义和调用有默认参数的函数:
#str1没有默认参数,str2有默认参数
def dis_str(str1,str2 = "http://c.biancheng.net/python/"):
    print("str1:",str1)
    print("str2:",str2)
dis_str("http://c.biancheng.net/shell/")
dis_str("http://c.biancheng.net/java/","http://c.biancheng.net/golang/")
运行结果为:
str1: http://c.biancheng.net/shell/
str2: http://c.biancheng.net/python/
str1: http://c.biancheng.net/java/
str2: http://c.biancheng.net/golang/
上面程序中,dis_str() 函数有 2 个参数,其中第 2 个设有默认参数。这意味着,在调用 dis_str() 函数时,我们可以仅传入 1 个参数,此时该参数会传给 str1 参数,而 str2 会使用默认的参数,如程序中第 6 行代码所示。
当然在调用 dis_str() 函数时,也可以给所有的参数传值(如第 7 行代码所示),这时即便 str2 有默认值,它也会优先使用传递给它的新值。
同时,结合关键字参数,以下 3 种调用 dis_str() 函数的方式也是可以的:
dis_str(str1 = "http://c.biancheng.net/shell/")
dis_str("http://c.biancheng.net/java/",str2 = "http://c.biancheng.net/golang/")
dis_str(str1 = "http://c.biancheng.net/java/",str2 = "http://c.biancheng.net/golang/")
再次强调,当定义一个有默认值参数的函数时,有默认值的参数必须位于所有没默认值参数的后面。因此,下面例子中定义的函数是不正确的:
#语法错误
def dis_str(str1="http://c.biancheng.net/python/",str2,str3):
    pass
Python ASCII码与字符相互转换
参考:https://www.runoob.com/python3/python3-ascii-character.html
注意不能直接用int(‘a’)进行转ascii的操作,因为进制不一样,可以用ord函数
# Filename : test.py
# author by : www.runoob.com

# 用户输入字符
c = input("请输入一个字符: ")

# 用户输入ASCII码,并将输入的数字转为整型
a = int(input("请输入一个ASCII码: "))


print( c + " 的ASCII 码为", ord(c))
print( a , " 对应的字符为", chr(a))
执行以上代码输出结果为:
python3 test.py
请输入一个字符: a
请输入一个ASCII码: 101
a 的ASCII 码为 97
101 对应的字符为e
Python global用法
参考:https://www.cnblogs.com/python-kp/p/12023057.html
如果需要在函数内部改变函数外部的变量,就可以通过在函数内部声明变量为global变量。这样当程序运行至global变量便会替换外部的同名变量。
# -*- coding:utf-8 -*-

name = "小明"

def test():
    global name
    name = "xiaoming"
    return name

if __name__ == "__main__":
    print name
    print test()
    print name
运行结果:
小明
xiaoming
xiaoming
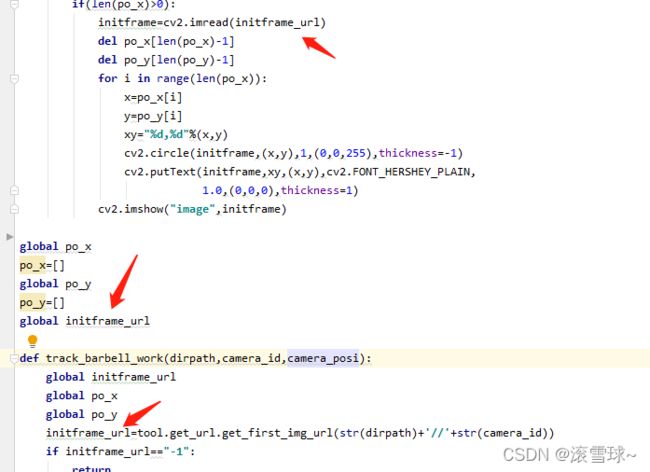
我遇到的问题
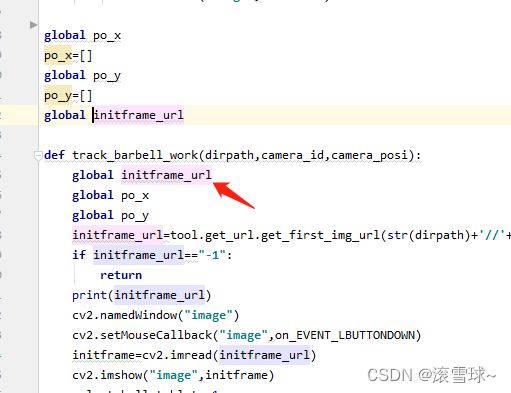
下图中我在别的py中import了这个track_barbell_work函数,然后最开始我initframe_url没有加global,导致我在track_barbell_work修改时,在上面的回调函数on_EVENT_LBUTTONDOWN中没有反应(即initframe_url并没有被修改,显示的全局变量的值),通过引用可以看到下面track_barbell_work函数中的initframe_url变量是局部新建立的,而on_EVENT_LBUTTONDOWN显然的还是全局变量。之后用全局变量global声明,每次赋值前也声明一下,表示这个变量是全局的,即可解决这个问题。

一个查看这个变量引用自哪里的小技巧
按住ctrl然后点击这个变量,即可看到这个变量来自哪里,如果这个只是局部,则它无法跳转至最开始的声明,否则可以选择跑转至其它和它相关的。
Python判断是否json是否包含一个key的方法
一个json文件里面直接用[“xxx”]的引用方式如果没有这个key会直接报错,需要先判断一下
参考:https://www.jb51.net/article/153817.htm
jsonObject 是个json
if (key in jsonObject) :
 print '有'
else:
 print '没有'
python写json中的indent
不写的话相当于输出的json都挤在一起

效果如下:

indent表示有几个缩进,如果加了4个
Python函数指定默认值
函数带个初始值,如果没有输入则为默认,否则覆盖成输入的值
def sort(a=1):
    print(a)
a=2
sort(a)
输出
2
Python指定函数参数对应
参考:https://blog.csdn.net/victory0943/article/details/106413546
def sort(ccc,ddd):
    print(ccc)
    print(ddd)
a=2
b=3
sort(ddd=a,ccc=b)
输出
3
2
Python中的np.arange()
参考:https://www.codeleading.com/article/29415748959/
start : 起始值,默认值为0,Optional(可选)。
end : 结束值(不含)。
step : 步长,默认值为1
dtype :默认为None,从其他输入值中推测,Optional(可选)。。
print( numpy.arange( 6 , 20 , 2 ) )  # 起点是 5,终点是 20,步长为 2
[ 6  8 10 12 14 16 18]
print( np.arange( 6 , 20 , 1.5 ) )  #步长支持小数
[ 6.   7.5  9.  10.5 12.  13.5 15.  16.5 18.  19.5]
** 在python里面表示幂运算
x=3
print(x**2)
#output:9
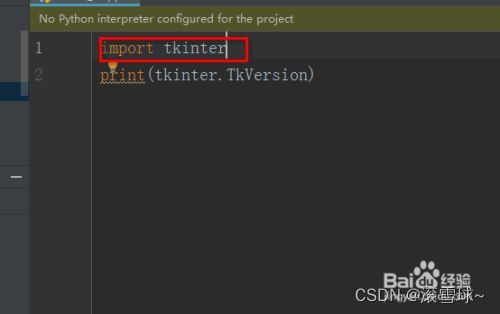
在python中怎样查看tkinter版本
参考:https://jingyan.baidu.com/article/e52e3615b26fbf01c70c5170.html

python字典中加元素
参考:https://www.jb51.net/article/196873.htm
book_dict = {"price": 500, "bookName": "Python设计", "weight": "250g"}

第一种方式:使用[]
book_dict["owner"] = "tyson"
python中 might be referenced before aasignment
python改变图像的大小
参考:https://blog.csdn.net/weixin_41463944/article/details/118675709
from PIL import Image
infile = r'D:\gxq\ao_meng\OneDrive\论文方向\各类图片\相机标定迭代测试\2.jpg'
outfile = r'D:\gxq\ao_meng\OneDrive\论文方向\各类图片\相机标定迭代测试\22.jpg'
im = Image.open(infile)
out = im.resize((960,540),Image.ANTIALIAS) #resize image with high-quality
out=out.convert('RGB')
out.save(outfile)
注意倒数第二行,需要进行RGB转换
参考:https://blog.csdn.net/weixin_39777626/article/details/82774270/
python判断dict中是否有元素
参考:https://www.jb51.net/article/201810.htm
a=dict()
a['a']=1
print(a['a'])
if ('a' in a.keys())==True:
    print('have')
print('b' in a.keys())
输出
1
have
False
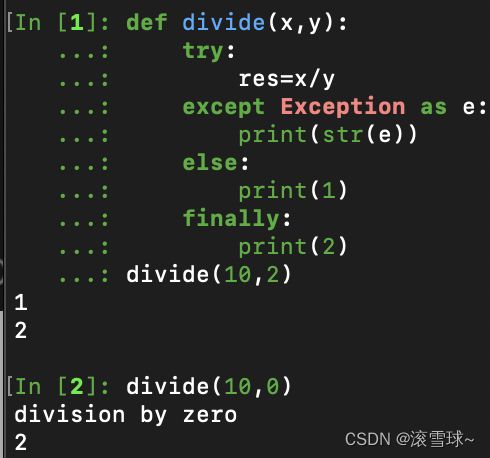
except
try:
    print(1+'a')
except:
    print("haha")
Python正则表达式
选取匹配的子段re.findall
import re
content='Hello 123 world 456 789'
result=re.findall('\d\d\d',content)
print(result)
输出
['123', '456', '789']
非贪婪匹配(.*?)为匹配整一段
import re
res=''
p_info=''
info=re.findall(p_info,res)
print(info)
输出
['']
.*?为代替某一段
输出
import re
res=''
p_info='(.*?)'
info=re.findall(p_info,res)
print(info)
输出
['']
正则匹配时自动忽略换行符,用re.S
import re
res='''
'''
p_info='(.*?)'
info=re.findall(p_info,res,re.S)
print(info)
输出
['']
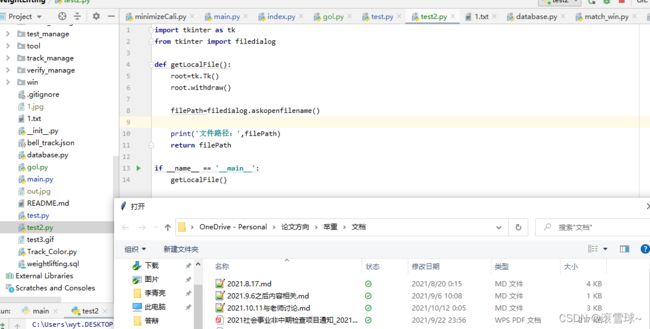
python选择本地文件路径
参考:https://www.cnblogs.com/sengzhao666/p/12748444.html
import tkinter as tk
from tkinter import filedialog

def getLocalFile():
    root=tk.Tk()
    root.withdraw()

    filePath=filedialog.askopenfilename()

    print('文件路径:',filePath)
    return filePath

if __name__ == '__main__':
    getLocalFile()
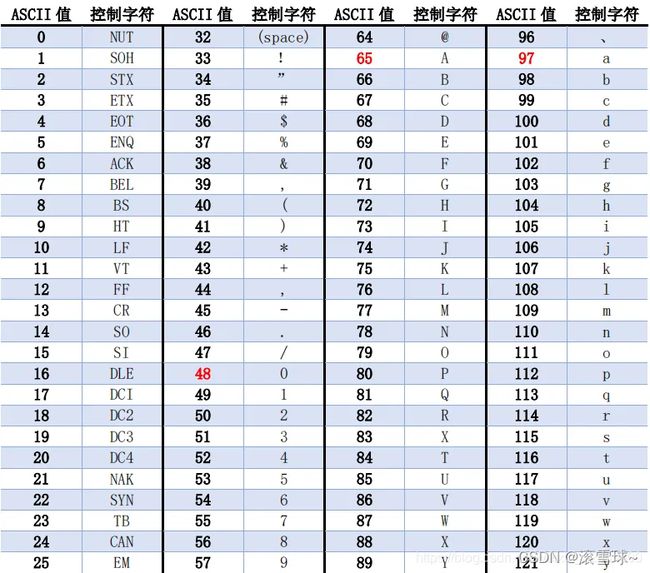
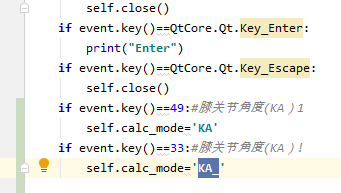
Python中的event.key()
参考:https://blog.csdn.net/weixin_39949386/article/details/111731391
本质上就是ASCII码表
python 怎么查看当前路径
参考:https://blog.csdn.net/nyist_yangguang/article/details/105524793
先要装载 os模块:
import os
print os.getcwd()
或者
print os.path.abspath(os.curdir)
print os.path.abspath(‘.’)
就可以了。
Python获取、格式化当前时间日期的方法
参考:http://www.imxmx.com/Item/1/176791.html
# 格式化日期
# time.strftime(format[,t]) 参数为日期格式
import time
times = time.time()
local_time = time.localtime(times)

# Y 年 - m 月 - d 日 H 时 - M 分 - S 秒
print(time.strftime("%Y-%m-%d %H:%M:%S",local_time))
# 2020-02-10 12:07:55

# Y 年 - b 月份英文简称 - d 日期 - H 时 - M 分 - S 秒 - a 周几的英文简称
print(time.strftime("%Y %b %d %H:%M:%S %a",local_time))
# 2020 Feb 10 12:07:55 Mon

