centos7安装docker+nginx+php+mysql+redis+openresty+rabbitmq容器
docker安装
yum install -y docker # 安装docker
安装docker遇到的几个问题参考资料
https://blog.csdn.net/BaiLiangbyLiang/article/details/114541773
http://www.weitip.com/news/22.html
https://www.cnblogs.com/yzgblogs/p/14607637.html
启动之前将docker的镜像源改为阿里云的镜像源
vim /etc/docker/daemon.json
#/etc/docker/daemon.json
{
  "registry-mirrors": ["https://ftnejmh3.mirror.aliyuncs.com"]
}
docker 常用命令
#常用命令
docker version #查看版本
systemctl start docker   # 启动docker
systemctl stop docker    # 停止docker
systemctl status docker  # 查看docker状态
systemctl restart docker # 重新启动docker
docker pull nginx  # 拉取下载镜像
docker inspect php | grep "IPAddress"  # 查看容器ip信息
docker images  # 查看本地镜像
docker ps -a  # 查看容器启动情况
docker exec -it 容器id/容器名称 bash  #进入容器内部
docker logs nginx  #查看容器日志
docker run -p 9000:9000 -d --name php -v /docker/www:/docker/www --privileged=true php:7.4-fpm  #创建容器应用
-p 9000:9000 :将容器的9000端口映射到主机的9000端口
-d 后台运行(守护进程)
--name php:将容器命名为php
-v 将主机中当前目录下的www挂载到容器的www目录
docker update --restart=always name #更新容器自动重启
docker搭建nginx容器
docker pull nginx # 拉取下载nginx镜像
mkdir docker # 创建docker目录,管理docker相关配置等文件
cd docker
mkdir nginx # 创建docker目录,管理docker下nginx相关配置文件,用于映射到容器中
cd /docker/nginx
touch default.conf
vim default.conf
#default.conf
server {
    listen       80;
    listen  [::]:80;
    server_name  localhost;
    root /docker/www/shopby/public;
    index index.php index.html;

    location / {
        try_files $uri $uri/ /index.php?$query_string;
    }

    error_page   500 502 503 504  /50x.html;
    location = /50x.html {
        root   /docker/www/shopby/public;
    }

    location ~ \.php$ {
        root /docker/www/shopby/public;
        fastcgi_pass   172.17.0.3:9000;  #映射到php服务端
        fastcgi_index  index.php;
        fastcgi_param  SCRIPT_FILENAME  $document_root$fastcgi_script_name;
        include        fastcgi_params;
    }
}
使用nginx镜像创建nginx应用容器
docker run -p 80:80 -d --name nginx -v /docker/nginx/default.conf:/etc/nginx/conf.d/default.conf -v /docker/www:/docker/www --privileged=true nginx
docker搭建php容器
docker pull php:7.4-fpm # 拉取指定下载php7.4版本
docker exec -it php bash
docker-php-ext-install pdo_mysql # 安装php的mysql扩展
使用php镜像创建php应用容器
docker run -p 9000:9000 -d --name php -v /docker/www:/docker/www --privileged=true php:7.4-fpm
docker搭建mysql容器
docker pull mysql # 拉取下载mysql最新版
cd /docker
mkdir mysql
vim mysql/my.cnf
#/docker/mysql/my.cnf
[client]
port        = 3306
socket        = /tmp/mysql.sock

[mysqld]
secure_file_priv=/var/lib/mysql
port        = 3306
socket        = /tmp/mysql.sock
datadir = /usr/local/mysql/data
default_storage_engine = InnoDB
performance_schema_max_table_instances = 400
table_definition_cache = 400
skip-external-locking
key_buffer_size = 32M
max_allowed_packet = 100G
table_open_cache = 128
sort_buffer_size = 768K
net_buffer_length = 4K
read_buffer_size = 768K
read_rnd_buffer_size = 256K
myisam_sort_buffer_size = 8M
thread_cache_size = 16
tmp_table_size = 32M
default_authentication_plugin = mysql_native_password
lower_case_table_names = 1
sql-mode=NO_ENGINE_SUBSTITUTION,STRICT_TRANS_TABLES

explicit_defaults_for_timestamp = true
max_connections = 500
max_connect_errors = 100
open_files_limit = 65535

log-bin=mysql-bin
binlog_format=mixed
server-id = 1
binlog_expire_logs_seconds = 600000
slow_query_log=1
slow-query-log-file=/usr/local/mysql/data/mysql-slow.log
long_query_time=3
early-plugin-load = ""

innodb_data_home_dir = /usr/local/mysql/data
innodb_data_file_path = ibdata1:10M:autoextend
innodb_log_group_home_dir = /usr/local/mysql/data
innodb_buffer_pool_size = 128M
innodb_log_file_size = 64M
innodb_log_buffer_size = 16M
innodb_flush_log_at_trx_commit = 1
innodb_lock_wait_timeout = 50
innodb_max_dirty_pages_pct = 90
innodb_read_io_threads = 1
innodb_write_io_threads = 1

[mysqldump]
quick
max_allowed_packet = 500M

[mysql]
no-auto-rehash

[myisamchk]
key_buffer_size = 32M
sort_buffer_size = 768K
read_buffer = 2M
write_buffer = 2M

[mysqlhotcopy]
interactive-timeout
使用mysql镜像创建mysql应用容器,MYSQL_ROOT_PASSWORD=root设置账户密码
docker run -p 3306:3306 -d --name mysql -v /etc/my.cnf:/etc/mysql/my.cnf --privileged=true -e MYSQL_ROOT_PASSWORD=root mysql
docker搭建redis容器
docker pull redis # 拉取下载mysql最新版
遇到问题:Error response from daemon: Get https://registry-1.docker.io/v2/library/ubuntu/manifests/2.04:
解决方式:
第1步:通过dig @114.114.114.114 registry-1.docker.io找到可用IP地址

第二步:修改/etc/hosts强制docker.io相关的域名解析到上面的ip

第三步:保存配置文件,逐个更换ip地址尝试下载镜像,这里是第三个地址成功的。
最后,使用下载成功的redis镜像创建redis应用容器
docker run -p 6379:6379 -d --name redis --privileged=true --requirepass root redis
至此,nginx+mysql+php+redis容器创建完成
redis.conf Maxmemory 4G # 设置最大内存 Maxmemory-policy allkeys-lru # 设置淘汰策略
错误:(error) ERR AUTH called without any password configured for the default user. Are you sure your configuration is correct?
这是设置容器时没有加–requirepass root设置密码参数,root为你要设置的密码
已忘记设置密码的容器,要么重建容器,
要么进入容器
docker exec -it redis bash
redis-cli
config set requirepass root #设置空密码,每次重启密码都会生效,要重复操作,先这样了,没找到配置文件永久设置,待更新…
docker搭建openresty容器
docker pull openresty/openresty # 拉取下载openresty
docker run -p 90:90 -d --name openresty openresty/openresty
docker exec -it openresty bash
cd /etc/nginx/conf.d
docker cp openresty:/etc/nginx/conf.d/default.conf /docker/openresty/conf/default.conf
docker stop openresty
docker rm openresty
docker run -p 90:90 -d --name openresty -v /docker/openresty/conf/default.conf:/etc/nginx/conf.d/default.conf -v /docker/www:/docker/www --privileged=true openresty/openresty
#安装wget
apt update # ubuntu apt命令 centos yum命令
apt -y install wget # 安装wgetcd /usr/local/openresty/lualib/resty/
wget https://raw.githubusercontent.com/bungle/lua-resty-template/master/lib/resty/template.lua
https://raw.githubusercontent.com/bungle/lua-resty-template/master/lib/resty/template/html.lua
https://raw.githubusercontent.com/ledgetech/lua-resty-http/master/lib/resty/http.lua
https://raw.githubusercontent.com/ledgetech/lua-resty-http/master/lib/resty/http_headers.lua
https://raw.githubusercontent.com/ledgetech/lua-resty-http/master/lib/resty/http_connect.lua
nginx缓存反向代理openresty+lua+template.html模板渲染
#nginx default.conf
proxy_cache_path /cache/nginx levels=1:2 keys_zone=imooc_cache:10m max_size=5g inactive=60m use_temp_path=off;
proxy_cache_path /cache/productInfoCache levels=1:2 keys_zone=productInfoCache:256m max_size=5g inactive=1d use_temp_path=off;

upstream shopby_openresty{
   server 172.17.0.7:90 weight=5 max_fails=3 fail_timeout=30s;
}

#default.conf
server {
    listen       80;
    listen  [::]:80;
    server_name  shopby-c.com;  # centos laravel shopby项目域名
    root /docker/www/shopby/public;
    index index.php index.html;

    location / {
        try_files $uri $uri/ /index.php?$query_string;
    }

    error_page   500 502 503 504  /50x.html;
    location = /50x.html {
        root   /docker/www/shopby/public;
    }

    location /home
    {
        proxy_cache imooc_cache;
        proxy_pass http://shopby_openresty;
        proxy_cache_valid 200 304 12h;
        proxy_cache_valid any 10m;
        proxy_cache_key $host$uri$is_args$args;
        include /etc/nginx/conf.d/proxy_params;
    }

    location /productinfo
    {
        proxy_cache productInfoCache;
        proxy_cache_valid 200 304 302 1d;
        proxy_cache_key $request_uri;
        proxy_pass http://shopby_openresty;
    }

    location ~ .*/.(gif|jpg|jpeg|png|bmp|swf|js|css)$
    {
        expires 30d;
    }

    location ~ \.php$ {
        root /docker/www/shopby/public;
        fastcgi_pass   172.17.0.3:9000;  #映射到php服务端
        fastcgi_index  index.php;
        fastcgi_param  SCRIPT_FILENAME  $document_root$fastcgi_script_name;
        include        fastcgi_params;
    }
}
#openresty  default.conf
lua_shared_dict dis_cache 20m;
lua_shared_dict productInfoCache 200m;

lua_package_path "/usr/local/openresty/lualib/?.lua";
lua_package_cpath "/usr/local/openresty/lualib/?.so";

server {
    listen       90;
    listen       [::]:90;
    server_name  shopby-o.com;
    root /docker/www/webserver;
    index index.html login.html;

    set $template_root "/docker/www/productinfo";
    location /shopby_home_index_category {
        content_by_lua_file /docker/www/lua/shopby_home_index_category.lua;
    }

    location /productinfo{
        default_type 'text/html';
        content_by_lua_file /docker/www/lua/productinfo.lua;
    }
}
#openresty productinfo.lua
local uri_args = ngx.req.get_uri_args()
local productId = uri_args["product_id"]

local cache_ngx = ngx.shared.productInfoCache
local cjson = require("cjson")
local productCacheKey = "lmrs::product::info::"..productId
local productCache = cache_ngx:get(productCacheKey)
if productCache == "" or productCache == nil then
    local http = require("resty.http")
    local httpc = http.new()
    local url = "http://192.168.31.198/api/productItems?product_id="..productId
    local resp,err = httpc:request_uri(url,{
        method = "POST",
        body = body,
        headers = {
            ["Content-Type"] = "application/x-www-form-urlencoded",
        }
    })
    productCache = resp.body
    cache_ngx:set(productCacheKey,productCache,10  * 60)
end
local productCacheJson = cjson.decode(productCache)
local productInfo = {
    product_id  = productId,
    product_name = productCacheJson["name"],
    product_long_name = productCacheJson["long_name"],
    product_sold_count = productCacheJson["sold_count"],
    product_review_count = productCacheJson["review_count"]
}
local template = require("resty.template")
template.render("template.html",productInfo)
#openresty template.html
<!DOCTYPE html>
<html lang="en">
<head>
<meta charset="UTF-8">
<title>{* product_name *}</title>
<script type="text/javascript" src="http://192.168.31.198:90/static/js/jquery_4.js"></script>
</head>
<body>
商品名称222:{* product_name *}
销量:{* product_sold_count *}
评价:{* product_sold_count *}
<input id="product_id" type="hidden" value="{* product_id *}">
<script type="text/javascript">
var product_id = document.getElementById("product_id").value;
$.ajax({
type: "post",
url: "http://192.168.31.198/api/productInfo",
data:{"product_id":product_id},
success: function(data) {
var html = ""
;
html += "价格:"+data.price;
$("body").append(html);
}
});
</script>
</body>
</html>
docker搭建rabbitmq容器
docker pull rabbitmq
docker run -p 5672:5672 -p 15672:15672 -d --name rabbitmq -v /docker/rabbitmq:/var/lib/rabbitmq --privileged=true --hostname byRabbitmq -e RABBITMQ_DEFAULT_VHOST=my_vhost -e RABBITMQ_DEFAULT_USER=rabbitmq -e RABBITMQ_DEFAULT_PASS=rabbitmq rabbitmq
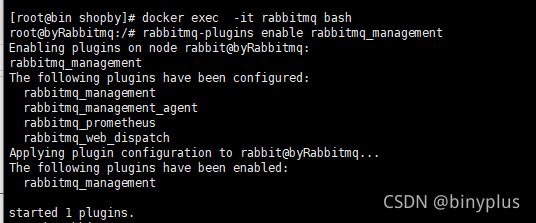
安装rabbitmq可视化管理组件:rabbitmq_management
docker exec -it rabbitmq bash
rabbitmq-plugins enable rabbitmq_management
php容器中安装amqp扩展
docker exec -it php bash
安装amqp之前需要先安装rabbitmq-c扩展
apt-get update
apt-get install wget
cd /home
wget https://github.com/alanxz/rabbitmq-c/releases/download/v0.8.0/rabbitmq-c-0.8.0.tar.gz
tar -zxvf rabbitmq-c-0.8.0.tar.gz
cd rabbitmq-c-0.8.0
./configure --prefix=/usr/local/rabbitmq-c
make && make installhttps://pecl.php.net/package-search.php # 搜索需要的包
https://pecl.php.net/get/amqp-1.10.2.tgz # amqp 包下载地址
cd /home
wget https://pecl.php.net/get/amqp-1.10.2.tgz
tar -zxvf amqp-1.10.2.tgz
cp -r amqp-1.10.2 /usr/src/php/ext/amqp
cp /home/rabbitmq-c-0.8.0/librabbitmq/amqp_ssl_socket.h /usr/src/php/ext/amqp/
docker-php-ext-configure amqp --with-php-config=/usr/local/bin/php-config --with-librabbitmq-dir=/usr/local/rabbitmq-c
docker-php-ext-install amqp
php -m | grep amqp
docker搭建rabbitmq容器
php容器中安装amqp扩展
laravel中使用rabbitmq
同步系统时间
yum -y install ntp ntpdate
ntpdate 0.asia.pool.ntp.org
docker cp /usr/share/zoneinfo/Asia/Shanghai nginx:/etc/localtime #同步docker容器内系统时间
docker cp /usr/share/zoneinfo/Asia/Shanghai php:/etc/localtime #同步docker容器内系统时间
修改laravel项目config/app.php ‘timezone’ => ‘Asia/Shanghai’
docker restart php
docker restart nginx


