2022年最新《谷粒商城开发教程》:1 - 构建工程篇
- Java工程师的进阶之路
- 代码地址
- 2 - vue 简要笔记
- 3 - 商品服务-API-三级分类
- 4 - 商品服务-API-品牌管理
- 5 - 商品服务-API-属性分组
目录
- 前言
- 一、项目架构
- 二、服务器环境搭建
- 三、开发环境搭建
- 四、IDEA环境搭建
- 五、数据库环境搭建
- 六、人人开源-环境搭建
- 七、人人开源-逆向工程
- 八、公共模块Common
- 九、测试
- 十、优化其他模块
- 十一、整合CloudAlibaba
-
- 11.1、Nacos注册中心
- 11.2、Nacos配置中心
- 11.3、整合Gateway网关
前言
前置知识:
- Vue
- Spring + SpringMVC + MyBatis
- SpringBoot + Mybatis-plus + SpringCloud + SpringCloudAlibaba
- Linux - Git - Redis - Docker - Nginx
- Java工程师的进阶之旅 - 上面的教程大部分有笔记
一、项目架构
整体架构图:

1、前后分离开发,分为内网部署和外网部署,外网是面向公众访问的,部署前端项目,可以有手机APP,电脑网页;内网部署的是后端集群,前端在页面上操作发送请求到后端,在这途中会经过Nginx集群,Nginx把请求转交给API网关(springcloud gateway)(网关可以根据当前请求动态地路由到指定的服务,看当前请求是想调用商品服务还是购物车服务还是检索),从路由过来如果请求很多,可以负载均衡地调用商品服务器中一台(商品服务复制了多份),当商品服务器出现问题也可以在网关层面对服务进行熔断或降级(使用阿里的sentinel组件),网关还有其他的功能如认证授权、限流(只放行部分到服务器)等。
2、到达服务器后进行处理(springboot为微服务),服务与服务可能会相互调用(使用OpenFeign组件),有些请求可能经过登录才能进行(基于OAuth2.0的认证中心。安全和权限使用springSecurity控制)
3、服务可能保存了一些数据或者需要使用缓存,我们使用redis集群(分片+哨兵集群)。持久化使用mysql,读写分离和分库分表。
4、服务和服务之间会使用消息队列(RabbitMQ),来完成异步解耦,分布式事务的一致性。有些服务可能需要全文检索,检索商品信息,使用ElaticSearch。
5、服务可能需要存取数据,使用阿里云的对象存储服务OSS。
6、项目上线后为了快速定位问题,使用ELK对日志进行处理,使用LogStash收集业务里的各种日志,把日志存储到ES中,用Kibana可视化页面从ES中检索出相关信息,帮助我们快速定位问题所在。
7、在分布式系统中,由于我们每个服务都可能部署在很多台机器,服务和服务可能相互调用,就得知道彼此都在哪里,所以需要将所有服务都注册到注册中心。服务从注册中心发现其他服务所在位置(使用阿里Nacos作为注册中心)。
8、每个服务的配置众多,为了实现改一处配置相同配置就同步更改,就需要配置中心,也使用阿里的Nacos,服务从配置中心中动态取配置。
9、服务追踪,追踪服务调用链哪里出现问题,使用springcloud提供的Sleuth、Zipkin、Metrics,把每个服务的信息交给开源的Prometheus进行聚合分析,再由Grafana进行可视化展示,提供Prometheus提供的AlterManager实时得到服务的告警信息,以短信/邮件的方式告知服务开发人员。
10、还提供了持续集成和持续部署。项目发布起来后,因为微服务众多,每一个都打包部署到服务器太麻烦,有了持续集成后开发人员可以将修改后的代码提交到github,运维人员可以通过自动化工具Jenkins Pipeline将github中获取的代码打包成docker镜像,最终是由k8s集成docker服务,将服务以docker容器的方式运行。
前后分离开发。前端项目分为admin-vue(工作人员使用的后台管理系统)、shop-vue(面向公众访问的web网站)、app(公众)、小程序(公众)
- 商品服务:商品的增删改查、商品的上下架、商品详情
- 支付服务
- 优惠服务
- 用户服务:用户的个人中心、收货地址
- 仓储服务:商品的库存
- 秒杀服务:定时任务与redis
- 订单服务:订单增删改查、验价、幂等性token
- 检索服务:商品的检索ES
- 中央认证服务:登录、注册、单点登录、社交登录
- 购物车服务:redis
- 后台管理系统:添加优惠信息等
二、服务器环境搭建
1、创建一个新的虚拟机CentOS7.6 for gulimall - 内存4G + 20G硬盘 + 4核处理器
2、虚拟机配置固定IP地址 - 教程
3、虚拟机安装Docker - 教程
4、Docker - MySQL and Nacos
这里将nacos也配置在了docker中,并且配置好了mysql的持久化
教程地址
5、Docker - Redis
5.1、如果直接挂载的话docker会以为挂载的是一个目录,先创建文件并配置持久化
mkdir -p /mydata/redis/conf
# 在 redis.conf 开启 redis持久化配置
echo 'appendonly yes' >  /mydata/redis/conf/redis.conf
5.2、运行容器
docker run -p 6379:6379 --name redis \
-v /mydata/redis/data:/data \
-v /mydata/redis/conf/redis.conf:/etc/redis/redis.conf \
--restart=always \
-d redis redis-server /etc/redis/redis.conf
6、Docker - Nginx
6.1、启动nginx测试容器,复制出配置文件
docker run --name test -d nginx:1.10

mkdir /mydata/nginx && cd /mydata/nginx

docker cp test:/etc/nginx .

mv /mydata/nginx/nginx /mydata/nginx/conf

docker rm -f test
6.2、运行容器
docker run -p 80:80 --name nginx \
-v /mydata/nginx/html:/usr/share/nginx/html \
-v /mydata/nginx/logs:/var/log/nginx \
-v /mydata/nginx/conf:/etc/nginx \
--restart=always \
-d nginx:1.10
三、开发环境搭建
3.1、maven
在settings中配置阿里云镜像,配置jdk1.8
IDEA安装插件lombok,mybatisX。IDEA设置里配置好maven
3.2、VSCode 安装插件
- Auto Close Tag
- Auto Rename Tag
- Chinese
- ESlint
- HTML CSS Support
- HTML Snippets
- JavaScript ES6
- Live Server
- open in brower
- Vetur
四、IDEA环境搭建
Git教程
- Gitee - 新建仓库
gulimall - 选择 - 语言java,在.gitignore选中maven,许可证选Apache-2.0
- 开发模型 - 生产/开发模型,开发时在dev分支,发布时在master分支
- IDEA -
New – Project from version control - git- 复制远程仓库地址 - 新建 -
pom.xml作为父工程pom,在maven窗口刷新,并点击+号,找到刚才的pom.xml添加进来,发现多了个root。这样比如运行root的clean命令,其他项目也一起clean了。
<project xmlns="http://maven.apache.org/POM/4.0.0" xmlns:xsi="http://www.w3.org/2001/XMLSchema-instance"
	xsi:schemaLocation="http://maven.apache.org/POM/4.0.0 https://maven.apache.org/xsd/maven-4.0.0.xsd">
	<modelVersion>4.0.0modelVersion>

	<groupId>com.laptoy.gulimallgroupId>
	<artifactId>gulimallartifactId>
	<version>0.0.1-SNAPSHOTversion>
	<name>gulimallname>
	<description>聚合服务description>

	<packaging>pompackaging>

	<modules>
		<module>gulimall-couponmodule>
		<module>gulimall-membermodule>
		<module>gulimall-ordermodule>
		<module>gulimall-productmodule>
		<module>gulimall-waremodule>
	modules>

project>
- 父工程
.gitignore文件添加,排除垃圾文件
**/mvnw
**/mvnw.cmd
**/.mvn
**/target/
.idea
**/.gitignore
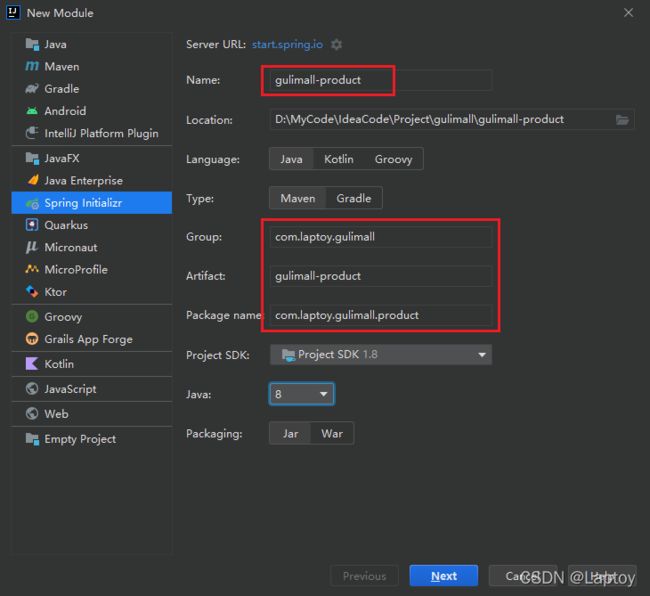
使用 Spring Initializr 依次创建出以下服务模块
1、 group - com.laptoy.gulimall
2、版本(版本一定要对上,否则必定报错)
- SpringBoot版本 -
2.1.8.RELEASE - SpringCloud版本 -
Greenwich.SR3
3、添加 - web和openfeign组件
| 服务名 | 服务名 | 包名 | 端口 |
|---|---|---|---|
| 优惠券服务 | gulimall-coupon | com.laptoy.gulimall.coupon |
7000 |
| 用户服务 | gulimall-member | com.laptoy.gulimall.member |
8000 |
| 订单服务 | gulimall-order | com.laptoy.gulimall.order |
9000 |
| 商品服务 | gulimall-product | com.laptoy.gulimall.product |
10000 |
| 存储服务 | gulimall-ware | com.laptoy.gulimall.ware |
11000 |
<project xmlns="http://maven.apache.org/POM/4.0.0" xmlns:xsi="http://www.w3.org/2001/XMLSchema-instance"
         xsi:schemaLocation="http://maven.apache.org/POM/4.0.0 https://maven.apache.org/xsd/maven-4.0.0.xsd">
    <modelVersion>4.0.0modelVersion>
    <parent>
        <groupId>org.springframework.bootgroupId>
        <artifactId>spring-boot-starter-parentartifactId>
        <version>2.1.8.RELEASEversion>
        <relativePath/>
    parent>

    <groupId>com.laptoy.gulimallgroupId>
    <artifactId>gulimall-productartifactId>
    <version>0.0.1-SNAPSHOTversion>
    <name>gulimall-productname>
    <description>gulimall-productdescription>

    <properties>
        <java.version>1.8java.version>
        <spring-cloud.version>Greenwich.SR3spring-cloud.version>
    properties>

    <dependencies>
        <dependency>
            <groupId>org.springframework.bootgroupId>
            <artifactId>spring-boot-starterartifactId>
        dependency>
        <dependency>
            <groupId>org.springframework.bootgroupId>
            <artifactId>spring-boot-starter-webartifactId>
        dependency>
        <dependency>
            <groupId>org.springframework.cloudgroupId>
            <artifactId>spring-cloud-starter-openfeignartifactId>
        dependency>
        <dependency>
            <groupId>org.springframework.bootgroupId>
            <artifactId>spring-boot-starter-testartifactId>
            <scope>testscope>
        dependency>
    dependencies>

    <dependencyManagement>
        <dependencies>
            <dependency>
                <groupId>org.springframework.cloudgroupId>
                <artifactId>spring-cloud-dependenciesartifactId>
                <version>${spring-cloud.version}version>
                <type>pomtype>
                <scope>importscope>
            dependency>
        dependencies>
    dependencyManagement>

    <build>
        <plugins>
            <plugin>
                <groupId>org.springframework.bootgroupId>
                <artifactId>spring-boot-maven-pluginartifactId>
            plugin>
        plugins>
    build>

project>
五、数据库环境搭建
1、下载SQL文件 SQL脚本位置
2、使用IDEA内置数据库可视化进行运行 sql脚本

3、选择所有脚本

4、最终效果

六、人人开源-环境搭建
1、采用 人人开源项目 作为基石 - 使用 renren-fast(后端),renren-fast-vue(前端)项目。
2、直接Clone并删除里面的 .git文件
git clone https://gitee.com/renrenio/renren-fast.git
git clone https://gitee.com/renrenio/renren-fast-vue.git
6.1、后端环境IDEA
1、把 renren-fast 移动到 gulimall 文件夹下(删掉 .git文件)
2、父项目POM添加
<modules>
	...
    <module>renren-fastmodule>
modules>
3、打开 - renren-fast/db/mysql.sql,创建数据库 gulimall_admin 并执行SQL文件
前面一起通过sql脚本创建好了
4、修改YML - 修改application-dev.yml中的数据库,修改为自己的 IP
url: jdbc:mysql://192.168.88.129:3306/gulimall_admin?useSSL=false&useUnicode=true&characterEncoding=utf-8&useLegacyDatetimeCode=false&serverTimezone=Asia/Shanghai
username: root
password: root
5、运行该模块
访问 - http://localhost:8080/renren-fast/ 成功返回 {“msg”:“invalid token”,“code”:401}
6.2、前端环境VSCode
1、用VSCode打开 renren-fast-vue
2、安装Node.js:下载 12.1 版本
3、CMD终端 - 查看版本并修改国内镜像
node -v
# 修改镜像仓库
npm config set registry http://registry.npm.taobao.org/
NPM是随同NodeJS一起安装的包管理工具。JavaScript-NPM类似于java-Maven。
4、以管理员身份在VSCode打开该项目
# 配置镜像
npm config set registry http://registry.npm.taobao.org/

npm install  [email protected]
npm install

# 启动
npm run dev
5、测试
访问 - http://localhost:8001/ 输入验证码登录成功
七、人人开源-逆向工程
1、拉取逆向工程项目
git clone https://gitee.com/renrenio/renren-generator.git
2、父工程POM添加
<modules>
	...
    <module>renren-generatormodule>
modules>
3、修改YML为自己的 MySQL IP地址
url: jdbc:mysql://192.168.88.129:3306/gulimall_pms?useUnicode=true&characterEncoding=UTF-8&useSSL=false&serverTimezone=Asia/Shanghai
username: root
password: root
4、修改逆向工程执行文件 - generator.properties
# 主目录
mainPath=com.laptoy
# 包名
package=com.laptoy.gulimall
# 模块名
moduleName=product   # 对应模块修改
# 作者
author=laptoy
# email
email=[email protected]
# 表前缀(类名不会包含表前缀)
# 我们的pms数据库中的表的前缀都pms
# 如果写了表前缀,每一张表对应的javaBean就不会添加前缀了
tablePrefix=pms_
5、进入该模块的resources/template/controller.java.vm修改控制类生成模板
ctrl + R- 搜索@RequiresPermissions注释这些代码(默认是shiro的安全,以后转为springsecurity,先不删除)- 删除该注解的引用 -
import org.apache.shiro.authz.annotation.RequiresPermissions;(这个直接删除)
6、访问 - localhost:80 - 这里全选其他但是不用选择undo_log数据表切记

6、直接复制 main文件夹 到对应模块
7、删除 resources/src 目录
8、发现有些代码报红,后面处理
八、公共模块Common
1、新建普通Maven模块 - gulimall-common
2、父工程POM
<modules>
	...
    <module>gulimall-commonmodule>
modules>
3、当前项目POM - 添加
<dependency>
    <groupId>com.baomidougroupId>
    <artifactId>mybatis-plus-boot-starterartifactId>
    <version>3.3.2version>
dependency>

<dependency>
    <groupId>org.projectlombokgroupId>
    <artifactId>lombokartifactId>
    <version>1.18.8version>
dependency>

<dependency>
    <groupId>org.apache.httpcomponentsgroupId>
    <artifactId>httpcoreartifactId>
    <version>4.4.13version>
dependency>
<dependency>
    <groupId>commons-langgroupId>
    <artifactId>commons-langartifactId>
    <version>2.6version>
dependency>

<dependency>
    <groupId>mysqlgroupId>
    <artifactId>mysql-connector-javaartifactId>
    <version>8.0.17version>
dependency>

<dependency>
    <groupId>javax.servletgroupId>
    <artifactId>servlet-apiartifactId>
    <version>2.5version>
    <scope>providedscope>
dependency>
4、五个开发模块添加依赖依赖common工程
<dependency>
    <groupId>com.laptoy.gulimallgroupId>
    <artifactId>gulimall-commonartifactId>
    <version>0.0.1-SNAPSHOTversion>
dependency>
5、拷贝文件 -
- common模块 建包
com.laptoy.common.utils
以下都是在renren-fast模块拷贝代码
- 拷贝
utils包里的Query、PageUtils、R、Constant到com.laptoy.common.utils - 拷贝
exception包的RRException到com.laptoy.common.utils下 - 拷贝
xss包里的HTMLFilter、SQLFilter到com.laptoy.common.xss下 - 拷贝
validator.group包里的AliyunGroup、QcloudGroup、QuniuGroup到com.laptoy.common.group下
九、测试
测试与整合商品服务里的mybatisplus
1、在product项目的resources目录下新建application.yml
server:
  port: 10000

spring:
  datasource:
    username: root
    password: root
    url: jdbc:mysql://192.168.88.129:3306/gulimall_pms?useUnicode=true&characterEncoding=UTF-8&useSSL=false&serverTimezone=Asia/Shanghai
    driver-class-name: com.mysql.cj.jdbc.Driver

# MapperScan
# sql映射文件位置
mybatis-plus:
  mapper-locations: classpath:/mapper/**/*.xml
  global-config:
    db-config:
      id-type: auto
2、主启动类
@MapperScan("com.laptoy.gulimall.product.dao")
@SpringBootApplication
public class GulimallProductApplication {
    public static void main(String[] args) {
        SpringApplication.run(GulimallProductApplication.class, args);
    }
}
3、测试 - 添加
@RunWith(SpringRunner.class)
@SpringBootTest
public class GulimallProductApplicationTests {

    @Autowired
    BrandService brandService;

    @Test
    public void contextLoads() {
        BrandEntity brandEntity = new BrandEntity();
        brandEntity.setDescript("哈哈1哈");
        brandEntity.setName("华为");
        brandService.save(brandEntity);
        System.out.println("保存成功");
    }
}
十、优化其他模块
10.1、gulimall-coupon(对应库gulimall_sms,端口7000)
1、打开generator逆向工程,修改generator.properties
# 主目录
mainPath=com.laptoy
# 包名
package=com.laptoy.gulimall
# 模块名
moduleName=coupon # 对应模块修改
# 作者
author=laptoy
# email
email=[email protected]
# 表前缀(类名不会包含表前缀)
# 我们的pms数据库中的表的前缀都pms
# 如果写了表前缀,每一张表对应的javaBean就不会添加前缀了
tablePrefix=sms_
2、打开generator逆向工程,修改application.yml - 连接gulimall_sms进行逆向工程
url: jdbc:mysql://192.168.88.129:3306/gulimall_sms?useUnicode=true&characterEncoding=UTF-8&useSSL=false&serverTimezone=Asia/Shanghai
username: root
password: root
3、新增 - YML
server:
  port: 7000

spring:
  datasource:
    username: root
    password: root
    url: jdbc:mysql://192.168.88.129:3306/gulimall_sms?useUnicode=true&characterEncoding=UTF-8&useSSL=false&serverTimezone=Asia/Shanghai
    driver-class-name: com.mysql.cj.jdbc.Driver

mybatis-plus:
  mapper-locations: classpath:/mapper/**/*.xml
  global-config:
    db-config:
      id-type: auto
      logic-delete-value: 1
      logic-not-delete-value: 0
4、运行逆向工程模块
访问 - localhost:80 - 勾选所有表除了undo_log表进行代码生成
5、复制 - main目录 到当前模块
6、删除 - resources下的 src包
7、测试类里的junit可能有问题,估计是springboot的junit的问题
7、运行测试
访问 - http://localhost:7000/coupon/coupon/list 响应成功
10.2、 gulimall-member(对应库gulimall_ums,端口8000)
1、模仿以上的代码
2、访问 - http://localhost:8000/member/growthchangehistory/list 响应成功
10.3、 gulimall-order(对应库gulimall_oms,端口9000)
1、模仿以上的代码
2、访问 - http://localhost:9000/order/order/list 响应成功
10.4、 gulimall-ware(对应库gulimall_wms,端口11000)
1、模仿以上的代码
2、访问 - http://localhost:11000/ware/wareinfo/list 响应成功
十一、整合CloudAlibaba
1、common模块POM - 加入依赖管理
<dependencyManagement>
    <dependencies>
        <dependency>
            <groupId>com.alibaba.cloudgroupId>
            <artifactId>spring-cloud-alibaba-dependenciesartifactId>
            <version>2.1.0.RELEASEversion>
            <type>pomtype>
            <scope>importscope>
        dependency>
    dependencies>
dependencyManagement>
11.1、Nacos注册中心
1、common模块引入依赖
<dependency>
    <groupId>com.alibaba.cloudgroupId>
    <artifactId>spring-cloud-starter-alibaba-nacos-discoveryartifactId>
dependency>
2、五个模块 - 启动类 - 添加注解 - 开启服务发现 - @EnableDiscoveryClient
3、五个模块 - YML - 新增
spring:
  application:
    name: gulimall-xxx
  cloud:
    nacos:
      discovery:
        server-addr: 192.168.88.129:8848
4、运行模块并访问 - 192.168.88.129:8848/nacos - 服务注册成功

11.2、Nacos配置中心
本项目的配置:
- 五个模块都有自己的命名空间
- 每个模块的命名空间采用组:dev、prod、test、info
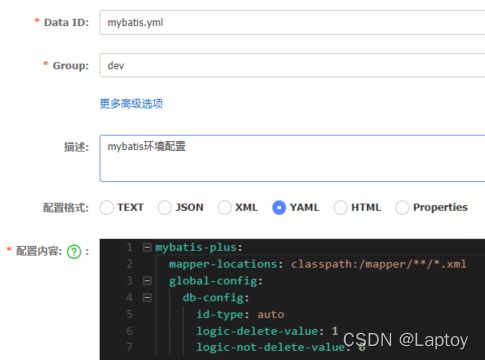
- 每个模块的组采用多配置集:mybatis.yml、datasource.yml、other.yml
1、为五个服务分别创建命名空间

2、为每个模块创建组(这个自行演示)
3、多配置集 - 这里以coupon模块做演示,其余模块自行模仿
代码配置
1、common模块引入依赖
<dependency>
     <groupId>com.alibaba.cloudgroupId>
     <artifactId>spring-cloud-starter-alibaba-nacos-configartifactId>
 dependency>
2、新增 - 连接配置中心文件 - bootstrap.properties - (配置中心也需要指定服务名)
spring.application.name=gulimall-xxx
spring.cloud.nacos.config.server-addr=192.168.88.129:8848

# 指定命名空间
spring.cloud.nacos.config.namespace=xxx-xxxx-xxxx

# 指定组
# spring.cloud.nacos.config.group=dev

# 指定组的多配置集
spring.cloud.nacos.config.ext-config[0].data-id=datasource.yml
spring.cloud.nacos.config.ext-config[0].group=dev
spring.cloud.nacos.config.ext-config[0].refresh=true

spring.cloud.nacos.config.ext-config[1].data-id=mybatis.yml
spring.cloud.nacos.config.ext-config[1].group=dev
spring.cloud.nacos.config.ext-config[1].refresh=true

spring.cloud.nacos.config.ext-config[2].data-id=other.yml
spring.cloud.nacos.config.ext-config[2].group=dev
spring.cloud.nacos.config.ext-config[2].refresh=true
3、运行 - http://localhost:7000/coupon/coupon/list 响应成功
11.3、整合Gateway网关
1、使用 initilizer 创建微服务
- Group:
com.laptoy.gulimall - Artifact:
gulimall-gateway - package:
com.laptoy.gulimall.gateway - 选中
Gateway组件添加
2、POM
- 修改 - SpringBoot版本:
2.1.8.RELEASE - 修改 - SpringCloud版本:
Greenwich.SR3 - 添加依赖 - 依赖 common模块
3、配置中心
- 新增命名空间:
gateway - 新增配置文件:
dev组 - other.properties:存放端口和注册中心配置(数据少直接用properties了)
spring.cloud.nacos.discovery.server-addr=192.168.88.129:8848
spring.application.name=gulimall-gateway
server.port=88
- 新增配置文件:
dev组 - gateway.yml:存放网关配置(看不懂的去看看cloud的教程,文章开头有链接自己的笔记)
spring:
  cloud:
    gateway:
      routes:
      - id: test_route
        uri: https://www.bilibili.com
        predicates:
          - Query=url,bilibili
4、YML - bootstrap.properties
spring.application.name=gulimall-gateway

spring.cloud.nacos.config.server-addr=192.168.88.129:8848
spring.cloud.nacos.config.namespace=xxx-xx-xx-xxx-xx

spring.cloud.nacos.config.ext-config[0].data-id=other.properties
spring.cloud.nacos.config.ext-config[0].group=dev
spring.cloud.nacos.config.ext-config[0].refresh=true

spring.cloud.nacos.config.ext-config[1].data-id=gateway.yml
spring.cloud.nacos.config.ext-config[1].group=dev
spring.cloud.nacos.config.ext-config[1].refresh=true
5、主启动类 - 开启服务发现并排除数据库相关配置,因为前面引入的common模块有数据库相关配置
@EnableDiscoveryClient
@SpringBootApplication(exclude = {DataSourceAutoConfiguration.class})
public class GulimallGatewayApplication {
    public static void main(String[] args) {
        SpringApplication.run(GulimallGatewayApplication.class, args);
    }
}
6、访问 - http://localhost:88/?url=bilibili 跳转到bilibili页面


