谷粒商城(四)-使用 gitee 的“人人开源“”项目搭建后台管理系统脚手架
一、后端项目 renren-fast(把人人开源项目里的 renren-fast项目加入我们的gulimall项目中作为module,搭建后台管理系统的后端项目)
1、在码云上搜索人人开源(https://gitee.com/renrenio),我们使用renren-fast,renren-fast-vue项目。
git clone https://gitee.com/renrenio/renren-fast.git
git clone https://gitee.com/renrenio/renren-fast-vue.git


2、下载到了桌面,我们把renren-fast删掉.git文件,然后移动到我们的项目文件夹,renren-vue删掉.git文件,是用VSCode打开的(后面再弄)。
(2)IDEA项目总目录中,配置好总项目的pom.xml,
<modules>
		<module>gulimall-coupon</module>
		<module>gulimall-member</module>
		<module>gulimall-order</module>
		<module>gulimall-product</module>
		<module>gulimall-ware</module>
		<module>renren-fast</module>
</modules>
3、version Control栏,将renren-fast的“无版本控制”加到“默认控制”
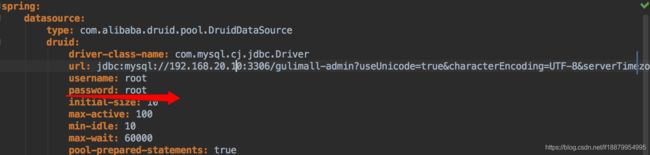
4、然后修改项目里renren-fast中的application.yml,修改application-dev.yml中的数库库的url,通常把localhost修改为192.168.20.10即可。
url: jdbc:mysql://192.168.20.10:3306/gulimall-admin?useUnicode=true&characterEncoding=UTF-8&serverTimezone=Asia/Shanghai
username: root
password: root

5、然后执行java下的RenrenApplication,
出现报错1(如果密码写123456)
1、springboot集成druid登陆mysql发生errorCode 1045, state 28000错误:说明是mysql数据库用户密码错误,去navicat改一下连接数据库的密码改为application-dev.yml中的123456就行,
2、但是改完密码之后,mysql数据库连不上、报错,把密码123456改为root即可!!!,然后去application-dev.yml中改密码为root!!!
出现报错2
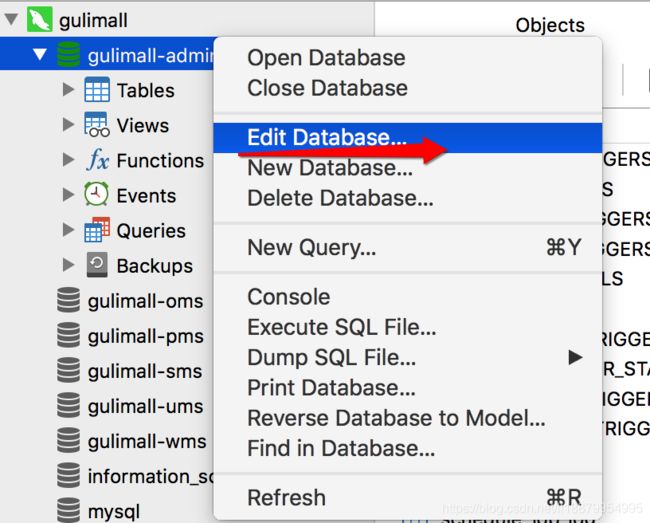
1、SQLSyntaxErrorException: Table ‘gulimall-admin.QRTZ_TRIGGERS’ doesn’t exist:说明数据库中不存在这个表,因为gulimall-admin数据库中表名是qrtz_triggers都是小写字母。我们collation使用utf8_general_ci区分大小写,所以会判定不是同一张表,会报错。
2、解决方法1(不用):编辑数据库,修改collation为utf8mb4_unicode_ci ,及改为不区分大小写。
3、解决方法2(用):用表名都是大写字母的sql语句创建gulimall-admin数据库~~https://blog.csdn.net/wll_123456/article/details/108418356
collation使用utf8mb4_general_ci 区分大小写、utf8mb4_bin 区分大小写、
collation使用utf8_bin时区分大小写,
综上:utf8的collation必用utf8_general_ci不区分大小写,
	utf8mb4的collation必用utf8mb4_unicode_ci不区分大小写
6、浏览器输入http://localhost:8080/renren-fast/ 得到{“msg”:“invalid token”,“code”:401}就代表无误,后端跑通了。
二、前端项目 renren-fast-vue(搭建后台管理系统的前端项目,并进让前后端连起来,人人开源项目里的 renren-fast-vue 使用 vscode软件进行开发运行)
1、用VSCode打开renren-fast-vue
2、安装node:http://nodejs.cn/download/ 选择mac下载。下载完安装。

3、安装npm
npm是随同NodeJS一起安装的包管理工具,相当于java的maven、JavaScript的npm
(1)检查node是否配置好了(本地终端):node -v
(2)配置npm的淘宝镜像仓库地址(本地终端):npm config set registry http://registry.npm.taobao.org/
node -v
npm config set registry http://registry.npm.taobao.org/
(3)然后安装依赖,去VScode的终端输入 npm install,让npm下载前端依赖的所有组件。(我这里只是一直卡在,没报错很开心,不需要管下面的引用)

npm install安装失败,解决方法
方法一1-如果安装失败清理缓存:npm rebuild node-sass、npm uninstall node-sass
2-淘宝镜像下载,安装node-sass淘宝镜像:npm i node-sass --sass_binary_site=https://npm.taobao.org/mirrors/node-sass/
3-执行以后看是否报错,如果没有则加载依赖,然后运行npm install。
参考:https://blog.csdn.net/weixin_43859732/article/details/107779450?utm_medium=distribute.pc_relevant.none-task-blog-BlogCommendFromMachineLearnPai2-4.control&depth_1-utm_source=distribute.pc_relevant.none-task-blog-BlogCommendFromMachineLearnPai2-4.control方法二
1-关于新谷粒P16的前端项目使用npm install报错的问题,首先确保安装了python3.0以上版本,并配置全局变量
2-其次大部分错误是报node-sass4.9.0安装失败。 执行以下步骤可以完美解决
(1)首先把项目文件夹下的package.json里面的node-sass4.9.0改成4.9.2(不改可能也没关系,不过我改了,防止踩坑)
(2)然后项目文件夹下打开cmd命令窗口(和Visual Studio Code的终端命令是一样的)(我在VScode中不成功,还是用cmd吧,在cmd中注意切换到renren-fast-vue项目目录) 执行:
npm i node-sass --sass_binary_site=https://npm.taobao.org/mirrors/node-sass/
(3)等待挺长时间,执行成功看看有没有报错,
(4)如果没报错执行下面命令 npm install , 没报错就是安装成功,然后在下面目录下使用npm run dev (运行项目)就ok了
注:这么做得原理就是先单独从淘宝镜像吧nod-sass下载下来,然后再进行编译,因为这句命令好像是不成功的,
(npm config set registry http://registry.npm.taobao.org/),默认从github下载,导致报错的。如果之前安装失败的,先清理缓存:npm
rebuild node-sass npm uninstall node-sass
3-另一个人的评论:
先把node_modules全部删除,然后再npm install chromedriver–chromedriver_cdnurl=http://cdn.npm.taobao.org/dist/chromedriver,最后npm install。
(4)1-VScode的终端中使用npm run dev 运行项目就ok了,
2-浏览器输入localhost:8001 就可以看到内容了,那么前端搭建成功,
3-登录账号admin,密码admin,登录成功,那么前后端联调成功。
npm run dev 运行项目报错:renren-fast-vue 无法正常启动登录页面,显示<%if(process. enV. NODE_ENV===’ production){%><%} else{%><%}%>
项目中使用的sass版本为4.9.0 支持的nodejs版本为10.x或者以下,而我们的nodejs版本是14.x,所以报错。
解决方法1(不用):VScode的终端卸载npm ,再重新安装npm
npm uninstall --save node-sass
npm install --save node-sass --unsafe-perm=true --allow-root

参考1,https://www.cnblogs.com/alan88/p/13414496.html
参考2,https://blog.csdn.net/weixin_43859732/article/details/107779450?utm_medium=distribute.pc_relevant.none-task-blog-BlogCommendFromMachineLearnPai2-4.control&depth_1-utm_source=distribute.pc_relevant.none-task-blog-BlogCommendFromMachineLearnPai2-4.control
解决方法2(用):1、先确保npm 和node版本必须符合,node>= 8.11.1,npm>= 5.6.0,VScode的终端执行node -v 和 npm -version,符合条件。2、安装2个组件:node-sass、sass-loader 。3、VScode的终端中使用 npm run dev 运行项目就ok了。
参考https://blog.csdn.net/u011611479/article/details/107851852
sudo npm install node-sass --save --unsafe-perm=true
sudo npm install sass-loader --unsafe-perm=true


三、逆向工程搭建(生成crud代码)
使用人人开源项目里的 renren-generator 项目为各个微服务模块逆向生成 crud 代码,这里以逆向生成 gulimall_pms 数据库中表的curd代码为例
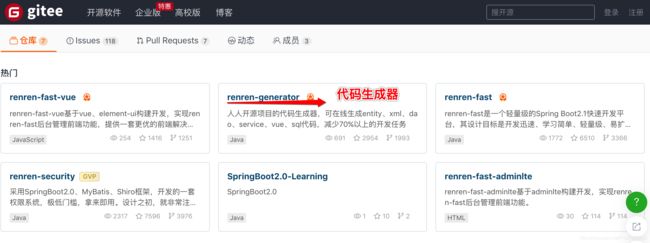
(1)克隆代码生成器(人人开源renren-generator )
git clone https://gitee.com/renrenio/renren-generator.git
(2)下载到桌面后,同样把里面的.git文件删除,然后移动到我们IDEA项目总目录中,同样配置好总项目的pom.xml,
<modules>
		<module>gulimall-coupon</module>
		<module>gulimall-member</module>
		<module>gulimall-order</module>
		<module>gulimall-product</module>
		<module>gulimall-ware</module>
		<module>renren-fast</module>
		<module>renren-generator</module>
</modules>
 (3)在maven中刷新一下,让项目名变粗体,稍等下面进度条完成。
(如果不能加粗,参考https://blog.csdn.net/lf18879954995/article/details/110407497)

(4)修改renren-generator的application.yml
url: jdbc:mysql://192.168.20.10:3306/gulimall-pms?useUnicode=true&characterEncoding=UTF-8&useSSL=false&serverTimezone=Asia/Shanghai
username: root
password: root
视频里面是gulimall_pms,我们是gulimall-pms,所以192.168.20.10:3306/gulimall-pms

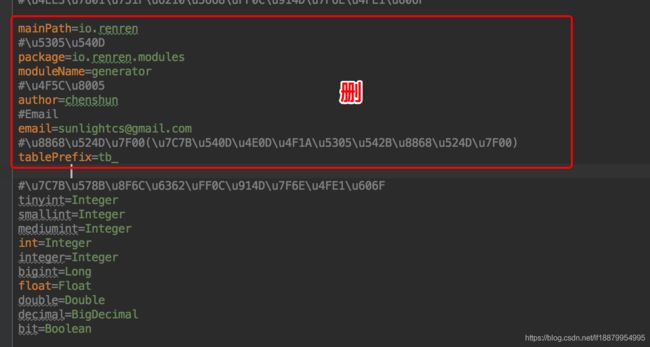
(5)然后修改renren-generator的generator.properties(这里乱码的百度IDEA设置properties编码)
#主目录
mainPath=com.atguigu
#包名
package=com.atguigu.gulimall
#模块名
moduleName=product
#作者
author=hh
[email protected]
#表前缀(类名不会包含表前缀) , 我们的pms数据库中的表的前缀都pms
#如果写了表前缀,每一张表对于的javaBean就不会添加前缀
tablePrefix=pms_
(6)运行renren-generator的RenrenApplication。http://localhost:80/
如果启动不成功:
1、windows修改application中port为801(原来为80)。访问http://localhost:801/
2、mac电脑修改application中port为8002(原来为80)。访问http://localhost:8002/
因为在linux/mac下,为了系统安全,使用小于1024端口时,需要被授权,最快的解决方案就是更换一个大于1024的端口。ok,把端口号更改为8002,重启,问题解决。
参考https://blog.csdn.net/lf18879954995/article/details/110411233

(7)在网页上下方点击每页显示50个(pms库中的表总共15个或者16个,看你用哪个sql代码),以让全部都显示!!!!!,然后点击全部,点击生成代码。下载了压缩包
pms库中的表总共15个或者16个,看你用哪个sql代码
sql1: https://blog.csdn.net/weixin_44623215/article/details/105883956
sql2:https://blog.csdn.net/wll_123456/article/details/108418356

(8)解压压缩包,将生成的 renren.zip 文件解压,将里面的 main 文件夹整个复制到gulimall\gulimall-product\src,与原来的mian进行整合,然后我们打开idea可以看到,多了很多代码。


(9)代码报错是因为有生成的curd代码有很多依赖没有被引入

创建一个maven 模块 gulimall-commom,用来储存每个微服务的公共依赖、bean、工具类等:在总项目上右击(在项目上右击很重要)new modules— maven(注意是maven不是spring initializr)—然后在ArtifactId上输入gulimall-common----然后再name上输入gulimall-common。


会看到是否把新文件上传到Git,选择是,每次都上传!!!

(10)可以看到,在总项目的pom.xml中也自动添加了
注意:当我们删除gulimall-commom项目时,我们要把总项目里面的pom.xml文件里面的
也删掉,刷新maven,如果gulimall-commom项目的maven仍然在列表里面,我们退出IDEA重启即ok。gulimall-common
(11)在common项目的pom.xml中添加坐标(dependency一定要在dependencies标签内)
<dependencies>
<!-- mybatisPLUS-->
<dependency>
    <groupId>com.baomidou</groupId>
    <artifactId>mybatis-plus-boot-starter</artifactId>
    <version>3.3.2</version>
</dependency>
<!--简化实体类,用@Data代替getset方法-->
<dependency>
    <groupId>org.projectlombok</groupId>
    <artifactId>lombok</artifactId>
    <version>1.18.8</version>
</dependency>
<!-- httpcomponent包https://mvnrepository.com/artifact/org.apache.httpcomponents/httpcore -->
<dependency>
    <groupId>org.apache.httpcomponents</groupId>
    <artifactId>httpcore</artifactId>
    <version>4.4.13</version>
</dependency>
<dependency>
    <groupId>commons-lang</groupId>
    <artifactId>commons-lang</artifactId>
    <version>2.6</version>
</dependency>
</dependencies>

(12)点击maven刷新,让comman项目的文件变蓝
(13)在product项目中的pom.xml中加入下面内容(dependency一定要在dependencies标签内。如果有报错,就手打这几行代码)
		<dependency>
			<groupId>com.atguigu.gulimall</groupId>
			<artifactId>gulimall-commom</artifactId>
			<version>0.0.1-SNAPSHOT</version>
		</dependency>

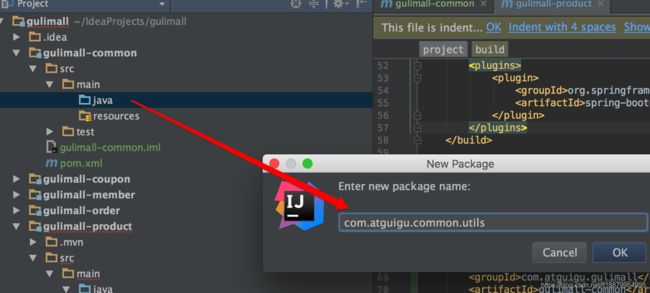
(14)common项目的java包,右键new package,包名为com.atguigu.common.utils
1-复制renren-fast项目utils包下的Query和PageUtils、R、Constant粘贴到common项目的java/com.atguigu.common.utils下。
2-复制renren-fast项目xss包粘贴到common项目的com.atguigu.common下

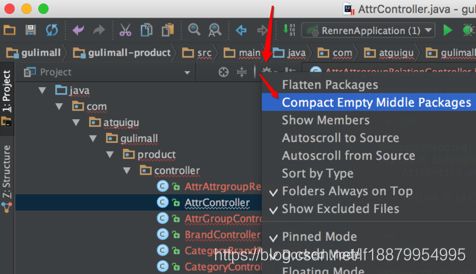
项目结构视图右上角那个齿轮 将【Compact Middle Packages】前面的√取消掉即可。包名就会层级显示出来,反之亦然。
3-common项目下utils包的Query类:
import io.renren.common.xss.SQLFilter 改为
import com.atguigu.common.xss.SQLFilter;
4-product项目下Controller中的每个类都需要删除import org.apache.shiro.authz.annotation.RequiresPermissions;很麻烦,所以不操作,直接看下面5-1~3。
import org.apache.shiro.authz.annotation.RequiresPermissions;
5-1注释renren-generator项目下\src\main\resources\template/Controller 中的所有@RequiresPermissions(“xxx”),
5-2 删除renren-generator项目下\src\main\resources\template/Controller 中的import org.apache.shiro.authz.annotation.RequiresPermissions;

5-3、重启逆向工程renren-generator项目。在页面上全选所有表,重新得到压缩包。
解压出来,只把里面的controller粘贴到product项目对应的目录就行
(先删除product项目的Controller,然后再粘贴解压包里面的Controller)

6-1 复制renren-fast项目exception包下的RRException类粘贴到common项目的com.atguigu.common.utils目录下,
删除common项目的com.atguigu.common.xss目录下SQLFilter类的import io.renren.common.exception.RRException;
那么SQLFilter类的报错解决
6-2 删掉common项目里xss包下的xssfiler类和XssHttpServletRequestWrapper类
6-3 commom项目下的HTMLFilter类和Query类“<>”报错,解决办法如下
报错:source 1.5 中不支持 diamond 运算符[ERROR] (请使用 -source 7 或更高版本以启用 diamond运算符)
1-检查ide的默认编译环境,file----setting,找Java Compiler ,设置 Target bytencode version 为1.8
2-检查项目的SDK,file------project Structure,选择和项目语言level 都改成1.8 和8
至此common项目完全没错了。

(15)测试与整合商品服务里的mybatisplus
(官网https://mp.baomidou.com/guide/quick-start.html)
1-在common项目的pom.xml中导入
<!-- 数据库驱动 https://mvnrepository.com/artifact/mysql/mysql-connector-java -->
<dependency>
    <groupId>mysql</groupId>
    <artifactId>mysql-connector-java</artifactId>
    <version>8.0.17</version>
</dependency>
<!--tomcat里一般都带-->
<dependency>
    <groupId>javax.servlet</groupId>
    <artifactId>servlet-api</artifactId>
    <version>2.5</version>
    <scope>provided</scope>
</dependency>
2-在product项目的resources目录下新建application.yml
(右键resources,选择new file,填application.yml)
spring:
  datasource:
    username: root
    password: root
    url: jdbc:mysql://192.168.20.10:3306/gulimall-pms
    driver-class-name: com.mysql.jdbc.Driver

# MapperScan
# sql映射文件位置
mybatis-plus:
  mapper-locations: classpath:/mapper/**/*.xml
  global-config:
    db-config:
      id-type: auto
server:
  port: 10000
3-在product项目的启动类上加上注解@MapperScan()
@MapperScan("com.atguigu.gulimall.product.dao")
@SpringBootApplication
public class GulimallProductApplication {
    public static void main(String[] args) {
        SpringApplication.run(GulimallProductApplication.class, args);
    }
}
4-然而执行后能通过,但是数据库中文显示乱码,所以我模仿逆向工程,把上面的配置url改为
url: jdbc:mysql://192.168.56.10:3306/gulimall-pms?useUnicode=true&characterEncoding=UTF-8&useSSL=false&serverTimezone=Asia/Shanghai
正常了。
5-然后去测试,在product项目的test目录下的GulimallProductApplicationTests.java测试类写测试方法,给数据库添加内容
@SpringBootTest
class gulimallProductApplicationTests {
    @Autowired
    BrandService brandService;
    @Test
    void contextLoads() {
        BrandEntity brandEntity = new BrandEntity();
        brandEntity.setDescript("哈哈1哈");
        brandEntity.setName("华为");
        brandService.save(brandEntity);
        System.out.println("保存成功");
    }
}

(16)测试与整合商品服务里的mybatisplus
(官网https://mp.baomidou.com/guide/quick-start.html)
我心态炸了,老是报这个错,放弃了。。。

下面这个报错不用管
Maven install报错To see the full stack trace of the errors, re-run Maven
with the -e switch.解决
[ERROR] To see the full stack trace of the errors, re-run Maven with the -e switch. [ERROR] Re-run Maven using the -X switch to enable full debug logging.
四、对其他项目逆向工程搭建(生成crud代码)
1、coupon项目
(1)重新打开renren-generator逆向工程,修改generator.properties
#主目录
mainPath=com.atguigu
#包名
package=com.atguigu.gulimall
#模块名
moduleName=coupon
#作者
author=hh
#email
email=55333@qq.com
#表前缀(类名不会包含表前缀) , 我们的sms数据库中的表的前缀都sms
#如果写了表前缀,每一张表对于的javaBean就不会添加前缀
tablePrefix=sms_
(2)修改renren-generator的application.yml
url: jdbc:mysql://192.168.20.10:3306/gulimall-sms?useUnicode=true&characterEncoding=UTF-8&useSSL=false&serverTimezone=Asia/Shanghai
username: root
password: root
(3)运行renren-generator的RenrenApplication。http://localhost:8002/
(4)同样让他一页全显示后选择全部:在网页上下方点击每页显示50个,以让全部都显示,然后点击全部,点击生成代码。

(5)解压压缩包,将生成的 renren.zip 文件解压,将里面的 main 文件夹整个复制到gulimall\gulimall-coupon\src,与原来的mian进行整合,然后我们打开idea可以看到,多了很多代码。
(6)在coupon项目中的pom.xml中加入下面内容(dependency一定要在dependencies标签内。如果有报错,就手打这几行代码)
		<dependency>
			<groupId>com.atguigu.gulimall</groupId>
			<artifactId>gulimall-commom</artifactId>
			<version>0.0.1-SNAPSHOT</version>
		</dependency>
(7)coupon项目的resources下src包先删除,coupon项目的resources目录下新建application.yml(右键resources,选择new file,填application.yml)
spring:
  datasource:
    username: root
    password: root
    url: jdbc:mysql://192.168.20.10:3306/gulimall-sms?useUnicode=true&characterEncoding=UTF-8&useSSL=false&serverTimezone=Asia/Shanghai
    driver-class-name: com.mysql.cj.jdbc.Driver


mybatis-plus:
  mapper-locations: classpath:/mapper/**/*.xml
  global-config:
    db-config:
      id-type: auto
      logic-delete-value: 1
      logic-not-delete-value: 0
server:
  port: 7000
(8)运行gulimallCouponApplication.java
访问http://localhost:8080/coupon/coupon/list,得到

2、member项目、order项目、ware项目都是一样
member端口是8000,order端口是9000,ware是11000。
(1)member项目的resources下src包先删除,member项目的resources目录下新建application.yml(右键resources,选择new file,填application.yml)
member、ums_、gulimall-ums、ulimall-ums、8000
spring:
  datasource:
    username: root
    password: root
    url: jdbc:mysql://192.168.20.10:3306/gulimall-ums?useUnicode=true&characterEncoding=UTF-8&useSSL=false&serverTimezone=Asia/Shanghai
    driver-class-name: com.mysql.cj.jdbc.Driver


mybatis-plus:
  mapper-locations: classpath:/mapper/**/*.xml
  global-config:
    db-config:
      id-type: auto
      logic-delete-value: 1
      logic-not-delete-value: 0
server:
  port: 8000
启动gulimallMemberApplication.java
http://localhost:8000/member/growthchangehistory/list
(2)order项目的resources下src包先删除,order项目的resources目录下新建application.yml(右键resources,选择new file,填application.yml)
order、oms_、gulimall-oms、gulimall-oms、9000
spring:
  datasource:
    username: root
    password: root
    url: jdbc:mysql://192.168.20.10:3306/gulimall-oms?useUnicode=true&characterEncoding=UTF-8&useSSL=false&serverTimezone=Asia/Shanghai
    driver-class-name: com.mysql.cj.jdbc.Driver
mybatis-plus:
  mapper-locations: classpath:/mapper/**/*.xml
  global-config:
    db-config:
      id-type: auto
      logic-delete-value: 1
      logic-not-delete-value: 0
server:
  port: 9000
启动gulimallOrderApplication.java
http://localhost:9000/order/order/list

(3)ware项目的resources下src包先删除,ware项目的resources目录下新建application.yml(右键resources,选择new file,填application.yml)
ware、wms_、gulimall-wms、gulimall-wms、11000
spring:
  datasource:
    username: root
    password: root
    url: jdbc:mysql://192.168.20.10:3306/gulimall-oms?useUnicode=true&characterEncoding=UTF-8&useSSL=false&serverTimezone=Asia/Shanghai
    driver-class-name: com.mysql.cj.jdbc.Driver


mybatis-plus:
  mapper-locations: classpath:/mapper/**/*.xml
  global-config:
    db-config:
      id-type: auto
      logic-delete-value: 1
      logic-not-delete-value: 0
server:
  port: 10000
启动gulimallWareApplication.java
http://localhost:11000/ware/wareinfo/list
