Mvc项目实例 MvcMusicStore 三
Mvc项目实例 MvcMusicStore 一
Mvc项目实例 MvcMusicStore 二
Mvc项目实例 MvcMusicStore 三
Mvc项目实例 MvcMusicStore 四
Mvc项目实例 MvcMusicStore 五
第四节 数据库复杂操作
接着上节,这节里我们将通过Linq表达式,实现数据仓储信息里的信息浏览,专集的详细显示;
1) 浏览某一流派下的专集 如/Store/Browse?genre=disco
打开StoreController.cs 找到 Browse方法,我们把代码修改如下:
//
// GET: /Store/Browse
public ActionResult Browse(string genre)
{
string genreName =
Server.HtmlEncode(Request.QueryString["genre"]);
var genreModel = storeDB.Genre.Include("Album").Single(g => g.Name == genreName);
var viewModel = new StoreBrowseViewModel
{
Genre = genreModel,
Albums = genreModel.Album.ToList()
};
return View(viewModel);
}
然后,动行项目;我们浏览/Store/Browse?genre=Jazz将看到下面的结果

说明:上面的数据库操作中应用到Linq里的lamada表达式,如果由不懂的,请返回第一节;
如果数据库信息不同,可能显示的数据也有所不同,请个根据情况判断。
2)浏览详细页信息
我们接着修改StoreController.cs 找到Details方法,把代码修改如下:
//
// GET: /Store/Details/5
public ActionResult Details(int id)
{
var albumModel = storeDB.Album.Single(a => a.AlbumId == id);
return View(albumModel);
}
令外,我们还要修改一下视图文件。从资源管理器里,找到Views文件夹àStoreàBrowse.aspx
修改页面代码如下:
<asp:Content ID="Content2" ContentPlaceHolderID="MainContent" runat="server">
<h2>Browsing Genre: <%:Model.Genre.Name %></h2>
<ul>
<%foreach (var album in Model.Albums)
{ %>
<li><a href="/Store/Details/<%:album.AlbumId%>"><%:album.Title %></a> </li>
<%} %>
</ul>
</asp:Content>
再次运行项目。接着点击/Store/Browse?genre=jazz里的连接,我们将会看到单个专集的名称信息。
编辑表单和数据验证
在过去的章节里,我们讲的都是一些数据读取。下面我们将介绍如何通过vs2010的mvc项目
快速建立编辑表单和数据显示列表,及数据的更新,添加及删除
首先,为这些操作添加一个控制器,并命名为StoreManagerController.cs
在项目资源管理器里,找到Controllers文件夹,右键单击à添加控制器 修改控制器名称为StoreManagerController 然后,

选中为Create 、Update、Delete和Details方案添加操作方法;
点击添加,我们将看到下面代码:
public class StoreManagerController : Controller
{
//
// GET: /StoreManager/
public ActionResult Index()
{
return View();
}
//
// GET: /StoreManager/Details/5
public ActionResult Details(int id)
{
return View();
}
//
// GET: /StoreManager/Create
public ActionResult Create()
{
return View();
}
//
// POST: /StoreManager/Create
[HttpPost]
public ActionResult Create(FormCollection collection)
{
try
{
// TODO: Add insert logic here
return RedirectToAction("Index");
}
catch
{
return View();
}
}
//
// GET: /StoreManager/Edit/5
public ActionResult Edit(int id)
{
return View();
}
//
// POST: /StoreManager/Edit/5
[HttpPost]
public ActionResult Edit(int id, FormCollection collection)
{
try
{
// TODO: Add update logic here
return RedirectToAction("Index");
}
catch
{
return View();
}
}
//
// GET: /StoreManager/Delete/5
public ActionResult Delete(int id)
{
return View();
}
//
// POST: /StoreManager/Delete/5
[HttpPost]
public ActionResult Delete(int id, FormCollection collection)
{
try
{
// TODO: Add delete logic here
return RedirectToAction("Index");
}
catch
{
return View();
}
}
}
从代码中我们看到,vs2010通过添加向导已经我们添加了一些基本操作。我们所需要做的就是修改和填充这些函数及设置返回值
首先为类添加变量
MusicStoreEntities storeDB = new MusicStoreEntities();
1) 修改Index 方法和添加StoreManager/Index视图
// GET: /StoreManager/
public ActionResult Index()
{
var albums = storeDB.Album.Include("Genre").Include("Artist").ToList();
return View(albums);
}
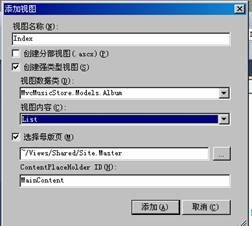
接着选中Index方法,右键单击,添加视图

这里我们要说明的是第一,我们为视图创建强类型视图,视图数据类选择MvcMusicStore.Modes.Album
第二,视图内容里,我们选择List

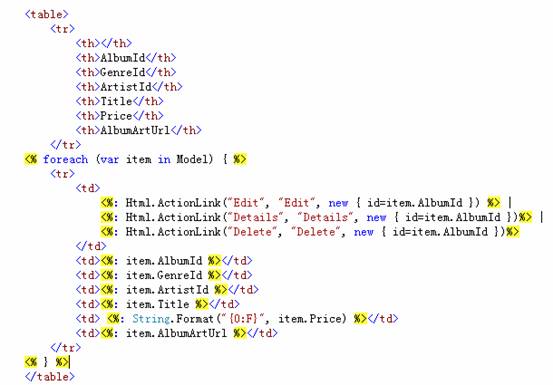
接着我们修改代码如下;
<table>
<tr>
<th></th>
<th>Title</th>
<th>Artist</th>
<th>Genre</th>
</tr>
<% foreach (var item in Model) { %>
<tr>
<td>
<%: Html.ActionLink("Edit", "Edit", new { id=item.AlbumId }) %> |
<%: Html.ActionLink("Details", "Details", new { id=item.AlbumId })%> |
<%: Html.ActionLink("Delete", "Delete", new { id=item.AlbumId })%>
</td>
<td><%: item.Title %></td>
<td><%: item.Artist.Name %></td>
<td><%: item.Genre.Name %></td>
</tr>
<% } %>
</table>
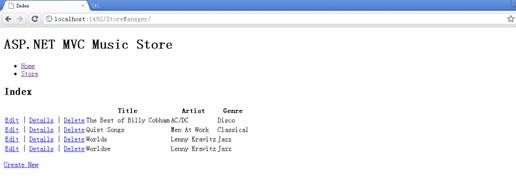
运行项目,浏览/StoreManager/ 你将看到下面的结果

好晚了,先写到这吧,下一部分我们将介绍如何使用编辑图来添加和更新数据信息