SpringCloud Alibaba 组件介绍
Spring Cloud Alibaba
一、介绍Spring Cloud Alibaba
Ⅰ、简介
- spring cloud Netflix 相关技术整体进入维护模式 Ribbon、Hystrix、zuul、Eureka、config等
- spring cloud 整合Netflix
- spring cloud alibaba 包含Netflix功能
- 中文介绍:https://github.com/alibaba/spring-cloud-alibaba/blob/master/README-zh.md
Ⅱ、Spring cloud Alibaba 体系
1、功能介绍
- 服务限流降级:默认支持 WebServlet、WebFlux, OpenFeign、RestTemplate、Spring Cloud Gateway, Zuul, Dubbo 和 RocketMQ 限流降级功能的接入,可以在运行时通过控制台实时修改限流降级规则,还支持查看限流降级 Metrics 监控。
- 服务注册与发现:适配 Spring Cloud 服务注册与发现标准,默认集成了 Ribbon 的支持。
- 分布式配置管理:支持分布式系统中的外部化配置,配置更改时自动刷新。
- 消息驱动能力:基于 Spring Cloud Stream 为微服务应用构建消息驱动能力。
- 分布式事务:使用 @GlobalTransactional 注解, 高效并且对业务零侵入地解决分布式事务问题。。
- 阿里云对象存储:阿里云提供的海量、安全、低成本、高可靠的云存储服务。支持在任何应用、任何时间、任何地点存储和访问任意类型的数据。
- 分布式任务调度:提供秒级、精准、高可靠、高可用的定时(基于 Cron 表达式)任务调度服务。同时提供分布式的任务执行模型,如网格任务。网格任务支持海量子任务均匀分配到所有 Worker(schedulerx-client)上执行。
- 阿里云短信服务:覆盖全球的短信服务,友好、高效、智能的互联化通讯能力,帮助企业迅速搭建客户触达通道。
2、功能组件
- Sentinel:把流量作为切入点,从流量控制、熔断降级、系统负载保护等多个维度保护服务的稳定性。
- Nacos:一个更易于构建云原生应用的动态服务发现、配置管理和服务管理平台。
- RocketMQ:一款开源的分布式消息系统,基于高可用分布式集群技术,提供低延时的、高可靠的消息发布与订阅服务。
- Dubbo:Apache Dubbo™ 是一款高性能 Java RPC 框架。
- Seata:阿里巴巴开源产品,一个易于使用的高性能微服务分布式事务解决方案。
- Alibaba Cloud OSS: 阿里云对象存储服务(Object Storage Service,简称 OSS),是阿里云提供的海量、安全、低成本、高可靠的云存储服务。您可以在任何应用、任何时间、任何地点存储和访问任意类型的数据。
- Alibaba Cloud SchedulerX: 阿里中间件团队开发的一款分布式任务调度产品,提供秒级、精准、高可靠、高可用的定时(基于 Cron 表达式)任务调度服务。
- Alibaba Cloud SMS: 覆盖全球的短信服务,友好、高效、智能的互联化通讯能力,帮助企业迅速搭建客户触达通道。
- 更多组件请参考 Roadmap。
二、服务注册和配置中心**Nacos**
Ⅰ、Nacos介绍
Nacos:文档 https://nacos.io/zh-cn/docs/what-is-nacos.html
- 一个更易于构建云原生应用的动态服务发现、配置管理和服务管理平台。
- Dynamic Naming and Configuration Service 注册中心+配置中心
- Nacos = Eureka + Config + Bus + Ribbon
Ⅱ、Nacos注册中心
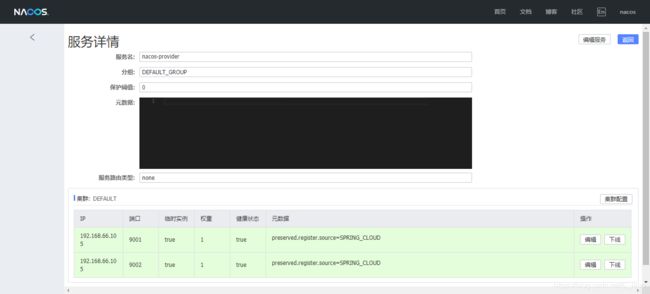
1、provider
-
Install:https://blog.csdn.net/weixin_40939212/article/details/108337893
-
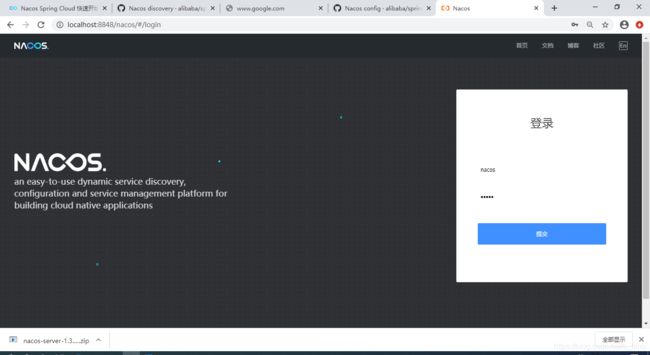
测试:http://localhost:8848/nacos(登录:nacos/nacos)
-
服务提供者配置(三部曲)*N(端口不一样的多台)
- pom
<dependencyManagement>
    <dependencies>

        <dependency>
            <groupId>com.alibaba.cloudgroupId>
            <artifactId>spring-cloud-alibaba-dependenciesartifactId>
            <version>2.1.0.RELEASEversion>
            <type>pomtype>
            <scope>importscope>
        dependency>
    dependencies>
dependencyManagement>

<dependencies>
    <dependency>
        <groupId>org.springframework.bootgroupId>
        <artifactId>spring-boot-starter-webartifactId>
    dependency>


    <dependency>
        <groupId>com.alibaba.cloudgroupId>
        <artifactId>spring-cloud-starter-alibaba-nacos-discoveryartifactId>
    dependency>
    <dependency>
        <groupId>org.projectlombokgroupId>
        <artifactId>lombokartifactId>
        <optional>trueoptional>
    dependency>
    <dependency>
        <groupId>org.springframework.bootgroupId>
        <artifactId>spring-boot-starter-testartifactId>
        <scope>testscope>
        <exclusions>
            <exclusion>
                <groupId>org.junit.vintagegroupId>
                <artifactId>junit-vintage-engineartifactId>
            exclusion>
        exclusions>
    dependency>
dependencies>

<build>
    <plugins>
        <plugin>
            <groupId>org.springframework.bootgroupId>
            <artifactId>spring-boot-maven-pluginartifactId>
        plugin>
    plugins>
build>- yml
server:
  port: 9001
spring:
  application:
    name: nacos-provider
  cloud:
    nacos:
      discovery:
        #nacos 服务地址
        server-addr: localhost:8848
management:
  endpoints:
    web:
      exposure:
      #注意这里的* 需要加上引号 不然启动报错
include: '*'- main application
@SpringBootApplication
@EnableDiscoveryClient
public class NacosApplication {
    public static void main(String[] args) {
        SpringApplication.run(NacosApplication.class, args);
    }
}
服务提供者 9001/9002 application.name= nacos-provider

2、Consumers
1、Consumer配置三部曲(与服务提供者一致,端口83)
- pom
- yml
- main application
2、由于集成了Ribbon做负载均衡,使用了RestTemplate做微服务发送,所以要增加RestTemplate的配置类
@Configuration
public class ApplictationContextConfig {
    @Bean
    @LoadBalanced//如果有多台服务提供者 不可忘加
    public RestTemplate restTemplate() {
        return new RestTemplate();
    }
}
3、调用
@RestController
public class NacosConsumerController {
    private static final String URL = "http://nacos-provider";//服务提供方
    @Autowired
    RestTemplate restTemplate;
    @GetMapping(value = "/consumer/{string}")
    public String echo(@PathVariable String string) {
        return "NacosConsumerController: " + restTemplate.getForObject(URL + "/provider/" + string, String.class);
    }
4、Nacos 服务

5、测试 http://localhost:83/consumer/nacos


Ⅲ、Nacos配置中心
官网:https://github.com/alibaba/spring-cloud-alibaba/wiki/Nacos-config
基于注册中心基础上,增加相关config的配置
1、基础配置
1、pom
<dependency>
     <groupId>com.alibaba.cloudgroupId>
     <artifactId>spring-cloud-starter-alibaba-nacos-configartifactId>
dependency>
2、新增bootstrap.yml配置文件
Nacos与config一样,在初始化的时候,先从配置中心拉取配置。而在springboot中配置文件的优先级顺序,bootstrap 要高于application。相同的内容会被bootstrap中的覆盖。
server:
port: 83
spring:
application:
name: nacos-config
profiles:
active: dev
cloud:
nacos:
config:
server-addr: localhost:8848
file-extension: yaml
discovery:
#nacos \u670D\u52A1\u5730\u5740
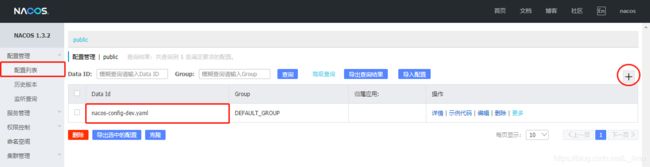
server-addr: localhost:88483、Nacos配置中心增加配置文件
- s p r i n g . a p p l i c a t i o n . n a m e − {spring.application.name}- spring.application.name−{profile}.${file-extension:properties}
- nacos-config -dev .yaml
- 应用名-环境.文件名后缀
4、使用@RefreshScope进行配置刷新
@RestController
@RefreshScope//自动刷新注解
public class NacosConfigController {}
2、多环境配置
1、namespace 开发环境隔离
2、Group 可以把不同的微服务划分为同一组
3、Service 就是微服务集群
3、Nacos集群
-
nginx(集群) 反向代理 Nacos集群,Nacos集群连接同一个数据库进行持久化
-
微服务注册地址变成nginx
  cloud:
    nacos:
      config:
      #集群部署 地址修改为nginx代理地址
        server-addr: localhost:8848
        file-extension: yaml
      discovery:
        #集群部署 地址修改为nginx代理地址
        server-addr: localhost:8848
三、服务监控降级Sentinel
Sentinel 的主要特性:

- 核心库(Java 客户端)不依赖任何框架/库,能够运行于所有 Java 运行时环境,同时对 Dubbo / Spring Cloud 等框架也有较好的支持。
- 控制台(Dashboard)基于 Spring Boot 开发,打包后可以直接运行,不需要额外的 Tomcat 等应用容器。
Ⅰ、基本配置
1、下载安装Sentinel
- 直接官网下载jar包,java -jar xxxx.jar运行 (需要有jdk配置)

- 配置微服务
<dependencyManagement>
    <dependencies>

        <dependency>
            <groupId>com.alibaba.cloudgroupId>
            <artifactId>spring-cloud-alibaba-dependenciesartifactId>
            <version>2.1.0.RELEASEversion>
            <type>pomtype>
            <scope>importscope>
        dependency>
    dependencies>
dependencyManagement>

<dependencies>

    <dependency>
        <groupId>com.alibaba.cloudgroupId>
        <artifactId>spring-cloud-starter-alibaba-sentinelartifactId>
        <version>2.2.3.RELEASEversion>
    dependency>

    <dependency>
        <groupId>com.alibaba.cspgroupId>
        <artifactId>sentinel-datasource-nacosartifactId>
        <version>1.8.0version>
    dependency>

    <dependency>
        <groupId>com.alibaba.cloudgroupId>
        <artifactId>spring-cloud-starter-alibaba-nacos-discoveryartifactId>
    dependency>
    <dependency>
        <groupId>org.springframework.bootgroupId>
        <artifactId>spring-boot-starter-webartifactId>
    dependency>

    <dependency>
        <groupId>org.projectlombokgroupId>
        <artifactId>lombokartifactId>
        <optional>trueoptional>
    dependency>
dependencies>- yml
server:
  port: 8401
spring:
  application:
    name: sentinel-provider
  cloud:
    nacos:
      discovery:
        #nacos 服务注册地址
        server-addr: localhost:8848
    sentinel:
      transport:
        #sentinel dashboard 地址
        dashboard: localhost:8080
management:
  endpoints:
    web:
      exposure:
include: '*'- main application
@SpringBootApplication
@EnableDiscoveryClient
public class SentinelApplication {
    public static void main(String[] args) {
        SpringApplication.run(SentinelApplication.class, args);
    }
}- controller
@RestController
public class SentinelController {
    @RequestMapping("/sentinel/testA")
    public String testA() {
        return "AAAAAAAAAA";
    }

    @RequestMapping("/sentinel/testB")
    public String testB() {
        return "BBBBBBBBBB";
    }
}- 查看dashboard(懒加载 需要先做一次请求)
- http://localhost:8401/sentinel/testA

Ⅱ、功能介绍
- 簇点链路
- 流控规则
- 降级规则
- 热点规则
- 系统规则
- 授权规则
- 集群流控
- 机器列表
- 实时监控
Ⅲ、持久化
在nacos配置管理中增加配置,配置会持久化到nacos的持久化数据库mysql
四、分布式事务
Ⅰ、Seata介绍
-
1、什么是Seata
Seata 是一个用于微服务架构的分布式事务解决方案,它的特点是高性能且易于使用,旨在实现简单并快速的事务提交与回滚。
-
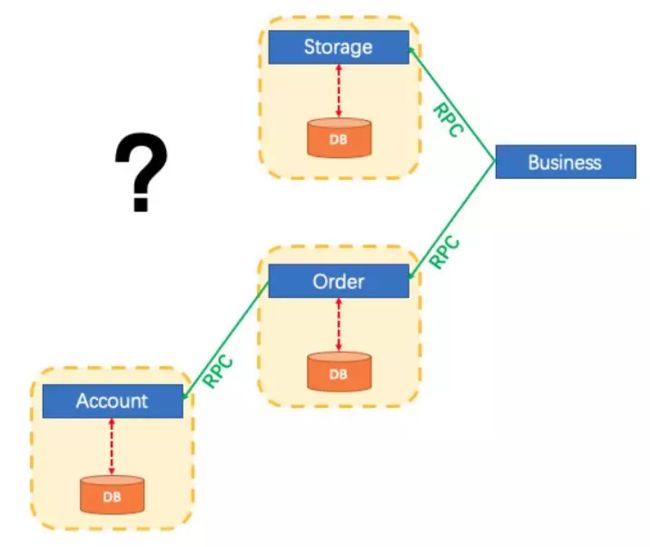
2、微服务架构中的分布式事务问题
从传统的单体应用说起,假设一个单体应用的业务由 3 个模块构成,三者使用单个本地数据源。

这样的话本地事务很自然就可以保证数据一致性。
但是在微服务架构中就不这么简单了,这 3 个模块被设计为 3 个不同数据源之上的 3 个服务,每个服务对应一个数据库。
本地事务当然也可以保证每个服务中的数据一致性,但是扩展到整个应用、整个业务逻辑范围来看,情况如何呢?
-
3、Seata 机制
Seata 就是用于解决上述微服务架构中的事务问题的解决方案。
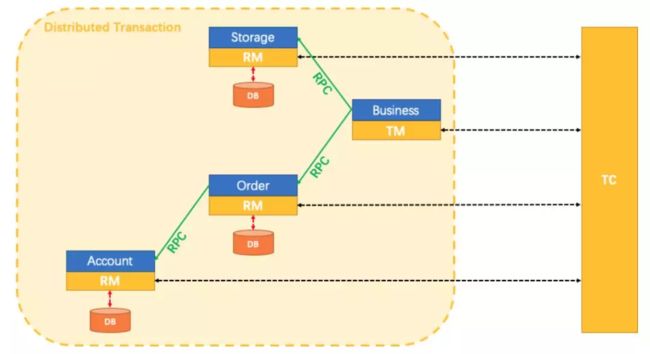
如下图所示,分布式事务是一个全局事务(Global Transaction),由一批分支事务(Branch Transation)组成,通常分支事务只是本地事务。

Seata 中有三大基本组件:
- Transaction Coordinator(TC):维护全局和分支事务的状态,驱动全局事务提交与回滚。
- Transaction Manager™:定义全局事务的范围:开始、提交或回滚全局事务。
- Resource Manager(RM):管理分支事务处理的资源,与 TC通信以注册分支事务并报告分支事务的状态,并驱动分支事务提交或回滚。
Ⅱ、执行流程
Seata 管理分布式事务的典型生命周期:
- TM 要求 TC 开始新的全局事务,TC 生成表示全局事务的 XID。
- XID 通过微服务的调用链传播。XID 通过微服务的调用链传播。
- RM 在 TC 中将本地事务注册为 XID 的相应全局事务的分支。RM 在 TC 中将本地事务注册为 XID 的相应全局事务的分支。
- TM 要求 TC 提交或回滚 XID 的相应全局事务。TM 要求 TC 提交或回滚 XID 的相应全局事务。
- TC 驱动 XID 的相应全局事务下的所有分支事务,完成分支提交或回滚。TC 驱动 XID 的相应全局事务下的所有分支事务,完成分支提交或回滚。
1、整体机制
两阶段提交协议的演变:
- 一阶段:业务数据和回滚日志记录在同一个本地事务中提交,释放本地锁和连接资源。
- 二阶段:
- 提交异步化,非常快速地完成。
- 回滚通过一阶段的回滚日志进行反向补偿。
2、写隔离
- 一阶段本地事务提交前,需要确保先拿到 全局锁 。
- 拿不到 全局锁 ,不能提交本地事务。
- 拿 全局锁 的尝试被限制在一定范围内,超出范围将放弃,并回滚本地事务,释放本地锁。
3、读隔离
在数据库本地事务隔离级别 读已提交(Read Committed) 或以上的基础上,Seata(AT 模式)的默认全局隔离级别是 读未提交(Read Uncommitted) 。
如果应用在特定场景下,必需要求全局的 读已提交 ,目前 Seata 的方式是通过 SELECT FOR UPDATE 语句的代理。
分支提交或回滚。TC 驱动 XID 的相应全局事务下的所有分支事务,完成分支提交或回滚。
1、整体机制
两阶段提交协议的演变:
- 一阶段:业务数据和回滚日志记录在同一个本地事务中提交,释放本地锁和连接资源。
- 二阶段:
- 提交异步化,非常快速地完成。
- 回滚通过一阶段的回滚日志进行反向补偿。
2、写隔离
- 一阶段本地事务提交前,需要确保先拿到 全局锁 。
- 拿不到 全局锁 ,不能提交本地事务。
- 拿 全局锁 的尝试被限制在一定范围内,超出范围将放弃,并回滚本地事务,释放本地锁。
3、读隔离
在数据库本地事务隔离级别 读已提交(Read Committed) 或以上的基础上,Seata(AT 模式)的默认全局隔离级别是 读未提交(Read Uncommitted) 。
如果应用在特定场景下,必需要求全局的 读已提交 ,目前 Seata 的方式是通过 SELECT FOR UPDATE 语句的代理。