Tkinter:功能按钮Button
功能按钮Button
-
-
-
- 功能按钮Button
-
- 功能按钮基本概念
- Lambda 表达式
- 含图像的功能按钮
- 简易计算器按钮布局应用
- 鼠标光标在功能按钮上的形状
-
-
功能按钮Button
功能按钮基本概念
功能按钮也可称作按钮,在窗口组件中可以设计在单击功能按钮时,执行某一个特定的动作( callback方法 )
功能按钮上面可以有文字,或是和标签一样可以有图像,如果是文字样式的功能按钮,可以设定此文字的字形。
语法格式:
Button(父对象, options,...)
Button( )方法的第一个参数是父对象,表示这个功能按钮将建立在哪一个窗口内。
Button( )方法内其他常用的options参数:
- borderwidth或bd:边界宽度默认是两个像素
- bg或background:背景色彩
- command:单击功能按钮时,执行此方法
- cursor:当鼠标光标移至按钮上时的形状
- fg或foreground:前景色彩
- font:字形
- height:高,单位是字符
- highlightbackground:当功能按钮取得焦点时的背景颜色
- highlightcolor:当功能按钮取得焦点时的颜色
- image:功能钮上的图像
- justify:当有多行文字时,最后一行文字的对齐方式
- padx:默认是1,可设置功能按钮与文字的间隔
- pady:默认是1,可设置功能按钮的上下间距
- relief:默认是relief=FLAT,可由此控制文字外框
- state:默认是state=NORMAL,若设置为DISABLED则以灰阶显示功能按钮,表示暂时无法使用
- text:功能按钮名称
- underline:可以设置第几个文字有下画线,从0开始算起,默认是-1表示无下画线
- width:宽,单位是字符宽
- wraplength:限制每行的文字数,默认是0,表示只有“\n”才会换行
例1
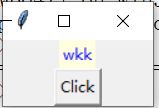
单击Click按钮,改变label的样式
from tkinter import *

def msgShow():
    label["text"] = "wkk"
    label["bg"]= "lightyellow"
    label["fg"] = "blue"


root = Tk()
root.title("Buttom Demo")
label = Label(root)

btn = Button(root,text = "Click",command = msgShow)
label.pack()
btn.pack()

root.mainloop()
可以分别设置属性的内容
以上代码中也可以使用config( )方法一次设置所有的属性
label.config(text="wkk",bg="lightyellow",fg="blue")
例2
单击“结束”按钮,关闭窗口
from tkinter import *

root = Tk()
root.title("Buttom Demo")
label = Label(root)

btn = Button(root,text = "关闭",command = root.destroy)
btn.pack()

root.mainloop()
root.destroy 可以关闭root窗口对象,同时程序结束
另一个常用的方法是quit,可以让Python Shell内执行的程序结束,但是root窗口则继续执行
例3
定时器程序,单击结束按钮,则程序结束
from tkinter import *

root = Tk()
root.title("Buttom Demo")
label = Label(root)

counter = 0
def run_counter(digit):
    def counting():
        global counter
        counter +=1
        digit.config(text=str(counter))
        digit.after(1000,counting)
    counting()
digit=Label(root,bg="yellow",fg="blue",height=3,width=10,font="Helvetic 20 bold")
digit.pack()
run_counter(digit)
btn = Button(root,text = "关闭",command = root.destroy)
btn.pack(pady=10)

root.mainloop()
例4
单击Yellow按钮可以将窗口背景设为黄色,单击Blue按钮可以将窗口背景设为蓝色,单击Exit按钮可以结束程序
from tkinter import *

root = Tk()
root.title("Buttom Demo")
root.geometry("300x200")


def yellow():
    root["bg"] = "yellow"
def blue():
    root["bg"] = "blue"


exitBtn = Button(root,text = "Exit",command = root.destroy)
blueBtn = Button(root,text = "Blue",command = blue)
yellowBtn = Button(root,text = "Yellow",command = yellow)

exitBtn.pack(anchor =S, side = RIGHT,padx=5,pady=5)
blueBtn.pack(anchor =S, side = RIGHT,padx=5,pady=5)
yellowBtn.pack(anchor =S, side = RIGHT,padx=5,pady=5)

root.mainloop()
Lambda 表达式
可以通过Lambda表达式调用相同的方法,但是传递不同参数
from tkinter import *

def bColor(bgColor):
    root.config(bg = bgColor)

root = Tk()
root.title("demo")
root.geometry("300x200")

exitbtn = Button(root,text="Exit",command=root.destroy)
bluebtn = Button(root,text="Blue",command=lambda:bColor("blue"))
yellowbtn = Button(root,text="Yellow",command=lambda:bColor("yellow"))

exitbtn.pack(anchor=S,side = RIGHT,padx=5,pady = 5)
bluebtn.pack(anchor=S,side = RIGHT,padx=5,pady = 5)
yellowbtn.pack(anchor=S,side = RIGHT,padx=5,pady = 5)

root.mainloop()
含图像的功能按钮
一般功能按钮是用文字当作按钮名称,但是也可以用图像当作按钮名称。
若是使用图像当作按钮,在Button( )内可以省略text参数设置按钮名称,但是在Button( )内要增加image参数设置图像对象。
from tkinter import *

def msgShow():
    label.config(text="wkk")

root = Tk()
root.title("demo")

label = Label(root)

sunPng = PhotoImage(file="sun.png")  #Image 图像
btn = Button(root,image=sunPng,command=msgShow)
label.pack()
btn.pack()
root.mainloop()
若是想要让图像和文字并存在功能按钮内,需要在Button( )内增加参数“compound=xx”。
其中,xx可以是left、top、right、bottom、center,分别代表图形在文字的左、上、右、下、中央。
btn = Button(root,image=sunPng,command=msgShow,text = "Click me",compound="top")
简易计算器按钮布局应用
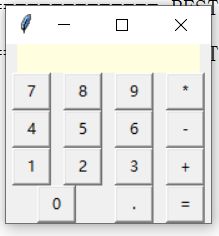
简易计算器按钮布局应用,最上方黄色底用标签显示,一般也是数字显示区
from tkinter import *

root = Tk()
root.title("calc")
lab = Label(root,text="",bg = "lightyellow",width = 20)

btn = []
for i in range(10):
    btn.append(Button(root,text=str(i),width = 3))

btnM = Button(root,text="*",width = 3)
btnS = Button(root,text="-",width = 3)
btnP = Button(root,text="+",width = 3)
btnD = Button(root,text=".",width = 3)
btnE = Button(root,text="=",width = 3)

lab.grid(row = 0,column = 0, columnspan = 4)
btn[7].grid(row=1,column = 0,padx=5)
btn[8].grid(row=1,column = 1,padx=5)
btn[9].grid(row=1,column = 2,padx=5)
btnM.grid(row=1,column = 3,padx=5)

btn[4].grid(row=2,column = 0,padx=5)
btn[5].grid(row=2,column = 1,padx=5)
btn[6].grid(row=2,column = 2,padx=5)
btnS.grid(row=2,column = 3,padx=5)

btn[1].grid(row=3,column = 0,padx=5)
btn[2].grid(row=3,column = 1,padx=5)
btn[3].grid(row=3,column = 2,padx=5)
btnP.grid(row=3,column = 3,padx=5)

btn[0].grid(row=4,column = 0,padx=5,columnspan=2)
btnD.grid(row=4,column = 2,padx=5)
btnE.grid(row=4,column = 3,padx=5)

root.mainloop()
鼠标光标在功能按钮上的形状
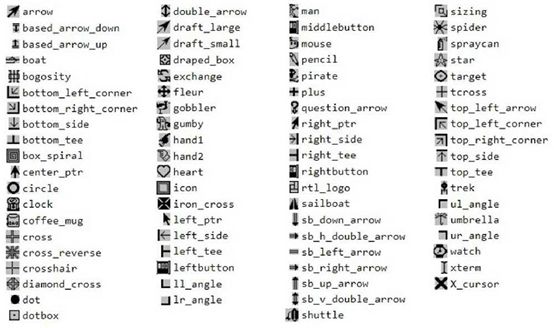
光标形状与名称的对应:
当鼠标光标在功能按钮上时形状是star
from tkinter import *

from tkinter import *

def msgShow():
    label.config(text="wkk")

root = Tk()
root.title("demo")

label = Label(root)

sunPng = PhotoImage(file="sun.png")  #Image 图像
btn = Button(root,image=sunPng,command=msgShow,cursor="star")
label.pack()
btn.pack()
root.mainloop()


