机器学习算法整理1(python)
1,机器学习算法
1.1 K-NN
(1)K-NN(k近邻):K-NN是一种基于实例的学习,其分类不取决于其内在的模型,而是对标签测试集进行参考。k-NN只是简单的记住所有训练数据,并与每个新样本进行比较,因此它是一种非归纳方法。
- KNeighborsClassifier:用户指定k,近邻数据的数量,噪声较大时,k值用较大值,但牺牲了分类边界的明确性。
- RadiusNeighborsClassifier:对每个训练的数据点指定固定的半径,当数据不是均匀采样时,较好。
(2)鸢尾花分类代码
# -*- coding: utf-8 -*-
"""
Created on Sun Mar 10 21:24:33 2019

@author: Larry
"""
#k-NN对鸢尾花数据进行分类学习算例
from sklearn.neighbors import KNeighborsClassifier as knn
from sklearn import datasets
import numpy as np
import matplotlib.pyplot as plt
from matplotlib.colors import ListedColormap

def knnDemo(X,y,n):
    #creates the classifier and fits it to the data
    res = 0.05
    k1 = knn(n_neighbors = n,p = 2,metric = 'minkowski')
    k1.fit(X,y)#对数据进行训练, 'minkowski'为闵可夫斯基距离

    #sets up the grid
    x1_min, x1_max = X[:,0].min() - 1,X[:,0].max() + 1
    x2_min, x2_max = X[:,1].min() - 1,X[:,1].max() + 1
    xx1, xx2 = np.meshgrid(np.arange(x1_min,x1_max,res), np.arange(x2_min, x2_max, res))#生成坐标轴的[x,y]的矩阵,范围包括了所有值

    #makes the prediction
    Z = k1.predict(np.array([xx1.ravel(),xx2.ravel()]).T)#转化成(x,y)对应的二维坐标
    Z = Z.reshape(xx1.shape)#xx1.shape是获得xx1的大小,然后将Z预测的结果变成和其一样

    #creates the color map
    cmap_light = ListedColormap(['#FFAAAA','#AAFFAA','#AAAAFF'])
    cmap_bold = ListedColormap(['#FF0000','#00FF00','#0000FF'])

    #plots the decision surface
    plt.contourf(xx1,xx2,Z,alpha = 0.4,cmap = cmap_light)
    plt.xlim(xx1.min(),xx1.max())
    plt.ylim(xx2.min(),xx2.max())

    #plots the samples
    for idx, c1 in enumerate(np.unique(y)):
        plt.scatter(X[:,0],X[:,1],c = y, cmap = cmap_bold)

    plt.show()


iris = datasets.load_iris()
X1 = iris.data[:,0:3:2]
X2 = iris.data[:,0:2]
X3 = iris.data[:,1:3]
y = iris.target
knnDemo(X2,y,15)
(3)关于部分函数的使用
- 关于contourf绘图的使用规则
链接: https://blog.csdn.net/lens___/article/details/83960810 - 对于一维数组或者列表,unique函数去除其中重复的元素,并按元素由大到小返回一个新的无元素重复的元组或者列表
- enumerate()函数用于将一个可遍历的数据对象(如列表,元组,字符串,字典等)组合一个索引序列,一般用在for语句中。
链接: https://blog.csdn.net/qq_34138155/article/details/81395812
1.2 Scikit-learn解决回归问题
(1)LinearRegression()对象
#线性回归问题
from sklearn import linear_model
clf = linear_model.LinearRegression()
y=clf.fit([[0, 0], [1, 1], [2, 2]],[0,1,2])
clf.coef_     #线性回归问题的估计系数组
array([0.5, 0.5])
(2)linear_model.Ridge()
- 岭回归可以解决多重线性问题,还可以用于输入变量远远超出样本数量的情况
- linear_model.Ridge()对象使用了L2正则化。对权值向量加以惩罚,这样会使平均权重更小。减少了对极值的敏感度,模型更为稳定.
- linear_model.Ridge()对象增加了一个正则化参数alpha,小的正值会提高模型的稳定性。可以是浮点数,也可以是数组(大小与目标变量相同)
#当特征之间有相关性
from sklearn.linear_model import Ridge
import numpy as np
def ridgeReg(alpha):
   n_samples,n_features = 10,5
   y = np.random.randn(n_samples)
   X = np.random.randn(n_samples,n_features)
   clf = Ridge(0.001)
   res = clf.fit(X,y)
   return(res)

res = ridgeReg(0.001)
print(res.coef_)
print(res.intercept_)   #线性模型中的截距或独立项数组
(3)scikit-learn中的降维算法
- 降维可以减少模型输入或特征变量,同时还能减少过拟合而提高模型的普遍性
- 主要工作确定哪些是冗余或无关的数据。特征选择和特征提取
选择是找子集,提取是结合具有相关性的变量,创造新的特征变量。 - 最常用的特征提取算法:PCA
- PCA使用正交变换将一组相关变量转换成一组不相关变量。
- PCA降维要求特征进行了缩放和平均归一化,即特征要具有零均值和相应的值域
# -*- coding: utf-8 -*-
"""
Created on Tue Mar 12 10:20:22 2019

@author: Larry
"""

import numpy as np
import matplotlib.pyplot as plt
from sklearn.decomposition import KernelPCA
from sklearn.datasets import make_circles
np.random.seed(0)
X,y = make_circles(n_samples = 400,factor = 0.3,noise = 0.05)
kpca = KernelPCA(kernel = 'rbf',gamma=10)
X_kpca = kpca.fit_transform(X)
plt.figure()
plt.subplot(2,2,1,aspect = 'equal')
plt.title("Original space")
reds = y == 0
biues = y == 1
plt.plot(X[reds,0],X[reds,1],"ro")
plt.plot(X[reds,0],X[reds,1],"ro")
plt.xlabel("$x_1$")
plt.ylabel("$x_2$")
plt.subplot(2,2,3,aspect = 'equal')
plt.plot(X_kpca[reds,0],X_kpca[reds,1],"ro")
plt.plot(X_kpca[reds,0],X_kpca[reds,1],"ro")
plt.title("Projection by KPCA")
plt.xlabel("1st principal component in space induced by $\phi$")
plt.ylabel("2nd component")
plt.subplots_adjust(0.02,0.01,0.98,0.94,0.04,0.35)
plt.show()
(4)交叉验证
- 分割测试集和验证集:train_test_split()。
- 报错‘’No module named ‘sklearn.cross_validation’,因为模块更新了,下面是参考链接
https://blog.csdn.net/Jeff_Winger/article/details/82222404
# -*- coding: utf-8 -*-
"""
Created on Tue Mar 12 11:03:31 2019

@author: Larry
"""

from sklearn.model_selection import train_test_split
from sklearn import datasets
from sklearn import svm
from sklearn import model_selection
iris = datasets.load_iris()
X_train,X_test,y_train,y_test = train_test_split(iris.data,iris.target,test_size=0.4,random_state=0)
clf = svm.SVC(kernel='linear',C=1).fit(X_train,y_train)
scores=model_selection.cross_val_score(clf,X_train,y_train,cv=5)
print("Accuracy:%0.2f(+/-%0.2f)"%(scores.mean(),scores.std()*2))
(5)决策树(DT)
# -*- coding: utf-8 -*-
"""
Created on Wed Mar 13 14:36:44 2019

@author: Larry
"""

from sklearn import tree
names = ['size','scale','fruit','butt']
labels = [1,1,1,1,1,0,0,0]
p1=[2,1,0,1]
p2=[1,1,0,1]
p3=[1,1,0,0]
p4=[1,1,0,0]
n1=[0,0,0,0]
n2=[1,0,0,0]
n3=[0,0,1,0]
n4=[1,1,0,0]
data=[p1,p2,p3,p4,n1,n2,n3,n4]

def pred(test,data=data):
    dtre = tree.DecisionTreeClassifier()
    dtre = dtre.fit(data,labels)
    print(dtre.predict([test]))
    with open('data/treeDemo.dot','w') as f:
        f = tree.export_graphviz(dtre,out_file=f,feature_names=names)

pred([1,1,0,1])
1.3集成学习
1.3.1Bagging(装袋)方法
- 也叫自举聚类(bootstrap aggregating)
- 最常见的bagging指的是有放回的抽样
# -*- coding: utf-8 -*-
"""
Created on Thu Mar 14 16:29:50 2019

@author: Larry
"""

from sklearn.ensemble import BaggingClassifier
from sklearn.tree import DecisionTreeClassifier
from sklearn import datasets

bcls=BaggingClassifier(DecisionTreeClassifier(),max_samples=0.5,max_features=0.5,n_estimators=50)
X,y=datasets.make_blobs(n_samples=8000,centers=2,random_state=0,cluster_std=4)
bcls.fit(X,y)
print(bcls.score(X,y))
(1)sklearn.ensemble模块中有两种基于决策树的算法:随机森林和极端随机树。算法比较
# -*- coding: utf-8 -*-
"""
Created on Thu Mar 14 17:03:35 2019

@author: Larry
"""

from sklearn import model_selection
import numpy as np
import matplotlib.pyplot as plt
from sklearn.linear_model import LogisticRegression
from sklearn.naive_bayes import GaussianNB
from sklearn.ensemble import RandomForestClassifier
from sklearn.ensemble import ExtraTreesClassifier
from sklearn.ensemble import VotingClassifier
from sklearn import datasets

def vclas(w1,w2,w3,w4):
    X,y=datasets.make_classification(n_features=10,n_informative=4,n_samples=500,n_clusters_per_class=5)
    Xtrain,Xtest,ytrain,ytest=model_selection.train_test_split(X,y,test_size=0.4)

    clf1=LogisticRegression(random_state=123)
    clf2=GaussianNB()
    clf3=RandomForestClassifier(n_estimators=10,bootstrap=True,random_state=123)
    clf4=ExtraTreesClassifier(n_estimators=10,bootstrap=True,random_state=123)


    clfes=[clf1,clf2,clf3,clf4]


    eclf=VotingClassifier(estimators=[('lr',clf1),('gnb',clf2),('rf',clf3),('et',clf4)],voting='soft',weights=[w1,w2,w3,w4])

    [c.fit(Xtrain,ytrain) for c in (clf1,clf2,clf3,clf4,eclf)]


    N=5
    ind = np.arange(N)
    width = 0.3
    fig,ax=plt.subplots()


    plt.rcParams['font.sans-serif']=['SimHei']#方法1简单,解决中文显示问题
    plt.rcParams['axes.unicode_minus'] = False

    for i,clf in enumerate(clfes):
        print(clf,i)
        p1=ax.bar(i,clfes[i].score(Xtrain,ytrain),width=width,color='black')
        p2=ax.bar(i+width,clfes[i].score(Xtest,ytest),width=width,color='grey')

    ax.bar(len(clfes)+width,eclf.score(Xtrain,ytrain),width=width,color='black')
    ax.bar(len(clfes)+width*2,eclf.score(Xtest,ytest),width=width,color='grey')
    plt.axvline(3.8,color='k',linestyle='dashed')
    ax.set_xticks(ind+width)
    ax.set_xticklabels(['LogisticRegression',
                       'GaussianNB',
                       'RandomForestClassifier',
                       'ExtraTrees',
                       'VotingClassifier'],rotation=40,ha='right')
    #ExtraTrees

    plt.title('Train and test score for different classifiers')
    plt.legend([p1[0],p2[0]],['测试','test'],loc='lower left')
#    plt.show()
    plt.savefig("data/temp.png",dpi=500,bbox_inches = 'tight')#解决图片不清晰,不完整的问题

vclas(1,3,5,4)
1.3.2 Boosting方法
(1)AdaBoost(自适应Boosting):采用了决策树分类器作为基学习器,并且对不可线性分裂的数据建立了决策边界。
(2)梯度Boosting:
- 有利于对混合数据类型
- 预测能力强
- 采用串行架构不适合并行技术,无法较好的扩展到大数据。
2相关评价指标
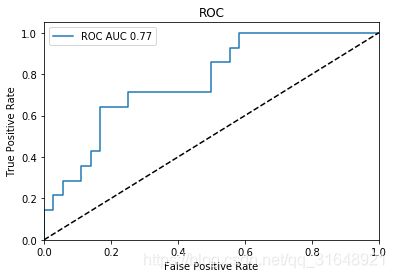
(1)ROC曲线(接受者操作特性),绘制了不同阈值下的真正率和假正率。
(2)在信号检测理论中,ROC图一直被用来描述分类器命中率和误报警率之间的权衡。
(3)对于多分类的ROC,可画出多个ROC,指定其中一个为正,其他全为负。
# -*- coding: utf-8 -*-
"""
Created on Thu Mar 14 09:45:27 2019

@author: Larry
"""
import matplotlib.pyplot as plt
from sklearn import svm,datasets
from sklearn.metrics import roc_curve,auc
from sklearn.model_selection import train_test_split
from sklearn.preprocessing import label_binarize
from sklearn.multiclass import OneVsRestClassifier

X,y=datasets.make_classification(n_samples=100,n_classes=3,n_features=5,n_informative=3,n_redundant=0,random_state=42)
#binarize the output
y=label_binarize(y,classes=[0,1,2])
n_classes=y.shape[1]
X_train,X_test,y_train,y_test=train_test_split(X,y,test_size=0.5)
classifier=OneVsRestClassifier(svm.SVC(kernel='linear',probability=True))
y_score=classifier.fit(X_train,y_train).decision_function(X_test)
fpr,tpr,_=roc_curve(y_test[:,0],y_score[:,0])
roc_auc=auc(fpr,tpr)
plt.figure()
plt.plot(fpr,tpr,label='ROC AUC %0.2f' % roc_auc)
plt.plot([0,1],[0,1],'k--')
plt.xlim([0.0,1.0])
plt.ylim([0.0,1.05])
plt.xlabel('False Positive Rate')
plt.ylabel('True Positive Rate')
plt.title('ROC')
plt.legend(loc="best")
plt.show()
