springboot之自动装配源码分析
1. 前言
如果你是一个浸淫 SpringBoot 已久的老手,那么可能下面的内容可能不那么适合你,写得很简单。但如果是
对于一个刚学习 SpringBoot 的新手而言,我想多少还是有些用的。本文就来手把手教你如何创建一个 SpringBoot 项目,并对其中的一些关键信息进行简单分析,让你更加快速的掌握如何创建一个 SpringBoot 项目。
2. springboot简介
使用 Servlet/JSP 开发 JavaWeb 时,一个接口对应一个Servlet,配置很繁琐。未尽量减少这种麻烦,Spring Boot 应用而生。它是由 Pivotal 团队提供的全新框架,目的适用于简化 Spring 应用的初始搭建即开发过程。该框架使用特定方式进行配置,从而使开发人员无需定义样板化的配置。
3. 核心代码
3.1 启动类
我们都知道SpringBoot项目创建好后,会自动生成一个当前模块的启动类。如下:
import org.springframework.boot.SpringApplication;
import org.springframework.boot.autoconfigure.SpringBootApplication;

@SpringBootApplication
public class TestApplication {
   public static void main(String[] args) {
      SpringApplication.run(TestApplication.class, args);
   }
}
3.2 @SpringBootApplication
在启动类中有个很重要的注解@SpringBootApplication,在该注解中除了元注解,就是@SpringBootConfiguration
、@EnableAutoConfiguration、@ComponentScan
- @SpringBootConfiguration:标识了当前类为配置类
- @ComponentScan:配置类的组件扫描
- @EnableAutoConfiguration:激活自动装配
@Target(ElementType.TYPE)
@Retention(RetentionPolicy.RUNTIME)
@Documented
@Inherited
@SpringBootConfiguration
@EnableAutoConfiguration
@ComponentScan(excludeFilters = { @Filter(type = FilterType.CUSTOM, classes = TypeExcludeFilter.class),
    @Filter(type = FilterType.CUSTOM, classes = AutoConfigurationExcludeFilter.class) })
public @interface SpringBootApplication {
  /**
   * 排除特定的自动配置类,以便它们永远不会被应用
   */
  @AliasFor(annotation = EnableAutoConfiguration.class)
  Class<?>[] exclude() default {};
  /**
   * 排除特定的自动配置类名称,以便它们永远不会被应用
   */
  @AliasFor(annotation = EnableAutoConfiguration.class)
  String[] excludeName() default {};

  /**
   * 用于扫描带注解组件的基本包
   */
  @AliasFor(annotation = ComponentScan.class, attribute = "basePackages")
  String[] scanBasePackages() default {};

  /**
   * 用于指定要扫描带注释组件的包。将扫描指定的每个类的包。
   */
  @AliasFor(annotation = ComponentScan.class, attribute = "basePackageClasses")
  Class<?>[] scanBasePackageClasses() default {};
  ...
}
3.3 @EnableAutoConfiguration
里我们重点看@EnableAutoConfiguration注解。
在该注解中我们看到了熟悉的@Import注解,并且该注解指定导入了AutoConfigurationImportSelector.class
@Target(ElementType.TYPE)
@Retention(RetentionPolicy.RUNTIME)
@Documented
@Inherited
@AutoConfigurationPackage
@Import(AutoConfigurationImportSelector.class)
public @interface EnableAutoConfiguration {
  String ENABLED_OVERRIDE_PROPERTY = "spring.boot.enableautoconfiguration";
  Class<?>[] exclude() default {};
  String[] excludeName() default {};
}
3.4 AutoConfigurationImportSelector
我们进入到AutoConfigurationImportSelector.class,看到当前类继承自DeferredImportSelector接口,而通过查看DeferredImportSelector源码 public interface DeferredImportSelector extends ImportSelector {}得知,DeferredImportSelector继承自ImportSelector接口。因此我们大概得知SpringBoot默认装载了ImportSelector::selectImports()方法返回的全限类名数组。
public class AutoConfigurationImportSelector implements DeferredImportSelector, BeanClassLoaderAware,
    ResourceLoaderAware, BeanFactoryAware, EnvironmentAware, Ordered {
        /**
         * 重写ImportSelector接口中的selectImports方法
         *
         *    该方法返回的数组<全限类名> 都将被装载到IOC容器
         */
	@Override
	public String[] selectImports(AnnotationMetadata annotationMetadata) {
	    if (!isEnabled(annotationMetadata)) {
	        return NO_IMPORTS;
	    }
	    AutoConfigurationEntry autoConfigurationEntry = getAutoConfigurationEntry(annotationMetadata);
            // 将符合注入IOC条件的Bean类信息返回
	    return StringUtils.toStringArray(autoConfigurationEntry.getConfigurations());
	}

	/**
	 * 获取自动配置的信息
	 */
	protected AutoConfigurationEntry getAutoConfigurationEntry(AnnotationMetadata annotationMetadata) {
	    if (!isEnabled(annotationMetadata)) {
	        return EMPTY_ENTRY;
	    }
	    // 获取元注解属性
	    AnnotationAttributes attributes = getAttributes(annotationMetadata);
	    // ** 获取候选的配置信息
	    List<String> configurations = getCandidateConfigurations(annotationMetadata, attributes);
	    // 移除重复元素
	    configurations = removeDuplicates(configurations);
	    // 获取任何限制候选配置的排除项
	    Set<String> exclusions = getExclusions(annotationMetadata, attributes);
	    // 判断排除项是否存在
	    checkExcludedClasses(configurations, exclusions);
	    // 从候选配置集合中排除需要排除的项
	    configurations.removeAll(exclusions);
	    // 获取在spring.factories中注册的过滤器,并执行filter方法,返回符合注册条件的元素
	    configurations = getConfigurationClassFilter().filter(configurations);
	    // 触发自动配置导入事件
	    fireAutoConfigurationImportEvents(configurations, exclusions);
	    // 返回自动配置和排除项信息
	    return new AutoConfigurationEntry(configurations, exclusions);
	}

	/**
	 * 获取属性
	 */
	protected AnnotationAttributes getAttributes(AnnotationMetadata metadata) {
	    String name = getAnnotationClass().getName();
	    AnnotationAttributes attributes = AnnotationAttributes.fromMap(metadata.getAnnotationAttributes(name, true));
	    Assert.notNull(attributes, () -> "No auto-configuration attributes found. Is " + metadata.getClassName()
                + " annotated with " + ClassUtils.getShortName(name) + "?");
	    return attributes;
	}

	/**
	 * 获取候选的配置信息
	 */
	protected List<String> getCandidateConfigurations(AnnotationMetadata metadata, AnnotationAttributes attributes) {
	    List<String> configurations = SpringFactoriesLoader.loadFactoryNames(getSpringFactoriesLoaderFactoryClass(),
	        getBeanClassLoader());
            // 这个就很重要了,从这里大概可以判断出 配置信息是从META-INF/spring.factories这个文件中获取到的
	    Assert.notEmpty(configurations, "No auto configuration classes found in META-INF/spring.factories. If you "
	        + "are using a custom packaging, make sure that file is correct.");
	    return configurations;
	}
}
3.5 SpringFactoriesLoader
为了验证配置信息是不是从META-INF/spring.factories获取的,我们继续跟踪源码SpringFactoriesLoader::loadFactoryNames()
public final class SpringFactoriesLoader {

	/**
	 * 工厂资源位置
	 *
	 *
	 *     可以存在于多个Jar文件中
	 */
	public static final String FACTORIES_RESOURCE_LOCATION = "META-INF/spring.factories";

	static final Map<ClassLoader, Map<String, List<String>>> cache = new ConcurrentReferenceHashMap<>();

	/**
	 * 加载工厂名称
	 *
	 */
	public static List<String> loadFactoryNames(Class<?> factoryType, @Nullable ClassLoader classLoader) {
		ClassLoader classLoaderToUse = classLoader;
		if (classLoaderToUse == null) {
			classLoaderToUse = SpringFactoriesLoader.class.getClassLoader();
		}
                // 当前上下文中 factoryTypeName = EnableAutoConfiguration注解的全限类名
		String factoryTypeName = factoryType.getName();
		return loadSpringFactories(classLoaderToUse).getOrDefault(factoryTypeName, Collections.emptyList());
	}

	/**
	 * 加载spring工厂
	 */
	private static Map<String, List<String>> loadSpringFactories(ClassLoader classLoader) {
		Map<String, List<String>> result = cache.get(classLoader);
		if (result != null) {
			return result;
		}
		result = new HashMap<>();
		try {
                    // 获取 META-INF/spring.factories 枚举信息
		    Enumeration<URL> urls = classLoader.getResources(FACTORIES_RESOURCE_LOCATION);
		    while (urls.hasMoreElements()) {
                        // spring.factories 文件地址
			URL url = urls.nextElement();
                        // 获取resource信息
			UrlResource resource = new UrlResource(url);
                        // 加载配置文件中的配置信息
			Properties properties = PropertiesLoaderUtils.loadProperties(resource);
                        // 遍历配置信息放入全局的Map缓存中
			for (Map.Entry<?, ?> entry : properties.entrySet()) {
			    String factoryTypeName = ((String) entry.getKey()).trim();
			    String[] factoryImplementationNames =
			        StringUtils.commaDelimitedListToStringArray((String) entry.getValue());
			    for (String factoryImplementationName : factoryImplementationNames) {
			        result.computeIfAbsent(factoryTypeName, key -> new ArrayList<>())
				    .add(factoryImplementationName.trim());
			    }
		        }
		    }
		    // Replace all lists with unmodifiable lists containing unique elements
		    result.replaceAll((factoryType, implementations) -> implementations.stream().distinct()
		        .collect(Collectors.collectingAndThen(Collectors.toList(), Collections::unmodifiableList)));
		    cache.put(classLoader, result);
		}
		catch (IOException ex) {
		    throw new IllegalArgumentException("Unable to load factories from location [" +
		        FACTORIES_RESOURCE_LOCATION + "]", ex);
		}
		return result;
	}
}
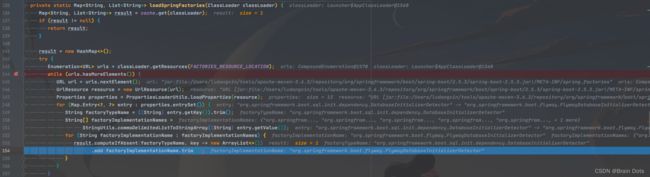
在这里为了更方便的查看loadSpringFactories中各步骤是用来干嘛的,特意添加debug截图如下:
3.6 spring.factories
spring-boot-autoconfigure下的META-INF/spring.factories文件信息
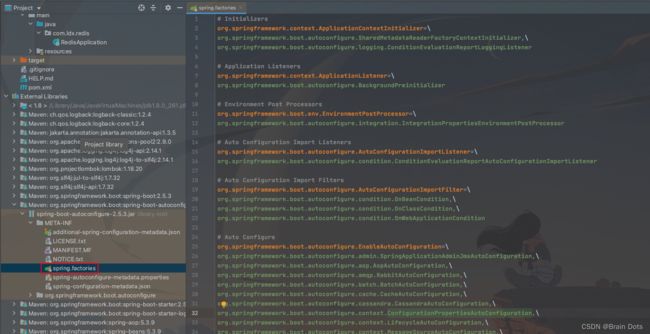
从上图中我们能看出spring.factories 中指定了很多常用中间件的auto configure文件信息。
3.7 RedisAutoConfiguration
我们仅查看我们比较熟悉的redis中间件的autoconfiguration文件信息
从RedisAutoConfiguration源码中我们能看出在文件中使用很多的@Conditional注解来实现注入符合条件的SpringBean
// 标识为配置类
@Configuration(proxyBeanMethods = false)
// 当存在RedisOperations.class时注入当前类
@ConditionalOnClass(RedisOperations.class)
// 激活RedisProperties属性文件
@EnableConfigurationProperties(RedisProperties.class)
// 导入客户端配置类
@Import({ LettuceConnectionConfiguration.class, JedisConnectionConfiguration.class })
public class RedisAutoConfiguration {

  @Bean
  // 当 当前环境中没有redisTemplate Bean时注入当前Bean
  @ConditionalOnMissingBean(name = "redisTemplate")
  /*
   * 当指定RedisConnectionFactory类已存在于 BeanFactory 中,并且可以确定单个候选项才会匹配成功。
   * 或者 BeanFactory 存在多个 RedisConnectionFactory 实例,但是有一个 primary 候选项被指定(通常在类上使用 @Primary 		 * 注解),也会匹配成功
   */
  @ConditionalOnSingleCandidate(RedisConnectionFactory.class)
  public RedisTemplate<Object, Object> redisTemplate(RedisConnectionFactory redisConnectionFactory) {
    RedisTemplate<Object, Object> template = new RedisTemplate<>();
    template.setConnectionFactory(redisConnectionFactory);
    return template;
  }

  @Bean
  @ConditionalOnMissingBean
  @ConditionalOnSingleCandidate(RedisConnectionFactory.class)
  public StringRedisTemplate stringRedisTemplate(RedisConnectionFactory redisConnectionFactory) {
    StringRedisTemplate template = new StringRedisTemplate();
    template.setConnectionFactory(redisConnectionFactory);
    return template;
  }

}
4. 小结
至此我们大概了解了SpringBoot是如何实现自动装配的。
- 项目启动
- 通过启动类上的@SpringBootApplication注解加载@EnableAutoConfiguration注解
- 通过@EnableAutoConfiguration加载@Import(AutoConfigurationImportSelector.class)执行AutoConfigurationImportSelector导入选择器
- 在AutoConfigurationImportSelector中执行selectImports()方法
- AutoConfigurationImportSelector::selectImports()通过加载ClassPath下的META-INF/spring.factories文件来动态的注入*AutoConfiguration类
- *AutoConfiguration类中通过使用@Conditional注解及其派生注解实现了Bean的灵活装载