SpringBoot入门----第一个SpringBoot2.0项目
Spring Boot 简介
Spring Boot 是 Spring 家族中的一个全新的框架,它用来简化 Spring 应用程序的创建和开发过程,也可以说 Spring Boot 能简化我们之前采用 SpringMVC + Spring + MyBatis 框架进行开发的过程。
在以往我们采用 SpringMVC + Spring + MyBatis 框架进行开发的时候,搭建和整合三大框架,我们需要做很多工作,比如配置 web.xml,配置 Spring,配置 MyBatis,并将它们整合在一起等,而 Spring Boot 框架对此开发过程进行了革命性的颠覆,完全抛弃了繁琐的 xml 配置过程,采用大量的默认配置简化我们的开发过程。
Spring Boot 入门
创建一个 Module,选择类型为 Spring Initializr 快速构建
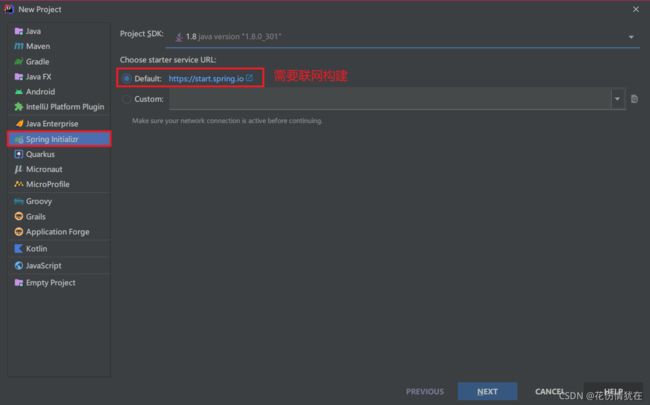
设置 GAV 坐标及 pom 配置信息

选择 Spring Boot 版本及依赖
会根据选择的依赖自动添加起步依赖并进行自动配置

设置项目名称、项目路径

提示:点击 Finish,如果是第一次创建,在右下角会提示正在下载相关的依赖

Show all

项目创建完毕,如下

项目结构

- static:存放静态资源,如图片、CSS、JavaScript 等
- templates:存放 Web 页面的模板文件
- application.properties/application.yml 用于存放程序的各种依赖模块的配置信息,比如 服务端口,数据库连接配置等
对 POM.xml 文件进行解释
<project xmlns="http://maven.apache.org/POM/4.0.0"
         xmlns:xsi="http://www.w3.org/2001/XMLSchema-instance"
         xsi:schemaLocation="http://maven.apache.org/POM/4.0.0 http://maven.apache.org/xsd/maven-4.0.0.xsd">
    <modelVersion>4.0.0modelVersion>

    <parent>
        <groupId>org.springframework.bootgroupId>
        <artifactId>spring-boot-starter-parentartifactId>
        <version>2.2.1.RELEASEversion>
        <relativePath/>
    parent>

    <groupId>com.bjpowernode.springbootgroupId>
    <artifactId>002-springboot-springmvcartifactId>
    <version>1.0.0version>

    <name>002-springboot-springmvcname>

    <description>Demo project for Spring Bootdescription>

    <properties>
        <java.version>1.8java.version>
    properties>
    <dependencies>

        <dependency>
            <groupId>org.springframework.bootgroupId>
            <artifactId>spring-boot-starter-webartifactId>
        dependency>

        <dependency>
            <groupId>org.springframework.bootgroupId>
            <artifactId>spring-boot-starter-testartifactId>
            <scope>testscope>
            <exclusions>
                <exclusion>
                    <groupId>org.junit.vintagegroupId>
                    <artifactId>junit-vintage-engineartifactId>
                exclusion>
            exclusions>
        dependency>
    dependencies>
    <build>
        <plugins>

            <plugin>
                <groupId>org.springframework.bootgroupId>
                <artifactId>spring-boot-maven-pluginartifactId>
            plugin>
        plugins>
    build>
project>
对 SpringBoot 项目结构进行说明
- mvn | mvnw | mvnw.cmd:使用脚本操作执行 maven 相关命令,国内使用较少,可删除
- .gitignore:使用版本控制工具 git 的时候,设置一些忽略提交的内容
- static|templates:后面模板技术中存放文件的目录
- application.properties:SpringBoot 的配置文件,很多集成的配置都可以在该文件中进行配置,例如:Spring、springMVC、Mybatis、Redis 等。目前是空的
- Application.java:SpringBoot 程序执行的入口,执行该程序中的 main 方法,SpringBoot就启动了
创建一个 Spring MVC 的 SpringBootController
SpringBootController 类所在包:com.lcz.springboot.controller
package com.lcz.springboot.controller;

import org.springframework.stereotype.Controller;
import org.springframework.web.bind.annotation.RequestMapping;
import org.springframework.web.bind.annotation.ResponseBody;

@Controller
public class SpringBootController {
    @RequestMapping(value = "/springBoot/say")
    public @ResponseBody String say() {
        return "Hello,springBoot!";
    }

}
注意:新创建的类一定要位于 Application 同级目录或者下级目录,否则 SpringBoot 加载不到。

例如Application在springboot目录下,那么你新创建的类只能在springboot目录下,可以直接在springboot目录下也可以是springboot目录下的其它目录,一句话来说:只要在springboot目录内就可以读取到!
在 IDEA 中右键,运行 Application 类中的 main 方法

通过在控制台的输出,可以看到启动 SpringBoot 框架,会启动一个内嵌的 tomcat,端口号为 8080,上下文根为空

在浏览器中输入http://localhost:8080//springBoot/say

入门案例分析
- Spring Boot 的父级依赖 spring-boot-starter-parent 配置之后,当前的项目就是 SpringBoot 项目
- spring-boot-starter-parent 是一个 Springboot 的父级依赖,开发SpringBoot 程序都需要继承该父级项目,它用来提供相关的 Maven 默认依赖,使用它之后,常用的 jar包依赖可以省去 version 配置
- Spring Boot 提供了哪些默认 jar 包的依赖,可查看该父级依赖的 pom 文件
- 如果不想使用某个默认的依赖版本,可以通过 pom.xml 文件的属性配置覆盖各个依赖项
通过 pom.xml 文件的属性配置覆盖各个依赖项,比如覆盖 Spring 版本:
<properties>
 <spring-framework.version>5.0.0.RELEASE
properties>
- @SpringBootApplication 注解是 Spring Boot 项目的核心注解,主要作用是开启Spring 自动配置,如果在 Application 类上去掉该注解,那么不会启动SpringBoot程序
- main 方法是一个标准的 Java 程序的 main 方法,主要作用是作为项目启动运行的入口
- @Controller 及 @ResponseBody 依然是我们之前的 Spring MVC,因为 Spring Boot的里面依然是使用我们的 Spring MVC + Spring + MyBatis 等框架
Spring Boot 的核心配置文件
Spring Boot 的核心配置文件用于配置 Spring Boot 程序,名字必须以 application 开始
核心配置格式
.properties 文件(默认采用该文件)
通过修改 application.properties 配置文件,在修改默认 tomcat 端口号及项目上下文件根
键值对的 properties 属性文件配置方式:
#设置内嵌 Tomcat 端口号
server.port=9090
#配置项目上下文根
server.servlet.context-path=/003-springboot-port-context-path
配置完毕之后,启动浏览器测试

页面显示结果

.yml 文件
yml 是一种 yaml 格式的配置文件,主要采用一定的空格、换行等格式排版进行配置。yaml 是一种直观的能够被计算机识别的的数据序列化格式,容易被人类阅读,yaml 类似于 xml,但是语法比 xml 简洁很多,值与前面的冒号配置项必须要有一个空格, yml 后缀也可以使用 yaml 后缀

注意:当两种格式配置文件同时存在,使用的是.properties 配置文件,为了演示 yml,可以先将其改名,重新运行 Application,查看启动的端口及上下文根
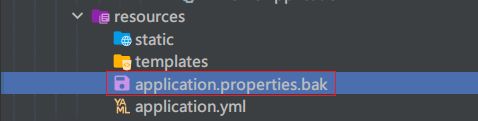
效果

多环境配置
在实际开发的过程中,我们的项目会经历很多的阶段(开发->测试->上线),每个阶段的配置也会不同,例如:端口、上下文根、数据库等,那么这个时候为了方便在不同的环境之间切换,SpringBoot 提供了多环境配置,具体步骤如下
为每个环境创建一个配置文件,命名必须以 application-环境标识.properties|yml

application-dev.properties
#开发环境
#设置内嵌 Tomcat 默认端口号
server.port=8080
#设置项目的上下文根
server.servlet.context-path=/005-springboot-multi-environment-dev
application-product.properties
#生产环境
#配置内嵌 Tomcat 默认端口号
server.port=80
#配置项目上下文根
server.servlet.context-path=/005-springboot-multi-environment-product
application-test.properties
#测试环境
#配置内嵌 Tomcat 端口号
server.port=8081
#配置项目的上下文根
server.servlet.context-path=/005-springboot-multi-environment-test
在总配置文件 application.properties 进行环境的激活
#SpringBoot 的总配置文件
#激活开发环境
#spring.profiles.active=dev
#激活测试环境
#spring.profiles.active=test
#激活生产环境
spring.profiles.active=product
等号右边的值和配置文件的环境标识名一致,可以更改总配置文件的配置,重新运行 Application,查看启动的端口及上下文根