云原生通用存储框架:Rook介绍与使用

新钛云服已为您服务1007天

基于Kubernetes (或K8S)的云原生应用程序已广泛用于生产环境,这带来了一个挑战:如何将传统存储系统集成到Kubernetes集群中?我们建议使用Rook作为解决方案。
Rook是一个开源的云原生存储编排器,可将存储软件转换为自我管理,自我扩展和自我修复的存储服务。Rook支持的存储系统包括Ceph,EdgeFS,Cassandra,CockroachDB,NFS和YugabyteDB。


Rook支持的存储系统
本文以Ceph为例,介绍Rook的概念和框架,然后解释其部署和应用程序。您可以按照本文中的步骤快速开始使用Rook。
Rook-Ceph架构
关于Ceph
在探讨Rook之前,让我们回顾一下Ceph。如果您熟悉Ceph,则可以跳过这一部分。
Ceph是一款开源,高度可扩展的分布式存储解决方案,用于有多年生产的块存储,共享文件系统和对象存储。它是Sage Weil博士论文的成果,于2003年诞生,然后在LGPL许可下于2006年发布。
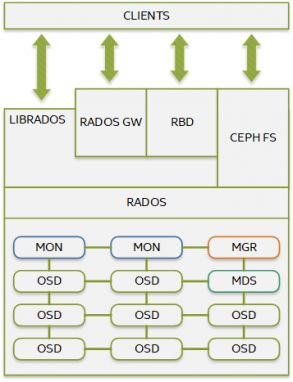
Ceph由几个组件组成:
MON(Ceph监视器)负责群集仲裁。所有群集节点都向MON报告,并共享有关其状态的每个更改的信息。
OSD(Ceph对象存储设备)负责存储对象并通过网络提供对它们的访问。
MGR(Ceph Manager)提供了额外的监视和与外部管理系统的接口。
RADOS(可靠的自治分布式对象存储)是Ceph集群的核心。RADOS确保所存储的数据始终与数据复制,故障检测和恢复保持一致。
LibRADOS是用于访问RADOS的库。借助对多种编程语言的支持,LibRADOS为RADOS提供了本机接口,并为其他高级服务(例如RBD,RGW和CephFS)提供了基础。
RBD(RADOS块设备)现在称为Ceph块设备,它提供了持久的块存储,它是精简配置的,可调整大小的,并存储在多个OSD上条带化的数据。
RGW(RADOS网关)是提供对象存储服务的接口。它使用libRGW(RGW库)和libRADOS来与应用程序之间的Ceph对象存储建立连接。RGW提供了与Amazon S3和OpenStack Swift兼容的RESTful API。
CephFS是提供POSIX兼容文件系统的Ceph文件系统。CephFS使用Ceph集群存储用户数据。
MDS(Ceph Metadata Server)跟踪文件层次结构,并仅存储CephFS的元数据。
Operator模式
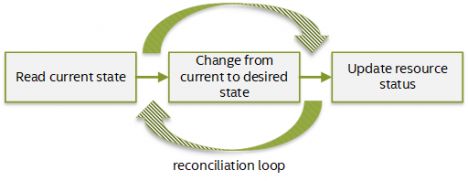
Rook Operator是Rook框架的核心。Operator是一个自定义的Kubernetes控制器,它使用CR(Custom Resource)来管理应用程序及其组件。
Kubernetes controller监视您的集群资源的状态,并尝试将当前集群状态移至所需状态。每个controller负责特定资源,并由协调循环实现。创建,更新或删除受监视资源时,将触发操作更新。
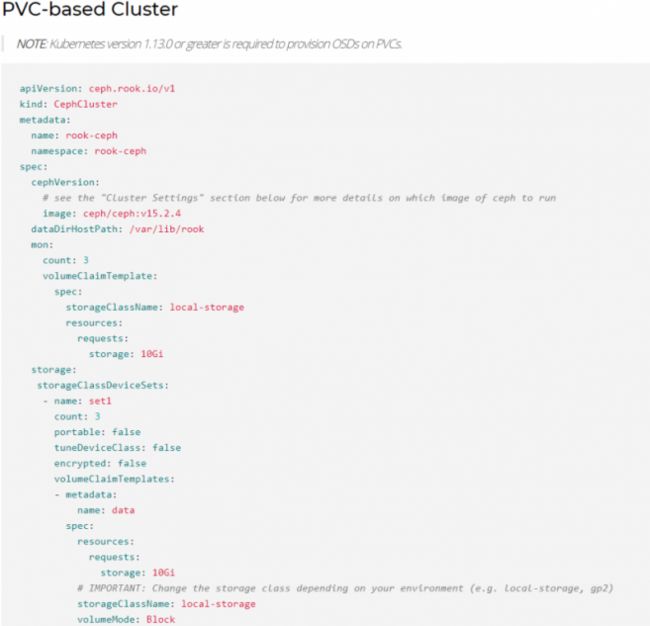
Rook定义了几个CR,我们以一个基于PVC的Ceph Cluster CR为例。PVC是Kubernetes的概念。有关详细信息,您可以参考:https://kubernetes.io/docs/concepts/storage/persistent-volumes/。
Ceph Rook
Rook operator是一个简单的容器,有引导和监视存储集群所需的全部内容。operator启动并监视Ceph守护程序Pod,例如MON,OSD,MGR等。它还监视守护程序以确保集群运行状况良好。Ceph MON在必要时启动或故障转移。随着群集的增长或收缩,将进行其他调整。
与本机Ceph一样,Rook-Ceph为应用程序提供块,文件系统和对象存储。
Ceph CSI(容器存储接口)是一种标准,用于将任意块和文件存储系统暴露给容器编排系统(如Kubernetes)上的容器化工作负载。Ceph CSI与Rook集成在一起,并支持两种方案:
-
RBD(块存储):此驱动程序针对RWO pod访问进行了优化,其中只有一个pod可以访问存储。
CephFS(文件系统):此驱动程序允许带有一个或多个Pod的RWX访问同一存储。
对于对象存储,Rook支持创建新存储桶以及通过两个自定义资源访问现有存储桶:对象存储桶声明(OBC)和对象存储桶(OB)。应用程序可以通过RGW访问对象。
对于Ceph集群维护者,有三种配置Ceph的方法:
Toolbox + Ceph CLI:推荐的方法是在Rook Toolbox终端中执行Ceph命令。
Ceph仪表板:第二种推荐方法是使用Ceph Dashboard。此方法的优先级与通过Ceph CLI进行配置的优先级相同。
通过ceph.conf的高级配置覆盖ConfigMap。某些设置无法通过CLI或信息中心轻松修改。例如,我们不能使用Ceph CLI直接删除MON。唯一的方法是覆盖configMap。
程序员可以使用Kubernetes客户端API来访问ConfigMap或Toolbox pod来操纵Rook-Ceph集群,从而开发自己的插件。

开始使用
本节显示了Rook-Ceph集群的部署以及Kubernetes应用程序的RBD设置。
软件配置

Rook-Ceph部署
准备Kubernetes集群
由于Rook基于Kubernetes集群,因此您需要设置一个Kubernetes集群并正确配置网络。如果您现有Kubernetes集群,则可以跳过本节。
1.安装Docker引擎:https://docs.docker.com/engine/install/ubuntu/
2.安装kubeadm,kubelet和kubectl:https://kubernetes.io/docs/setup/production-environment/tools/kubeadm/install-kubeadm/#installing-kubeadm-kubelet-and-kubectl
sudo apt-get update && sudo apt-get install -y apt-
transport-https curl
curl -s https://packages.cloud.google.com/apt/doc/apt-key.gpg | sudo
apt-key add -
cat <
3.拉取docker镜像:
kubeadm config images pull --kubernetes-version=v1.18.6
4.在主节点上启动Kubernetes集群:
sudo swapoff -a
sudo kubeadm init --pod-network-cidr 10.244.0.0/16 --apiserver-advertise-address  --node-name master --ignore-preflight-errors=all
kubectl apply -f https://docs.projectcalico.org/v3.14/manifests/calico.yaml
kubectl taint nodes master node-role.kubernetes.io/master:NoSchedule-
5.加入Kubernetes节点:
kubeadm join :6443 --token zifmp3.27h736nwdfjli6fi \
    --discovery-token-ca-cert-hash sha256:5c11bfd28f016fd15b656850324de5d4d9a042c9a9e620aba3d1c959b7ac0ad5
Rook和Ceph集群配置
使用以下守护程序启动Rook operator和Ceph集群:MONs,OSD,MGR和Ceph CSI插件和驱动程序。
1.使用CRD(Custom Resource Definition)启动Rook通用组件:
kubectl apply -f https://github.com/rook/rook/blob/release-1.3/cluster/examples/kubernetes/ceph/common.yaml
2.启动有CSI支持的Rook operator:
kubectl apply -f https://github.com/rook/rook/blob/release-1.3/cluster/examples/kubernetes/ceph/operator.yaml
3.启动Ceph集群:
kubectl apply -f https://github.com/rook/rook/blob/release-1.3/cluster/examples/kubernetes/ceph/cluster.yaml
在应用此Yaml配置之前,您需要在自己的环境中调整一些守护程序参数。
Ceph监视器中的设置:
mon:
    count: 3
    allowMultiplePerNode: false
必须分配Ceph OSD,节点和原始设备或过滤器中的设置:
storage: # cluster level storage configuration and selection
    useAllNodes: true
    useAllDevices: true
    #deviceFilter:
    config:
      # metadataDevice: "md0" # specify a non-rotational storage so ceph-volume will use it as block db device of bluestore.
      # databaseSizeMB: "1024" # uncomment if the disks are smaller than 100 GB
      # journalSizeMB: "1024"  # uncomment if the disks are 20 GB or smaller
      # osdsPerDevice: "1" # this value can be overridden at the node or device level
      # encryptedDevice: "true" # the default value for this option is "false"
# Individual nodes and their config can be specified as well, but 'useAllNodes' above must be set to false. Then, only the named
# nodes below will be used as storage resources.  Each node's 'name' field should match their 'kubernetes.io/hostname' label.
#    nodes:
#    - name: "172.17.4.201"
#      devices: # specific devices to use for storage can be specified for each node
#      - name: "sdb"
#      - name: "nvme01" # multiple osds can be created on high performance devices
#        config:
#          osdsPerDevice: "5"
#      - name: "/dev/disk/by-id/ata-ST4000DM004-XXXX" # devices can be specified using full udev paths
#      config: # configuration can be specified at the node level which overrides the cluster level config
#        storeType: filestore
#    - name: "172.17.4.301"
#      deviceFilter: "^sd."
使用PVC设置OSD:
kubectl apply -f https://github.com/rook/rook/blob/release-1.3/cluster/examples/kubernetes/ceph/cluster-on-pvc.yaml
    storage:
     storageClassDeviceSets:
     - name: set1
       # The number of OSDs to create from this device set
       count: 3
       # IMPORTANT: If volumes specified by the storageClassName are not portable across nodes
       # this needs to be set to false. For example, if using the local storage provisioner
       # this should be false.
       portable: true
       # Certain storage class in the Cloud are slow
       # Rook can configure the OSD running on PVC to accommodate that by tuning some of the Ceph internal
       # Currently, "gp2" has been identified as such
       tuneDeviceClass: true
       # Since the OSDs could end up on any node, an effort needs to be made to spread the OSDs
       # across nodes as much as possible. Unfortunately, the pod anti-affinity breaks down
       # as soon as you have more than one OSD per node. If you have more OSDs than nodes, K8s may
       # choose to schedule many of them on the same node. What we need is the Pod Topology
       # Spread Constraints.
       # Another approach for a small number of OSDs is to create a separate device set for each
       # zone (or other set of nodes with a common label) so that the OSDs will end up on different
       # nodes. This would require adding nodeAffinity to the placement here.
       placement:
         podAntiAffinity:
           preferredDuringSchedulingIgnoredDuringExecution:
           - weight: 100
             podAffinityTerm:
               labelSelector:
                 matchExpressions:
                 - key: app
                   operator: In
                   values:
                   - rook-ceph-osd
                 - key: app
                   operator: In
                   values:
                   - rook-ceph-osd-prepare
               topologyKey: kubernetes.io/hostname
         topologySpreadConstraints:
         - maxSkew: 1
           topologyKey: kubernetes.io/hostname
           whenUnsatisfiable: DoNotSchedule
           labelSelector:
             matchExpressions:
             - key: app
               operator: In
               values:
               - rook-ceph-osd
               - rook-ceph-osd-prepare
       resources:
       #   limits:
       #     cpu: "500m"
       #     memory: "4Gi"
       #   requests:
       #     cpu: "500m"
       #     memory: "4Gi"
       volumeClaimTemplates:
       - metadata:
           name: data
           # if you are looking to give your OSD a different CRUSH device class than the one detected by Ceph
           # annotations:
           #   crushDeviceClass: hybrid
         spec:
           resources:
             requests:
               storage: 64Gi
           # IMPORTANT: Change the storage class depending on your environment (e.g. local-storage, gp2)
           storageClassName: local-sc
           volumeMode: Block
           accessModes:
             - ReadWriteOnce
       # dedicated block device to store bluestore database (block.db)
       - metadata:
           name: metadata
           spec:
             resources:
               requests:
                 # Find the right size https://docs.ceph.com/docs/master/rados/configuration/bluestore-config-ref/#sizing
                 storage: 3Gi
           # IMPORTANT: Change the storage class depending on your environment (e.g. local-storage, gp2)
           storageClassName: local-sc
#     volumeMode: Block
#     accessModes:
#       - ReadWriteOnce
4.启动toolbox,它包含Ceph CLI命令:
kubectl apply -f https://github.com/rook/rook/blob/release-1.3/cluster/examples/kubernetes/ceph/toolbox.yaml
Volume Claim与应用程序
此阶段适用于应用程序。根据声明请求RBD卷并将其安装在应用程序上。
1.为Ceph-CSI定义StorageClass:
kubectl apply -f https://github.com/rook/rook/blob/release-1.3/cluster/examples/kubernetes/ceph/csi/rbd/storageclass.yaml
在StorageClass配置中,提供程序名称必须为:rook-ceph.rbd.csi.ceph.com,并且具有RBD卷的池设置。
2.启动CochroachDB应用程序,并使用Ceph CSI提供的RBD卷定义挂载点。
kubectl apply -f https://github.com/cockroachdb/cockroach/blob/master/cloud/kubernetes/cockroachdb-statefulset.yaml
使用一下volume claim声明设置。
volumeClaimTemplates:
  - metadata:
      name: datadir
    spec:
      accessModes:
        - "ReadWriteOnce"
      storageClassName: rook-ceph-block
      resources:
        requests:
          storage: 16Gi
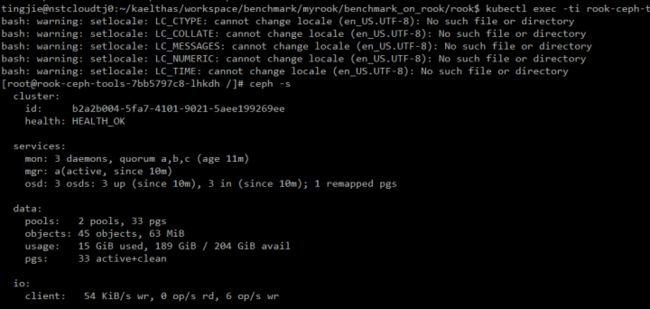
部署后,检查Rook-Ceph和应用程序容器的状态。


配置Ceph集群
如前所述,有三种方法可以配置Rook-Ceph集群:
1.Toolbox和Ceph CLI。
rook-ceph-tools pod运行后,将其与以下命令连接:
kubectl -n rook-ceph exec -it $(kubectl -n rook-ceph get pod -l "app=rook-ceph-tools" -o jsonpath='{.items[0].metadata.name}') bash
例如,创建一个新的复制池:rbd2,如下所示:

2.Ceph仪表板。
有关仪表板的详细信息,请参阅以下页面:https://rook.io/docs/rook/v1.3/ceph-dashboard.html
3.通过ceph.conf进行的高级配置将覆盖ConfigMap。
有些设置无法通过CLI或仪表板轻松修改,例如Ceph监视器计数。它是CRD:Ceph Cluster的一部分,并由operator进行监视。您需要在减少Ceph Cluster CRD的mon.count之后,通过编辑configmap:rook-ceph-mon-endpoints来删除专用监视器。
kubectl edit configmap rook-ceph-mon-endpoints -n rook-ceph

另一种情况是ceph.conf中的参数。您需要更新configmap:rook-config-override。
kubectl edit configmap rook-ceph-override -n rook-ceph
-------------------------------------
apiVersion: v1
kind: ConfigMap
metadata:
  name: rook-config-override
  namespace: rook-ceph
data:
  config: |
    [global]
    osd crush update on start = false
    osd pool default size = 2
如果需要升级或清理,则可以参考Rook社区中的文档。
概括:
在本文中,我们介绍了operator,Rook-Ceph框架的概念,以及如何为Ceph快速部署基于PVC的OSD。
与Ceph集群的本机部署相比,Rook的优势显而易见:它可以简化部署,管理,扩展和升级工作。由于Rook部署在Kubernetes集群中,因此可以轻松地调度和重用Ceph客户端和存储节点。与专用的“存储”和“客户端”节点相比,它有助于降低轻量级集群的成本。
参考:
Rook.io: https://rook.io/docs/rook/v1.3/
Rook github: https://github.com/rook/rook
原文:https://01.org/kubernetes/blogs/tingjie/2020/introduction-cloud-native-storage-orchestrator-rook
了解新钛云服
新钛云服三周岁,公司月营收超600万元,定下百年新钛的发展目标
当IPFS遇见云服务|新钛云服与冰河分布式实验室达成战略协议
新钛云服正式获批工信部ISP/IDC(含互联网资源协作)牌照
深耕专业,矗立鳌头,新钛云服获千万Pre-A轮融资
新钛云服,打造最专业的Cloud MSP+,做企业业务和云之间的桥梁
新钛云服一周年,完成两轮融资,服务五十多家客户
上海某仓储物流电子商务公司混合云解决方案
往期技术干货
低代码开发,全民开发,淘汰职业程序员!
国内主流公有云VPC使用对比及总结
万字长文:云架构设计原则|附PDF下载
刚刚,OpenStack 第 19 个版本来了,附28项特性详细解读!
Ceph OSD故障排除|万字经验总结
七个用于Docker和Kubernetes防护的安全工具
运维人的终身成长,从清单管理开始|万字长文!
OpenStack与ZStack深度对比:架构、部署、计算存储与网络、运维监控等
什么是云原生?
IT混合云战略:是什么、为什么,如何构建?
