基于Vue3和element-plus实现一个完整的登录功能
先看一下最终要实现的效果:
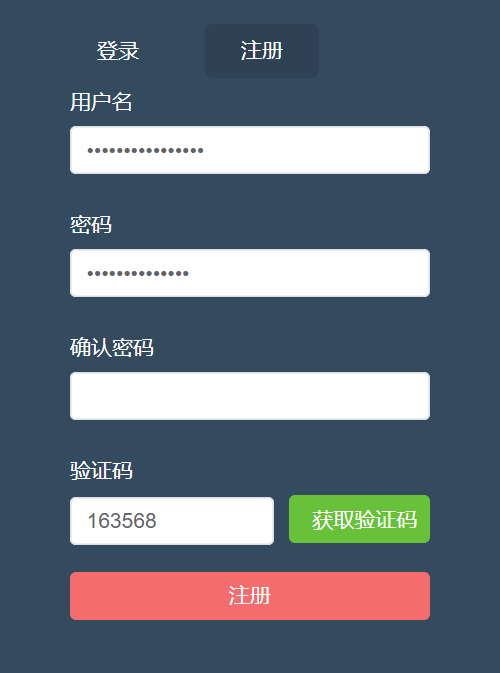
登录页面:

注册页面:
(1)引入element-plus组件库
引入组件库的方式有好多种,在这里我就在main.js全局引入了.
npm i element-plus -Smain.js中代码:
import { createApp } from "vue";
//element-plus
import ElementPlus from "element-plus";
import "element-plus/dist/index.css";
import App from "./App.vue";
import router from "./router";
import axios from "axios";
import store from "./store";
//创建实例
const app = createApp(App);
//全局应用配置
app.config.globalProperties.$axios = axios;

app.use(ElementPlus).use(store).use(router).mount("#app");
引入之后自己可以用几个按钮测试一下是否引入成功.
(2)登录及注册页面
html部分
views/account/Login.vue
{{ data.code_button_text }}
{{ data.current_menu === "login" ? "登录" : "注册" }}
js部分
css部分(使用了scss)
(3)封装一些公共方法及样式
新建styles文件夹,然后新建几个样式文件:
normalize.scss
/*! normalize.css v8.0.1 | MIT License | github.com/necolas/normalize.css */

/* Document
   ========================================================================== */

/**
 * 1. Correct the line height in all browsers.
 * 2. Prevent adjustments of font size after orientation changes in iOS.
 */
 /* div的默认样式不存在padding和margin为0的情况*/
 html, body, span, applet, object, iframe,
 h1, h2, h3, h4, h5, h6, p, blockquote, pre,
 a, abbr, acronym, address, big, cite, code,
 del, dfn, em, img, ins, kbd, q, s, samp,
 small, strike, strong, sub, sup, tt, var,
 b, u, i, center,
 dl, dt, dd, ol, ul,
 fieldset, form, legend,
 table, caption, tbody, tfoot, thead, tr, th, td,
 article, aside, canvas, details, embed,
 figure, figcaption, footer, header, hgroup,
 menu, nav, output, ruby, section, summary,
 time, mark, audio, video {
   margin: 0;
   padding: 0;
   font-size: 100%;
   font: inherit;
   vertical-align: baseline;
 }
 /* HTML5 display-role reset for older browsers */
 article, aside, details, figcaption, figure,
 footer, header, hgroup, menu, nav, section {
   display: block;
 }
 html {
    line-height: 1.15; /* 1 */
    -webkit-text-size-adjust: 100%; /* 2 */
  }

  /* Sections
     ========================================================================== */

  /**
   * Remove the margin in all browsers.
   */

  body {
    margin: 0;
    font-family: 'Microsoft YaHei';
    font-size: 14px;
  }

  /**
   * Render the `main` element consistently in IE.
   */

  main {
    display: block;
  }

  /**
   * Correct the font size and margin on `h1` elements within `section` and
   * `article` contexts in Chrome, Firefox, and Safari.
   */


  /* Grouping content
     ========================================================================== */

  /**
   * 1. Add the correct box sizing in Firefox.
   * 2. Show the overflow in Edge and IE.
   */

  hr {
    box-sizing: content-box; /* 1 */
    height: 0; /* 1 */
    overflow: visible; /* 2 */
  }

  /**
   * 1. Correct the inheritance and scaling of font size in all browsers.
   * 2. Correct the odd `em` font sizing in all browsers.
   */

  pre {
    font-family: monospace, monospace; /* 1 */
    font-size: 1em; /* 2 */
  }

  /* Text-level semantics
     ========================================================================== */

  /**
   * Remove the gray background on active links in IE 10.
   */

  a {
    background-color: transparent;
    text-decoration: none;
  }


  /**
   * 1. Remove the bottom border in Chrome 57-
   * 2. Add the correct text decoration in Chrome, Edge, IE, Opera, and Safari.
   */

  abbr[title] {
    border-bottom: none; /* 1 */
    text-decoration: underline; /* 2 */
    text-decoration: underline dotted; /* 2 */
  }

  /**
   * Add the correct font weight in Chrome, Edge, and Safari.
   */

  b,
  strong {
    font-weight: bolder;
  }

  /**
   * 1. Correct the inheritance and scaling of font size in all browsers.
   * 2. Correct the odd `em` font sizing in all browsers.
   */

  code,
  kbd,
  samp {
    font-family: monospace, monospace; /* 1 */
    font-size: 1em; /* 2 */
  }

  /**
   * Add the correct font size in all browsers.
   */

  small {
    font-size: 80%;
  }

  /**
   * Prevent `sub` and `sup` elements from affecting the line height in
   * all browsers.
   */

  sub,
  sup {
    font-size: 75%;
    line-height: 0;
    position: relative;
    vertical-align: baseline;
  }

  sub {
    bottom: -0.25em;
  }

  sup {
    top: -0.5em;
  }

  /* Embedded content
     ========================================================================== */

  /**
   * Remove the border on images inside links in IE 10.
   */

  img {
    display: block;
    border-style: none;
  }

  /* Forms
     ========================================================================== */

  /**
   * 1. Change the font styles in all browsers.
   * 2. Remove the margin in Firefox and Safari.
   */

  button,
  input,
  optgroup,
  select,
  textarea {
    font-family: inherit; /* 1 */
    font-size: 100%; /* 1 */
    margin: 0; /* 2 */
  }

  /**
   * Show the overflow in IE.
   * 1. Show the overflow in Edge.
   */

  button,
  input { /* 1 */
    overflow: visible;
  }

  /**
   * Remove the inheritance of text transform in Edge, Firefox, and IE.
   * 1. Remove the inheritance of text transform in Firefox.
   */

  button,
  select { /* 1 */
    text-transform: none;
  }

  /**
   * Correct the inability to style clickable types in iOS and Safari.
   */

  button,
  [type="button"],
  [type="reset"],
  [type="submit"] {
    -webkit-appearance: button;
  }

  /**
   * Remove the inner border and padding in Firefox.
   */

  button::-moz-focus-inner,
  [type="button"]::-moz-focus-inner,
  [type="reset"]::-moz-focus-inner,
  [type="submit"]::-moz-focus-inner {
    border-style: none;
    padding: 0;
  }

  /**
   * Restore the focus styles unset by the previous rule.
   */

  button:-moz-focusring,
  [type="button"]:-moz-focusring,
  [type="reset"]:-moz-focusring,
  [type="submit"]:-moz-focusring {
    outline: 1px dotted ButtonText;
  }

  /**
   * Correct the padding in Firefox.
   */

  fieldset {
    padding: 0.35em 0.75em 0.625em;
  }

  /**
   * 1. Correct the text wrapping in Edge and IE.
   * 2. Correct the color inheritance from `fieldset` elements in IE.
   * 3. Remove the padding so developers are not caught out when they zero out
   *    `fieldset` elements in all browsers.
   */

  legend {
    box-sizing: border-box; /* 1 */
    color: inherit; /* 2 */
    display: table; /* 1 */
    max-width: 100%; /* 1 */
    padding: 0; /* 3 */
    white-space: normal; /* 1 */
  }

  /**
   * Add the correct vertical alignment in Chrome, Firefox, and Opera.
   */

  progress {
    vertical-align: baseline;
  }

  /**
   * Remove the default vertical scrollbar in IE 10+.
   */

  textarea {
    overflow: auto;
  }

  /**
   * 1. Add the correct box sizing in IE 10.
   * 2. Remove the padding in IE 10.
   */

  [type="checkbox"],
  [type="radio"] {
    box-sizing: border-box; /* 1 */
    padding: 0; /* 2 */
  }

  /**
   * Correct the cursor style of increment and decrement buttons in Chrome.
   */

  [type="number"]::-webkit-inner-spin-button,
  [type="number"]::-webkit-outer-spin-button {
    height: auto;
  }

  /**
   * 1. Correct the odd appearance in Chrome and Safari.
   * 2. Correct the outline style in Safari.
   */

  [type="search"] {
    -webkit-appearance: textfield; /* 1 */
    outline-offset: -2px; /* 2 */
  }

  /**
   * Remove the inner padding in Chrome and Safari on macOS.
   */

  [type="search"]::-webkit-search-decoration {
    -webkit-appearance: none;
  }

  /**
   * 1. Correct the inability to style clickable types in iOS and Safari.
   * 2. Change font properties to `inherit` in Safari.
   */

  ::-webkit-file-upload-button {
    -webkit-appearance: button; /* 1 */
    font: inherit; /* 2 */
  }

  /* Interactive
     ========================================================================== */

  /*
   * Add the correct display in Edge, IE 10+, and Firefox.
   */

  details {
    display: block;
  }

  /*
   * Add the correct display in all browsers.
   */

  summary {
    display: list-item;
  }

  /* Misc
     ========================================================================== */

  /**
   * Add the correct display in IE 10+.
   */

  template {
    display: none;
  }

  /**
   * Add the correct display in IE 10.
   */

  [hidden] {
    display: none;
  }

  ul, li { list-style: none; }
elementui.scss(当时测试时用的)
.el-button-block{
    display: block;
    width: 100%;
}
新建main.scss(引入上方两个样式文件)
@import "./normalize.scss";
@import './elementui.scss'
vue.config.js配置一下样式文件
  css: {
    // 是否使用css分离插件 ExtractTextPlugin
    extract: true,
    // 开启 CSS source maps?
    sourceMap: false,
    // css预设器配置项
    loaderOptions: {
      scss: {
        additionalData: `@import "./src/styles/main.scss";`,
      },
    },
    // requireModuleExtension: true,
  },
登录中封装的校验方法
新建utils文件夹,
a.validate.js
// 校验邮箱
export function validate_email(value) {
  let regEmail = /^([a-zA-Z]|[0-9])(\w|\-)+@[a-zA-Z0-9]+\.([a-zA-Z]{2,4})$/;
  return regEmail.test(value);
}

// 校验密码
export function validate_password(value) {
  let regPassword = /^(?!\D+$)(?![^a-zA-Z]+$)\S{6,20}$/;
  return regPassword.test(value);
}

// 校验验证码
export function validate_code(value) {
  let regCode = /^[a-z0-9]{6}$/;
  return regCode.test(value);
}
封装请求方法
npm i axios -S记得先在main.js中引入axios
import axios from "axios";utils中新建request.js
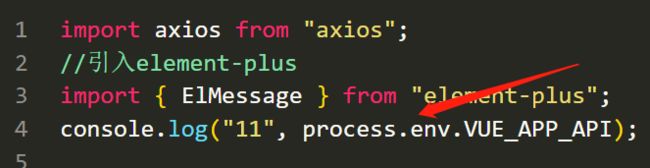
import axios from "axios";
//引入element-plus
import { ElMessage } from "element-plus";
console.log("11", process.env.VUE_APP_API); //undefined??

//创建实例
const service = axios.create({
  baseURL: "/devApi", //请求地址
  timeout: 5000, //超时
});

//添加请求拦截器
service.interceptors.request.use(
  function (config) {
    //在发送请求之前做些什么
    return config;
  },
  function (error) {
    console.log(error.request);
    const errorData = JSON.parse(error.request.response);
    if (errorData.message) {
      //判断是否具有message属性
      ElMessage({
        message: errorData.message,
        type: "error",
      });
    }
    //对请求错误做些什么
    return Promise.reject(errorData);
  }
);

//添加响  应拦截器
service.interceptors.response.use(
  function (response) {
    //对响应数据做些什么
    console.log("响应数据", response);
    const data = response.data;
    if (data.resCode === 0) {
      return Promise.resolve(data);
    } else {
      ElMessage({
        message: data.message,
        type: "error",
      });
      return Promise.reject(data);
    }
  },
  function (error) {
    //对响应错误做些什么
    const errorData = JSON.parse(error.request.response);
    if (errorData.message) {
      //判断是否具有message属性
      ElMessage({
        message: errorData.message,
        type: "error",
      });
    }

    return Promise.reject(errorData);
  }
);

//暴露service
export default service;
(4)配置环境变量
和项目根路径同级,新建几个文件:
.env.development
VUE_APP_API = '/devApi'可以自定义,但是必须是VUE_APP_XXX的格式
.env.production
VUE_APP_API = '/production'.env.test
VUE_APP_API = '/test'配置完后记得在axios文件中打印一下,看下能输出自己配置的环境变量吗.
(5)配置代理(跨域)
基本大同小异,代理地址改成自己的就可以了.
  devServer: {
    open: false, //编译完成是否自动打开网页
    host: "0.0.0.0", //指定使用地址,默认是localhost,0.0.0.0代表可以被外界访问
    port: 8080,
    proxy: {
      "/devApi": {
        target: "http://v3.web-jshtml.cn/api", //(必选)API服务器的地址
        changeOrigin: true, //(必选) 是否允许跨域
        ws: false, //(可选) 是否启用websockets
        secure: false, //(可选) 是否启用https接口
        pathRewrite: {
          "^/devApi": "", //匹配开头为/devApi的字符串,并替换成空字符串
        },
      },
    },
  },
登录基本上是完成了,还有优化的点,比如说登录放在vuex中,
继续改造一下,把登录放在vuex中实现:
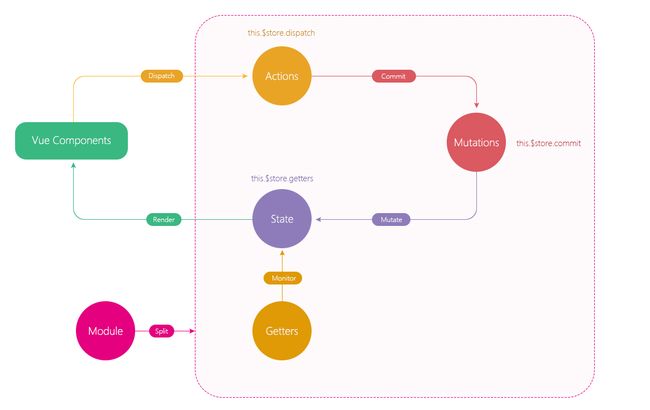
先看一下vuex的执行逻辑图:
store新建modules文件夹,新建app.js:
import { Login } from "@/api/account";

const state = {
  count: 100,
};
const getters = {};
const mutations = {};
const actions = {
  loginAction(context, requestData) {
    return new Promise((resolve, reject) => {
      Login(requestData)
        .then((response) => {
          resolve(response);
        })
        .catch((error) => {
          reject(error);
        });
    });
  },
};

export default {
  namespaced: true,
  state,
  getters,
  mutations,
  actions,
};
登录页面改造:
import { useStore } from "vuex"; // store
const store = useStore();注释掉之前的代码:
 /** 登录 */
    // const login = () => {
    //   const requestData = {
    //     username: data.form.username,
    //     password: sha1(data.form.password),
    //     code: data.form.code,
    //   };
    //   data.submit_button_loading = true;
    //   Login(requestData)
    //     .then((response) => {
    //       console.log("login", response);
    //       data.submit_button_loading = false;
    //       proxy.$message({
    //         message: response.message,
    //         type: "success",
    //       });

    //       reset();
    //     })
    //     .catch((error) => {
    //       console.log("登录失败", error);
    //       data.submit_button_loading = false;
    //     });
    // };

    const login = () => {
      const requestData = {
        username: data.form.username,
        password: sha1(data.form.password),
        code: data.form.code,
      };
      data.submit_button_loading = true;
      store
        .dispatch("app/loginAction", requestData)
        .then((response) => {
          proxy.$message({
            message: response.message,
            type: "success",
          });
          reset();
        })
        .catch((error) => {
          console.log("失败", error);
        });
    };
好了,等有继续优化的地方我再继续完善.
(4)路由守卫
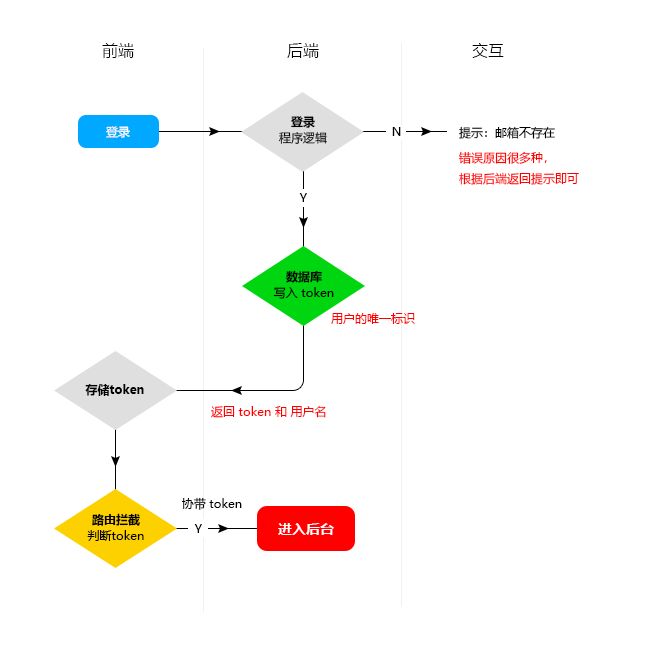
先来看一下总体的思路图:
在router文件下新建permit.js:
import router from "./index";
//cookie
import { getToken } from "@/utils/cookies";

//全局路由守卫
router.beforeEach((to, from) => {
  // console.log("from", from);
  //token不存在
  if (!getToken()) {
    console.log("to", to);
    if (to.name !== "Login") {
      return {
        name: "Login",
      };
    }
  }
});

//全局后置守卫
router.afterEach((to, from) => {
  console.log(to);
  console.log(from);
});
引入到main.js中:
//路由守卫
import "./router/permit";
utils文件中新建cookies.js文件
先安装js-cookie:
npm i js-cookie -Scookies.js:
import Cookies from "js-cookie";

//变量
const tokenKey = "tokenAdmin";
const usernameKey = "username";

//获取token
export function getToken() {
  return Cookies.get(tokenKey);
}

//写入token
export function setToken(value) {
  return Cookies.set(tokenKey, value);
}

//删除token
export function removeToken() {
  return Cookies.remove(tokenKey);
}

//写入 username
export function setUsername(value) {
  return Cookies.set(usernameKey, value);
}

//获取 username
export function getUsername() {
  return Cookies.get(usernameKey);
}

//删除 username
export function removeUsername() {
  return Cookies.remove(usernameKey);
}
vuex中改造一下:
store/app.js
import { Login, Logout } from "@a/account";
import {
  setToken,
  setUsername,
  getToken,
  getUsername,
  removeToken,
  removeUsername,
} from "@u/cookies";

const state = {
  token: "" || getToken(),
  username: "" || getUsername(),
  collapse: JSON.parse(sessionStorage.getItem("collapse")) || false,
};
const getters = {};
const mutations = {
  SET_COLLAPSE(state) {
    state.collapse = !state.collapse;
    sessionStorage.setItem("collapse", JSON.stringify(state.collapse));
  },
  //设置token
  SET_TOKEN(state, value) {
    state.token = value;
    value && setToken(value); //当value存在时写入token
  },
  //设置用户名
  SET_USERNAME(state, value) {
    state.username = value;
    value && setUsername(value); //当value存在时写入token
  },
};
const actions = {
  //登录
  loginAction(context, requestData) {
    return new Promise((resolve, reject) => {
      Login(requestData)
        .then((response) => {
          let data = response.data;
          context.commit(" SET_TOKEN", data.token);
          context.commit("  SET_USERNAME", data.username);
          resolve(response);
        })
        .catch((error) => {
          reject(error);
        });
    });
  },

  //退出
  logoutAction({ commit }) {
    return new Promise((resolve, reject) => {
      Logout()
        .then((response) => {
          removeToken();
          removeUsername();
          commit(" SET_TOKEN", "");
          commit("  SET_USERNAME", "");
          resolve(response);
        })
        .catch((error) => {
          reject(error);
        });
    });
  },
};

export default {
  namespaced: true,
  state,
  getters,
  mutations,
  actions,
};
主页有退出的话可以这么来触发:
  //退出
    const handleLogout = () => {
      proxy
        .$confirm("确定退出管理后台", "提示", {
          confirmButtonText: "确定",
          cancelButtonText: "取消",
          type: "warning",
        })
        .then(() => {
          store.dispatch("app/logoutAction").then((res) => {
            proxy.$message({
              type: "success",
              message: res.message,
            });
            replace({
              name: "Login",
            });
          });
        })
        .catch(() => {
          // catch error
        });
    };
记得引入和返回,不能忘记:
import { useStore } from "vuex";
import { ref, getCurrentInstance } from "vue";
import { useRouter } from "vue-router";
//获取实例上下文
const { proxy } = getCurrentInstance();
//引入router
const { replace } = useRouter();
const store = useStore(); return {
handleLogout,
};再来改造一下之前封装的axios方法:
import axios from "axios";
//引入element-plus
import { ElMessage } from "element-plus";
// console.log("11", process.env.VUE_APP_API); //undefined??
//cookies
+import { getToken, getUsername, removeToken, removeUsername } from "./cookies";
//引入路由
+import router from "@/router";

//创建实例
const service = axios.create({
  baseURL: "/devApi", //请求地址
  timeout: 5000, //超时
});

//添加请求拦截器
service.interceptors.request.use(
  function (config) {
    //在发送请求之前做些什么
   + if (getToken()) {
      config.headers["Token"] = getToken(); //携带token Token可以和后端约定
    }
   + if (getUsername()) {
      config.headers["Username"] = getUsername();//Username可以和后端约定
    }

    console.log("config", config);
    return config;
  },
  function (error) {
    console.log(error.request);
    const errorData = JSON.parse(error.request.response);
    if (errorData.message) {
      //判断是否具有message属性
      ElMessage({
        message: errorData.message,
        type: "error",
      });
    }
    //对请求错误做些什么
    return Promise.reject(errorData);
  }
);

//添加响  应拦截器
service.interceptors.response.use(
  function (response) {
    //对响应数据做些什么
    console.log("响应数据", response);
    const data = response.data;
   + if (data.resCode === 0) {
      return Promise.resolve(data);
    } else {
      ElMessage({
        message: data.message,
        type: "error",
      });
      return Promise.reject(data);
    }
  },
  function (error) {
    //对响应错误做些什么
    const errorData = JSON.parse(error.request.response);
    if (errorData.message) {
      //判断是否具有message属性
      ElMessage({
        message: errorData.message,
        type: "error",
      });
    }

    //token失效自动退出
   + if (errorData.resCode === 1010) {
      router.replace({
        name: "Login",
      });
      removeToken();
      removeUsername();
    }

    return Promise.reject(errorData);
  }
);

//暴露service
export default service;
再来优化一下目录别名这块:
vue.config.js
  configureWebpack: (config) => {
    config.resolve = {
      // 配置解析别名
      extensions: [".js", ".json", ".vue"], // 自动添加文件名后缀
      alias: {
        "@": path.resolve(__dirname, "./src"),
        "@u": path.resolve(__dirname, "./src/utils"),
        "@a": path.resolve(__dirname, "./src/api"),
        "@c": path.resolve(__dirname, "./src/components"),
      },
    };
  },
改完记得重启项目,所以之前的代码就这样写了:
import { Login, Logout } from "@a/account";
import {
  setToken,
  setUsername,
  getToken,
  getUsername,
  removeToken,
  removeUsername,
} from "@u/cookies";